background image

LaCie 

rugged 

XL 

• D

esign


by

 N

eil

 P

oulton


Getting Connected

User Manual 

page 14

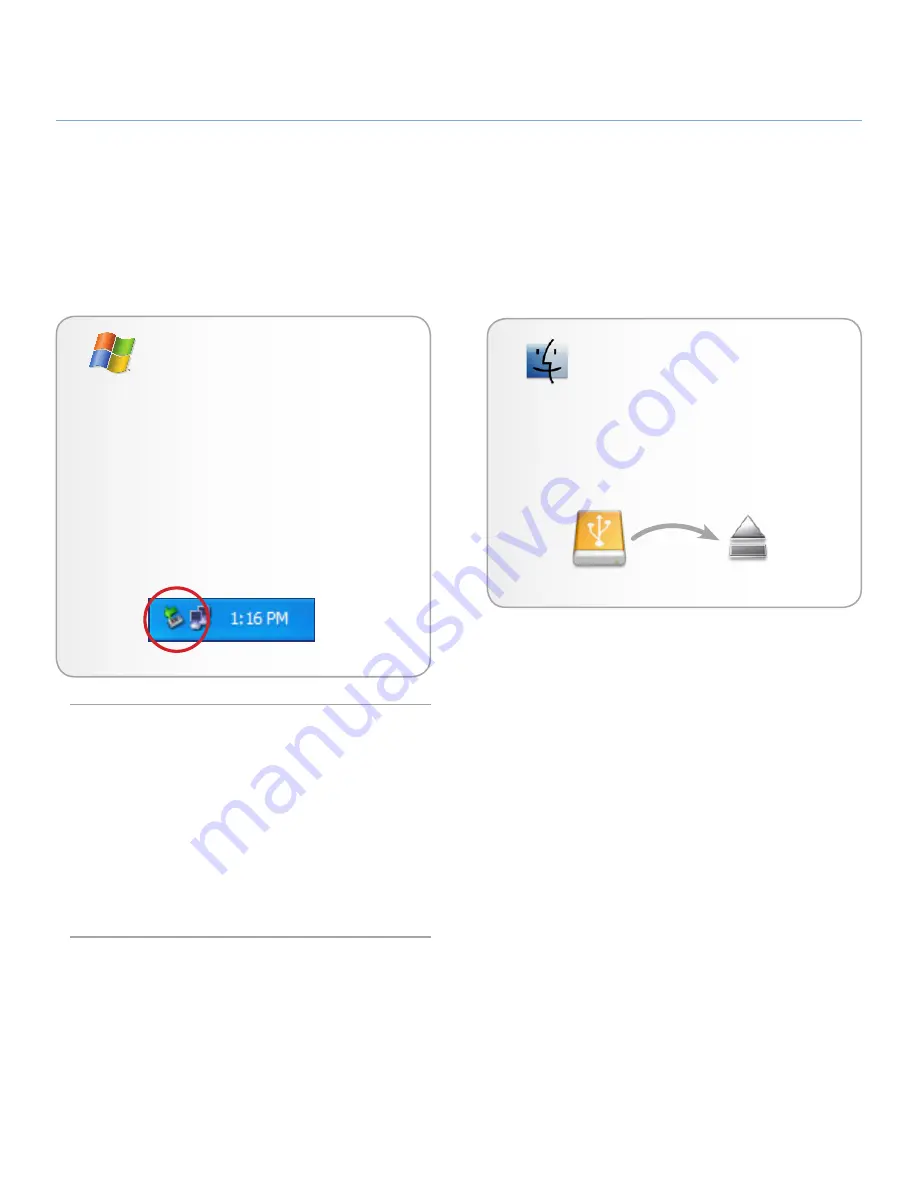
2.4. Disconnecting Your LaCie Rugged XL

eSATA and USB external devices feature “plug & play” connec-
tivity, which means that your drive can be connected and dis-
connected while the computer is running.  To prevent failures, 
however, it is important to follow these steps when disconnect-
ing your LaCie Rugged XL.

    Mac Users

1.  Drag the hard disk icon to the trash.

2.  When the icon disappears from the desktop, the drive 

can be disconnected.

    Windows Users

1.  From the 

System Tray

 (located in the lower right-hand 

side of your screen), click the 

Eject

 icon (a small green 

arrow over a hardware image).

2.  A message will appear, listing the devices the Eject icon 

controls (it should say, “Safely remove...”). Click on the 
LaCie Rugged XL in this prompt.

3.  This message will appear: “Safe to Remove Hardware” 

(or similar). It is now safe to disconnect the device.

eSATA  and  USB  external  devices  feature  “plug  &  play”  con-
nectivity, which means that your drive can be connected and 
disconnected while the computer is running.  To prevent fail-
ures, however, it is important to unmount or safely disconnect 
your drive before switching interfaces.  See section 

2.4. Discon-

necting Your LaCie Rugged XL

, for proper disconnection pro-

cedures.


2.5. Switching Interfaces

Summary of Contents for 301848U

Page 1: ...Supply 11 2 2 Connecting the Interface Cable 12 2 3 Launching LaCie Setup Assistant 13 2 4 Disconnecting Your LaCie Rugged XL 14 2 5 Switching Interfaces 14 3 Optional Formatting and Partitioning 15 3...

Page 2: ...sed in accordance with the instructions may cause harmful interfer ence to radio communications However there is no guarantee that interference will not occur in a particular installation If this equi...

Page 3: ...g your LaCie Rugged XL in an environ ment that is too cold or humid may damage the unit Always unplug the LaCie Rugged XL from the electrical outlet if there is a risk of lightning or if it will be un...

Page 4: ...ower you through your specific applications Ideal for speed intensive applications the LaCie Rugged XL handles the curves of your demanding data needs Secure and stable the LaCie Rugged XL is an ideal...

Page 5: ...ATA cable 4 External power supply 5 Quick Install Guide NOTE The User Manual and software utilities are pre loaded on the drive IMPORTANT INFO Please save your packaging In the event that the drive sh...

Page 6: ...ost computers do not come from the factory with eSATA ports so you may need to purchase a PCI PCI X or PCI Express card to be able to connect your LaCie Rugged XL via these in terfaces LaCie offers a...

Page 7: ...ugged XL Design by Neil Poulton Introduction User Manual page 7 1 3 Views of the LaCie Rugged XL Rear View 1 On Off switch 2 Power input jack 3 eSATA port 4 Hi Speed USB 2 0 port Power USB 2 0 eSATA 1...

Page 8: ...s hard drives CD DVD drives and digital cameras USB 2 0 Cables Your LaCie drive is shipped with a Hi Speed USB 2 0 cable to ensure maximum data transfer performance when connected to a Hi Speed USB 2...

Page 9: ...s do not have the L shaped design of other SATA connectors In addition the guide features are vertically offset and reduced in size to prevent the use of unshielded in ternal cables in external applic...

Page 10: ...t the power supply section 2 1 Step 2 Connect an interface cable section 2 2 Step 3 Run LaCie Setup Assistant to format your drive for optimal performance with your system section 2 3 IMPORTANT INFO D...

Page 11: ...al page 11 1 Connect the power supply cord to the power supply brick 2 Connect the power supply to the LaCie Rugged XL and to a grounded wall outlet or surge protector 3 Turn on the drive using the po...

Page 12: ...e 1 Connect the power supply as described in section 2 1 Con necting the Power Supply 2 Connect one end of the interface cable to your computer 3 Connect connect the other end of the interface cable t...

Page 13: ...will appear on your desktop IMPORTANT INFO If you do not launch LaCie Setup Assis tant or if you quit LaCie Setup Assistant after formatting has be gun your drive will not be ready to use and will req...

Page 14: ...ocated in the lower right hand side of your screen click the Eject icon a small green arrow over a hardware image 2 A message will appear listing the devices the Eject icon controls it should say Safe...

Page 15: ...A partition is a section of the hard disk s storage capacity that is created to contain files and data For instance you could create three partitions on your drive one partition for your of fice docum...

Page 16: ...ave to expand the Storage list to see the Disk Man agement option Information about all storage devices connected to your computer appears in the right hand pane 3 Find the disk corresponding to your...

Page 17: ...ugged XL as a FAT32 volume on a Mac CAUTION Following these steps will erase everything from the hard disk If you have information that you want to protect or continue to use back up this information...

Page 18: ...on your computer in the Volume label field b Select Perform a quick format c Leave the other options at their default values and click OK 5 Click OK in the format warning dialog During the format tin...

Page 19: ...steps 1 Right click My Computer and select Manage Fig 3 2 2 A The Computer Management window opens 2 Select Disk Management under Storage you may have to expand the Storage list to see the Disk Manag...

Page 20: ...d click Next 7 Choose a drive letter to assign to the drive Click Next 8 Select Format this partition with the following settings and Enter a name for the volume as you d like it to appear on your com...

Page 21: ...the Volume Scheme menu choose the number of partitions you want to divide the drive into 16 maximum You can adjust the size of each partition using the slide bar between the partitions in the Volume...

Page 22: ...here should be an icon for the LaCie drive on the desktop If the drive does not appear follow the rest of the Troubleshooting tips to isolate the problem Does your computer s con figuration meet the m...

Page 23: ...rom its sleep mode The drive is working slowly Are there other USB or eSATA devices connected to the same port or hub Disconnect any other USB or eSATA devices and see if the drive s performance incre...

Page 24: ...les waiting 10 seconds and then reconnecting them If the drive is still not recognized restart your computer and try again Have the USB or eSATA drivers been installed correctly and enabled Open Apple...

Page 25: ...ctions This is normal Your drive has an autoswitching power feature which means that if your drive is connect ed to your computer turning the computer on will automatically turn the drive on Likewise...

Page 26: ...u are in front of your computer and that you have the fol lowing information on hand Information Where to Find Information LaCie hard drive serial number Located on a sticker at the back of drive or o...

Page 27: ...www lacie com fr contact LaCie Germany Contact us at http www lacie com de contact LaCie Italy Contact us at http www lacie com it contact LaCie Japan Contact us at http www lacie com jp contact LaCi...

Page 28: ...s suppliers accept no liability for any loss of data during the use of this device or for any of the problems caused as a result LaCie will not under any circumstances be liable for direct special or...

Reviews: