17
Caution:
If the MFS 3000 transducers are operated in the flow direction contrary to that indicated
by the arrow on the rating plate, the transducer constant GK may change by 0.15%
3.
Electrical installation
3.1
Location and connecting cables
Location
Do not expose the compact flow meter to direct sunlight. Install a sunshade if necessary.
Connecting cables
To conform to protection category requirements, observe the following recommendations:
–
Fit blanking plug PG 16 or 1/2” NPT and apply sealant to unused cable entries.
–
Do not kink cables directly at cable entries.
–
Provide water drip point (U bend in cable).
–
Do not connect rigid conduit to cable entries. Use flexible conduit when required. Make
sure conduit drains away from connection to converter and transducer.
–
If cables are a tight fit, enlarge inside diameter of cable gland by removing the appropriate
ring(s) from the seal.
3.2
Connection to power
–
Note information given on the instrument dataplate (voltage, frequency)!
–
Electrical connection in conformity with IEC 364 or equivalent national standard.
–
Special regulations apply to installation in hazardous areas. Please refer to separate "Ex"
installation instructions.
–
The PE protective ground conductor must be connected to the separate U-clamp
terminal in the terminal box of the signal converter.
–
Do not cross or loop the cables in the terminal box of the signal converter. Use separate
(PG or NPT) cable glands for power and output cables.
–
Ensure that the screw thread of the round cover on the terminal box is well greased at
all times.
NOTE: The grease used must be non-corrosive to aluminium; typically it must be resin-
and acid-free.
–
Protect sealing ring from damage.
–
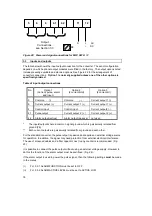
See Figure 22 for the arrangement of power connections.
Please ensure that the information about power given on the
dataplate corresponds to the locally available mains voltage.


