background image

KPWL-0300 User's Manual 

62 

10.3 

Checking the Relay Route 

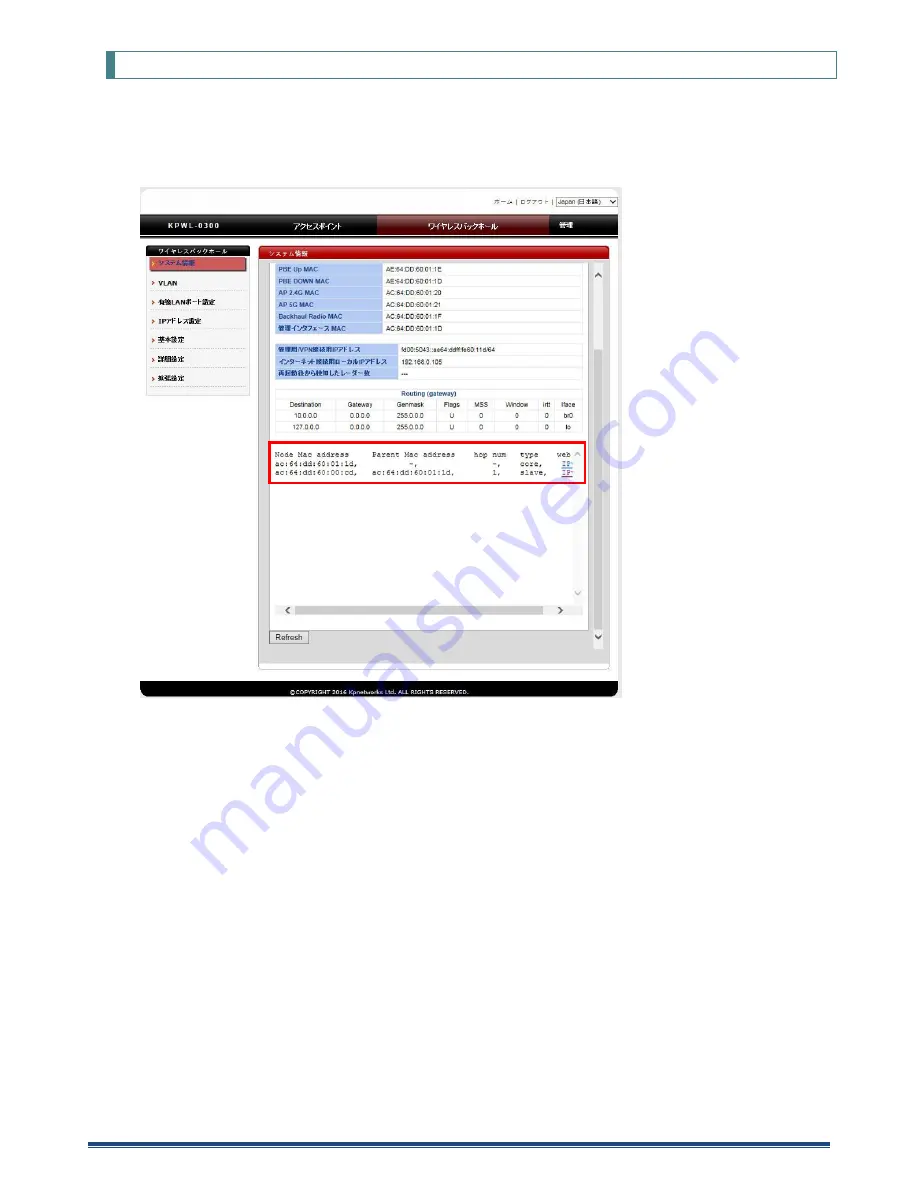
The relay route can be checked with the web setting screen. 
 
Click the [Wireless Backhaul Network] tab. Next, on the side menu, click "System Information" to display relay route 
information. 
* Displayed for the core node only. 


Node Mac address 

Node MESH MAC address 

Parent Mac address 

Node directly above (MESH MAC) 

hop num 

Number of hops from the core 

type 

Type (core or slave unit) 

web UI 

Link to the slave unit web UI (IPv6 address) 

* For information about the IPv6 address, refer to 
"Remote settings" earlier in this manual. 


A constructed route (topology) can be divided by combining Hop and Parent. 


Summary of Contents for KPWL-0300

Page 1: ...e information and knowledge necessary to install the KPWL 0300 Wireless Access Point from Kpnetworks which allows you to Create a Wireless LAN area by just setting it down With this manual you can do a basic or custom installation of the KPWL 0300 without any further specialized knowledge of wireless networks ...

Page 2: ...ep 3 Use the computer s browser to display the KPWL setting screen 17 Step 4 Configure KPWL settings 18 6 2 Initializing Settings 19 6 3 Remote Settings 20 Accessing the KPWL 0300 with an IPv6 Address 21 6 4 List of Setting Items 23 Items that can be set in the Access Point tab 23 Items that can be set in the Wireless Backhaul Network tab 27 Items that can be set in the Management tab 30 7 Upgradi...

Page 3: ...mission Software 50 9 5 Multi SSID and VLAN 52 Setting Procedure 52 9 6 802 1 Authentication 55 802 1 Authentication Process 55 Network Configuration 56 Setting Procedure 57 10 Building a Wireless LAN Area with the KPWL 0300 Expert 58 10 1 Communication between Terminals 58 Setting Procedure 59 10 2 Relay Circuit Radio Wave Intensity 61 10 3 Checking the Relay Route 62 10 4 Updating Firmware from ...

Page 4: ...n which it was sold Do not use it anyplace other than the country in which it was sold Kpnetworks has not established technical support or maintenance for anyplace other than where the device is sold Use this device according to the methods described in this manual Specifically be sufficiently aware of the precautions and warnings and do not use the product in such ways If the device malfunctions ...

Page 5: ... Always hold the plug when you unplug the power cable 6 Do not excessively bend the connectors or other parts of the cables 7 Do not move the device while it is connected 8 Connect it only to a 100 240 VAC electric outlet 9 Confirm that the AC adapter is securely and fully inserted into the electric outlet 10 Connect only the AC adapter provided with the device Do not allow contact with static ele...

Page 6: ...ore convenient and people can connect to the network from any place that is within the range of the radio waves On the other hand it is possible to connect from any place within range of the radio waves even if there are obstructions for example Because of this if you do not do the security settings there is a risk that the following problems may occur Your communications could be intercepted A ma...

Page 7: ...ircuits 8 3 AC cord 1 4 AC adapter 1 5 Attachment for wall mounting 1 6 Types of screws Screws for wall mounting 4 Anchors for wall mounting 4 Screws for mounting attachment Security screws Head of screw 1 Screws for mounting attachment Philips screw Head of screw 1 Image of Content of Package In order from below the attachment for wall mounting antennas AC adapter AC cord and set of screws are in...

Page 8: ...ain unit front view and rear view 1 LED lamps 2 Hole for attachment for wall mounting Main unit top view 3 AC power cable inlet 4 Reroute button 5 LAN port LINK2 6 LAN port LINK1 Left view right view 7 Antenna connectors for access circuits 8 USB port 9 Security slot Bottom view 10 Antenna connectors for relay circuits 11 Mode switch 3 4 5 6 7 7 7 7 8 9 10 10 10 10 11 ...

Page 9: ...KPWL 0300 User s Manual 8 Attachment Bracket nector ...

Page 10: ...1 Attach the antennas for access circuits Insert them into the plugs on the left and right sides of the main unit 2 Attach the antennas for relay circuits Insert them into the plugs on the bottom side of the main unit 3 Attach the attachment for wall mounting ...

Page 11: ...t you have telecommunications equipment such as a modem that you rent or purchase from a telecommunications carrier or provider with whom you have contracted for internet access 2 Connect the computer to telecommunications equipment or a wired router with a LAN cable 3 Confirm that it is possible to connect to the internet under these conditions Ex For a computer running Windows go to Local Area C...

Page 12: ...hich channel W52 or W56 is being used by the relay circuit For details refer to DFS later in this manual 3 Select an installation location Do not immediately perform final installation work First be sure to do a temporary installation and check radio wave conditions and communication conditions For information about installation locations refer to Signal Connectability later in this manual 4 If yo...

Page 13: ...f times and then remain lit If you can confirm that the LINK LED is on that KPWL is enabled for use The LED flashes one to four times to indicate the strength of the link more flashes mean a stronger link If the LED flashes twice or less there is the danger that communication quality including speed may be low due to a weak connection If the LED does not light it means that DPWL interconnection li...

Page 14: ...e side of KPWL 0300 _G or KPWL 0300 _A the are the last 6 digits of the MAC address 5 Start your browser and access the internet such as by displaying a web page to confirm the connection For iPad iPhone iPod touch etc This is the connection procedure for iPad version 4 2 1 but other systems can be connected in almost the same way 1 Tap Settings 2 Tap Wi Fi 3 Select KPWL 0300 _G or KPWL 0300 _A th...

Page 15: ...splays the list of settings so just go to the next step 11 Press the button to save the settings 12 After Save is complete appears select Test Connection After Connecting to access point Obtaining IP Address Testing internet connection appear and then the connection name and the signal strength appear the connection is complete Step 7 Perform final installation After confirming connection of the K...

Page 16: ...h the name of the shop or service Access the web setting screen go to the Access Point tab Basic Settings SSID and set an arbitrary text string Regarding the setting items refer to Setting Item List explained later Regarding the setting methods refer to How to change settings later in this manual When you want to separate the SSIDs for each access point For each of the KPWL 0300s access the web se...

Page 17: ...e KPWL 0300 unit to the computer 1 Power up the KPWL unit connect the AC power cable Next connect one end of the LAN cable to the computer s LAN port and then connect the other end to the KPWL unit s LAN port 2 Configure the computer s internet settings 1 In Control Panel click Network and Internet and then click Network and Sharing Center 2 Click Local Area Connection On the Local Area Connection...

Page 18: ... which can be viewed and configured using a web browser 1 In the browser address bar input 192 168 3 1 This displays an authentication dialog box 2 Input admin for both the user name and password and then click OK This displays the web setting screen You can change the user name and password with the Admin Account Settings on the Management tab of the web setting screen ...

Page 19: ...stem Information screen to view current settings Use the menu on the left side of the screen to select a category page name and the applicable setting items will appear For information about the meaning of each setting available settings and more refer to the List of setting items later in this manual After all the settings are the way you want click Apply ...

Page 20: ... pressed on the web setting screen 6 2 Initializing Settings You can use the web setting screen to initialize settings 1 Click the Management tab Next on the side menu click Factory Defaults 2 Click Factory Defaults You can also initialize settings from the KPWL 0300 unit 1 Hold down the Reroute button for about 10 seconds and then release it 2 Confirm that the LED lamps turn off momentarily and t...

Page 21: ...an interactively communicate so changes cannot be made to devices slave 4 in the example in the diagram that are not linked due to communications obstructions etc Also for the same reason remote setting changes cannot be done to the relay circuits the links break if the relay circuit settings are changed Slave 1 Mac xx xx xx 63 07 08 IPv6 fd00 5043 ae64 ddff fe63 0708 Such as a wired router or hub...

Page 22: ... and then click Properties 6 Select the Use the following IP address option and then configure the settings as described below IPv6 Address Any IPv6 address starting with fd00 5043 Example fd00 5043 xxxx xxxx xxxy yyyy For the part of the address inside the rectangular boundary above specify any hexadecimal number Note however that you should not use the following for the red characters ae64 ddff ...

Page 23: ...lue is the device s IPv6 address Note the precautions below when calculating an IPv6 address The black characters fd00 5043 ae64 ddff fe in the above address are fixed Do not change them Input two colons between the 5043 and ae64 parts of the fixed address Specifying the URL of the Management Page Input the calculated IP address in the browser address bar Input the calculated IP address that was c...

Page 24: ...ou can specify the channels that are used For 2 4 GHz 1 ch to 13 ch For 5 GHz 36 ch to 140 ch For 2 4 GHz 11 ch For 5 GHz 36 ch Channel Bandwidth The values that can be set vary depending on the value specified for Band If 11b 11g 11b g or 11a is specified Fixed at 20 MHz If 11g n or 11b g n is specified You can select from 20 MHz 40 MHz or xch The value for x varies depending on the value specifi...

Page 25: ...done and the stealth mode functions Enable Disable Enable Wireless Client Isolation Set whether or not it is possible to communicate between wireless clients Disable It is possible to communicate between terminals over SSID STA Separator Allows communications between wireless clients SSID Separator Turns off communications between SSIDs Disable STA Separator SSID Separator Disable Authentication M...

Page 26: ...812 Secondary RADIUS Server Appears if you selected IEEE802 1x EAP or WEP EAP for Authentication Method The settings can be done for Secondary RADIUS Server The setting items are the same as for Primary RADIUS Server Any IP address Port number Secret key Authentication Port 1812 WPA Type Appears if you selected WPA PSK or WPA EAP for Authentication Method Specify the type of WPA for doing authenti...

Page 27: ...ow that is used for the frame collision avoidance configuration Generally the smaller the value the higher the probability of acquiring transmission rights 1 to 15 alphanumeric characters BK 4 BE 4 VI 3 VO 2 BK 4 BE 4 VI 3 VO 2 CWmax You can specify the maximum value for the contention window 1 to 15 alphanumeric characters BK 10 BE 6 VI 4 VO 3 BK 10 BE 10 VI 4 VO 3 AIFSN You can specify the frame...

Page 28: ...to use DHCP for IP addresses Static IP Address DHCP Client DHCP Client IP address on LAN side You can specify this if you have selected a static IP address for IP Address Assignment Specify the IP address for the LAN side xxx xxx xxx xxx 192 168 3 1 Broadcast IP Address You can specify this if you have selected a static IP address for IP Address Assignment Set the broadcast IP address xxx xxx xxx ...

Page 29: ...value specified for Band For 11a Fixed at 20 MHz For 11a n 20 MHz 40 MHz For 11a n ac 20 MHz 40 MHz Auto 80 40 20 MHz For 11a 20 MHz For 11a n 40 MHz For 11a n ac Auto 80 40 20 MHz Tx Power You can specify the strength of the wireless output The larger it is the higher the output 1 to 12 12 SafeZone You can specify whether to allow encryption of the relay circuits ON performed OFF not performed ON...

Page 30: ...elf Normally do not specify If the value is set to 11 or higher Route update is done at the period of the value 1 to 65535 300 Heal Switch You can specify this if you have selected a core in Backhaul Mode Specify whether to use the quick recovery function ON OFF OFF NACK Counts Threshold for Self Healing 1 255 You can specify this if you have selected a core in Backhaul Mode If you selected ON for...

Page 31: ...s admin Management Protocol If you select this check box you can do the following settings related to SNMP SNMP Version You can specify the SNMP version v1 v2c v1 v2c SNMP Get Community You can specify the SNMP Get Community Single byte alphanumeric characters public SNMP Set Community You can specify the SNMP Set Community Single byte alphanumeric characters private Factory Default You can initia...

Page 32: ...ays Half hour SMTP Server Address You can specify the SMTP server address Single byte alphanumeric characters SMTP Server Port You can specify the SMTP server port Single byte alphanumeric characters Sender E mail You can specify the e mail address of the sender Single byte alphanumeric characters Receiver E mail You can specify the e mail address of the receiver Single byte alphanumeric character...

Page 33: ...cable can be used USB memory 20 MB or more 1 Prepare a USB memory in which there are no other files KPWL unit and its AC power cable Installation of antennas is not required just to do a version upgrade They do not need to be removed Computer for configuring settings Use a computer that has a wired LAN port and web browsing capabilities If there is no wired LAN port prepare a separate USB wired LA...

Page 34: ...ion in FM Version Step 4 Upgrade the firmware 1 Turn off the power to the KPWL 0300 unplug the power cable 2 Insert the USB memory into the USB port on the right side of the unit 3 Turn on the power to the KPWL 0300 plug in the power cable 4 The LED lamp flashes and it stays lit For cores the POWER LINK and STAT LEDs light For slaves the POWER and LINK LEDs light Do not remove the USB memory or tu...

Page 35: ...creen The firmware upgrade is complete if the version is as specified If there is no change do step 4 again Step 6 Do a reroute When the firmware update is complete press the reroute button on one of the KPWL 0300s to do a reroute However note that links cannot be established if the versions of the firmware are not the same ...

Page 36: ... use of W52 5 2 GHz band 150 to 5250 MHz outdoors Because of this the W52 setting is restricted to indoor use only During relay data is concealed protected by AES128 encryption which enables secure communication In terms of the protocol stack both the relay circuit and access circuit correspond to Layer 2 Data Link Layer 8 2 Core and Slave Units KPWL units can be broadly divided between a core uni...

Page 37: ...le communication quality etc The KPWL 0300 enables stable communication by intercommunication between devices to form quasi static routes with core centered tree structure Patent Application 2008 18337 The stable communication routes constructed by the tree structure along with dual relay specific boards make it possible to maintain high communication quality even when the number of wireless hops ...

Page 38: ...hat network which leads to an increase in the volume of transmissions and the load on the relay circuits These are just a few of the reasons Furthermore you may also separate networks by taking into account the number of users and the volume of communications data volume and frequency of communications To separate networks change the settings for the relay circuits Mesh If the channel you are usin...

Page 39: ...on the machine in a high place that is not easily affected by the movement of people or objects Also signals characteristically are reflected by objects such as metals for which it is easy for electricity to pass through and go through objects such as wood and glass for which it is difficult for electricity to pass through As a result although it is difficult for obstacles like glass to be a barri...

Page 40: ...d according to the direction of the antenna install by aligning the direction of the antennas between the KPWLs with which you want to relay Direction of the Relay Antennas To ensure signal quality of the relay circuits install the KPWLs so all their antennas are aligned so they are parallel If the direction of polarity differs the signal level may decrease and the possible distance for communicat...

Page 41: ...Phone laptop etc that is equipped with wireless LAN Wi Fi to display a list of access points and check the strength via the icons etc You can also check in more detail by using wireless access point monitoring tools like inSSIDer2 which is introduced in About channels later in this manual However because RSSI received signal strength indication mentioned above is just signal strength you cannot ch...

Page 42: ...on the side the KPWL 3000 unit that is the furthest from the core unit 3 Note how many times the LINK LED lamp flashes The LED flashes one to four times to indicate the strength of the link more flashes mean a stronger link If the LINK LED flashes twice or less change the location of the unit and try again Relationship between LINK LED Flash Count and RSS The LINK LED flash count depends on the ra...

Page 43: ...12 116 120 124 128 132 136 140 in W56 With the relay circuits use W52 for 802 11a and the 5 GHz frequency bands that correspond to W56 There are 4 channels 36ch 40ch 44ch and 48ch in W52 and 11 channels 100ch 104ch 108ch 112ch 116ch 120ch 124ch 128ch 132ch 136ch and 140ch in W56 Because the relay function uses 2 channels within these to do communications set 2 channels that are separated such as 3...

Page 44: ...owing site http inssider softonic jp 2 Click Free download The download does not start immediately it stops until you have moved to the page and then starts in about 15 seconds4 3 Execute the inSSIDer Installer 2 x x xxxxxx exe5 that you downloaded and install it 4 Start inSSIDer2 5 Clicking Start at the top right displays a list of access points on the upper half of the screen RSSI is the wireles...

Page 45: ...0 are not displayed here Based on this information you can reduce wireless interference by setting frequency bands that are not used much However as you can see by monitoring with these tools the wireless strength fluctuates due to a variety of reasons such as airflow the presence of a reflective object and its reflectance absorbance and the existence of distance and obstacles it is not always fix...

Page 46: ...When a radar wave is detected the DFS function changes to a different channel which generates the operation described below Channel scan is performed to determine the new channel During the channel scan the POWER LED flashes and internet access from wireless terminals is disabled This condition may continue for one minute or longer Since the channel change is automatic operation may be on a channe...

Page 47: ...node is an upstream node and a relay circuit in which the applicable node is the starting point divides into branches in the downstream direction DFS startup judgment may be performed by the upstream node if there is a mutually hidden terminal relationship between multiple downstream nodes If this happens change the installation locations between the downstream nodes add nodes or take other measur...

Page 48: ...s Use a cross LAN cable for connections between nodes In addition you can also combine a wired backhaul and a wireless backhaul as shown below Image of a wired and wireless BH configuration 6 The wireless backhaul has so far been described as a wireless mesh network abbreviated as mesh or MS However in the future we intend to shift to the use of wireless backhaul in descriptions because there coul...

Page 49: ...nnect the cross LAN cable to the LAN port on the right side of the device In addition for a wired BH configuration as in the image shown above slave 2 is the lower position KPWL If the settings of the devices are correct when you turn on the power the POWER lamp lights and the STAT LED flashes Regarding the LINK LED if the relays between devices have been structured the same as for the wireless BH...

Page 50: ...lone of which are the contract provider and the type of contract Plus they cannot be expected to maintain a consistent speed While keeping this in mind be aware of whether you doing a simple measurement or measuring usage in an actual usage scenario Also do measurements in conditions that do not use the KPW 0300 measuring only the internet circuit while being aware that it will be the maximum spee...

Page 51: ...e throughput of the wireless access circuits iPerf is a tool that measures throughput by sending TCP and UDP and operates in Linux Windows and MacOS The server receives data and the client sends data using a cloud based server system 1 Prepare two computers and install iPerf on each Download iPerf from the following site https iperf fr Copy the file you downloaded anywhere we recommend directly on...

Page 52: ...UDP communications and change and send the TCP buffer size Help appears in iperf help so set the options to match the conditions Additionally because it relies on the TCP IP overhead in the throughput measurements that used iPerf and the performance of the PC being used the maximum speed specified in 802 11 may not be reached PC 1 Iperf s PC 2 Iperf c y y y y PC 1 Iperf s PC 2 Iperf c x x x x Upwa...

Page 53: ... networks for which VLAN is used Setting Procedure Assume that you are configuring the network in the diagram above In this section the inner VLAN ID is 101 and the guest VLAN ID is 102 Additionally the management VLAN ID to access the KPWL 0300 webpage is 103 L2 Switch Settings The L2 switch settings differ according to the type of device so refer to the manual of the device you are using to do s...

Page 54: ...ck the Wireless Backhaul Network tab and then click VLAN from the side menu 2 Turn on VLAN Switch and then input each VLAN ID as follows Management VLAN 103 SSID 1 101 SSID 2 102 3 Click Apply to enable the settings 4 Click the Access Point tab and then click Basic Settings from the side menu 5 Enable Wireless and then input the SSID names as follows SSID 1 inner SSID SSID 2 guest SSID 6 Click App...

Page 55: ... and then set the following Authentication Method MPA PSK WPA Type WPA2 Encryption Type AES Pre shared Key Any passphrase 9 Click Apply to enable the settings 10 Select guest SSID in SSID and then set the following Authentication Method No Authentication 11 Click Apply to enable the settings ...

Page 56: ...ticipating in specific or all networks A separate RADIUS server is required to use 802 1X authentication 802 1 Authentication Process 2 Queries the RADIUS server whether authentication is possible 1 Request connection using an authentication ID realm and password 3 RADIUS server responds regarding whether or not to permit authentication 4 Connects or denies connection depending on the authenticati...

Page 57: ... for which VLAN is used A VLAN compliant L2 switch is required to use VLAN Connect the L2 switch to the KPWL 0300 and then connect the RADIUS sever or a router to the L2 switch The network management segment is a segment for accessing the KPWL 0300 web page Install the RADIUS server to this segment RADIUS Server KPWL 0300 L2 switch Router Segment for network management VLAN ID 1 Inner WLAN segment...

Page 58: ...cess Point tab and then click Security from the side menu 2 Select either IEEE802 1x EAP or WPA EAP from Authentication Method or select MAC RADIUS authentication from Additional Authentication Items appear for setting the RADIUS Server 3 Do settings for the RADIUS Server RADIUS Server Specify the IP address for RADIUS Server Authentication Port Specify the port number for RADIUS Server Normally k...

Page 59: ... indicates communications between terminals that are wirelessly connected on different nodes multicasting Here node indicates a KPWL and terminal indicates computers mobile devices etc that are wirelessly connected to the KPWL Unicasting Control intercommunications that are permitted not permitted between Terminal A and Terminal B Multicasting Control intercommunications that are permitted not per...

Page 60: ...other STA Separator Terminals that are connected to the same AP cannot communicate with each other SSID Separator Terminals that are connected using the same SSID for the same AP can communicate with each other However terminals that are connected using different SSIDs even on the same AP cannot communicate with each other Communications that are permitted not permitted depending on the setting re...

Page 61: ...eless Client Isolation settings Permitting not permitting communications between Terminal A and Terminal B Disable Can STA Separator Cannot SSID Separator Can Doing Multicasting Settings 1 Click the Wireless Backhaul Network tab and then click Advanced Settings from the side menu 2 Select ON in Privacy Switch This item can only be set on the parent core The child slave takes over the settings of t...

Page 62: ...second method is to check the RSSI values on the web setting screen Click the Wireless Backhaul Network tab Next on the side menu click System Information to display the RSSI Table Note however that the second method can be used for a slave node only Since there are no nodes above the core node the table is not displayed for it Mac address MAC address E RSSI RSSI value successive average E dbm dBm...

Page 63: ...elay route information Displayed for the core node only Node Mac address Node MESH MAC address Parent Mac address Node directly above MESH MAC hop num Number of hops from the core type Type core or slave unit web UI Link to the slave unit web UI IPv6 address For information about the IPv6 address refer to Remote settings earlier in this manual A constructed route topology can be divided by combini...

Page 64: ...re is being updated Do not turn off the devices during the update 5 Reboot starts after the firmware update is finished Wait until the reboot is complete 10 5 If You Forget Your Login Password If you change the password used to access the web management screen Default admin and then forget it you will need to restore factory default settings For information about how to restore factory default set...

Page 65: ...r of connected terminals 200 maximum 2 4 GHz 100 5GHz 100 QoS IEEE 802 11e Supported settings WMM EDCA AC_BE AC_BK AC_VI AC_VO SSID Multi SSID 32 maximum 2 4 GHz 16 5GHz 16 Stealth SSID Configurable for each SSID Wireless backhaul logical maximum values Maximum number of hops 20 Maximum number of branches 20 Number of AP per mesh 50 Number of terminal connections per mesh 10 000 VLAN Configurable ...

Page 66: ...comply with the limits for a Class B digital device pursuant to part 15 of the FCC Rules These limits are designed to provide reasonable protection against harmful interference in a residential installation This equipment generates uses and can radiate radio frequency energy and if not installed and used in accordance with the instructions may cause harmful interference to radio communications How...

Reviews: