background image

PS5000C MKII Operator’s Manual 

4-10


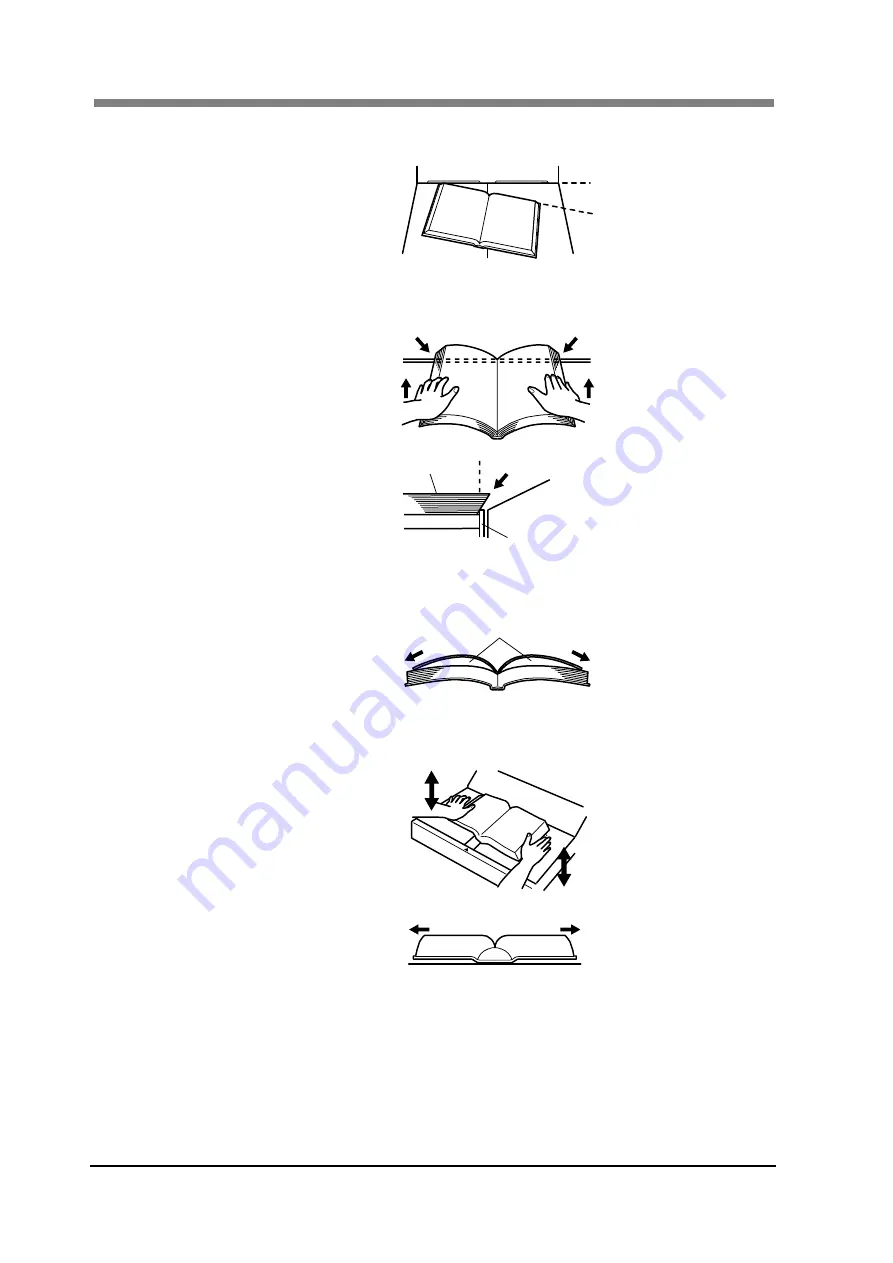
How to place the original on the book table 

Do not place the original askew. 


Do not place the book with its top edge beyond the stopper. 
Be careful to avoid the condition shown in the figure below if pressing the original 
from the bottom. 


When the original is spread open, be careful not to produce gaps between pages. 
Press both pages and then pull them apart. 


Hold the edges of both pages at the middle with your hands, and press the book 
down, pulling the pages slightly apart. 


Original

Stopper 

Spread

Summary of Contents for PS5000C MKII

Page 1: ...PS5000C MKII Operator s Manual...

Page 2: ......

Page 3: ...f the precautions listed in this manual Please note that some parts of the contents of this section may not correspond with the purchased product Warning and Precautions Symbols WARNING Ignoring this...

Page 4: ...o the power outlet Failure to do this could result in a fire or electrical shock Do not scratch abrade place a heavy object on heat bend pull on or damage the power cord Use of a damaged power cord ex...

Page 5: ...ck could result If this product has been dropped or its cover damage immediately turn OFF the power switch unplug the power cord from the power outlet and then call your authorized service representat...

Page 6: ...tism They could cause these products to malfunction The inside of this product has areas subject to high temperature which may cause burns When checking the inside of the unit for malfunctions such as...

Page 7: ...age quality could result Do not throw or drop a toner unit or PC drum unit as poor image quality could result Do not use this product in an area where ammonia or other gases or chemicals are present F...

Page 8: ...ystem and do not touch any part of the system the manual does not cover NEVER attempt to disassemble or remodel the system The contents of this manual are subject to change without notice No part of t...

Page 9: ...n in the text NEVER attempt to disassemble or remodel the scanner as it is very dangerous Call your authorized dealer when you want to move a scanner which has been installed U S A only NOTE This equi...

Page 10: ...and found to comply with UL60950 1 Books magazines journals and other materials may be copyrighted Unauthorized scanning into a computer and subsequent printing of such copyrighted materials may be co...

Page 11: ...bility EMC Part 3 Limits Section 3 Limitation of voltage fluctuations and flicker in low voltage supply systems for equipment with rated current up to and including 16A EN55024 1998 A1 2001 A2 2003 El...

Page 12: ...ording to Local State or Federal Laws Books magazines journals and other materials may be subject to copyright The copying scanning or altering of such materials may unless authorized by the copyright...

Page 13: ...llation start up procedures and explanation of the image acquisition screen for the PS5000C MKII Twain Driver Chapter 4 Operation Describes operation precautions and procedures and settings for each f...

Page 14: ...ication and functions 2 3 Chapter 3 PS5000C MKII Twain Driver 3 1 1 PS5000C MKll TWAIN Driver Setup 3 2 1 1 Trademark Acknowledgments 3 2 1 2 System environment 3 2 1 3 Installation procedure 3 3 2 Se...

Page 15: ...ced 4 17 7 3 Originals with Folds wrinkles or warps 4 17 7 4 Bound with special binding 4 18 8 Using the glass plate unit 4 19 Chapter 5 Troubleshooting 5 1 1 Problems of the Scanner 5 2 2 Troubleshoo...

Page 16: ......

Page 17: ...Chapter 1 Precautions for Installation Operation...

Page 18: ...tor ensuring fairly constant temperature A well ventilated place A dry place A dust free location An area not subject to undue vibration A stable and level surface 1 2 Power source The power source vo...

Page 19: ...ith local electrical standards NOTE Never connect the ground cable to a gas pipe the ground wire for a telephone line or a water pipe 1 4 Moving the Scanner Please contact your authorized dealer befor...

Page 20: ...ile the book is being scanned This is necessary in order to stabilize the illuminance on the book NEVER bring any magnetized object or use flammable sprays liquids near the Scanner NEVER place a vase...

Page 21: ...n carrying the Scanner hold the places shown in the below figure Be careful not to hurt your back Do not carry the Scanner When moving the Scanner be sure to disconnect the power cord and the USB cabl...

Page 22: ...PS5000C MKII Operator s Manual 1 6...

Page 23: ...Chapter 2 Overview...

Page 24: ...s set face up on the book table This makes setting the book very easy and reduces concerns that the book may be creased or damaged In addition warped text lines and text compression are corrected ensu...

Page 25: ...to the contours of the book See pages 4 8 through 4 13 for detailed information and limitations 4 Power switch Turns the Scanner ON OFF 5 USB connector Connect the USB cable that is supplied with the...

Page 26: ...devices to the Scanner 11 Stopper Used as the reference position for the original When placing the original align its top edge with this position 12 Center mark Adjust the center of the original to th...

Page 27: ...Chapter 3 PS5000C MKII Twain Driver...

Page 28: ...demarks of International Business Machines Corporation Microsoft Windows Windows 2000 Windows XP Windows Vista and Windows 7 are registered trademarks of Microsoft Corporation All other brand or produ...

Page 29: ...ter installing the Driver 2 Connect the Scanner to the personal computer with the USB Cable 3 Turn on the power switch of the personal computer and start Windows NOTE Do not turn the power switch of t...

Page 30: ...ation of the Application Version of the Application and the Driver might be different from the screen display The 32 bit version of the driver will automatically be installed in a 32 bit OS and the 64...

Page 31: ...PS5000C MKII Twain Driver 3 5 8 Click the Yes button 9 Click the Install button 10 When the InstallShield Wizard Complete screen appears click the Finish button and remove the CD ROM from the personal...

Page 32: ...screen appears select Locate and install driver software 13 Select Install this driver software anyway 14 The installation of the Driver is completed After the installation of the Driver is completed...

Page 33: ...glass plate unit has been attached Perform the adjustments described in 2 2 Aging 10min through 2 7 Tone Curve If the User Account Control setting is enabled when operating under Windows Vista or Wind...

Page 34: ...turn the setting to enable Be sure to perform the procedure with the authority of the System Administrator NOTE Displayed screens may be different depending on the OS of your PC Be sure to do this pro...

Page 35: ...appear to ask your permission if you want to continue with the turning off of UAC click Continue 6 Uncheck Use User Account Control UAC to help protect your computer and then Click OK 7 Reboot the PC...

Page 36: ...ure about two times 1 Launch the application and the PS5000C MKII TWAIN Driver 2 Check Adjustment on the screen of the PS5000C MKII TWAIN Driver 3 Select 1 Aging 10min on the pull down list under Adju...

Page 37: ...stment Sheet A3 size on the cradle as shown below NOTE Align the Setup Adjustment Sheet against the original stopper Be sure to adjust the center of Setup Adjustment Sheet at the center of cradle If t...

Page 38: ...nfirmation screen to confirm the inability of User Account Control during the adjustment 4 The window indicating that adjustment is underway will appear When the window disappears the adjustment is co...

Page 39: ...the cradle in the previous adjustment 2 Select 3 Black Shading on the pull down list under Adjustment and then click Start 3 Click OK on the confirmation screen to confirm the inability of User Accoun...

Page 40: ...calibrate the white shading level 1 Assemble the adjustment plate and place it on the cradle NOTE For the procedure to assemble the adjustment plate refer to 2 1 Assembling the adjustment plate and 2...

Page 41: ...4 White Shading on the pull down list under Adjustment and then click Start 4 Click OK on the confirmation screen to confirm the inability of User Account Control during the adjustment 5 The window in...

Page 42: ...e to place the Setup Adjustment Sheet If the glass plate is attached close it 2 Select 5 White Balance on the pull down list under Adjustment and then click Start 3 Click OK on the confirmation screen...

Page 43: ...e parameters This procedure is required only when the machine is installed or the optional glass plate is attached NOTE KODAK Gray Scale Q 13 is not included in the kit 1 Assemble the adjustment plate...

Page 44: ...If the glass plate unit has been attached close it Adjust the top of the Test Chart along with the adjustment plate Be sure to adjust the center of the cradle to the center of the Test Chart Align the...

Page 45: ...Chapter 3 PS5000C MKII Twain Driver 3 19 3 Select Neutral on the pull down list under Profile and then change the settings as below Size B5L Type Sheet...

Page 46: ...PS5000C MKII Operator s Manual 3 20 4 Click Preview to read the image 5 Drag with the mouse on the image of the Gray Scale at position A and select the area...

Page 47: ...en the histogram screen is opened the previous value appears Whenever you preview the screen after reselecting the area or other parameters be sure to click Draw on the histogram screen to update the...

Page 48: ...eds the acceptable range adjust the tone curve again Repeat the procedure of Adjustment Preview Scan Histogram Confirmation NOTE A M 19 in the ToneCurve screen means each position of the Gray Scale To...

Page 49: ...the glass plate unit has been attached perform the adjustment with the glass plate open Be sure not to close it during adjustment 2 Select 6 Image Registration on the pull down list under Adjustment...

Page 50: ...ersonal computer is connected with the PS5000C MKII 2 Turn ON the power supply of the PS5000C MKII 3 Turn ON the power supply of the personal computer 4 First select Start and then Setting Control pan...

Page 51: ...ppears click No in order not to restart the computer 8 Turn OFF the power switch of PS5000C MKII 9 Select Start Setting and then Control panel to move on to Add or Remove program 10 Select Book Scanne...

Page 52: ...PS5000C MKII Operator s Manual 3 26 12 When the Uninstall Complete screen appears click the Finish button 13 Restart the personal computer...

Page 53: ...arted from any Twain compatible application The start up procedure when using Adobe Photoshop Elements 5 0 is described below 1 Select the Twain driver Start Adobe Photoshop Elements 5 0 and select Fi...

Page 54: ...D 2 Page When the type of original is set to Book or Sheet then the Spread Single or Split option can be selected Spread Scans two spread pages of the original Single Scans either the right page or le...

Page 55: ...OTE Color Scans the image as 24 bit full color data Grayscale Scans the image as 8 bit grayscale data Black and White Scans the image as binary data 5 Resolution Select the resolution of the image to...

Page 56: ...the original NOTE Frame Masking does not function properly when there is an image less than 2 mm from the edge of the original Depending on the density or color of the original frame masking may not f...

Page 57: ...necessary turn the finger masking function off The finger masking function does not work properly in the following cases The term finger in the following sentences includes the shadow of the finger W...

Page 58: ...he white balance is adjusted using the value determined with the setup adjustments 14 Color Correction When the Enable checkbox is checked the preset color correction will be performed To embed the de...

Page 59: ...Chapter 4 Operation...

Page 60: ...book table Note that reflections from wrist watches rings or the like may disorder the image correction function Be careful not to insert your fingers or fingernails into the central part of the book...

Page 61: ...nt Keep your hands off the book table while lowering the glass Use care to prevent your fingers fingernails etc from being pinched by the glass as it is lowered When raising or lowering the glass plat...

Page 62: ...the personal computer before turning off the Scanner 2 3 Power saving features If left without any operation for 15 minutes after turning the power switch ON the operation panel and fluorescent lamp t...

Page 63: ...If you wish to use a disabled operation panel please contact your authorized service representative 3 1 Making scanning condition settings Key descriptions Highlight the item to be set Select the hig...

Page 64: ...e available settings are listed below When DOC PAGE is set to SPREAD 11 17 L 11 14 L 8 5 14 L 8 5 11 L P 5 5 8 5 L P A3 L B4 P A4 P L B5 P L A5 P L When DOC PAGE is set to SINGLE 8 5 11 P 7 11 P 7 8 5...

Page 65: ...el Reset Selecting RESET in the Panel Reset screen resets the scanning condition settings to their default settings NOTE The default scanning condition settings are shown below Default settings DOC TY...

Page 66: ...he book with the center mark For a sheet original Place the original face up on the book table aligning the top edge of the book against the stopper When making spread or split scans align the center...

Page 67: ...Chapter 4 Operation 4 9 For a 3D object Place the 3D object face up on the book table Optimum exposure can be obtained by placing the 3D object on a piece of white paper...

Page 68: ...pper Be careful to avoid the condition shown in the figure below if pressing the original from the bottom When the original is spread open be careful not to produce gaps between pages Press both pages...

Page 69: ...book exceeds 50 the image may not be read correctly 50 NOTE Auto Focus is only effective within the range of 50 mm 2 inch above the usual height of the book table Adjust the book table height so that...

Page 70: ...lect Sheet for scanning a single page document Select 3D for scanning the original other than Book or Sheet REFERENCE For details refer to Chapter 3 5 Book scanner screen 2 Place the original with the...

Page 71: ...scanned Split Both pages are scanned separately one page at a time Size Select the original size to be scanned from the pull down list Image mode Color Suitable for color documents Grayscale Suitable...

Page 72: ...r arm head or any other obstacle into the space enclosed by the scanner unit and the right and left edges of the book or the Scanner will not be able to obtain an optimum image Be sure not to move you...

Page 73: ...nter of the book area between pages of an open book often looks crowded with little space between characters when viewed from above due to the curved surface If simply scanned as it is the text appear...

Page 74: ...m a book or file Note however that it may not make reliable images from any of the following types of originals If a warning message appears refer to Chapter 5 2 Troubleshooting If any originals other...

Page 75: ...edges as shown in the figure In this case remove the tag or bookmark before scanning In order to obtain optimum result of the book corrections hide the bookmarks away from the original 7 3 Originals w...

Page 76: ...e extent that the Auto Focus function is effective 50 mm 2 inches 50 mm 2 inchse Push the center of the book table with your hands see figure The depth can be adjusted to two levels Push down either s...

Page 77: ...s plate unit by its handle and gently lower it onto the document to flatten the document CAUTION The glass plate unit has movable parts When pressing down on the document with the glass plate use care...

Page 78: ...PS5000C MKII Operator s Manual 4 20...

Page 79: ...Chapter 5 Troubleshooting...

Page 80: ...n the screen of the personal computer and on the operation panel screen the LED lamp flashes red and scanning stops In this case turn the power switch off and then back on Start the personal computer...

Page 81: ...er and turn it on again Restart the personal computer I F error After confirming that the USB cable is connected turn ON the power switch of the Scanner again and restart the computer Adjustment Failu...

Page 82: ...er Invalid Shading data Reinstall the driver Cannot find the scanner Turn off the power switch of the Scanner and turn it on again Restart the personal computer 2 2 Errors shown on the operation panel...

Page 83: ...ced on the proper position Set the original to the proper position 2 Is the original too high Check to make sure that the original is within 50mm of the book table 3 Is the original setting correct Se...

Page 84: ...PS5000C MKII Operator s Manual 5 6...

Page 85: ...Chapter 6 Maintenance...

Page 86: ...any cord of other electrical devices 2 If any of the following condition is found turn the Scanner off immediately unplug the power cord from the outlet and call your local authorized dealer The power...

Page 87: ...Chapter 7 Product specifications...

Page 88: ...ection Editing functions Center erase Frame masking Finger masking Centering Finger masking is nonfunctional in the Sheet mode All of Editing functions are nonfunctional in the 3D mode Image Quality P...

Page 89: ...ndows Vista Windows 7 64bit OS Windows XP Windows Vista Windows 7 Recommended PC system CPU INTEL Core2 Duo 2 33GHz or faster MEM 2GB or more VIDEO 256MB MEM or more Dimensions 35 19 inches W 29 40 in...

Page 90: ...Manual 7 4 2 Appendix 2 1 Assembling the adjustment plate Requirement parts x 6pcs x 4pcs Assembling procedure Inset the cut in part of into that of Caution Assemble them on the flat place such as des...

Page 91: ...hapter 7 Product specifications 7 5 2 2 Placing the adjustment plate Place Adjustment Plate on the platen Position standard Portrait Front cover Landscape Center of the platen Completion drawing Cutou...

Page 92: ...red to provide the following information to your local authorized dealer 1 Your company name address telephone number department name floor number machine location etc 2 Model name serial number condi...

Page 93: ......

Page 94: ...Printed in Japan The information contained in this manual is subject to change without notice to incorporate improvements made on the product or products the manual covers Manufactured For Konica Mino...

Reviews: