background image

CR 5 A2

■ 

88 

DE

AT

CH

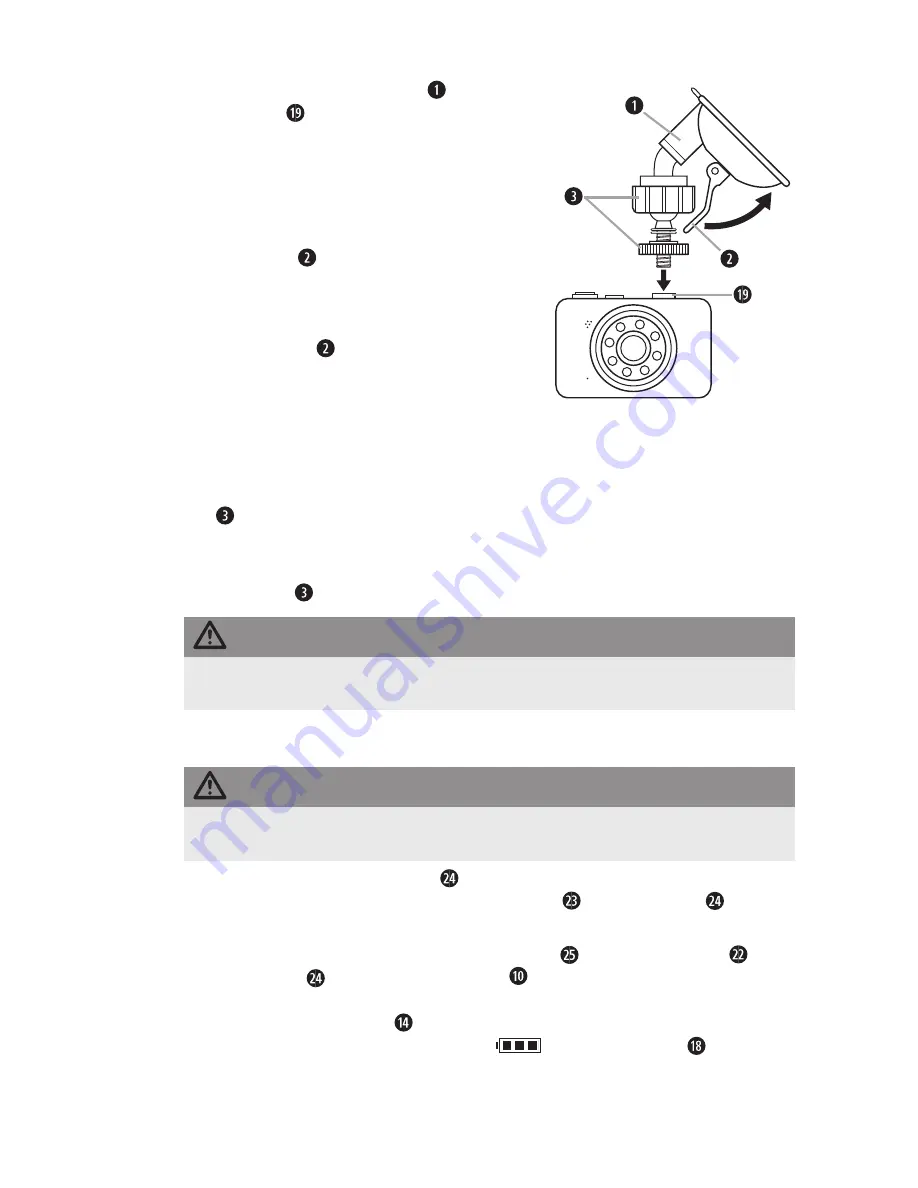
Kamera an der Windschutzscheibe montieren

1)  Schrauben Sie die Halterung   in das 

Gewinde   der Kamera ein . Positionieren 
Sie den Saugnapf an der Windschutzscheibe . 
Achten Sie darauf, dass der Saugnapf flach 
aufliegt .

2)  Setzen Sie den Saugnapf fest auf die Wind-

schutzscheibe und drücken Sie den Verriege-
lungshebel   in Richtung der Windschutz-
scheibe . Dadurch wird ein Unterdruck erzeugt 
und der Saugnapf fest an die Windschutz-
scheibe gezogen . Bewegen Sie den Verrie-
gelungshebel   entgegengesetzt, um den 
Saugnapf wieder von der Windschutzscheibe 
zu lösen . Um das Lösen zu erleichtern, ist am 
Saugnapf eine Lasche angebracht .

3)  Nachdem Sie die Kamera mit dem Saugnapf 

an der Windschutzscheibe befestigt haben, 
lösen Sie nacheinander die Rändelschrauben 

 und justieren die Kamera nach Ihren 

Wünschen .

4)  Sind gewünschte Position und Ausrichtung gefunden, ziehen Sie die Rändel-

schrauben   wieder handfest an .

 ACHTUNG


Die Kamera muss so positioniert werden, dass das Sichtfeld des Fahrers immer 
frei ist .

Stromversorgung herstellen

 ACHTUNG


Verwenden Sie zur Stromversorgung des Gerätes ausschließlich den  
mitgelieferten Kfz-Adapter .

1)  Schließen Sie den Kfz-Adapter   an die Bordspannung (Zigarettenanzünder-

Buchse) Ihres Fahrzeugs an . Die Betriebsleuchte   am Kfz-Adapter   zeigt die 
Betriebsbereitschaft an, wenn die Bordspannung an der Buchse anliegt .

2)  Verbinden Sie das mitgelieferte Mini-USB-Kabel   mit der USB-Buchse   am 

Kfz-Adapter   und dem USB-Anschluss   der Kamera . Sobald die Kamera 
über die Bordspannung mit Spannung versorgt wird, startet die Videoaufnahme 
und die Betriebsanzeige   leuchtet rot . Wenn der interne Geräteakku geladen 
wird, erscheint das Batterieladesymbol 

 auf dem Bildschirm   .

Summary of Contents for 275078

Page 1: ...shboard Camera CR 5 A2 Dashcam Bedienungsanleitung und Sicherheitshinweise Camer video pentru ma in Instruc iuni de utilizare i indica ii de siguran Dashboard Camera Operating instructions and safety...

Page 2: ...shinweise Seite 79 Before reading unfold the page containing the illustrations and familiarise yourself with all func tions of the device nainte de a citi instruc iunile privi i imaginile i familiariz...

Page 3: ...a e b C d...

Page 4: ...275078 Kompernass Handels GmbH BurgstraSSe 21 44867 Bochum Deutschland Germany www kompernass com Last Information Update Versiunea informa iilor Stand der Informationen 03 2016 Ident No CR5A2 022016...

Page 5: ...n the windscreen 10 Providing electric power 10 Handling and operation 11 Switching on and off making settings 11 Basic settings 11 Setup menu 11 Video standby mode 14 Start end recording 14 Photo sta...

Page 6: ...pyright protection Any copying or reproduction including extracts thereof and the reproduction of images even in a modified state is permitted only with the written authorisation of the manufacturer N...

Page 7: ...us injury or death WARNING A warning at this hazard level indicates a potentially hazardous situation Failure to avoid this hazardous situation could result in physical injury Follow the instructions...

Page 8: ...anteed by using these replacement parts Never open the device and never carry out any repairs yourself Protect the device from moisture spray and dripping water and penetration by liquids Never subjec...

Page 9: ...disconnect it from the power supply immediately WARNING Under no circumstances should the smoke be inhaled as this could be harmful to your health Check regularly to ensure that the suction cup is sec...

Page 10: ...these views Personal determinability Personal determinability exists when it can be established that a certain person was at a certain location at a certain time This identification can be made by mea...

Page 11: ...rophone Mini USB port Reset opening Loudspeaker Infrared LEDs Figure C Operating display Cover Mini HDMI connection microSD card slot Screen Figure D Thread for the tripod mount On Off button button t...

Page 12: ...nt is incomplete or damaged due to defective packaging or carriage contact the Service hotline see the Service section Disposal of packaging materials The packaging protects the device from damage dur...

Page 13: ...an be removed from the device NOTE The camera does not have any internal memory Therefore recordings can only be made with a memory card inserted You can find the maximum recording time depending on t...

Page 14: ...osen the knurled screws and adjust the camera as per your wishes 4 Once you have found the desired position and orientation retighten the knurled screws CAUTION The camera must be positioned so that t...

Page 15: ...on and off making settings Press the on off button to switch on the device The camera image is displayed on the screen The device is now in video standby mode To switch off the device press and hold t...

Page 16: ...on you can the use the buttons to choose whether the device switches off automatically after 1 Min 3 Min or 5 Min of inactivity If you select Off the device will not switch off automatically Confirm y...

Page 17: ...u can then use the buttons to select whether the display icons and the menus are to be displayed in the normal mode Off or rotated by 180 On The best selection depends on how you have mounted the came...

Page 18: ...minutes here 3 minutes I display for exposure correction J symbol for video standby K red dot flashes during recording L symbol for a write protected file Start end recording Press the button repeate...

Page 19: ...deo exposure in three steps upwards from 1 to 3 brighter or downwards from 1 to 3 darker When the setting is set to 0 there is no exposure compensation Use the buttons to select the desired video expo...

Page 20: ...utomatically begin recording again If the function is deactivated the device does not stop recording if no motion is detected NOTE You should only activate this function while the vehicle is parked if...

Page 21: ...splay for photo standby J display for continuous advance function only visible if feature is enabled Taking photos Press the button repeatedly as required to zoom into the subject Hold down the button...

Page 22: ...confirm your selection with the button to return to the list of menu items 3 photos in series If you access this menu option you can then use the buttons to activate or deactivate the function take a...

Page 23: ...l up this menu item with the button To exit the activated menu item without making a change press the MODE button Below right the current menu board as well as the total number of menu boards is shown...

Page 24: ...the button After wards the display will return to the list of menu items NOTE Using this function on a large number of files can take several seconds If you select a video with the buttons the screen...

Page 25: ...is menu option you can then use the buttons to select whether to protect the currently selected file from deletion Write protect this file to remove the write protection for the selected file Unlock t...

Page 26: ...restart the device Changing the fuse The car adapter contains a fuse If the device does not function it may be be cause the fuse is defective Exchange the defective fuse for a replacement fuse of the...

Page 27: ...er Improper repairs can cause considerable risks to users and damage to the device Fault causes and rectification The following table will help to identify and rectify minor faults Fault Possible caus...

Page 28: ...e the built in battery from time to time Disposal of the device The adjacent symbol of a crossed out wheelie bin means that this device is subject to Directive 2012 19 EU This directive states that th...

Page 29: ...nal Photo resolutions 5 megapixels 3 megapixels 2 megapixels 1 3 megapixels 0 3 megapixels 7 megapixels and 12 megapixels interpolated Photo format JPEG Video resolution Res 1 1920 x 1080 pixels frame...

Page 30: ...d for commercial use The warranty is void in the case of abusive and improper handling use of force and internal tampering not carried out by our authorised service branch Your statutory rights are no...

Page 31: ...curent 36 Operarea i func ionarea 37 Pornirea i oprirea realizarea set rilor 37 Set ri de baz 37 Meniul Setup 37 Preg tirea pentru nregistrarea video 40 nceperea terminarea nregistr rii 40 Starea pre...

Page 32: ...protejat prin drepturi de autor Reproducerea respectiv retip rirea chiar i numai par ial precum i redarea imagini lor chiar i modificate este permis numai cu acordul scris al produc torului Indica ii...

Page 33: ...RTIZARE Avertiz rile pentru acest grad de pericol marcheaz o situa ie poten ial periculoas Dac situa ia periculoas nu este evitat aceasta poate provoca r niri Respecta i indica iile din aceast avertiz...

Page 34: ...gur respectarea cerin elor de siguran Nu deschide i niciodat aparatul i nu efectua i repara ii la acesta Proteja i aparatul mpotriva apei pulverizate sau a apei care picur i mpotriva infiltr rii lichi...

Page 35: ...mului la aparat acesta se va deconecta imediat de la sursa de alimentare electric AVERTIZARE Nu inspira i n niciun caz fumul deoarece acesta este d un tor pentru s n tate Verifica i regulat dac ventuz...

Page 36: ...astfel de cadre Identificarea personal Vorbim despre o identificare personal n momentul n care se poate determina c o anumit persoan s a aflat la un anumit moment ntr un anumit loc Identificarea se po...

Page 37: ...ET Difuzor LED uri infraro ii Figura C Indicator de operare Capac Conector mini HDMI Slot de card micro SD Ecran Figura D Filet pentru prinderea suportului stativ Tasta Pornit Oprit Tasta pentru porni...

Page 38: ...incomplet sau dac componentele sunt deteri orate din cauza ambalajului precar sau a transportului apela i linia telefonic direct de service a se vedea capitolul Service Eliminarea ambalajului Ambalaju...

Page 39: ...rdului Cardul micro SD va ie i u or din slot i poate fi acum scos din aparat INDICA IE Camera nu dispune de memorie intern De aceea nregistr rile pot fi realizate numai dac a i introdus un card de mem...

Page 40: ...i g sit pozi ia i orientarea dorite str nge i din nou manual uruburile randalinate ATEN IE Camera trebuie pozi ionat astfel nc t c mpul vizual al oferului s fie n permanen liber Realizarea aliment ri...

Page 41: ...sa i tasta Pornit Oprit pentru a porni aparatul Imaginea de la camer apare pe ecran Aparatul este acum preg tit de operare n modul video Pentru a opri aparatul men ine i tasta Pornit Oprit ap sat tim...

Page 42: ...e la lista punctelor de meniu Auto Power Off Oprirea automat Dac apela i aceast func ie de meniu pute i selecta apoi cu tastele dac aparatul se va opri automat dup 1 min 3 min sau 5 min de inactivi ta...

Page 43: ...olurilor de pe afi aj i a meniurilor se face normal Off sau rotit la 180 On n acest caz cea mai potrivit setare depinde de modul n care a i pozi ionat camera Format memory card Formatare card de memor...

Page 44: ...minute I Indica ie pentru corec ia expunerii J Simbol pentru starea preg tit de nregistrare video K Punctul ro u clipe te n timpul nregistr rii L Simbolul pentru un fi ier protejat mpotriva tergerii n...

Page 45: ...Exposure Expunerea Dac apela i aceast func ie de meniu pute i corecta apoi expunerea video n trei trepte n sus de la 1 p n la 3 mai luminos respectiv n jos de la 1 p n la 3 mai ntunecat n setarea 0 n...

Page 46: ...mentul n care nu mai sunt detectate imagini n mi care Dac aparatul nregistreaz din nou mi c ri acesta re ncepe automat o nou nregistrare Dac func ia este dezactivat aparatul nu ntrerupe nregistrarea n...

Page 47: ...ndicarea orei numai dac este activat func ia Marcaj de or i dat G Simbolul pentru autodeclan ator aici 5 secunde vizibil numai dac func ia este activat H Simbol pentru corec ia expunerii I Indica ie p...

Page 48: ...o n trei trepte n sus de la 1 p n la 3 mai luminos respectiv n jos de la 1 p n la 3 mai ntunecat Cu tastele selecta i corec ia dorit pentru expunerea foto i confirma i selec ia cu tasta pentru a reven...

Page 49: ...espectiva func ie de meniu cu tasta Pentru a p r si un punct de me niu f r a face modific ri ap sa i tasta MODE n dreapta jos este afi at masca de meniu curent precum i num rul total al m tilor de men...

Page 50: ...i selec ia cu tasta Apoi afi ajul revine la lista punctelor de meniu INDICA IE Aplicarea acestor func ii pe un num r mare de fi iere poate dura c teva secunde Dac selecta i un videoclip cu tastele ec...

Page 51: ...e i selecta apoi dac fi ierul selectat curent trebuie protejat mpotriva tergerii Write protect this file dac protec ia fi ierului selectat curent trebuie ridicat Unlock this file dac toate fi ierele t...

Page 52: ...ni Schimbarea siguran ei n adaptorul auto se g se te o siguran Dac aparatul nu func ioneaz este posibil ca siguran a s fie defect nlocui i n acest caz siguran a cu alta nou de acela i tip consulta i i...

Page 53: ...pericol pentru utilizatorul aparatului i defectarea acestuia din urm Cauzele defec iunilor i remedierea acestora Tabelul urm tor este util pentru localizarea i remedierea defec iunilor minore Defec iu...

Page 54: ...nd n c nd Eliminarea aparatului Simbolul al turat al pubelei t iate cu ro i indic faptul c acest aparat face obiectul directivei 2012 19 EU Aceast directiv indic faptul c la sf r itul perioadei de uti...

Page 55: ...ii foto 5 megapixeli 3 megapixeli 2 megapixeli 1 3 megapixeli 0 3 megapixeli 7 megapixeli i 12 megapixeli interpolat Format de nregistrare foto JPEG Rezolu ii video Rez 1 1 920 x 1 080 pixeli rat de...

Page 56: ...ntru o utilizare profesional n cazul manevr rii abuzive sau necorespunz toare uzului de for i interven iilor care nu au fost realizate de c tre filiala noastr autorizat de service garan ia i pierde va...

Page 57: ...CR 5 A2 BG 53 54 54 54 54 54 55 56 56 58 59 60 60 61 Micro SD 61 62 62 63 63 63 Setup 63 66 66 69 69 70 73 74 74 74 75 75 75 76 76 76 76 76 77 78 78 78...

Page 58: ...CR 5 A2 54 BG USB USB Implementers Forum Inc...

Page 59: ...CR 5 A2 BG 55...

Page 60: ...CR 5 A2 56 BG 40 C...

Page 61: ...CR 5 A2 BG 57...

Page 62: ...CR 5 A2 58 BG...

Page 63: ...CR 5 A2 BG 59 A MENU MODE Mini USB RESET Mini HDMI Micro SD USB 12 24 V USB Mini USB...

Page 64: ...CR 5 A2 60 BG CR 5 A2 12 24 V USB Mini USB...

Page 65: ...o SD Micro SD Micro SD Micro SD Micro SD Micro SD Micro SD Micro SD Micro SD Micro SD 1080P 4 GB 0 19 8 GB 0 41 16 GB 1 21 32 GB 2 41 720P 4 GB 0 32 8 GB 1 06 16 GB 2 12 32 GB 4 22 480P 4 GB 0 47 8 GB...

Page 66: ...CR 5 A2 62 BG 1 2 3 4 1 2 Mini USB USB USB...

Page 67: ...CR 5 A2 BG 63 3 Setup Setup MENU MODE Setup Default settings MODE MENU...

Page 68: ...CR 5 A2 64 BG Time date MODE MODE MODE MODE YY MM DD MM DD YY DD MM YY MODE MODE Auto Power Off 1 3 5 Impact sensor Beep sound...

Page 69: ...CR 5 A2 BG 65 Auto display off 1 3 5 MODE Language Display icon rotation 180 Format memory card Micro SD Micro SD OK Default settings OK Setup MENU...

Page 70: ...CR 5 A2 66 BG A B C Micro SD D E F G H 3 I J K L MODE...

Page 71: ...CR 5 A2 BG 67 MENU Motion detection MODE MENU Resolution 1920 x 1080P HD 1280 x 720P 640 x 480P Exposure 1 3 1 3 0 Video length 3 5 10 Micro SD Micro SD...

Page 72: ...CR 5 A2 68 BG Motion detection Audio recording...

Page 73: ...CR 5 A2 BG 69 MODE A B C Micro SD D E F G 5 H I J MENU...

Page 74: ...CR 5 A2 70 BG MODE MENU Resolution 12MP 7MP 5MP 3MP 2MP 1 3MP 0 3MP MP 5MP 2592 1944 5 Micro SD Exposure 1 3 1 3 3 photos in series 3 3 Self timer 2 5 10 MODE...

Page 75: ...CR 5 A2 BG 71 A B C D E F MENU Delete MODE MENU Delete OK...

Page 76: ...CR 5 A2 72 BG Write protection A B C D E MODE F G H...

Page 77: ...CR 5 A2 BG 73 MENU Delete MODE MENU Delete OK Write protection Mini HDMI Mini HDMI...

Page 78: ...CR 5 A2 74 BG Mini USB USB USB USB Micro SD RESET...

Page 79: ...CR 5 A2 BG 75 Setup...

Page 80: ...CR 5 A2 76 BG RESET 2012 19 U 2014 30 EU 2011 65 EU...

Page 81: ...2 AL 250 V 5 V 1 A Micro SD FAT 32 GB 2 7 TFT LC 6 8 cm 5 3 2 1 3 0 3 7 12 JPEG 1 1920 1080 25 fps 1 GB 5 2 1280 720 30 fps 3 640 480 30 fps AVI 58 1920 x 1080 80 2592 x 1944 30 1920 x 1080 56 2592 x...

Page 82: ...CR 5 A2 78 BG 3 00800 111 4920 kompernass lidl bg IAN 275078 KOMPERNASS HANDELS GMBH BURGSTRASSE 21 44867 BOCHUM GERMANY www kompernass com...

Page 83: ...heibe montieren 88 Stromversorgung herstellen 88 Bedienung und Betrieb 89 Ein und Ausschalten Einstellungen vornehmen 89 Grundeinstellungen 89 Setup Men 89 Video Aufnahmebereitschaft 92 Aufnahme start...

Page 84: ...ung bzw jeder Nachdruck auch auszugsweise sowie die Wieder gabe der Abbildungen auch im ver nderten Zustand ist nur mit schriftlicher Zustim mung des Herstellers gestattet Hinweise zu Warenzeichen USB...

Page 85: ...Todes zu vermeiden WARNUNG Ein Warnhinweis dieser Gefahrenstufe kennzeichnet eine m gliche gef hrliche Situation Falls die gef hrliche Situation nicht vermieden wird kann dies zu Verletzungen f hren D...

Page 86: ...tsanforderungen erf llen ffnen Sie niemals das Ger t und nehmen Sie keine Reparaturen daran vor Sch tzen Sie das Ger t vor Spritz und Tropfwasser und dem Eindringen von Fl ssigkeiten Setzen Sie das Ge...

Page 87: ...cklung feststellen trennen Sie es sofort von der Stromversorgung WARNUNG Der Rauch darf keinesfalls eingeatmet werden da dieser gesundheitssch dlich ist berpr fen Sie regelm ig ob der Saugnapf fest mi...

Page 88: ...er Ansichten Personelle Bestimmbarkeit Eine personelle Bestimmbarkeit liegt vor wenn festgestellt werden kann dass eine bestimmte Person zu einer bestimmten Zeit an einem bestimmten Ort war Die Identi...

Page 89: ...hluss RESET ffnung Lautsprecher Infrarot LEDs Abbildung C Betriebsanzeige Abdeckung Mini HDMI Anschluss Micro SD Karteneinschub Bildschirm Abbildung D Gewinde zur Aufnahme der Stativhalterung Ein Aus...

Page 90: ...jektiv HINWEIS Bei einer unvollst ndigen Lieferung oder Sch den infolge mangelhafter Verpackung oder durch Transport wenden Sie sich an die Service Hotline siehe Kapitel Service Entsorgung der Verpack...

Page 91: ...icro SD Karte wird ein kleines St ck ausgeworfen und kann aus dem Ger t entnommen werden HINWEIS Die Kamera verf gt ber keinen internen Speicher Aufnahmen k nnen daher nur mit eingelegter Speicherkart...

Page 92: ...die R ndelschrauben und justieren die Kamera nach Ihren W nschen 4 Sind gew nschte Position und Ausrichtung gefunden ziehen Sie die R ndel schrauben wieder handfest an ACHTUNG Die Kamera muss so posi...

Page 93: ...en Dr cken Sie die Ein Aus Taste um das Ger t einzuschalten Das Kamerabild erscheint auf dem Bildschirm Das Ger t ist nun in Video Aufnahmebereitschaft Um das Ger t auszuschalten halten Sie die Ein Au...

Page 94: ...r ck Automatische Abschaltung Wenn Sie diese Men funktion aufrufen k nnen Sie anschlie end mit den Tasten ausw hlen ob sich das Ger t nach 1 Min 3 Min oder 5 Min Inaktivit t automatisch abschaltet Wen...

Page 95: ...y Symbole und der Men s normal Aus oder um 180 gedreht Ein angezeigt werden sollen Welche Einstellung hier sinnvoll ist richtet sich danach wie Sie die Kamera angebracht haben Speicherkarte formatiere...

Page 96: ...n I Anzeige f r Belichtungskorrektur J Symbol f r Video Aufnahmebereitschaft K Roter Punkt blinkt w hrend der Aufnahme L Symbol f r eine gegen L schen gesch tzte Datei Aufnahme starten beenden Dr cken...

Page 97: ...ler bzw nach unten von 1 bis 3 dunkler korrigieren In der Einstellung 0 findet keine Belichtungskorrektur statt W hlen Sie mit den Tasten die gew nschte Video Belichtungskorrektur aus und best tigen S...

Page 98: ...omatisch mit einer neuen Aufnahme Bei aus geschalteter Funktion unterbricht das Ger t die Aufnahme nicht wenn Bewegungen ausbleiben HINWEIS Diese Funktion sollten Sie nur aktivieren w hrend das Fahrze...

Page 99: ...ge nur bei aktivierter Funktion Zeit Datums Stempel G Symbol f r Selbstausl ser hier 5 Sekunden nur sichtbar wenn Funktion akti viert ist H Symbol f r Belichtungskorrektur I Anzeige f r Foto Aufnahmeb...

Page 100: ...nach oben von 1 bis 3 heller bzw nach unten von 1 bis 3 dunkler korrigieren W hlen Sie mit den Tasten die gew nschte Foto Belichtungskorrektur aus und best tigen Sie Ihre Auswahl mit der Taste um dan...

Page 101: ...aste aufrufen Um einen aufgerufenen Men punkt ohne nderung wieder zu verlassen dr cken Sie die MODE Taste Unten rechts wird die aktuelle Men tafel sowie die Gesamtzahl der Men tafeln angezeigt Um das...

Page 102: ...gen Sie Ihre Auswahl mit der Taste Anschlie end kehrt die Anzeige dann zur Liste der Men punkte zur ck HINWEIS Die Anwendung dieser Funktionen auf eine Vielzahl von Dateien kann einige Sekunden dauern...

Page 103: ...e end mit den Tas ten ausw hlen ob die gerade angew hlte Datei gegen L schen gesch tzt werden soll Diese Datei schreibsch tzen der Schutz der gerade angew hlte Datei aufgehoben werden soll Diese Datei...

Page 104: ...cherungswechsel Im Kfz Adapter befindet sich eine Sicherung Sollte das Ger t nicht funktionieren k nnte die Sicherung defekt sein Dann wechseln Sie diese gegen eine Ersatzsiche rung gleichen Typs aus...

Page 105: ...rsteller geschult sind Durch unsachgem e Reparaturen k nnen erhebli che Gefahren f r den Benutzer und Sch den am Ger t entstehen Fehlerursachen und behebung Die nachfolgende Tabelle hilft bei der Loka...

Page 106: ...eit zu Zeit aufladen Ger t entsorgen Das nebenstehende Symbol einer durchgestrichenen M lltonne auf R dern zeigt an dass dieses Ger t der Richtlinie 2012 19 EU unterliegt Diese Richtlinie besagt dass...

Page 107: ...ca 6 8 cm Bilddiagonale Foto Aufl sungen 5 MPixel 3 MPixel 2 MPixel 1 3 MPixel 0 3 MPixel 7 MPixel und 12 MPixel interpoliert Foto Aufnahmeformat JPEG Video Aufl sungen Aufl 1 1920 x 1080 Pixel Bildra...

Page 108: ...ltanwendung und bei Eingriffen die nicht von unserer autorisierten Service Niederlassung vorge nommen wurden erlischt die Garantie Ihre gesetzlichen Rechte werden durch diese Garantie nicht eingeschr...

Reviews: