


CR 5 A2
GB
│
CY
│
17
■
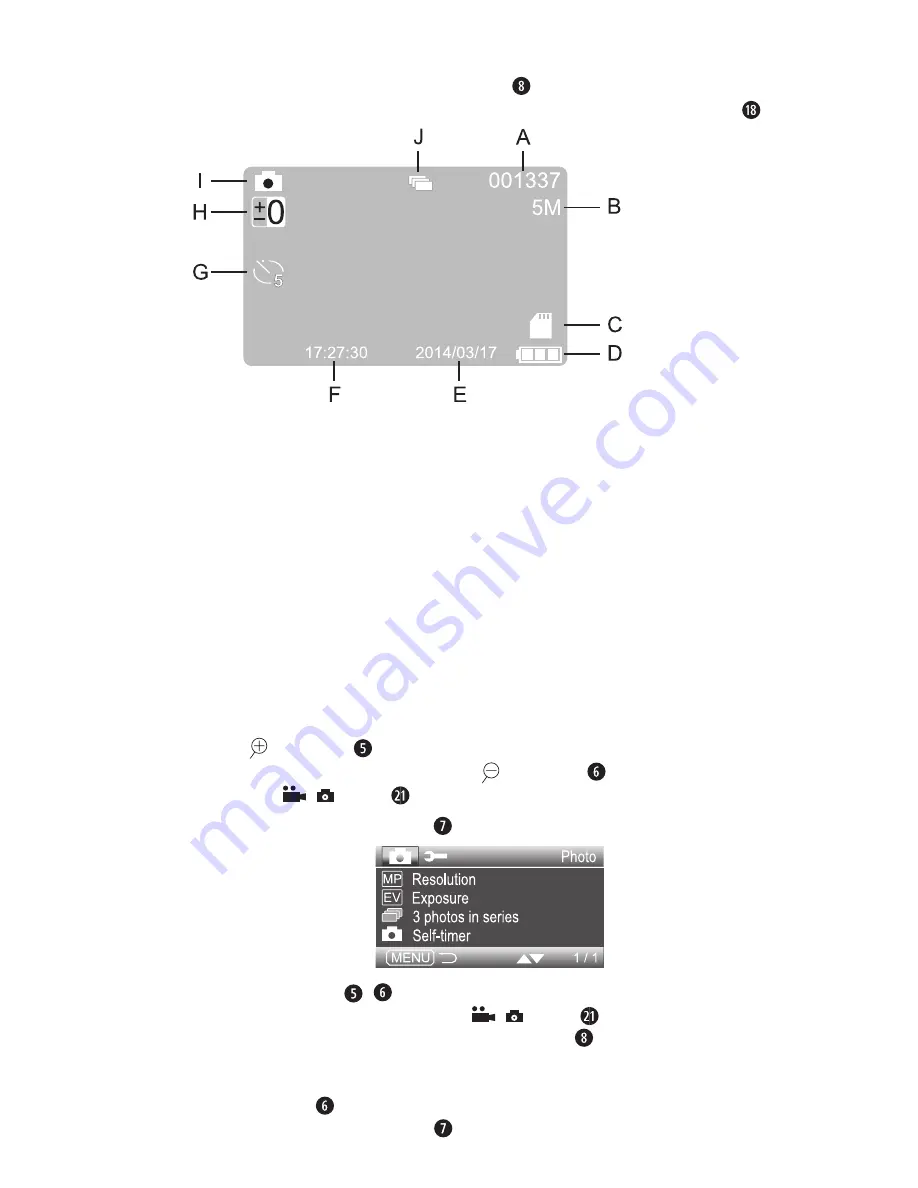
Photo standby
With the menu closed, press the MODE button during video standby to switch to
photo standby . The device then displays the following overview on the screen :
A – displays the remaining number of photos that can still be taken depending on
resolution and available storage space
B – current photo resolution
C – symbol to indicate an inserted microSD card
D – battery charge level of the internal battery
E – date display (only when the "Time & date stamp" is activated)
F – time display (only when the "Time & date stamp" is activated)
G – symbol for self-timer (here 5 seconds: only visible if the function is activated)
H – symbol for exposure correction
I – display for photo standby
J – display for continuous advance function (only visible if feature is enabled)
Taking photos
Press the / ▲ button repeatedly as required to zoom into the subject . Hold down
the button for fast zoom . You can use the / ▼ button in the same way to zoom
out . Press the
/ button to take a photo .
If you now press the MENU button in photo standby, the following menu opens:
Using the ▲▼ buttons / you can move the selection bar to the desired entry
and then call up this menu item with the
/ button . To exit the activated menu
item without making a change, press the MODE button . Below right, the current
menu board as well as the total number of menu boards is shown . If the
lowest menu item on a menu board is selected which leads to a further menu board,
press the ▼ button to jump to the first entry on the following menu board . To close
the menu, press the MENU button .
Summary of Contents for 275078
Page 3: ...a e b C d...
Page 58: ...CR 5 A2 54 BG USB USB Implementers Forum Inc...
Page 59: ...CR 5 A2 BG 55...
Page 60: ...CR 5 A2 56 BG 40 C...
Page 61: ...CR 5 A2 BG 57...
Page 62: ...CR 5 A2 58 BG...
Page 63: ...CR 5 A2 BG 59 A MENU MODE Mini USB RESET Mini HDMI Micro SD USB 12 24 V USB Mini USB...
Page 64: ...CR 5 A2 60 BG CR 5 A2 12 24 V USB Mini USB...
Page 66: ...CR 5 A2 62 BG 1 2 3 4 1 2 Mini USB USB USB...
Page 67: ...CR 5 A2 BG 63 3 Setup Setup MENU MODE Setup Default settings MODE MENU...
Page 70: ...CR 5 A2 66 BG A B C Micro SD D E F G H 3 I J K L MODE...
Page 72: ...CR 5 A2 68 BG Motion detection Audio recording...
Page 73: ...CR 5 A2 BG 69 MODE A B C Micro SD D E F G 5 H I J MENU...
Page 75: ...CR 5 A2 BG 71 A B C D E F MENU Delete MODE MENU Delete OK...
Page 76: ...CR 5 A2 72 BG Write protection A B C D E MODE F G H...
Page 77: ...CR 5 A2 BG 73 MENU Delete MODE MENU Delete OK Write protection Mini HDMI Mini HDMI...
Page 78: ...CR 5 A2 74 BG Mini USB USB USB USB Micro SD RESET...
Page 79: ...CR 5 A2 BG 75 Setup...
Page 80: ...CR 5 A2 76 BG RESET 2012 19 U 2014 30 EU 2011 65 EU...


