background image

Tools:    

•  Two M4 hexagon socket cap screws (DIN 912)

•  3 mm T-handle Allen key

•  No. 2 Phillips head screwdriver

Bolt the AKD PDMM to a conductive metal plate. See the 

AKD PDMM Installation 

Manual

 for the dimensions and mounting information on your specific drive model.

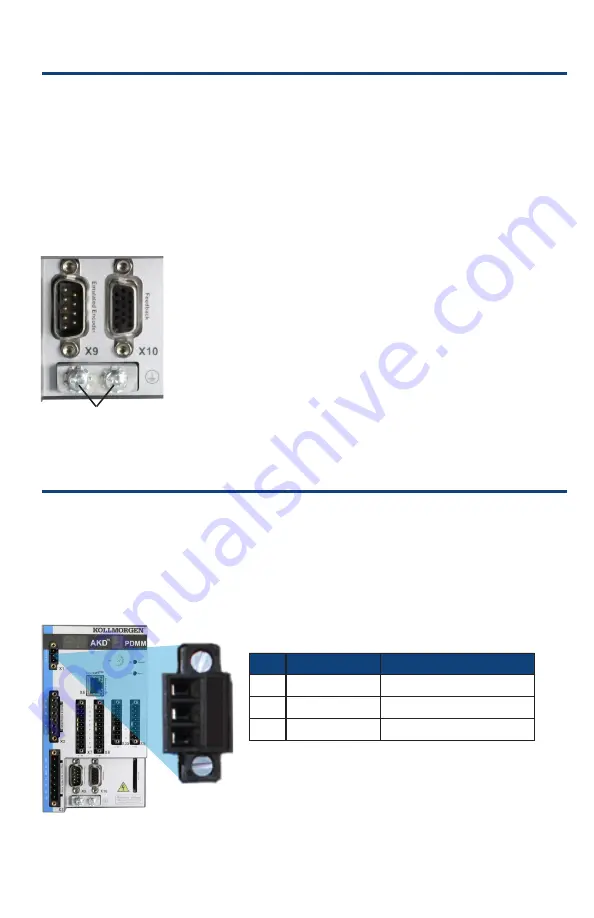
Connect the protective earth (PE) to any ground screw on the drive grounding lug 

shown in 

Figure 2

.


Figure 2. Protective Earth (PE) Connection

Step 2: Connect Logic Power and STO (X1 Connector) 

Safe Torque Off (STO) is a restart lock safety feature that protects personnel by pre-

venting an unintentional system restart. To use this feature, the STO pin must be con-

nected to the output of a security control or a safety relay. The safety relay must comply 

with the requirements of the SIL 2 according to IEC 61800-5-2, PL d according to ISO 

13849-1. 

Connect logic supply and safe torque off (STO) as shown in 

Figure 3

.

Figure 3. Logic Supply Pin Configuration

Pin Signal

Description

1

+24 Vdc

Logic power

2

24 V GND

Supply GND

3

STO

STO enable

Grounding Lug

+24  GND ST

O

5

Step 1: Secure the Drive and Connect the Protective Earth

Summary of Contents for AKD PDMM

Page 1: ...nts Pending Part Number 903 200014 00 North America Kollmorgen Customer Support Internet www kollmorgen com E Mail support kollmorgen com Tel 1 540 633 3545 Fax 1 540 639 4162 Europe Kollmorgen Customer Support Internet www kollmorgen com E Mail technik kollmorgen com Tel 49 0 2102 9394 0 Fax 49 0 2102 9394 3155 Keep all manuals as a product component during the life span of the product Pass all m...

Page 2: ...changes which improve the performance of the device may be made without prior notice Printed in the United States of America This document is the intellectual property of Kollmorgen All rights reserved No part of this work may be reproduced in any form by photocopying microfilm or any other method or stored processed copied or distributed by electronic means without the written permission of Kollm...

Page 3: ...ive Earth PE Step 2 Connect Logic Power and STO X1 Connector Step 3 Connect Motor Power X2 Connector Step 4 Connect Feedback X10 Connector Step 5 Connect I O X7 X8 X35 and X36 Connectors Step 6 Connect AC Input Power X3 and X4 Connectors Step 7 Connect Drive Communication X32 Step 8 Confirm Connections After installing the hardware install the Kollmorgen Automation Suite Integrated Development Env...

Page 4: ...e included at the end of this Quick Start guide Steps 1 through 8 of this guide provide detailed information for each connection shown below Figure 1 AKD PDMM Wiring Diagram X32 TCP IP STO X 1 3 Power Brake K1 Power ON 3 3 Mains Power Fuses Enable X8 3 X8 4 X8 2 X8 1 X1 2 X1 1 24V DN 24V DC 24V GND Logic Power Feedback ...

Page 5: ... Connector Safe Torque Off STO is a restart lock safety feature that protects personnel by pre venting an unintentional system restart To use this feature the STO pin must be con nected to the output of a security control or a safety relay The safety relay must comply with the requirements of the SIL 2 according to IEC 61800 5 2 PL d according to ISO 13849 1 Connect logic supply and safe torque of...

Page 6: ...Power X2 Connector Wire the motor power cable to the X2 mating connector according to Figures 4 5 and 6 as appropriate Figure 4 Connector X2 AKD PDMM xxxx06 Figure 5 Connector X2 AKD PDMM xxxx07 Pin Signal Description 1 Br Motor holding brake negative 2 Br Motor holding brake positive 3 PE Protective earth motor housing 4 U Motor phase U 5 V Motor phase V 6 W Motor phase W Pin Signal Description 1...

Page 7: ...ot have brake leads Wire gauge required varies with drive amperage Step 4 Connect Feedback X10 Connector Connect the feedback from the motor to the X10 connector according to Figure 7 Standard Kollmorgen motor feedbacks are plug and play and require no parameter set ting for motor recognition and commutation to occur Figure 7 Feedback connection AKD PDMM 6 11 1 10 15 5 7 AKD PDMM Quick Start Conne...

Page 8: ...utput 1 Programmable N A X7 8 Digital Output 1 Programmable N A X7 9 Digital Input 2 Reference Point High speed X7 10 Digital Input 1 Home Switch High speed X8 1 Fault Relay Output N A N A X8 2 Fault Relay Output N A N A X8 3 Digital Common X8 Common line for X8 pins 4 5 6 N A X8 4 Digital Input 8 Hardware enable Not programmable X8 5 Digital Input 6 Negative limit switch N A X8 6 Digital Input 5 ...

Page 9: ... for X7 X8 X35 and X36 are not common to each other Connect the DCOMx line to the 0V of the I O supply when using source type sensors with digital inputs Connect the DCOMx line to the 24 V of the I O supply when using sink type sensors with digital inputs Connect AC input power for your AKD PDMM model as shown in Figures 9 and 10 Do not apply power until all hardware connections are made Pin Signa...

Page 10: ... external braking resistor use please consult the installation manual Step 7 Connect AKD PDMM Communication X32 1 Assign an IP Address To establish communication between the PC and the AKD PDMM you must first set the AKD PDMM IP address using either static or dynamic IP addressing a Static IP addressing switch setting 1 to 9 The S1 rotary switch on the front panel of the AKD PDMM corresponds to it...

Page 11: ...matically be displayed on the 7 segment LED during the power on boot sequence Figure 12 B2 B3 Pushbuttons d Changing the IP address If the AKD PDMM is not powered on then you can change the IP address using the rotary switch and the change takes effect upon AKD PDMM restart You can also change the IP address while the AKD PDMM is powered on If you move the rotary switch while 24 V logic power is s...

Page 12: ... connect to the AKD PDMM Figure 14 Network Connection Selection 3 In the network connection window scroll to Internet Protocol TCP IP and then select Properties Configure the TCP IP properties as shown below and click OK Figure 15 Network Connection Properties Select connection PC Running KAS IDE AKD PDMM Service Port TCP IP X32 Connection AKD PDMM Quick Start Connect AKD PDMM Communication ...

Page 13: ...n corporate networks If the network does not have a DHCP server you can connect using a stand alone router with a built in DHCP server In either case both the PC and the AKD PDMM acquire IP addresses auto matically Figure 16 Option B Connection to a Router Step 8 Confirm Connections After completing Steps 1 through 7 you can turn on logic power to the AKD PDMM through the X1 connector bus voltage ...

Page 14: ...ower on 2 Boot sequence 3 IP address 4 Operational program not running 5 Operational program running Confirm that the link LEDs on the AKD PDMM green LED on the RJ45 connector and on your PC are both illuminated If both LEDs are illuminated then you have a working electrical connection Figure 18 Active connection LED AKD PDMM Quick Start Confirm Connections ...

Page 15: ...gh this connection Software Setup Step 9 Install and Start the KAS IDE Once the Kollmorgen Automation Suite Integrated Development Environment KAS IDE installation is complete click the IDE icon to launch the program Begin a new project in the KAS IDE by selecting File New This will launch the Add a New Controller window Figure 19 Add a New Controller 15 Acquiring AKD PDMM connection AKD PDMM conn...

Page 16: ...plication Template Choose from PipeNetwork PLCopen or Library and click Finish The controller will then be added to the project view To associate the project with the IP address of the PDMM controller right click on the Controller option in the Project View Figure 21 Controller Selection AKD PDMM Quick Start Install and Start the KAS IDE ...

Page 17: ... setting up and tuning the drives adding and configuring HMIs and creating a PLC program For more complete information see the KAS IDE User Guide Once a project new or saved is opened the user can open a variety of items to build a project from the Project Explorer Figure 23 Project View Create PLC Programs Add Motion Configure Resident I O Configure Drives and Remote I O Add Additional Reference ...

Page 18: ...t Figure 24 Compile and Connect Next click on the EtherCAT item in the project view to bring up the EtherCAT Devices screen in the IDE workspace Click on Scan Devices and the IDE will launch a view which automatically identifies your connected device s Click OK to add these devices to the project Figure 25 Scan Devices Mapped to Axis Step 1 Compile Project Step 2 Connect to Target Step 1 Go to the...

Page 19: ... active Click on the EtherCAT item in the proj ect tree and then click on the OnlIne Configuration Mode button next to Scan Devices Figure 28 Online Configuration Mode Online Configuration Mode is now active To configure a particular item in the Ether CAT network click on the item in the project tree A set of screens will open in the work space that enable the user to completely configure the sele...

Page 20: ... configuration steps Figure 30 Setup Wizard Step 12 Running the Axis To perform basic motion without running a project use the Service Motion view with the drive set to Position Mode Figure 31 Service Motion AKD PDMM Quick Start Configuring the Drives and Remote I O ...

Page 21: ...21 Wiring Diagram 3A and 6A 240V AKD PDMM x00306 to x00606 ...

Page 22: ...22 Wiring Diagram 12A 240V AKD PDMM x01206 ...

Page 23: ...Wiring Diagram 3A 6A and 12A 480V AKD PDMM xzzz07 23 ...

Page 24: ...achine builders an irrefutable marketplace advantage For assistance with your application needs visit www kollmorgen com or contact us at North America Kollmorgen 203A West Rock Road Radford VA 24141 USA Phone 1 540 633 3545 Fax 1 540 639 4162 Email support kollmorgen com Europe Kollmorgen Europe GmbH Pempelfurtstraße 1 40880 Ratingen Germany Phone 49 0 2102 9394 0 Fax 49 0 2102 9394 3155 Email te...

Reviews: