


15
Toolbars:
Go to
View>Toolbars
–
there are four in total and it’s useful
to have them all showing (click on
one to turn it on/off) until you determine which features you find most useful. You can then create a custom
toolbar with just those you need most often. (
View>Toolbars>Customize
)
Palettes:
Go to
View>Palettes
–
there are three in total. The important ones are the
Shop Palette
(which
shows all available colors for your vector images) and the
Job Palette
(which tracks all colors that have
been used in the current file). To activate a palette, click on the name to check it.
Show Sign Blank
: Go to
View>Show Sign Blank
–
makes
document boundaries visible.
Tool
: Go to
Cut>Plotting Defaults
and, under
Tool
, select
Drag Knife
. Note that you must click on
Apply
to lock in a change in this window. Then you can click on
Close.
Axis Swap:
Go to
Cut>Plotting Defaults -
checking
Axis Swap
will cut your images left to right, as you
see them on the screen, similar to a portrait orientation. Un-checking
Axis Swap
will rotate images and cut
them front to back on the cutter, similar to a landscape orientation. Refer to
Section 4.1
for a clearer
understanding of where images will cut. Again, click on
Apply
if you make a change in this window.
Page
versus
Sign Blank:
Go to
Cut>Plotting Defaults
–
checking
Page
mode will cause images to be
moved to the origin to be cut. Checking
Sign Blank
will cut the images in the same location as shown in
the Sign Blank. Again, refer to
Section 4.1
for a clearer understanding of where images will cut and click on
Apply
if you make a change in this window.
Machine Limits
: Go to
Cut>Plotting Defaults
, click on
Setup.
These are the maximum and minimum
length and width for cutting. Set the
Length
to at least 15” or longer. If you plan to cut vinyl, then you may
wish to ma
ke it as long as 48”,
although there is no limit. Set the
Width
to 15” or 24” or
whatever width
matches your cutter’s limit.
If working in metric, enter the appropriate equivalents in mm.
Multiple Instance
: Go to
Options>Multiple Instance
- allows more than one file to be opened at a time.
Automatic Save
: Go to
Options>Automatic Save
–
creates backup files while you are working.
Show Grid
: Go to
View> Show Grid
–
turn on/off the grid. There is also an icon for this on the
Workspace
toolbar.
Grid Size
: Go to
Options>Klic-N-Kut Setup>General Preferences
–
sets distance between grid lines
.
Duplicates
: Go to
Options>Klic-N-Kut Setup>General Preferences
- When you use
Edit>Duplicate
to
copy an image, this is the offset from the original. If you want the duplicate to be directly on top of the
ori
ginal, enter 0 for both values. Usually, you will want the image offset by some amount so that it’s
apparent you have a duplicate available.
Show Fill
: Go to
View>Show Fill
–
turns on/off the fill. With Show Fill turned on, closed images will be
filled with the color you select from the
Shop Palette
on the bottom of the screen. Open images will appear
with dashed lines. There is also an icon for this on the
Workspace
toolbar or you can use
Alt-S
.
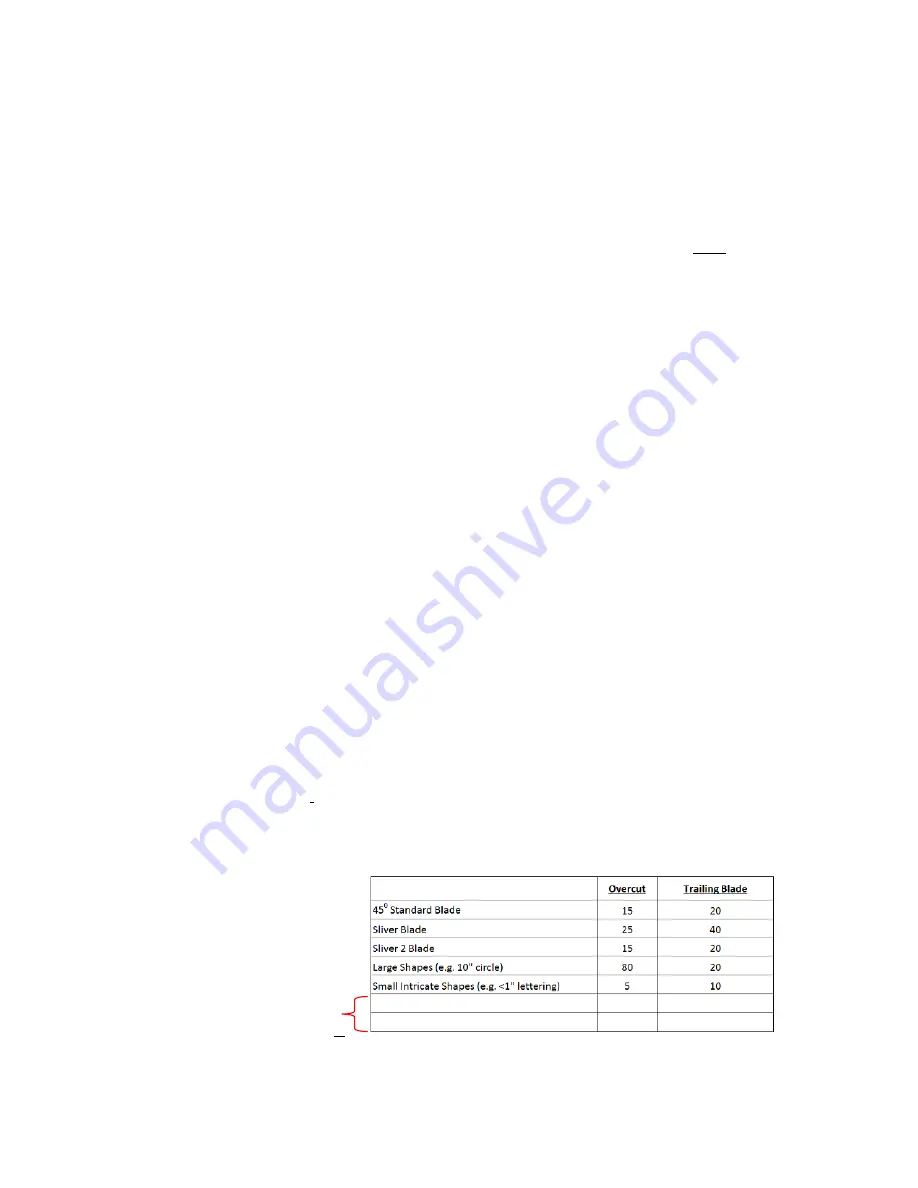
Overcut and Trailing Blade
–
these settings compensate for the angle of the blade. Go to
Cut>Tool
Options.
The
Overcut
setting ensures that paths are fully closed. The
Trailing Blade
setting enhances
the sharpness of corners. Depending on the blade you are using and the intricacy of the cut, these values
will need to be altered for the
Drag Knife
only. The following table shows recommended values for these
parameters:
In this same
Cut>Tool Options
window, the values above can be stored under
Material
. Enter values for
Overcut
and
Trailing Blade
, and then click on the
Add Material
button. Enter a name for the listing, such
as “Red Capped Blade” or “Large Shapes” and then click on
OK
. This menu list is then available in the
Layout>Blank
Size
window where you also select the dimensions for your Sign Blank.
Enter more values based on
future KNK blades or your own
experiences with certain designs
or materials.


