18
WARNING!
Make sure oven is cool and power to the
oven has been turned off before removing
the door.
Failure to do so could result in electrical
shock or burns.
The oven door is heavy and fragile. Use
both hands to remove the oven door. The
door front is glass. Handle carefully to
avoid breakage.
Broken glass could cause an injury.
Grasp only the sides of the oven door. Do
not grasp the handle as it may swing in
your hand and cause damage or injury.
Failure to grasp the oven door firmly and
properly could result in personal injury or
product damage.
Oven Door Removal
The oven door can be removed for hand
cleaning if needed.
To remove the door
1. Be sure to read the above WARNING
before attempting to remove oven door.
2. Open the door completely.
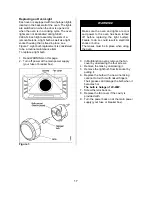
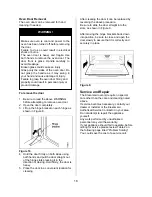
3. Lift up the hinge bracket on each hinge as
shown in Figure 8.
Figure 16
.
4. Hold the door firmly on both sides using
both hands and pull the door straight out
of the hinge slots pressing it in the
direction of closing. Hold firmly; the door is
heavy.
5. Place the door in a convenient location for
cleaning.
After cleaning the door it can be replaced by
reversing the above procedure.
Be sure to slide the door straight into the
slots, as shown in Figure 9.
After moving the hinge brackets back down
into position, be sure to close and open the
door slowly to assure that it is correctly and
securely in place.
Figure 9.
Service and Repair
The Kleenmaid oven(s) require no special
care other than the care and cleaning noted
above.
If service becomes necessary, contact your
dealer or installer or the Kleenmaid
Authorised Service Contractor in your area.
Do not attempt to repair the appliance
yourself.
Any work performed by unauthorised
personnel may void the warranty.
If your appliance should fail to operate, before
calling for service please review Table 2 on
the following page titled “Problem Solving”.
You could save the cost of a service call.


