12
•
Releasing the button starts the run down
of time, time-of-day reappears. The
indicator is illuminated steadily, the
operation starts at once.
•
Once operation end time has been
reached, the alarm will sound (max. 2min).
The indicator and temperature display will
flash alternately. Stop the alarm by
pressing the operation end button once.
Press again to switch the oven into
manual mode. The indicator will
disappear.
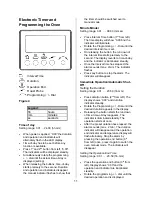
Delayed Start/Automatic Shut-Off
The programmer may also be used to have
your oven start at a later time, cook for a
preset cooking period and shut itself off
automatically. This function is not
recommended for foods that contain baking
powder or yeast, as these foods will not rise
properly if cooked this way. Also, please keep
in mind that the time required for the oven to
come up to temperature must be included in
the cooking time. In most cases this means
that approximately 10 minutes should be
added to the cooking time. A preheat time is
usually not necessary for convection function,
but in all cases follow your recipe.
To use the programmer so that your cooking
will start at some later time and shut-off
automatically:
•
First program
duration
, then
operation end
time
as described above.
•
Releasing the operation end button starts
run down of time. If the programmed
operation end is not the actual time-of-day
plus the programmed duration. Duration
and operation end indicators are
illuminated steadily.
•
When the calculated start time is reached,
the operation end indicator will disappear,
and the duration will run down.
•
At the end of the cooking time the alarm
sounds (max. 2min). The operation end
indicator and the temperature display flash
alternately. Stop the alarm by pressing the
operation end button once, press again to
switch the oven into manual mode. The
indicator will disappear.
Roast Probe
Introduction:
Setting range: 30°C - 99°C
The temperature display is activated on
inserting the roast probe into its socket in the
cavity. If temperatures below or above these
limits are set, this will be indicated by the limit
value being displayed steadily, whereas the
“°C” indication is flashing.
•
Insert the roast probe. Temperature
display shows 60°C, the temperature
indicator flashes.
•
Press roast probe button (4
th
from left). “60
°C” temperature is displayed steadily.
•
Rotate progr / - dial until the
desired food temperature between 30°C
and 99°C is displayed.
•
Releasing the button starts the
temperature program. However, only the
actual temperature at the sensor is being
displayed. The pre-set temperature can be
displayed by pressing the temperature
button.
•
On reaching the pre-set temperature, the
alarm sounds (max. 2min). Once the pre-
set temperature is reached the
temperature display will flash and turn off
until a new higher temperature setting is
entered, if required.
•
Unplug the meat probe. The temperature
display will disappear.
Caution:
The timer will accept only a valid
temperature setting. This means the
desired food temperature has to be higher
than the actual temperature! Invalid
settings are indicated by the flashing of the
temperature display. If this occurs, set the
temperature again to a valid value.


