background image

In the View Mode 

NO SIGNAL

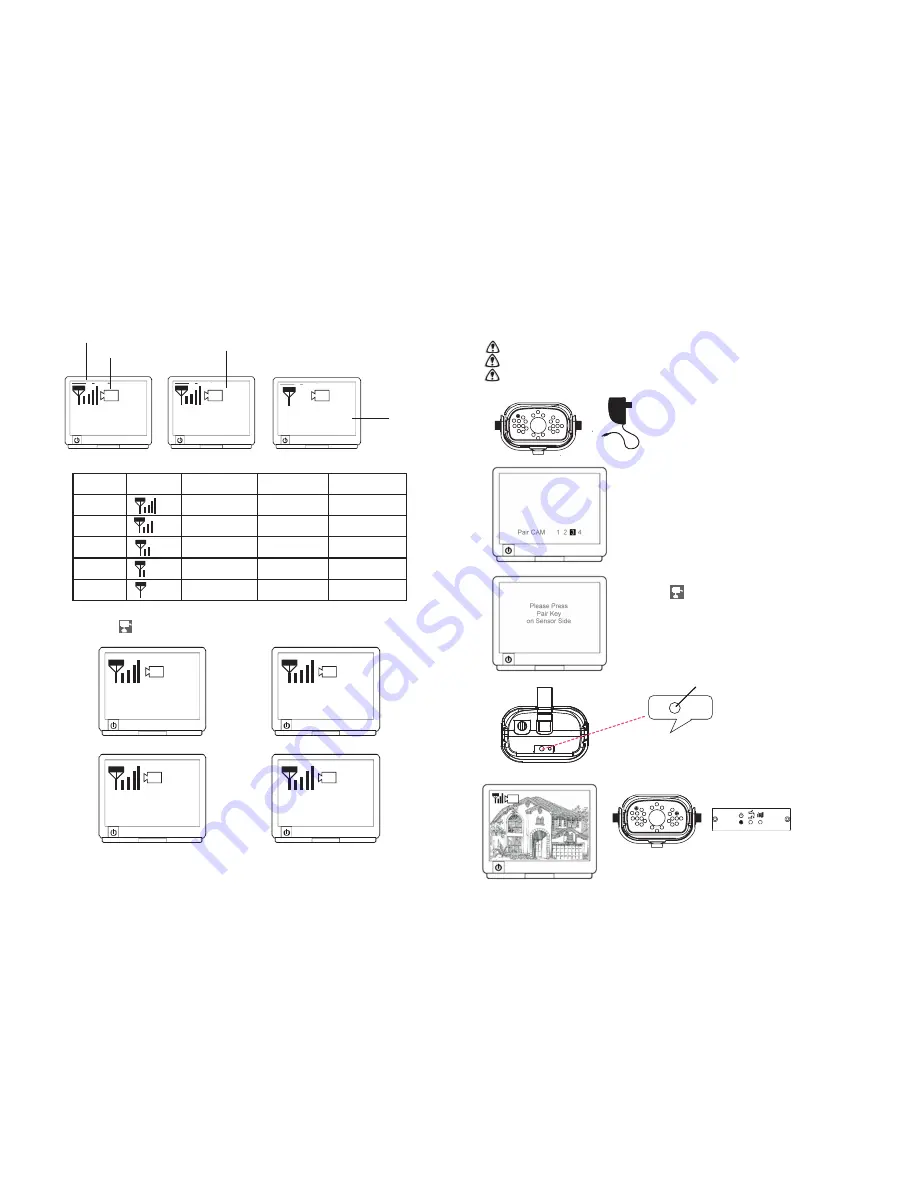
A. Signal Indicator shows signal strength, more dots means stronger signal.

Signal Level 

Indicator            Data Rate        VGA Frame Rate   QVGA Frame Rate

Perfect    

                    1062~1280Kbps 

5~10Fps            15~30Fps

Good    

                    725~1062Kbps 

 3~5Fps            12~20Fps

Fair 


                    543~725Kbps                 2~4Fps             8~15Fps

Low 


                    250~543Kbps                 0~1Fps             0~4Fps

Zero 


                       0~250Kbps                   0Fps               0Fps

B. Channel indicator shows the current camera being picked up by the receiver

     By pressing       (Cam), you can manually switch among multi cameras.

     Or you can set up auto scan in the Menu Mode.

Signal Indicator

Channel Indicator

Zoom Indicator

Status Indicator

ZOOM

Camera 1

Camera 2

Camera 3

Camera 4

C. When System Message shows “NO SIGNAL”, it means Service out of Range. 

     Please refer to Trouble Shooting page.

7

1

1

1

1

2

3

4

12

Pairing key

Pairing Camera(s)

This function is available for multi cameras users. 

        It is highly recommended to pair the camera before hardware installation.
        Before pairing the camera, make sure camera is power ON, camera status indicator
        as shown:

A. Simply pair the camera by selecting the 
     desired channel in Menu Mode. 
B. Only assign one camera to one channel. 
     Channel memory will be overwritten if 
     next camera is assigned to same channel.
C. Pairing new camera to channel 3, settings 
     as shown:

D. Press         (Pair).
E. System will count down within 60
     seconds, system message as shown:

F. W

ithin 60-seconds count

    down, press the Pair Key 
    on the back of camera.

G. Once pairing 
     completed, 
     camera and 
     receiver status 
     indicators as 
     shown.

60

3

Summary of Contents for C1190

Page 1: ...FULLY AND SAVE This manual contains important information about this product s operation If you are installing this product for others you must leave this manual or a copy with the end user Digital Wi...

Page 2: ...on Step3 Advance Operation Connecting to PC About Digital Wireless Technology Trouble Shooting Product Specification What You Get 1 Digital Wireless Color Camera 1 Wireless Receiver 1 Wireless Camera...

Page 3: ...e the equipment away from the receiver Plug the equipment into an outlet on a circuit different from that to which the receiver is connected Consult the dealer or an experienced radio television techn...

Page 4: ...g Auto Manual Scan Sequence or detail Dim over bright image at night time Ideal low light vision distance is from 9 feet 3 metres to 24 feet 8 metres Adjust the camera to have camera view fit in this...

Page 5: ...s not good enough place the receiver at a new angle or readjust its position to make an improvement Or simply relocate the camera closer to the receiver Why Image Compression In order to provide a pri...

Page 6: ...eady to use Wireless Connection LED Indicator When wireless signal is well connected LED indicators as shown Camera Receiver 5 Video Audio AV Out AV Mode Connect receiver to TV leave USB cable UNPLUGG...

Page 7: ...lections B Pressing Menu Mode Enter Exit Menu Mode C Pressing Zoom IN OUT Zoom IN ZOOM QVGA size or Zoom OUT VGA size the camera D Pressing Cam Pair In View mode manually select among available camera...

Page 8: ...em Message shows NO SIGNAL it means Service out of Range Please refer to Trouble Shooting page 7 1 1 1 1 2 3 4 12 Pairing key Pairing Camera s This function is available for multi cameras users It is...

Page 9: ...om Indicator shows Zoom status By pressing Zoom on the receiver you can switch between two resolutions Zoom OUT VGA Zoom IN ZOOM QVGA E Pan Tilt In Zoom IN mode ZOOM press to pan and tilt camera view...

Page 10: ...make sure all cameras are paired to assigned channels See next pages for detail A Simply set the skip camera s OFF by pressing Left Right B Skip Camera 2 and 4 during 5 seconds Scan Time interval sett...

Reviews: