background image

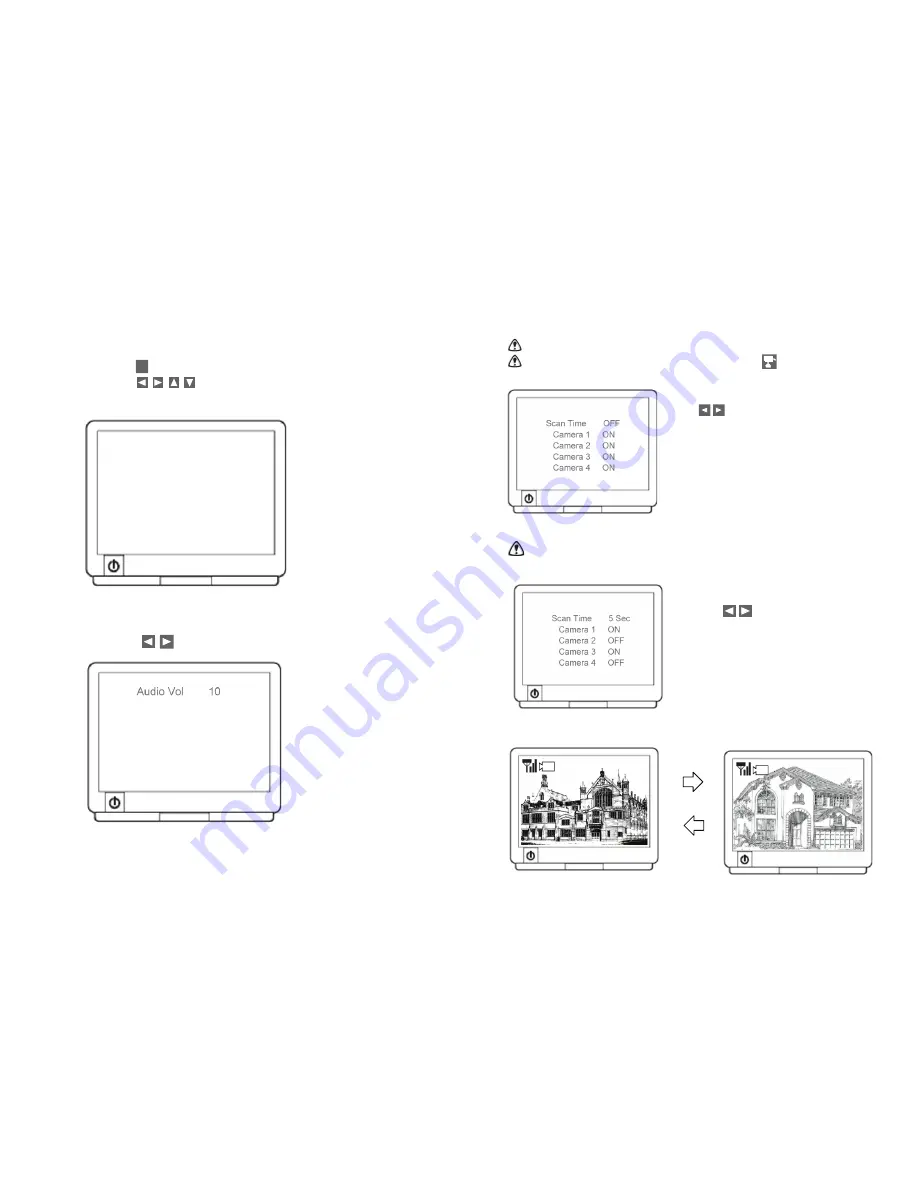
Setting Auto / Manual Scan Sequence

This function is available for multi cameras user.

        Scan Time will be turn off every time after your press       (Cam) for manual scan

A. Use             (Left / Right) to change Scan 

Time interval from OFF / 5 sec / 10 sec / 15sec.

B. Default setting is OFF, system will not scan 

     and camera display has to be manually assigned.

Skip Certain Camera(s) During Scan

       Before setting Scan and Skip, make sure all cameras are paired to assigned 

       channels. See next pages for detail.

A. Simply set the skip camera(s) OFF by 

     pressing             (Left / Right).

B. Skip Camera 2 and 4 during 5 seconds Scan 

Time interval, settings as shown:

TV Display as shown:

5 Seconds

10

1

3

Step3: Advance Operation 

Knowing the Menu

M

9

Audio Vol         10

    Camera 4     ON

    Camera 3     ON

    Camera 2     ON

    Camera 1     ON

Reset

Pair CAM       1 2 3 4

Scan Time       OFF

olume from 0 to 20. 

V

Audio

ou can use              (Left / Right) to change 

Y

olume

V

Audio

Setting

the settings.

ou can Use                       (Left / Right / Up / Down) to select and change 

Y

By Pressing        (Menu), you can enter / exit Menu Mode

Summary of Contents for C1190

Page 1: ...FULLY AND SAVE This manual contains important information about this product s operation If you are installing this product for others you must leave this manual or a copy with the end user Digital Wi...

Page 2: ...on Step3 Advance Operation Connecting to PC About Digital Wireless Technology Trouble Shooting Product Specification What You Get 1 Digital Wireless Color Camera 1 Wireless Receiver 1 Wireless Camera...

Page 3: ...e the equipment away from the receiver Plug the equipment into an outlet on a circuit different from that to which the receiver is connected Consult the dealer or an experienced radio television techn...

Page 4: ...g Auto Manual Scan Sequence or detail Dim over bright image at night time Ideal low light vision distance is from 9 feet 3 metres to 24 feet 8 metres Adjust the camera to have camera view fit in this...

Page 5: ...s not good enough place the receiver at a new angle or readjust its position to make an improvement Or simply relocate the camera closer to the receiver Why Image Compression In order to provide a pri...

Page 6: ...eady to use Wireless Connection LED Indicator When wireless signal is well connected LED indicators as shown Camera Receiver 5 Video Audio AV Out AV Mode Connect receiver to TV leave USB cable UNPLUGG...

Page 7: ...lections B Pressing Menu Mode Enter Exit Menu Mode C Pressing Zoom IN OUT Zoom IN ZOOM QVGA size or Zoom OUT VGA size the camera D Pressing Cam Pair In View mode manually select among available camera...

Page 8: ...em Message shows NO SIGNAL it means Service out of Range Please refer to Trouble Shooting page 7 1 1 1 1 2 3 4 12 Pairing key Pairing Camera s This function is available for multi cameras users It is...

Page 9: ...om Indicator shows Zoom status By pressing Zoom on the receiver you can switch between two resolutions Zoom OUT VGA Zoom IN ZOOM QVGA E Pan Tilt In Zoom IN mode ZOOM press to pan and tilt camera view...

Page 10: ...make sure all cameras are paired to assigned channels See next pages for detail A Simply set the skip camera s OFF by pressing Left Right B Skip Camera 2 and 4 during 5 seconds Scan Time interval sett...

Reviews: