KGuard Security Mars PRO Series User Manual Download Page 27

Mars PRO Series NVR

27

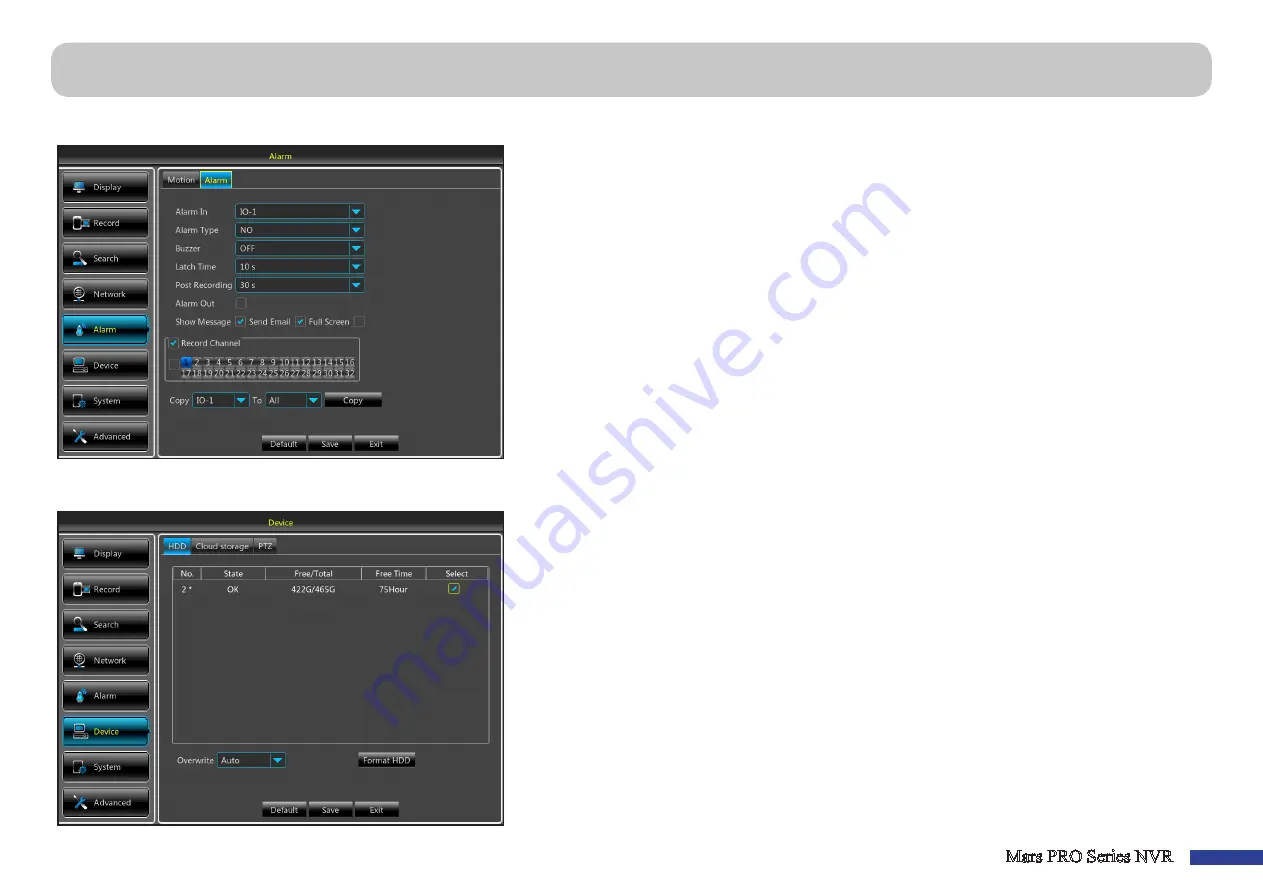
This menu allows you to configure the alarm settings.

•  Alarm In

Select the IO alarm sensor.

•  Alarm Type

Select the alarm sensor type: 

NO

 (Normal-Open), 

NC

 (Normal-Close), or 

OFF

.

•  Buzzer

: Set the buzzer duration when the alarm sensor is triggered. To disable buzzer, select 

OFF

.

•  Latch Time

Select the alarm sound duration of the I/O alarm device.

•  Post Recording

Here you can configure how long the NVR will continue to record after the alarm 

sensor is triggered.

•  Alarm Out

If an alarm device is connected, check the box to make the device sound the alarm 

when the alarm sensor is triggered.

•  Show Message/Sent Email

: Check the box to display a message on screen or let the NVR to send 

you an auto-email when the alarm sensor is triggered.

• 

Full Screen

: If this function is enabled and the alarm sensor is triggered, the corresponding channel 

will be displayed in full screen.

•  Record Channel

Select which channels start to record when the alarm sensor is triggered.

This menu allows you to configure the HDD that the NVR uses for saving the recordings. You need to format the HDD only at the first startup and if you replace the HDD. 

•  Format HDD

Select the HDD you want to format and then click 

Format HDD

. To start formatting, 

you need to enter your user name and password and then click 

OK

 to confirm to continue 

formatting.

•  Overwrite

: Use this option to overwrite the old recordings on the HDD when the HDD is full. For 

example, if you choose the option 7 days then only the last 7 days recordings are kept on the HDD. 
To prevent overwriting any old recordings, select 

Disable

. If you have disabled this function, please 

check the HDD status regularly, to make sure the HDD is not full.

Alarm: Alarm & Device: HDD

Summary of Contents for Mars PRO Series

Page 1: ...USER MANUAL Mars PRO Series Default user name admin Default password 123456 EN...

Page 2: ...se undesired operation Copyright Limitation of Liability This publication is provided AS IS without warranty of any kind either expressed or implied including but not limited to the implied warranties...

Page 3: ...n be avoided Follow the recommended practices listed below Faulty installation improper grounding and incorrect operation and maintenance of electrical equipment are always sources of danger Do not tr...

Page 4: ...the Hard Disk Drive s 5 Making the Connections 6 Common NVR Operations 8 Live Viewing Screen 9 Main Menu 10 Display IP Camera 11 Display IP Camera Camera Setup 12 Display Output Image Control 13 Disp...

Page 5: ...allation procedure of 3 5 and 2 5 are slightly different Please see the installation details as follows a Connect the data and power cables to the two hard disk drives and place the hard disk drives o...

Page 6: ...nnecting speakers I e SATA Connect this to an external hard drive to backup files stored on the NVR J VGA Connect this to your TV or a monitor with VGA input K HDMI Connect this to your digital TV or...

Page 7: ...external hard disk drive to backup files stored on the NVR 5 Connect the included power cable 48V 2A 4 Pin DIN connector 6 Use the USB flash disk for backup camera or system upgrade 7 Connect a RS 485...

Page 8: ...d via the Main Menu Using the Supplied Mouse A B A Left Button B Right Button Click once to choose an item in the menus and confirm your selection Click once to open the pop up menu on the Live Viewin...

Page 9: ...the recording quality G Click this to start viewing channels in a sequence set in Display Output on page 13 H Click this to adjust the volume I Click this to start stop cruise for a PTZ camera J Click...

Page 10: ...ettings and DDNS parameters E Alarm Select this menu option to set the motion area and sensitivity and configure the alarm settings F Device Select this menu option to format the HDD view available sp...

Page 11: ...tion port Manufacturer Display the camera manufacturer s name Device Type Display the device type MAC Address Display the camera s MAC address Firmware Version Display the camera s firmware version Re...

Page 12: ...nnels are displayed on the Live Viewing screen Color setting Click Setup to configure video color settings Channel Select the channel you want to modify Show Name Show Time Uncheck if you do not want...

Page 13: ...me of the camera Channel Select the channel you want to modify IR CUT Mode Select the desired built in filter switch over mode to ensure the camera works properly both in the daylight and night IR CUT...

Page 14: ...n to the Privacy Zone menu Channel Select the channel s where you want to set privacy zone s Privacy Zone You need to enable this function to set privacy areas Area Setup Decide how many privacy areas...

Page 15: ...ing schedule for other channels use Copy To function The image on the left side shows a recording schedule defined for Channel 1 According to this example schedule Channel 1 would On Saturday and Sund...

Page 16: ...corded videos Click Search The result is displayed in the calendar Start Time End Time Click on the date that is marked with a small orange triangle in the calendar and specify the beginning time and...

Page 17: ...ck to zoom in f Time Bar The color indicates the video recording type Normal recording green Motion recording yellow Alarm recording red and IO recording blue g Recording Type Indicator Motion IO Alar...

Page 18: ...up purposes 3 Set the date and time to search for the recordings Click on the specific day and then click The recordings of that day will be displayed as a list 4 Select the recording s and click 5 Ch...

Page 19: ...o mark the beginning of the video footage you wish to backup 4 Click 5 Click on the Time Bar to mark the end of the video footage you wish to backup 6 Click The marked up area is now displayed within...

Page 20: ...e 18 To playback event s double click on the event Please see more details in Playback Recordings on page 17 This menu displays a list of events presented in chronological order the most recent events...

Page 21: ...t the network type you are using NOTE If you are not sure in your network type or settings please contact your ISP Internet Service Provider DHCP This is the network type when a device on your network...

Page 22: ...erver Usually should be enough just to enter the DNS1 server address UPNP If you want to log in remotely to the NVR using Web Client you need to complete the port forwarding Enable this option if your...

Page 23: ...will not affect the recorded video saved into the HDD Channel Select the channel to configure stream related information Enable Enable to allow the remote access function Resolution Set the screen re...

Page 24: ...email Sender Enter your email address Sender Password Enter the password of your email Receiver Enter the email address where you want to receive the event notifications from the NVR Interval Configur...

Page 25: ...s is the Subnet Mask for the internal switch Gateway This is the Gateway for the internal switch Switch Mode Select the switch mode For adding KGUARD ONVIF cameras such as IPB 300 or IPB 400 to PoE po...

Page 26: ...ter an event occurs that the NVR will continue to record The recommended recording length is 30 seconds but it can be set higher up to 5 minutes Channel Select the channel you want to set the motion d...

Page 27: ...reen If this function is enabled and the alarm sensor is triggered the corresponding channel will be displayed in full screen Record Channel Select which channels start to record when the alarm sensor...

Page 28: ...munication protocol between the PTZ capable camera and NVR Baudrate The speed of the information sent from the NVR to the PTZ capable camera Make sure it matches the compatibility level of your PTZ ca...

Page 29: ...Flicker Choose the video format between 50 Hz or 60 Hz depending on your geographical location For example in USA the flicker should be set to 60 Hz if set to 50 Hz then the live video from the camer...

Page 30: ...t the start time and end time for daylight saving NTP stands for Network Time Protocol This feature allows you to synchronize the date and time automatically on the NVR over Internet Therefore the NVR...

Page 31: ...r IDs when multiple NVRs are connected in the same network Device Name Enter the desired name for your NVR The name can include both letters and numbers This menu allows you to view the basic informat...

Page 32: ...ogin Auto Reboot Set enable to reboot the NVR based on a schedule Reboot Choose to reboot the NVR on daily basis on weekly basis or on monthly basis Update Click to start updating the firmware Select...

Page 33: ...the box to display a message on the screen when Disk Full Disk Error or Video Loss event happens Send Email Check the box to let the NVR to send you an auto email when an event occurs To set up the e...

Page 34: ...e NVR and router or the manual port forwarding is completed in the router NOTE For Safari on Mac OS verify the following a Make sure you have installed or updated the Web plug in to the latest version...

Page 35: ...d below Record Path Set the path to save manual recordings on your PC s local drive Download Path Set the path on your PC s local drive where you want to download recordings from the NVR Snapshot Path...

Page 36: ...ports Answer Make sure the camera is ONVIF compliant If the camera does not support PoE check if the camera is using an external power supply Check if the camera is set to the same network segment as...

Page 37: ...LTD Address 4F No 113 Jian 2nd Road Jhonghe District New Taipei City 23585 Taiwan TEL 886 2 8228 6080 FAX 886 2 8221 6857 Email support kguardsecurity com USA Technical Support Contact TEL 1 866 978...

Reviews: