(No.RA020<Rev.002>)1-33
3.2
Precautions for Reassembly
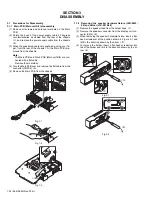
3.2.1 Main PCB (Main unit A/2) reassembly
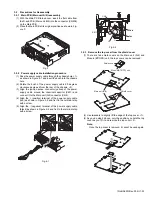
(1) With the Main PCB turned over, insert the flat cable from
the D-sub PCB (Main unit B/2) into the connector (CN906)
on the Main PCB.
(2) Place the Main PCB at its original position as shown in Fig-
ure 3.
Fig.3
3.2.2 Power supply cable installation procedure
(1) Pass the power supply cable through the chassis hole <1>
as shown in Figure 4-1 and insert the bush into the chassis
hole.
(2) Rotate the bush of the power supply cable 90 degrees
clockwise as viewed from the rear of the chassis. <2>
(3) Align the ignition sense connector (yellow) of the power
supply cable around the chemical capacitor (C401) and
connect it to the Main unit (A/2) connector (CN4).
(4) Align the + (positive) terminal of the power supply cable
(red) as shown in Figure 4-2 and fix it to the terminal strip
with a screw.
(5) Align the - (negative) terminal of the power supply cable
(black) as shown in Figure 4-2 and fix it to the terminal strip
with a screw.
Fig.4-1
Fig.4-2
3.2.3 Remove the top cover from the shield cover
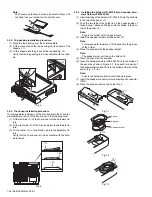
(1) There are five shield covers on the Main unit (A/2) and
Module (BT/GPS) unit, the top covers can be removed.
(2) Use tweezers to slightly lift the edge of the top cover. <1>
(3) As you do step 2 above, vary the position you hold the top
cover as you lift it, and remove the top cover <2>.
Note:
Once the top cover is removed, it cannot be used again.
<1>
<2>
<2>
C2
CN4
Black
Red
IC911
Shield cover
Main unit (A/2)
Shield cover
Module(BT/GPS) unit
<1>
<1>
<2>
Summary of Contents for NX-5700
Page 106: ...MEMO ...
Page 137: ...MEMO ...


