background image

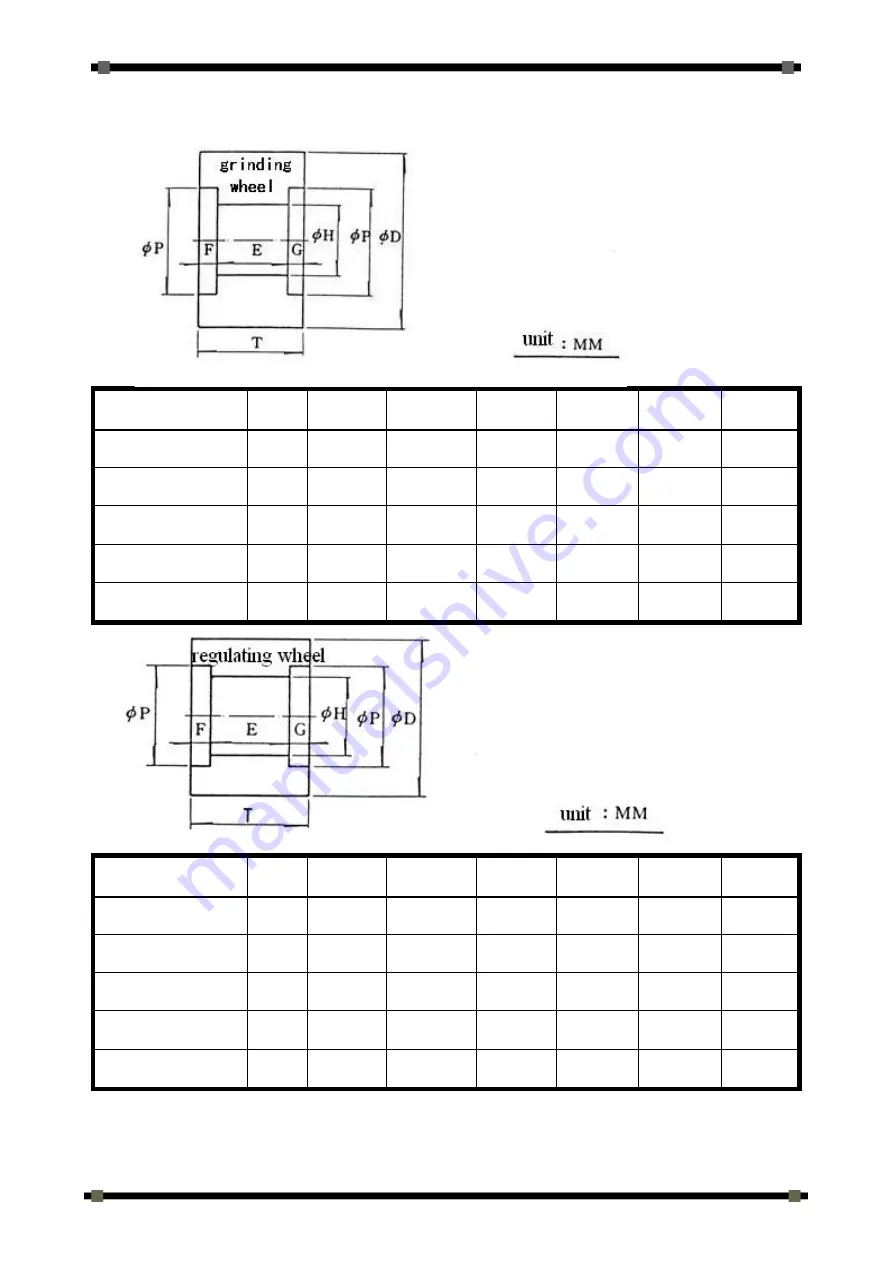
9 GRINDING APPLICATION 

9-23

9.8


Size List of Grinding Wheel and Regulating Wheel


ψ

ψ

JHC-12 series 

305 

150 

120 

25 

25 

175 

100 

JHC-18 series 

455 

205 

228.6 

25 

25 

295 

155 

JHC-18A series  455 

255 

228.6 

50 

50 

295 

155 

JHC-18B series  455 

305 

228.6 

50 

50 

295 

205 

JHC-20 series 

510 

205 

254 

25 

25 

320 

155 

ψ

ψ

JHC-12 series 

205 

150 

90 

25 

25 

130 

100 

JHC-18 series 

255 

205 

111.2 

75 

20 

170 

110 

JHC-18A series  255 

255 

111.2 

100 

45 

170 

110 

JHC-18B series  255 

305 

111.2 

100 

65 

170 

140 

JHC-20 series 

305 

205 

127 

75 

20 

190 

110 

Property 

of 

Kent 

Industrial 

USA 

Do 

Not 

Reproduce

Summary of Contents for JHC-18S

Page 1: ... www kentusa com I 1 800 KENT USA P r o p e r t y o f K e n t I n d u s t r i a l U S A D o N o t R e p r o d u c e ...

Page 2: ...G MACHINE MODEL JHC 12BN JHC 12S JHC 18 JHC 18A JHC 18B JHC 18S JHC 18AS JHC 18BS JHC 20 JHC 20S File NO JHC CLGM E001 Date 2015 12 25 Version R00 Original Instructions P r o p e r t y o f K e n t I n d u s t r i a l U S A D o N o t R e p r o d u c e ...

Page 3: ...specification 2 3 2 3 JHC 20 series specification 2 5 2 4 Machanism and part list 2 7 2 5 Parts function 2 10 2 6 Standard accessories 2 12 2 7 Optional accessories 2 13 3 MACHINE LAYOUT 3 1 3 1 Floor space 3 1 4 TRANSPORTATION INSTALLATION 4 1 4 1 Lifting 4 1 4 2 Transportation 4 2 4 2 1 Center of gravity position of forklift and machine 4 2 4 2 2 Position offorklift transportation 4 3 4 3 Founda...

Page 4: ... Workrestand blade support 5 28 5 7 1 Workrest 5 28 5 7 2 Blade 5 29 5 7 3 Ejection and adjustment workrest andblade 5 30 5 8 Adjustment of thrufeed guide plate 5 31 6 OPERATION 6 1 6 1 Operation key description 6 1 6 2 Machine switch off procedure 6 10 6 2 1 Operaton panel 6 10 6 2 2 Auto griding operation panel 6 11 6 2 3 Switch of proximal regulating wheel motor 6 12 6 3 Machine switch off proc...

Page 5: ...lic system 7 12 7 6 1 Hydraulic circuit 7 12 7 6 2 Hydraulic pressure adjustment 7 13 7 6 3 Flow adjustment 7 14 7 7 Coolant selection 7 15 8 TROUBLE SHOOTING 8 1 8 1 Common cause remedy 8 1 9 GRINDING APPLICATION 9 1 9 1 Centerlessgrinding principle 9 1 9 2 Centerless grinding method 9 3 9 2 1 Thrufeed method 9 3 9 2 2 Infeed method 9 4 9 2 3 Endfeed method 9 4 9 2 4 Tangential feed method 9 4 9 ...

Page 6: ... 6 Multi size workpiece 9 6 9 3 7 Cone workpiece 9 7 9 4 Introduction of grinding wheel 9 8 9 5 Grinding wheel circumferential speed 9 13 9 6 Grinding difficulty and solution 9 16 9 7 Spare parts 9 19 9 8 Size List of Grinding Wheel and Regulating Wheel 9 23 P r o p e r t y o f K e n t I n d u s t r i a l U S A D o N o t R e p r o d u c e ...

Page 7: ...ding trainning to operate and maintain the machine Also please follow below safety rules and local laborer safety laws 1 This machine will be only operated by qualify operator who knows the machine s specification and safety rules very well 2 When machine is running don t get close to any movable parts of machine If need please turn off the machine power 3 Pleare wear protective hair cap or hold h...

Page 8: ...dent and keep the machine working well the safety considerations are very important Pay attenton on the safety rules will much increase the productivity 1 Wear the goggles and mask 2 Wear the safety shoes 3 Wear the safety helmet and overall and tight the cuff 4 Do not wear gloves while operating machine 5 Keep the area where around machine clean dry and bright anytime 6 Make sure machine foundati...

Page 9: ...ing wheel and regulating wheel 2 Do not use hand to clearn the chips which on the wheel and worktable Please clean after machine is stoped 3 Stop teh machine while adjusting the direction of coolant spray 4 Do not try to touch or change the workpiece when worktable moving or workpiece is near ginding wheel 5 Place workpiece between centers and make sure it s tightened 6 Do not use objects to force...

Page 10: ...over load the socket and connector 5 Turn off main power before changing thefuse or any electrial parts 6 Turn off NC controller pressure control board and mainpower and lock at off position while checking electrical equipment to avoid people turn on 7 Do not use any wet tools to touch electrical equipment 8 Please use proper and indicated fuse and never use high volume fuse or cooper 9 Open cabin...

Page 11: ...1 SAFETY TIPS 1 5 1 5The SAMPLE AND POSITION FOR THE WARNING SIGN 1 2 3 4 5 6 P r o p e r t y o f K e n t I n d u s t r i a l U S A D o N o t R e p r o d u c e ...

Page 12: ...1 SAFETY TIPS 1 6 Warning Sign Location P r o p e r t y o f K e n t I n d u s t r i a l U S A D o N o t R e p r o d u c e ...

Page 13: ... size dia width hole ψ205 150 ψ90 Grinding wheel speed 1900 R P M Regulating wheel speed 20 337 R P M 7 step 10 300 R P M Stepless Grinding wheel motor 7 5HP Regulating wheel motor 1HP 6P 1 8KW servo motor Hydraulic pump motor 1HP Coolant pump motor 1 8HP Regulating wheel feed on handwheel 4mm Rev 0 02mm Gra 2 MACHINE SPECIFICATION P r o p e r t y o f K e n t I n d u s t r i a l U S A D o N o t R ...

Page 14: ...001mm Gra Dressing handwheel 1 25mm Rev 0 01mm Gra Regulating wheel tilt angle 5 3 Regulating wheel swivel angle 5 Machine size L W H approx 1800 1400 1400mm Net weight approx 1600kgs Shipping gross weight approx 1750kgs Packing size L W H approx 2300 1100 1800mm P r o p e r t y o f K e n t I n d u s t r i a l U S A D o N o t R e p r o d u c e ...

Page 15: ...ing wheel speed 1500 R P M Regulating wheel speed 13 316 R P M 10 step 10 250 R P M stepless 13 316 R P M 10 step 10 250 R P Mstepless 13 316 R P M 10 step 10 250 R P Mstepless Grinding wheel motor 15HP 20HP Regulating wheel motor 2HP 6P 2 9KW servo motor 2HP 6P 2 9KW servo motor 3HP 6P 4 4KW servo motor Hydraulic pump motor 1HP Coolant pump motor 1 4HP 1 2HP Regulating wheel feed on handwheel 3 5...

Page 16: ... 001mm Gra Dressing handwheel 2mm Rev 0 01mm Gra Regulating wheel tilt angle 5 3 Regulating wheel swivel angle 5 Machine size L W H approx 2300 2000 1530mm Net weight approx 2800kgs 2900kgs 3000kgs Shipping gross weight approx 3100kgs 3200kgs 3300kgs Packing size L W H approx 3200 1400 1900mm P r o p e r t y o f K e n t I n d u s t r i a l U S A D o N o t R e p r o d u c e ...

Page 17: ...ding wheel speed 1350 R P M Regulating wheel speed 13 316 R P M 10 step 10 250 R P M stepless Grinding wheel motor 20HP Regulating wheel motor 3HP 6P 2 9KWservo motor Hydraulic pump motor 1HP Coolant pump motor 1 2HP Regulating wheel feed on handwheel 3 5mm Rev 0 05mm Gra Regulating micro feed on handwheel 0 1mm Rev 0 001mm Gra Table feed on handwheel 9mm Rev 0 05mm Gra P r o p e r t y o f K e n t...

Page 18: ...ndwheel 2mm Rev 0 01mm Gra Regulating wheel tilt angle 5 3 Regulating wheel swivel angle 5 Machine size L W H approx 2300 2000 1530mm Net weight approx 3200kgs Shipping gross weight approx 3500kgs Packingsize L W H approx 3200 1400 1900mm P r o p e r t y o f K e n t I n d u s t r i a l U S A D o N o t R e p r o d u c e ...

Page 19: ...2 MACHINE SPECIFICATION 2 7 2 4 Machanism and part list P r o p e r t y o f K e n t I n d u s t r i a l U S A D o N o t R e p r o d u c e ...

Page 20: ...2 MACHINE SPECIFICATION 2 8 NO NAME NO NAME P r o p e r t y o f K e n t I n d u s t r i a l U S A D o N o t R e p r o d u c e ...

Page 21: ...ng wheel box 09 Feeding handwheel for worktable 28 Micro feeding handwheel for regulating wheel 10 Micro feeding handwheel for worktable 29 Regulating wheel 11 Feeding handwheel for regulating wheel 30 Grinding wheeloil lens 12 Coolant tank 31 Hydraulic pump driving motor 13 Regulating wheel dresser 32 Regulating gear box 14 Regulating wheel dressing emergency return handle 15 Regulating wheel dre...

Page 22: ...y bearing of variousehandwheels and scrws 9 Feeding handwheel for worktable adjust the distance between the blade and grinding wheel 10 Micro feeding handwheel for worktable after positioning worktable the handwheel is functioned 11 Feeding handwheel for regulating wheel adjust the distance between blade and regulating wheel 12 Coolant tank where to store coolant 13 Regulating wheel dresser dress ...

Page 23: ...vel angle of rgulating wheel and upper feed moving surface 26 Micro feeding handwheel for worktable adjustthe distance between workrest and grinding wheel slightly 27 Regulating wheel box fix regulating wheel housing 28 Micro feeding handwheel for regulating wheel ajust the distance between the regulating wheel and blade slightly 29 Regulating wheel control feeding amount and rpm 30 Grinding wheel...

Page 24: ...krest and blade 5 Tool box and tool 6 Working lamp 7 Diamond dresser 2 8 Thrufeed safety device 9 Flange exatractor 10 Leveling screw and plate 11 Thrufeed process gauge 12 Oil tank with pump 13 Water tank with pump If order paper filter or hydrocyclone coolant filtering unit water tank is not attached P r o p e r t y o f K e n t I n d u s t r i a l U S A D o N o t R e p r o d u c e ...

Page 25: ...9 Automatic thrufeed device 10 Vibratory parts feeder 11 Auto thrufeed taper grinding device 12 Auto infeed forming grinding devive 13 Wheel balancing arbor 14 Wheel balancing base 15 Off line gauging non contact O D measuring system 16 Grinding wheel automatic balancing system 17 Oil cooler 18 Rotary type grinding wheel dressing attachment 19 Jib crane and hook for grinding wheel 20 Grinding bala...

Page 26: ...CHINE LAYOUT 3 1 3 1 Floor space Unit mm MODEL SIZE JHC 12 JHC 18 JHC 20 A 1800 2300 2300 B 1400 2000 2000 3 MACHINE LAYOUT P r o p e r t y o f K e n t I n d u s t r i a l U S A D o N o t R e p r o d u c e ...

Page 27: ...4 TRANSPORTATION INSTALLATION 4 1 4 1 Lifting 4 TRANSPORTATION INSTALLATION P r o p e r t y o f K e n t I n d u s t r i a l U S A D o N o t R e p r o d u c e ...

Page 28: ...N INSTALLATION 4 2 4 2 Transportation 4 2 1 Center of gravity position of forklift and machine Models JHC 12 JHC 18 JHC 20 C mm 325 460 P r o p e r t y o f K e n t I n d u s t r i a l U S A D o N o t R e p r o d u c e ...

Page 29: ...4 TRANSPORTATION INSTALLATION 4 3 4 2 2 Position offorklift transportation P r o p e r t y o f K e n t I n d u s t r i a l U S A D o N o t R e p r o d u c e ...

Page 30: ...at least 150mm thickness at the place installing the machine and to keep from source of vibration such as punching or planer It would be better to use vibration isolated equipment at the foundation This is especially important for high precision grinding machine P r o p e r t y o f K e n t I n d u s t r i a l U S A D o N o t R e p r o d u c e ...

Page 31: ... to ensure its precision Each graduation of level should be 0 02mm m Please do not apply wooden level owing to its low precision In regulating spirit level see below should be laid on worktable of lower slide so as to adjust machine s level and the surface of worktable Must make sure worktable surface and the spirit level bottom is clear without dust before adjustment P r o p e r t y o f K e n t I...

Page 32: ...e for protection When take the plastic cover off machine Please use soft cloth with kerosene to clean machine body and then put either oil or grease on parts which need to be lubricated before running the machine Do not clean by gasoline and Vaseline water P r o p e r t y o f K e n t I n d u s t r i a l U S A D o N o t R e p r o d u c e ...

Page 33: ... grinding wheel with flange 2 and lock it tightly with nuts 3 and place it on the balance base 2 Rotate the grinding wheel by hand When it stops the bottom point is where with the most heavy weight And then adjust weight blocks 4 Loosen fixing screw 5 while adjusting move weight blocks 4 and fasten fixing screw 5 3 By serveral times of adjustment make the grinding wheel non stop at the certain poi...

Page 34: ...ANISM AND ADJUSTMENT 5 2 5 2 Assemble and disassemble of grinding wheel 5 2 1 Procedure Show as figures base different models P r o p e r t y o f K e n t I n d u s t r i a l U S A D o N o t R e p r o d u c e ...

Page 35: ...5 MECHANISM AND ADJUSTMENT 5 3 P r o p e r t y o f K e n t I n d u s t r i a l U S A D o N o t R e p r o d u c e ...

Page 36: ...sh 2 Loose grinding wheel locked nut along with clockwise direction for 2 3 cycles by spanner do not draw out completely 3 Take out spanner and mount flange extractor then keep rinding wheel away from main shft 4 Take out flange extractor and draw out grinding wheel locked nut 5 Dismantle grinding wheel slightly P r o p e r t y o f K e n t I n d u s t r i a l U S A D o N o t R e p r o d u c e ...

Page 37: ...tep 3 Fig 3 1 Draw out screw on flange cover and seperate grinding wheel and flange 2 Follow the above actions in reverse sequence to install back Fig 3 P r o p e r t y o f K e n t I n d u s t r i a l U S A D o N o t R e p r o d u c e ...

Page 38: ...ake out oilseal bush 2 Loose grinding wheel locked nut along with clockwise direction for 2 3 cycles by spanner do not draw out completely 3 Take out spanner and mount flange extractor then keep rinding wheel away from main shft 4 Take out flange extractor and draw out grinding wheel locked nut P r o p e r t y o f K e n t I n d u s t r i a l U S A D o N o t R e p r o d u c e ...

Page 39: ...loading tube 2 Dismentle the grinding wheel slightly Step 4 Fig 4 1 Draw out screw on flange cover and seperate grinding wheel and flange 2 Follow the above actions in reverse sequence to install back P r o p e r t y o f K e n t I n d u s t r i a l U S A D o N o t R e p r o d u c e ...

Page 40: ... 3 Parts between grinding wheel and flange should be coated with anti rust grease or paved with a coat of tinfoil for the conveninece of disassembling next time 4 When install back alloy bearing housing all bolts should be fixed by diagonal way 5 Do not release bearing fixing nut P r o p e r t y o f K e n t I n d u s t r i a l U S A D o N o t R e p r o d u c e ...

Page 41: ...rcumference of spindle with proper pressure where all contact surface msut be cleaned Then start grinding wheel or regulating wheel and read out variation from gauge The maximum variation should not over 0 002mm If it s over this value slightly knock flange locked nut along with the variation by reverse direction The action must be repeated for several times until varation is eliminated 1 P r o p ...

Page 42: ...d in dresing feed with 0 to 300mm min of range of continuing regulating structure Rough grinding is in 200 250mm min and finishing in 30 50mm min feed speed where dressing is made If there is large amount of heart generated owing to diamond tool when dresing coolant must be added which will not only control temperature rising but also washes out impurities in sands To dress feed amount rought grin...

Page 43: ...rent models JHC 12 series dresser combination 1 Feeder 2 Feed spindle 3 Hexgon socket fixed screw 4 Diamond tool 5 Hexgon socket fixed screw 6 Feed spindle housing 7 Hexagon socket bolt 8 Locked bolt 9 Locked sleeve 10 Locked nut P r o p e r t y o f K e n t I n d u s t r i a l U S A D o N o t R e p r o d u c e ...

Page 44: ...bolt 7 3 Release Hexgon socket fixed screw 5 and draw out feed spindle 2 through feeder 1 4 Draw out Hexgon socket fixed screw and dismantle worn diamond tool 4 and replace a new one Then lock hexgon socket fixed screw tightly 5 Assemble back base on above mentioned action in reverse sequence replacement is finished P r o p e r t y o f K e n t I n d u s t r i a l U S A D o N o t R e p r o d u c e ...

Page 45: ...t 10 andknockserval times inward to make locked bolt 8 to loose feed spindle 3 2 Draw out hexagon socket bolt 7 3 Loose3 piece hexgon socket fixed bolt 1 and draw out feed spindle thourgh feeder 4 Rease hexagon socket fixed screw 4 and dismental worn diamond tool 5 and replace new one Then lock hexgon socket fixed screw 4 tightly 5 Assemble back base on above mentioned action in reverse sequence r...

Page 46: ...rts should be cleaned and lubricated 2 Diamond dresser protruding length is about 15 20 mm 3 When install back hexgon socket fixed bolt 1 need to align the keyway of feeding axis P r o p e r t y o f K e n t I n d u s t r i a l U S A D o N o t R e p r o d u c e ...

Page 47: ...ng wheel slide are respecively equipped with rough feed handwheel and micro feed handwheel no micro feed device for regulating wheel slide of JHC 12S Micro feed is to lock worm shaft inside feed handwhee by outside nut Generally moving regulating wheel slide is to compensate worn size of regulating wheel Regulating wheel spindle make 5 level swivel to grinding wheel spindle The advantage is that c...

Page 48: ...hem up as below figure First loose end cover A Then revolve locked screw B forward by clockwise direction and backward by conterclockwise direction from standing at positiong screw It might be jammed if not turning by hand You may start regulate wheel driving motor to rotate regulating spindle Then press downpositiong screw to make spindle axial movement Please do not rotate positioning screw by h...

Page 49: ... Assemble and disassemble of regulating wheel 1 Procedure as below fig shown JHC 12 series regulating combination JHC 18 series regulating wheel combination P r o p e r t y o f K e n t I n d u s t r i a l U S A D o N o t R e p r o d u c e ...

Page 50: ...ts between regulating wheel and flange should be coated with anti rusting grease or paved with a coat of tinfoil for the convenience of disassembling next time 4 Do not loose alloy bearing fixing nut 5 To install back alloy beawring house all bolts should be screwed by diagonal way P r o p e r t y o f K e n t I n d u s t r i a l U S A D o N o t R e p r o d u c e ...

Page 51: ...ake out oil seal bush 2 Loose 2 3 cycles of regulating wheel locked nut with clockwise direction by spanner Do not draw out completely 3 Take out spanner and mount flange extractor Then keep regulating wheel away from spindle 4 Take out flange extractor and draw out regulating wheel locked nut 5 Dismantle regulating wheel slightly Fig 2 P r o p e r t y o f K e n t I n d u s t r i a l U S A D o N o...

Page 52: ... Fig 3 1 Draw out screw on flange cover from and seperate flange and regulating wheel 2 To install back base on above mentioned action in reverse order Fig 3 P r o p e r t y o f K e n t I n d u s t r i a l U S A D o N o t R e p r o d u c e ...

Page 53: ... Fig 2 1 Take out oil seal bush 2 Loose 2 3 cycles of regulaing wheel locked nut with clockwise direction by spanner Do not draw out completely 3 Take out spanner and mout flange extractor Then keep grinding wheel away from spindle 4 Take out flange extractor and draw out regulating wheel locked nut 5 Dismantle regulating wheel slightly P r o p e r t y o f K e n t I n d u s t r i a l U S A D o N o...

Page 54: ...w out screw on flange cover and separate flange and regulating wheel 2 To install back base on to above mentioned action in reverse order 5 6 4 Speed of regulating wheel P r o p e r t y o f K e n t I n d u s t r i a l U S A D o N o t R e p r o d u c e ...

Page 55: ... V of workpiece and the rotating speed of regulating wheel Usually the slant angle for grinding is 2 3 and the circuferential speed range of workpiece is from 25 35m min Before machining slant angle of workpiece is in a slight bending state should be expanded and feed speed must be accelerated When turns out with good real circle increasing rotating speed to obtain high precision The axial feed sp...

Page 56: ...y adjust workpiece axial feed speed It s no recommended because correcton must be made up changing slant angle Besides be noticed that correction both on workpiece s circumferential aspeed and correcting grinding conditon P r o p e r t y o f K e n t I n d u s t r i a l U S A D o N o t R e p r o d u c e ...

Page 57: ...the surface on regulating wheel after dressing will affect grinding surface of workpiece The difference between regulating wheel and grinding wheel after dressing is that the later s shape is cylindrical and the former shape is like single piece and double curvature planes which is formed by slant angle of regulating wheeland swivel angleof dressing device Generally speaking in rough grinding slan...

Page 58: ...el 1 Loose lock nuts 2 3 2 Rotate regulating bolt 1 to make regulating wheel slant transversely where slant scale can be shon from angle indicator 4 3 Upon regulating to required angle lock 2 and 3 P r o p e r t y o f K e n t I n d u s t r i a l U S A D o N o t R e p r o d u c e ...

Page 59: ...tally Note JHC 12 series have handscres each one for both sides When adjusting rotater right on one side and left turn is made on the other sidel Upon positioning you must rotate right for draw tight the left rotate 3 Horizontal swivel angle can be shown by indcator 3 4 After positioning lock 2 P r o p e r t y o f K e n t I n d u s t r i a l U S A D o N o t R e p r o d u c e ...

Page 60: ...M AND ADJUSTMENT 5 28 5 7 Workrestand blade support 5 7 1 Workrest Infeed grinding workrest blade Thrufeed grinding workrest blade P r o p e r t y o f K e n t I n d u s t r i a l U S A D o N o t R e p r o d u c e ...

Page 61: ...ameter of workpiece 1 2 to 1 6 of diameter of workpiece plus center height of grinding wheel or regulating wheel is the cener height of grinding piece If the height of support blade is insufficient packing plate should be used to achieve the required height The thickness of support blade is shown on chart below Thickness of support blade mm Diameter of workpiece mm 0 8 1 2 1 1 5 3 2 3 5 3 4 6 4 5 ...

Page 62: ...workrest on worktable 5 measure the required positon and turn feed handwheel in worktable 5 to move balde near grinding wheel 6 Adjust workrest 2 to makethe cutting edge 1 of blad being in parallel with the surface of grinding wheel 6 lockworkrest lock bolts 4 to fix workretst on worktable 5 6 1 2 5 P r o p e r t y o f K e n t I n d u s t r i a l U S A D o N o t R e p r o d u c e ...

Page 63: ...ntry of regulating wheel s edge is 1 2 tolerance of workpiece Theexit edge has the gap of 0 01 to 0 03mm and both entry and exit of grinding wheel s edge takes gap of 0 2 to 0 4mm fig 2 The test method is to put afinish grindedworkpieceto move from entry to exit back and forth to ensure that it is passed smoothly and moves in on direction If guide plate and regulating wheel are not on the same lin...

Page 64: ...on A Panel description 6 OPERATION POWER 0 START OFF OFF OFF ON ON ON RPM 0000 E M ER G N E C Y S T O P 20 40 60 80 100 220 A OFF ON 1 2 7 9 11 12 13 10 8 6 3 4 5 P r o p e r t y o f K e n t I n d u s t r i a l U S A D o N o t R e p r o d u c e ...

Page 65: ...ber control knob Turn the knob to choose required rotation number ofregulating wheel spindle 6 Emergency stop button Press the button to stop all machine operation whileabnormal situationshappen Turn the key clockwisely to recover operation 7 Turn on switch of grinding wheel motor 8 Turn off switch of grinding wheel motor 9 Turn on switch of regulating wheel motor OFF ON POWER 0 20 40 60 80 100 22...

Page 66: ...SCRIPTION 10 Turn off switch of regulating wheel motor 11 Hydraulic start switch 12 Coolant start switch 13 Coolant stop switch OFF START ON OFF P r o p e r t y o f K e n t I n d u s t r i a l U S A D o N o t R e p r o d u c e ...

Page 67: ...C 12BN regulating wheel tachometer regulating wheel tachometer Handle R P M Handle R P M N N 0 B 1 65 A 1 20 B 2 96 A 2 32 B 3 146 A 3 47 S N 337 P r o p e r t y o f K e n t I n d u s t r i a l U S A D o N o t R e p r o d u c e ...

Page 68: ...HC 20 regulating wheel tachometer regulating wheel tachometer Handle R P M Handle R P M 1 A 13 2 B 73 2 A 21 2 C 97 3 A 36 3 B 125 1 B 45 3 C 168 1 C 60 0 S 316 P r o p e r t y o f K e n t I n d u s t r i a l U S A D o N o t R e p r o d u c e ...

Page 69: ...ample tachometer A 1 1 Pull up handle 1 and move to A then insert and fix 2 Pull up handle 2 and move to 1 then insert and fix 3 Other revolutions base on tachometer to coordinate rpm P r o p e r t y o f K e n t I n d u s t r i a l U S A D o N o t R e p r o d u c e ...

Page 70: ...POWER 電源 MAUNAL UP 寸動上 STOP 非常停止 AUTO START 自動啟動 MANUAL FEED FORWARD 寸動進 O F F 切 M A N U A L 手 動 A U T O 自 動 CONTINUAL 連續 MAUNAL DOWN 寸動下 MANUAL FEED BACKWARD 寸動退 14 15 16 17 18 19 20 21 P r o p e r t y o f K e n t I n d u s t r i a l U S A D o N o t R e p r o d u c e ...

Page 71: ...L control robot arm to drop manually 18 Emergency stop button Press the button to stop all machine operation while abnormal situationshappen Turn the key clockwisely to recover operation 19 Auto start to do once or continual auto grinding cycle 20 MODE MANUAL move lower slide forward manually 21 MODE MANUAL move lower slide backward manually MANUAL FEED BACKWARD 寸動退 MANUAL FEED FORWARD 寸動進 AUTO ST...

Page 72: ...onal Please press ENABLE to do the security scanning process under the safe mode after confirming the correct then control loop will start accordingly P r o p e r t y o f K e n t I n d u s t r i a l U S A D o N o t R e p r o d u c e ...

Page 73: ...curreent indicator 3 displays loaidng current A 7 Push grinding wheel spindle stop switch to stop running 8 Push regulating wheel spindle motor start switch ON 9 and regulating wheel spindle begins 9 Turn regulating wheel rotation number control knob 5 to choose required rotating speed of regulating spindle Regulating wheel spindle rotation number indicator displays the rotation number 10 Press tu...

Page 74: ...Turn model choice knob 15 to choose AUTO and press AUTO START switch 19 to precede once auto grinidngcyle Choose CONTINUAL to procede continual auto grinding cycle 3 Turn model chose knob 15 to choose MANUAL and press MANUAL UP botton 16 to raise robot arm Press MANUAL DOWNbutton 17 to drop robot arm Press MANUAL FEED FORWARDbutton 20 to move lower slide forward Press MANUAL FEED BACKWARDbutton 21...

Page 75: ...n is to stop regulating wheel 6 3 Machine switch off procedure 1 Turn mode selection knob to be OFF and use operation key to stop coolant and regulating wheel 2 Dry run the grinding wheel about 5 minutes to dry water fuly 3 Switch off griding wheel 4 Press EMERGENCY STOP button 5 Turn off power switch in the electric box and finish shutdown procedure P r o p e r t y o f K e n t I n d u s t r i a l...

Page 76: ...e as 6 of hydrulic circuit after turning on auto lubrication motor need to turn onstop valve 5 in advance If grinding wheel rotates CCW need to change any 2 power lines of auto lubrication motor Do not change grinding wheel motor wiring because grinding wheel regulating wheel and motor have been connected to the same rotating direction during assemblely After taht test diretion of coolant pump The...

Page 77: ...placement Unscrew the cover in advance and take out then release screw of reflector and take out to replace lamp The workping lamp specification is 12V 55W P r o p e r t y o f K e n t I n d u s t r i a l U S A D o N o t R e p r o d u c e ...

Page 78: ...001 2 AC DC power input selection 0 Pn001 3 Warning code output selection 0 Pn201 PG dividing ratio Plus rev 5000 Pn300 Speed commend input gain 0 01V Rated speed 787 JHC 12serires 950 JHC 18 20 24series Pn305 Soft start acceleration time Ms 3000 Pn306 Soft start deceleration time ms 3000 Pn50A 0 Input signal selection1 Input signal configuration mode 0 SI0 Pn50A 1 S ON signal formed 7 Effective s...

Page 79: ...n50B 3 N CL signal formed 6 SI6 Pn600 The power of the external regenerative resistor 10W 30 JHC 12 series Pn600 The power of the external regenerative resistor 10W 30 JHC 18 20 series Pn600 The power of the external regenerative resistor 10W 40 JHC 18BS 24series P r o p e r t y o f K e n t I n d u s t r i a l U S A D o N o t R e p r o d u c e ...

Page 80: ...rce oil 2 Clean and mainten machine and turn off machine power power switch on electric box door after duty off 3 Maintein machine after machine stops completely or pwer is shutdown to prevent danger happens 7 MAINTENANCE REPAIR P r o p e r t y o f K e n t I n d u s t r i a l U S A D o N o t R e p r o d u c e ...

Page 81: ...ulating wheel spindlebelt tension Each week Check if within the tension Formed diamond dresserbelt tension Each week Check if within the tension Water tank Each week Renew base on coolant quality and accuracy requirement Filter cleanness Each week Include oil cooler and air conditioning filters of electric box Wheel head filter can Each season Check and clean External hydraulic box and filter Each...

Page 82: ...h connect point 4 The fuses are regular 5 Ground wire has connected 6 Isolation or not on the wires 7 Wire connected loosen or not 8 Damage on wire protector fuse or not 9 Switch function work well or not 10 Each indication light work well or not 11 The galvanometer work well or not 12 The dynamo work well or not 13 The magnetic contactor work well or not 14 The lamp work well or not Lubrication h...

Page 83: ...on abnormal heat on the magnetic contactor Cooler device 1 Pump work well or not 2 Separator plate filter work well or not 3 Leaking from connector or switch pipe or not Grinding wheel spindle 1 Vibration abnormal noise or not 2 Abnormal heat from spindle bearing 3 Properly on belt suspending or not Regulating wheel spindle 1 Vibration abnormal noise or not 2 Properly on belt suspending or not P r...

Page 84: ...ely 2 All filter of pump suction side must keep clean and smooth and maintain periodically 3 Main reason for leaking is poor gasket please replace new one at any time 4 Open cavities of hydraulic circuit to exclude air to prevent noise and vibration P r o p e r t y o f K e n t I n d u s t r i a l U S A D o N o t R e p r o d u c e ...

Page 85: ...oth grinding wheel spindle and regulating wheel spindle before shipping In this way oil tank must be filled with oil before working otherwise both bearing and spindle will be damaged The other sliding aprts must be lubricated as indicated But oil in transmission box hasn t been revmoved Please do not add oil ever H line Otherwise there will be too much oil as show below Oil of the same grade form ...

Page 86: ...l meter Gulf brandHD 220 Esso EP 220 Lower than oil level meter need to refill 1st 100H afterwards every 500H Regulating wheel gear box 12BN 18 18A 18B 20 Increace to center line of oil level meter C P CAdvance d gear oil 90 140 Gear oil ST Esso Lower than oil level meter need to refill Each month Dressing device feed screw fig 2 Appropriate amount Gulf brand special cycle engine oil R 68 Each day...

Page 87: ...AIR 7 8 1 Oil of the same grade from other brand is available also 2 Increase change oil cycle is based on the period of 8 hours per day P r o p e r t y o f K e n t I n d u s t r i a l U S A D o N o t R e p r o d u c e ...

Page 88: ...ro feed bearing 2 Worktable micro feed bearing 3 Regulating wheel feed bearing and screw 4 Worktable feed bearing and screw 5 Rail of slide 6 Plane of revolution on lower slide 7 Rail of lower slide 8 Inlet of oiler P r o p e r t y o f K e n t I n d u s t r i a l U S A D o N o t R e p r o d u c e ...

Page 89: ...screw 2 Worktable micro feed bearing 3 Worktable feed bearing and screw 4 Rail of slide 5 Plane of revolution on lower slide 6 Rail of lower slide 7 Inlet of oiler 8 Oil port of regulating wheel gear box 9 Drain port of regulating wheel gear box P r o p e r t y o f K e n t I n d u s t r i a l U S A D o N o t R e p r o d u c e ...

Page 90: ...7 MAINTENANCE REPAIR 7 11 Fig 3 P r o p e r t y o f K e n t I n d u s t r i a l U S A D o N o t R e p r o d u c e ...

Page 91: ...3 Motor 11 Grinding wheel 19 Dressing oil cylinder 4 Hydraulic pump 12 Regulating wheel oil lens 20 Flow control valve 5 Stop valve 13 Regulating wheel 21 Pressure switch 6 Pressure gage 14 Flow control valve 22 Pressure gage 7 Filter 1 2 15 Direction change lever 8 Flow control valve JHC 18 series has no the device 16 Dressing oil cylinder P r o p e r t y o f K e n t I n d u s t r i a l U S A D o...

Page 92: ...low oil cylinder shaft of dresser will vibrate while moving When filter is clogged by impurities oil pressure will decrease In this condition take out filter and clean it If oil pressure is still low open cap of oil pressure regulator and adjust screws The pressure increase by clockwise direction and decrease by counterclockwise directin NO ITME NO ITEM NO ITEM C Oii port 2 Pressure gauge 4 Filter...

Page 93: ...re switch is to cut off power connection automatically and stop the grinding wheel to protect the alloy beawring among gridning wheel in case of the pressure lower than indication set on the gauge Setting 1 Start the machine and turn on the grindng wheel spindle 2 Rotate adjusting screws above pressure switch to make the pressure over 1kg cm2 3 Clockwise direction adjusting the flow valve when the...

Page 94: ...device can get rid of great amount of grinding chips that extends coolant change period There are varioud types of coolant please choose the proper type 1 Water solubility coolant 1 Emulsifying series coolant With mineral oil as the element liquid fatty acid soap petroleum resin soap tea acid soap petroleum sulfur soap 5 20 of negative iron active agent as teh emulsifier mix further with alcohol f...

Page 95: ...me pressure additives it can effectively reduce grits worn and torn and prevent grinding wheel s holes from being clogged which may reduce heating Hence this is suitable for precisin grinding and better for aluminum workpiece Be ware of its inflammability and hygiene 3 Water Water is good for cooling but lessgood for lubrication It may cause rest formetalworkpieces Underspecial conditions it s use...

Page 96: ...nding wheel can t be started Hydraulic pressure is too low Adjust hydraulic pressure to required range Grinding wheel spindle motor isn t moving 1 Overload relay and cut off Press RESET button 2 The pressure is to low to work Filter is stuck and micro moton switch is invalid Adjust pressure clean filter and renew 3 Hydraulic pump lose function Repair or renew 4 Oil pump rotates but lubricator isn ...

Page 97: ... Oil pump noise 1 Inlet pipe is air in Sink inlet pipe into oil tank indeed 2 Too much air inside system Exclude air out of the system indeed 3 Too much impurities stuck filter Maintain base on period 4 Oil pipe is stuck Remove impurities inside oil pipe 5 Oil pump unit is broken Replace by engineer base on regulaton 6 Oil viscosity is too high Follow oil usage regulation 7 Pump shaft and the moto...

Page 98: ...workrest and regulating whel are to support center and rotate workpiece The turning direction of grinding wheel is reverse to the regulating wheel The workpiece is pressed against workrest and regulating whel in the grinding wheel process The turning speed of workpiece is made to be the same as that of regulating wheel The drive is carried out by friction between regulating wheel and wrokpiece Rea...

Page 99: ...ed assumptive state only skew point is ground and coming out a nearly real circle through grinding In fact real circle is enhanced by supoort blade which is formed an angle on top of workrest as point and line in fig shown when lower part on surface of workpiece contacts regulating wheel or blade cetner of circle on workpiece will descend Its ground diameter is shortere when center of circle ascen...

Page 100: ...to inclinaton of regulating wheel Only incline regulatig wheel workpiece touches regulating wheel on one point Hence regulating must be corrected to dram line and its corrected device is placed according to the inclinaton This method is only suitable for cylindrical workpiece and few different diameters of workpiece such as rod bar piston pin needle bearing retainer and pipe etc To go on rough gri...

Page 101: ... such as insert take out metering grinding wheel and correction of regulating wheel compensation to worn grinding wheel the auto machines and tools are employed including conical roller roller enginevevalve spinder crank shaft and rear accelerating box etc 9 2 3Endfeed method Make 2 grinding to be cone shap Ensure grinding wheels and workrest are fixed and insert workpiecefron grinding wheel side ...

Page 102: ... larger than its length Workpiece must be kept in a fixed pose Some workpieces must be for fixed grinding by using special fitting Movement occurs in grinding just place upper disc between two wheels 9 3 3Long bar workpiece In long bar grinding V shaped way for feeding can be equipped in fronotthemachien and V shaped way for discharge mounted at the reatr of the machine In this method it s very di...

Page 103: ...d be mounted on the top of grinding aprt from where to regulate its balance for grinding Please refer to below figure 9 3 5Cross shape workpiece For cross shape workpieces such as cross connection grinding two sides of twogriding wheels are ground in the same time but in pre machining notice its concentricity and right angle on griding part 9 3 6Multi size workpiece There are more than two differe...

Page 104: ...centricity grinding is made in accordance with the folloing ways 1 When conical angle is small regulate level scale of regulating wheel as below left figure 2 When cnical angle is large dress grinding wheel and regulating wheel Then send workpiece to the fix position for grinding as below right figure 3 Another type is tapering bar such as antennas fishing rod which is to be ground by automatic ta...

Page 105: ...re explained as fllowing A grit WA grit Single crystallized grit C grit GC grit As far as steel is concerned the most tough A grit is better for soft steel Aluminum oxide series a High tensile strength tough and higher viscosity workpiece B Large feed depth a Extreme high tensile strength tough and fragile workpiece b Smaller feed depth Alloy stell which is hard and difficult to be grinded Silicon...

Page 106: ...t generating fucntion may prevent lip of grit from being buried GC grit which is harder than C grit is applied in high compresion state of special cast iron and super hard alloy with heating treatment As for stainles steel it is poor of grinding The hardest single crystallized grit in aluminum series and it toughness lying between A grit and WA grit is used to attain good rok efficiency P r o p e ...

Page 107: ...y fine Dia mm 1 3 0 4 1 0 1 0 4 0 024 0 08 The roughness degrees which are by centerless grinding process can be summarized as Process Rough Rougha polishing Polishing Lap grinding Roughness no 46 60 80 120 180 Gernally speaking for better efficiency high ductility workpiece is applied by tough grinding wheel to improve its grinding surface Fine grinding wheel is usually adopted for hard machining...

Page 108: ...quried shellae or rubber binding grinding wheel are applied Regulating wheels almost are ubbersbinding grinding D Binding degree Binding degree represents strength of binding agent The following is its classification Binding degree E F G H I J K L M N O P Q R S T U V W X Y Z Strength Very soft Soft Medium Hard Very hard Grinding wheel has the degrees of K L M while regulating wheel has degreesof Q...

Page 109: ...h texture applies to soft workpiece and dense texture applies to hard and brittle workpiece 2 Finishing degree and grinding volume Large grinding volume with rough grinding degree is applied by rough texture Precision grinding is employed by dense texture The above mentioned items are the general rules for selecting grinding wheel Before griding the codition of workpiece and the status of girnding...

Page 110: ...the speed of vitrified binding grinding wheel is 1800m min 16kg cm2 of centrifugal tension is then generated Gridnign wheel of roughnessdegree of no 46 and binding degree of K whose circumferential speed would decelerate becuase diameter reduced due to abrasion Once and new grinding wheel circumferential speed is determined it s not necessary to make any correction until its speed declined by abra...

Page 111: ...eel SACM HRC55 WA 60L High carbon chromium bearing steel SUT Structure alloy steel cast work SCA Carbon tool steel SK HRC55 WA 60K L Tool steel High speed tool steel SKH HRC60 WA 60K L GC60L 32A 60L Alloy tool steel SKS SKD SKT HRC60 WA 60K GC60L 32A 60L Stainless steel Stainless steel 1 4 SUS1 4 Heat resisting steel 1 3 SEH1 3 WA 60K L GC60L 32A 60L Stainless steeel5 16 SUS5 16 Heat resisting ste...

Page 112: ...9 GRINDING APPLICATION 9 15 Non iron Bronze BC A 60M Material for permanent magnet cast magnet WA 60K C 60L CGC 60L P r o p e r t y o f K e n t I n d u s t r i a l U S A D o N o t R e p r o d u c e ...

Page 113: ...ing coolant incooling water Come with equal space of screwlike trace 1 hit the edge of grinding wheel 2 undesireable regulation of guide plate 3 high dressing speed 4 diamond tool worn torn 5 diamond tool holder loose 1 form the edge as cone shape of grinding wheel 2 make guide plate pareallel 3 reduce dressing speed and feeding volume 4 change contact surface of diamond tool Equal or unequal spac...

Page 114: ...older and change diamond tool 12 Isolate external vibration Fail to get real circle 1 Center is too low 2 Blade angle is too small 3 Excessive hardness of grinding wheel 4 Large pressure of grinding 5 Large volume of rough grinding 6 Regulating wheel is loose 7 Coolant is not enough in grinding hollow piece 8 Undesirable dressing 1 Increase center height 2 Increast angle 3 Increase thrust speed 4 ...

Page 115: ...ease tilt angle of grindingwheel 3 Reduce swivel angle of regulaitng wheel on dressing device Fail to get real straightness 1 More deformation before grinding 2 Excessive griding volume in the first grinding 3 Insufficient grinding volume P r o p e r t y o f K e n t I n d u s t r i a l U S A D o N o t R e p r o d u c e ...

Page 116: ...9 1 O ring G50 2 Center rest Thrust bearing 51111 2 Oil lens O ring G45 1 Regulating wheel End cover alloy bearing seat Oil seal TC45 62 9 1 O ring G35 2 O ring G55 1 Front bearing external nut Oil seal TC70 88 1 O ring G60 2 O ring G95 1 Rear bearing external nut O ring G85 1 O ring G95 1 Thrust bearing seat Thrust bearing 51107 2 Rear cover Oil seal TC40 50 8 1 O ring G85 1 Oil lens O ring G45 1...

Page 117: ...earing seat Ball screw bearing 6006Z 1 Automatic alignment bearings 1206 1 Dressing cylinder Cylinder cover O ring P45 2 O ring P14 2 Piston O ring P32 2 Oil supply system Filter O ring 4033 1 O ring P105 1 Filter net 1 2 1 Oil tank Filter net 3 4 1 Hydraulic pressureswitch valve O ring P21 1 O ring P10A 1 P r o p e r t y o f K e n t I n d u s t r i a l U S A D o N o t R e p r o d u c e ...

Page 118: ... ring G70 2 Center rest Thrust bearing 51117 2 Oil lens O ring G45 1 Regulating wheel End cover alloy beawring seat Oil seal TC50 72 12 1 O ring G40 2 O ring G65 1 Front bearing external nut Oil seal TC85 110 13 1 O ring G120 1 O ring G75 2 Spindle rear cover Oil seal TC50 62 7 1 O ring G115 1 Rear bearing external nut O ring G115 2 Thrust bearing seat Thrust bearing 51109 2 Oil lens O ring G80 1 ...

Page 119: ...aring seat Thrust bearing 51109 2 Micro feed bearing seat Thrust bearing 51107 2 Dressing cylinde Feed bearing seat O ring P65A 2 O ring P20 2 Piston O ring P48A 2 Oil supply system Filter can O ring 4033 1 O ring P105 1 Filter 1 2 1 Oil tank Filter 3 4 1 Hydraulic switch valve O ring P21 1 O ring P10A 1 P r o p e r t y o f K e n t I n d u s t r i a l U S A D o N o t R e p r o d u c e ...

Page 120: ... 6 50 50 295 155 JHC 18B series 455 305 228 6 50 50 295 205 JHC 20 series 510 205 254 25 25 320 155 ψD T ψH F G P E JHC 12 series 205 150 90 25 25 130 100 JHC 18 series 255 205 111 2 75 20 170 110 JHC 18A series 255 255 111 2 100 45 170 110 JHC 18B series 255 305 111 2 100 65 170 140 JHC 20 series 305 205 127 75 20 190 110 P r o p e r t y o f K e n t I n d u s t r i a l U S A D o N o t R e p r o d...

Reviews: