background image


95 

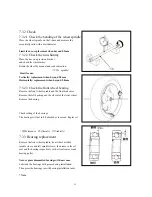
• Bearings must be pressed in horizontally. 

7.3.4 Installation                              

Install it in reverse order. 

Instructions: 

Lubricate the front wheel spindle, gear housing assembly, oil 

seal (opening), spindle sleeve, bearing 6201-2RS and middle 

spindle sleeve assembly. 

Albany grease is suggested. 


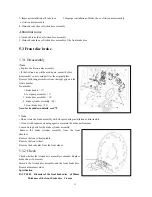
Install the front wheel spindle

1

, front wheel, gear housing assembly

8


and nut M10

Χ

1.25

9

When the gear housing assembly

8

is installed, the 

odometer gear housing assembly shall be aligned well. If 

the front wheel spindle is not well aligned and locked, 

the odometer housing assembly will be deformed. 

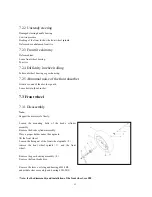
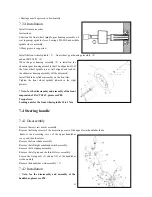
Install the brake cylinder assembly on the front rim. 

Tighten the front wheel spindle (shown in the right 

picture). 


* Note: for the disassembly and assembly of the front 

suspension of FACT 50 4T, please see P88. 

Torque force: 

Locking nuts for the front wheel spindle  55-62 N·m 

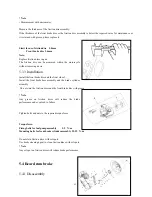
7.4 Steering handle 

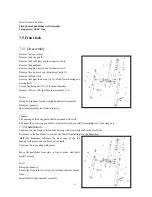
7.4.1 Disassembly 

Remove the rearview mirror assembly. 

Remove the fixing screws of the decorating covers of the upper/lower handlebar shade. 

 Remove the decorating cover of the upper handlebar 

cover, and then the meter. 

Remove the front shade assembly. 

Remove the left/right combined switch assembly. 

Remove the fuel pump assembly. 

Remove the left grip and the throttle lever assembly. 

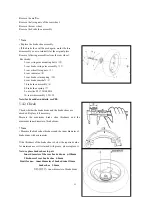
Loosen the fixing bolt (2) and nut (3) of the handlebar 

weld assembly. 

Remove the handlebar weld assembly

1

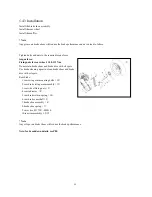
7.4.2 Installation 

* Note: for the disassembly and assembly of the 

handlebar, please see P90. 

Summary of Contents for FACT 50 4T

Page 1: ...1 FACT 50 4s Maintenance Manual Contents...

Page 2: ...0 2 5 Ignition coil 71 2 6 Trigger 71 3 Startup System 74 3 1 Preparing documents 74 3 2 Failure diagnosis 75 3 3 Startup motor 75 3 4 Starter relay 77 4 Bulbs Switches Meters 80 4 1 Preparing documen...

Page 3: ...10 1 Preparing documents 122 10 2 Failure diagnosis 122 10 3 Fuel pump 123 11 Carburetor 128 11 1 Preparing documents 128 11 2 Failure diagnosis 129 11 3 Carburetor disassembly 129 11 4 Installation a...

Page 4: ...ring documents 159 16 2 Failure diagnosis 160 16 3 Crankcase 160 16 4 Assembly 162 Inspection and Maintenance of Exhaust Emission System 163 18 Exhaust Emission Control System 165 18 1 Warranty on the...

Page 5: ...y inspection of engine entire motorcycle and electrical parts Breakdown drawing systematic drawing failure analysis and statements are contained at the first part of each chapter Please note that phot...

Page 6: ...the doctor if electrolyte splashes on eyes Electrolyte is poisonous Drink a large quantity of fresh water milk milk of magnesia laxative antacid or mineral oil if electrolyte is swollen accidentally T...

Page 7: ...ally note important connections before disassembly Replace parts which will not be in use before disassembly Bolts and screws with different length shall be separately used for different assembly part...

Page 8: ...oof boot shall be mounted at the original design position groove clip connector During dismantling ball bearings one or two inside outside bearing rollers shall be supported by tools Ball bearings may...

Page 9: ...be clamped during moving Cables along the handlebar shall be neither too tight nor too loose and do not interface with any neighboring parts at steering positions Cables shall be properly deployed wi...

Page 10: ...nance and repair Metric screws bolts and nuts can not be exchanged with imperial fasteners 3 New gaskets O rings cotter pins and locking pieces shall be applied for re assembly 4 Bolts with large diam...

Page 11: ...cial tools for disassembling assembling engine parts are as follows Table 1 1 Name Remark Special socket spanner Clutch clamp holder Flywheel puller Feeler gauge Bearing disassembly tools Bearing asse...

Page 12: ...12 Fig 1 7 Fig 1 8 Fig 1 9 Fig 1 10 handle Fig 1 11 Fig 1 12 pliers piston Fig 1 13 Fig 1 14...

Page 13: ...ter Magnetic rack V block Dial indicator Vernier calipers Circlip pliers Screwdriver with striking cap Tool for assembling oil seal of front fork Tool for hammering seal of front fork Steering nut spa...

Page 14: ...14 Fig 1 21 Fig 1 22 Fig 1 23 Fig 1 24 Fig 1 25 Fig 1 26 Fig 1 27 Fig 1 28 2 Special tools for repairing the chassis tool for hammering seal of front fork Fig 1 29 3 Steering nut spanner...

Page 15: ...g 1 33 Fig 1 34 Table 1 32 continued Fig 1 33 Fig 1 34 Specification FACT 50 4T25Km Model FACT 50 4T Engine type QJ137QMB Length mm 1800 Fuel type Unleaded petrol 92 95 Width mm 700 No of cylinder 1 H...

Page 16: ...m Battery capacity type 12V 4AH dry charged Max Hp 1 24kW 4000rpm Magnetor capacity 89 6W 5000rpm Compression ratio 6 9 1 Spark plug BR7ES NGK Performance Max speed 25km h Spark plug gap 0 6 0 8mm Dia...

Page 17: ...tch Carburetor type PD19JB Variable speed gear Stepless Idle speed rpm 1800 100rpm min Transmission gear Transmission Belt transmission Max torque 4 55N m 5200rpm Battery capacity type 12V 4AH dry cha...

Page 18: ...18 FACT 50 4T...

Page 19: ...n Check power supply for ignition Check whether short circuit or open circuit occurs to ignition coil Check whether short circuit or open circuit occurs inside the ignition system Check whether CDI ig...

Page 20: ...ortly after startup Continue to work after startup The carburetor is blocked inside or the float is too high Startup device of carburetor startup enrichment system is at fault Remove spark plug and ch...

Page 21: ...iving Check cooling system Air cooled engine Check whether heat sink is spotted or there is too much oil stain Clean Check whether cooling fan or air director is damaged forcedly air cooled engine Ins...

Page 22: ...is blocked 2 Check whether the startup device for carburetor startup enrichment system works normally 3 Check whether the carburetor float is too low Normal combustible gas mixture Check whether the c...

Page 23: ...ty 3 Check abrasion of the piston ring and the cylinder Start the engine and slowly accelerate observe the rotation speed change of engine The rotation speed of engine rises as it slowly accelerates T...

Page 24: ...control cable is flexible when being pulled and whether the throttle valve spring is too soft Check whether the electrode gap of spark plug is too small 1 Check whether CDI ignition device is in good...

Page 25: ...al pressure Inflate as required Check whether oil leakage occurs in fuel tank fuel switch fuel pipe or carburetor Solve problems based on actual situation Check the proportion of mixed combustible gas...

Page 26: ...from the fuel filler Difficulty in Transmission Shift Start the engine and check whether the idle speed is too high Re adjustment Check whether it is coordinated when shifting Check whether the clutc...

Page 27: ...positioning wheel spring is ruptured or lacks elasticity Replacement Disassemble crankcase and check whether the engagement depth for each gear is in accordance with requirements Proper depth in engag...

Page 28: ...4 Check whether the piston surface of brake caliper and the wall of oil tank are excessively abraded or damaged Malfunction of drum brake Check whether the free stroke of brake lever is within 10mm 20...

Page 29: ...No voltage Voltage available Open circuit between the connector and the battery Check whether the rectifier or the rectifier regulator is broken down with an ohm meter Remove the connector between the...

Page 30: ...rt circuit Short circuit between the rectifier or the rectifier regulator or the battery and the ignition switch Replace the charging coil 1 Check whether the battery electrolyte is enough 2 Check whe...

Page 31: ...ral gear or grip the clutch lever press the startup button The starter motor works normally after short circuit The starter motor does not work after connection and there is no sound from starter rela...

Page 32: ...the contact of conductor joint between starter relay and starter motor is bad Remove the lead wires connecting to starter motor and battery from the starter relay and press the starting button Check w...

Page 33: ...regulator Dismantle the headlamp assembly and check whether any bulb is burnt The horn can make loud sound and the steering lamp is light The horn can not make loud sound and the steering lamp is not...

Page 34: ...move the connector between the rectifier regulator and the cable assembly check whether there is open circuit between the lighting charging coil of electromagnetic motor and the rectifier regulator wi...

Page 35: ...tness of lamps The lamp works normally Still weak light from the lamp Low stable voltage of rectifier regulator Check whether there is short circuit in the charging coil of electromagnetic coil and th...

Page 36: ...t power cord or bad earth of lamp holder at the breakdown side Bad contact inside the steering lamp switch Press the horn button and check whether the horn works normally The horn makes loud sound The...

Page 37: ...en circuit short circuit between battery and ignition switch Normal battery power supply Remove the power cord from the terminal of the electric horn and strike the power cord with the earth check the...

Page 38: ...of brake lamp switch or bad contact inside Spark available No spark Short circuit or open circuit between the brake lamp switch and the brake lamp Short circuit or open circuit between the ignition s...

Page 39: ...tween the rectifier or the rectifier regulator or the battery and the ignition switch Replace charging coil 1 Check whether the electrolyte inside the battery is sufficient 2 Check whether the electro...

Page 40: ...gnition timing Bolt nut fastener Rim tire Tire specification Preparing principles General Warning Make sure that it is well ventilated before starting the engine It is forbidden to start it in a close...

Page 41: ...70 195kpa Locking nut for front wheel spindle 55 62 N m Torque value Fixing nut for rear wheel 100 113 N m Certification for Related Parts Type Name Certificate No Remark Front outer tire E11 75R 0002...

Page 42: ...nary tools Absorber working inspection I I I Ordinary tools Screw fastening inspection I I I I I I Torque spanner Oil leakage inspection for gearbox I I I I I I Ordinary tools Inspection or replacemen...

Page 43: ...instruction manual supplied by the company We are not responsible for any loss rising from private adjustment or maintenance 2 Increase frequency of washing air filter if your motorcycle runs on the...

Page 44: ...nut for adjustment Air filter Filter replacement Remove the body guard Remove the fixing screws of air filter Remove the top cap of air filter Remove the cartridge from the filter Check whether the c...

Page 45: ...ll be installed with hand first and then fastened with spark plug sleeve Battery Battery disassembly Remove the fixing screws of the battery box cover Remove the battery box cover Remove the negative...

Page 46: ...r to check the charging condition Charging Connection the positive pole of the charger to the positive pole of the battery The negative pole of the charger to the negative pole of the battery voltmete...

Page 47: ...eter Adjust the adjusting screws of the throttle cable Idle speed 1800 100rpm min When it rotates unstably at idle speed or it is unsmooth during oil filling slightly adjust the idle speed adjusting s...

Page 48: ...re is too much carbon fouling inside the combustion chamber and at piston head Gear oil Inspection Note Set the middle kickstand on the flat ground and keep the motorcycle upright for checking the oil...

Page 49: ...eriodically maintenance shall be guaranteed and replace the drive belt if necessary drive belt Free stroke of front rear brake Free stroke of front brake Measure the free stroke of front brake at the...

Page 50: ...adlamp Remove the front shield Disconnect the connector of the headlamp Remove the headlamp headlamp Clutch Start the engine and increase its speed gradually to check the work condition of the clutch...

Page 51: ...ushing of the engine is loose or not compress upwards or downwards Bolt nut fastener Check whether each bolt nut and fastener is loose If yes tighten it to required torque Rim tire Check whether tires...

Page 52: ...is loose Tighten it to the required torque value if it is loose Torque value locking nut of the front wheel spindle 55 62 N m fixing nut of the rear wheel 100 113 N m Fixing steering stem bearing and...

Page 53: ...of Electrical System Fasteners Name of fastening parts and fasteners Tightening torque N m Clutch cover bolt of the startup motor Clutch fixing nut of the startup motor Rectifier bolt High voltage co...

Page 54: ...54 Charging system 1 Battery 12V 4AH 2 Seat lock assembly 3 Horn 4 Rectifier 5 Power lock assembly 6 CDI igniter 7 Relay 8 Release resistance...

Page 55: ...re overvoltage inside the battery will shorten its service life 3 The battery will be self discharged if being stored for a long time which reduces its capacity It shall be charged about every three m...

Page 56: ...ted voltage Charging limit 14 8V 0 4V 5000rpm Tightening torque force Tools Rectifier bolt 5 0 N m Universal fixing spanner High voltage coil fixing bolt 9 0 N m Flywheel remover Flywheel fixing nut 5...

Page 57: ...vehicle Check the charging condition closed circuit voltage Open the battery cover and remove the battery plate assembly Remove cables to the battery connectors Measure voltage between battery termin...

Page 58: ...e main switch or in the main wire in the case of any abnormality 1 4 2 Charging check Use a multimeter to check the charging status of the battery when it is being fully charged Install the fully char...

Page 59: ...he coil of the magnetor 1 5 2 Voltage current regulator check When the main cable is inspected to be normal check whether the plug of the voltage current regulator is in good contact Measure impedance...

Page 60: ...d coil of the magnetor and the body with multimeter Standard 2 0 2 5 20 bolt cooling fan Replace the magnetor coil when the measured value exceeds the standard value 1 7 2 Disassembly Remove the body...

Page 61: ...art of the flywheel Install the solid key into the groove above the upper crankshaft key and confirm it Aim the groove in the flywheel at the solid key on the shaft Note Ensure there is no any bolt in...

Page 62: ...62 Ignition System 1 storage battery 12V 4AH 2 FBT assembly 3 rectifier 4 power lock assembly 5 CDI igniter 6 relay 7 seat lock assembly 8 horn Ignition System...

Page 63: ...caused by poor contact of the socket Check whether each connector is in good condition 6 Check whether the heat value used for the spark plug is proper If not the engine may work abnormally or the spa...

Page 64: ...inal of high voltage wires Poor CDI group when item is checked to be abnormal or there is no spark for spark plug Side voltage Normal high voltage but no spark Poor spark plug or secondary leakage of...

Page 65: ...ark plug is installed on the cylinder head Connect the lead of the ignition coil and also the shunt between the primary coil terminal black white and the GND Press the startup motor or step the actuat...

Page 66: ...en the compression pressure is normal Remove 4P and 2P connectors of CDI group Connect the peak voltage shunt between the trigger blue white with 2P connector and the 4P connector black terminal white...

Page 67: ...Secondary coil of the ignition coil Black spark plug cap excluding the spark plug 0 5 5 5K 2 5 Ignition coil 2 5 1 Disassembly Remove the body guard Remove the spark plug cap Remove the primary lead...

Page 68: ...e the impedance between the primary side wire of the ignition coil and the negative terminal Standard 0 5 5 5K 10 20 2 6 Trigger Note Check the trigger on the engine Check Remove the body guard Remove...

Page 69: ...69 Startup System 1 storage battery 12V 4AH 2 seat lock assembly 3 horn 4 rectifier 5 power lock assembly 6 CDI igniter 7 relay 8 release resistance Startup Schematic Diagram...

Page 70: ...tch please comply with related regulations Preparing principles Item Standard Limit for use Length of the brush of the startup motor 6 2mm 3mm Bushing of the startup idler shaft 8 3mm Outer diameter o...

Page 71: ...e Before the startup motor is disassembled turn off the main switch remove the GND wire of the battery and then power on to check whether the startup motor works for ensuring safety Remove the wire cl...

Page 72: ...ront cover with grease Install the brush on the bracket Lubricate moving parts at two ends of the brush shaft with grease Press each brush into the bracket and install the electrode front cover Note P...

Page 73: ...with regulations When there is no voltage at the starter relay terminal check the conduction of the brake switch and leads 3 4 3 Check GND loop of the starter relay Remove the starter relay connector...

Page 74: ...assembly 7 headlamp twin lamps 8 tail lamp 9 rear left steering lamp assembly 10 rear right steering lamp assembly 11 rear reflector A Iden No of headlamp E3 00 1006 B Iden No of front steering lamp...

Page 75: ...ch from the vehicle to measure its conduction 4 2 Failure diagnosis When the main switch ON is not light it is due to Poor bulbs Poor switch Bad contact or broken wires 4 3 Replacement of headlamp bul...

Page 76: ...lacement of tail lamp bulbs 4 5 1 Disassembly Remove the seat Remove the fixing screws of rear left right guard for dismantling the tail lamp shade Disconnect the tail lamp connector Remove the rear l...

Page 77: ...4 7 Main switch 4 7 1 Check Remove the front guard Remove the foot guard Remove the main switch lead terminal Check conduction of the terminal 4 7 2 Replacement of main switch Remove the foot guard a...

Page 78: ...right rearview mirror assembly Remove the fixing screws of the left right combined switch Loosen the left right combined switch Remove the right grip assembly and the left steering grip Remove the le...

Page 79: ...ing bolt Fixing screw of muffler decorating shade Fixing bolt of handlebar weld assembly Front wheel spindle locking nut Front absorber fixing bolt Rear wheel fixing nut Rear absorber top nut Rear abs...

Page 80: ...handle 18 plunger assembly 19 dust cover of bleed nipple 20 spring piece 21 friction disc assembly 22 front brake disc 23 little guide 24 brake cylinder assembly 25 bolt M8 36 26 front brake disc moun...

Page 81: ...r 9 rear brake camshaft 10 rear brake return spring 11 rear brake swing arm assembly 12 rear swing arm mounting bolt 13 o ring 14 dust cover A Torque for mounting nut 5 100 113N m B I D of brake drum...

Page 82: ...5 3 5 5 1 2 Torque force Fixing bolts for fuel pump assembly 5 9 N m Mounting bolts for front brake cylinder assembly 22 29 N m Fixing bolts for brake handle 5 9 N m Fixing nuts for rear wheel 100 113...

Page 83: ...andle 17 2 fuel pump assembly 1 3 brake hose assembly 12 4 brake cylinder assembly 24 5 front brake disc 22 Note for breakdown details see P79 Note Do not stain the brake assembly with oil spots durin...

Page 84: ...e front brake disc and the front wheel Install the front brake hose assembly and the brake cylinder assembly Do not stain the friction discs and the front brake disc with grease Note Any grease on fri...

Page 85: ...rake shoe spring 7 9 outer tire E11 75R 000216 10 rear rim assembly 3 50 12 Note for breakdown details see P80 5 4 2 Check Check whether the brake drum and the brake shoes are abraded Replace it if ne...

Page 86: ...brake shoes and brake disc with oil spots Use brake cleaning agent to clean brake shoes and brake disc with oil spots Rear brake 1 rear swing arm mounting bolts 12 2 rear brake swing arm assembly 11...

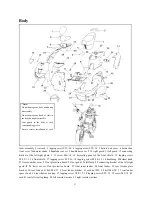
Page 87: ...board 23 foot pedal 24 tail lamp 25 connecting bracket of the left right guard II 26 lower cover of foot protection board 27 front inner fender 28 front fender 29 rear license plate bracket 30 rear f...

Page 88: ...the left right guard left right guard front fender rear rack lower cover of protection board battery box cover foot pedal tail lamp rear left right turn light rear license plate bracket rear fender N...

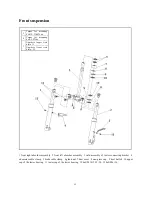
Page 89: ...nt rim 3 50 12 7 tire 120 70 12 8 gear housing assembly 9 nut M12 1 25 10 valve cap 11 valve 12 front brake disc 13 installation nut of front brake disc 14 nut Tire size outer tire 120 70 12 A Auth No...

Page 90: ...meter cable clamp 5 brake cable clamp 6 gland nut 7 dust cover 8 one piece cup 9 steel ball 5 10 upper cup of the lower bearing 11 lower cup of the lower bearing 12 bolt M10 1 25 30 13 bolt M6 16 A To...

Page 91: ...bined switch assembly fitting seat 13 spring washer 5 14 nut M5 15 screw M5 20 16 right combined switch assembly 17 handle set screw M5 18 right rearview mirror 19 left rearview mirror 20 left combine...

Page 92: ...brake disc shall not be stained with grease during operation Motorcycle Standards Measurement points Item Standard mm Limit for use mm Front wheel spindle Bending 0 2 Vertically 2 0 Front wheel Rim sh...

Page 93: ...uard Loose bolts in the absorber 7 3 Front wheel 7 3 1 Disassembly Note Support the motorcycle firmly Loosen the mounting bolts of the brake cylinder assembly Remove the brake cylinder assembly Place...

Page 94: ...ck the front wheel bearing Remove the front wheel spindle and the front brake disc Remove the left bushing and the oil seal of the front wheel Remove the bearing Check rolling of the bearings The bear...

Page 95: ...ront rim Tighten the front wheel spindle shown in the right picture Note for the disassembly and assembly of the front suspension of FACT 50 4T please see P88 Torque force Locking nuts for the front w...

Page 96: ...weld assembly Fixing nut spanner Special disassembly tool for bearing cup Note The opening of the body guard shall be cleaned with cloth The upper lower bearing cup shall be dismantled with a special...

Page 97: ...97 Install the handlebar Install the body guard Install the front wheel Note for the disassembly and assembly of the front fork please see P89...

Page 98: ...r brake camshaft 10 rear brake return spring 11 rear brake swing arm 12 rear swing arm mounting bolt 13 o ring 14 bolt M10 1 25 40 15 rear absorber assembly A Torque for fixing nut 5 of the rear wheel...

Page 99: ...rear indicator 9 rear brake camshaft 10 rear brake return spring 11 rear brake swing arm assembly 12 rear swing arm mounting bolt 13 O ring A Tire size 130 70 12 B Rim size 3 50 12 Rim run out limit V...

Page 100: ...il spots Preparing Principles Item Standard mm Limit for use mm Vertically 2 0 Rear wheel shimmy Horizontally 2 0 Locking torque force Fixing nuts for the rear wheel 100 113 N m Fixing bolts of rear a...

Page 101: ...e the eccentricity ratio with a dial indicator Limit for use Vertically replacement when beyond 2 0mm Horizontally replacement when beyond 2 0mm When the rear wheel shimmy exceeds the limit the rear w...

Page 102: ...rear fender Remove fixing bolts of the rear absorber Remove the rear absorber 8 4 2 Installation Installation of the rear absorber Torque force Upper fixing nut 37 44 N m Lower fixing nut 22 29 N m I...

Page 103: ...t 4 left cover sheet 5 front cover of helmet box 6 rear storage box rack 7 seat steel rope 8 rear storage box rack holder 9 bolt M6 16 10 bolt M6 12 A Note for the disassembly of the fuel tank turn th...

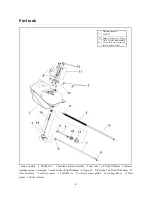
Page 104: ...amp 8 7 vacuum tube 4X 8X360mm 8 clamp 7 9 fuel tube 2 4 5X 8 5X250mm 10 filter assembly 11 oil level sensor 12 bolt M5 16 13 oil level sensor gasket 14 sealing rubber 15 filter jacket 16 filter eleme...

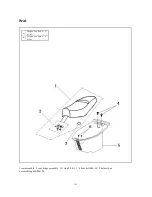
Page 105: ...105 Seat 1 seat assembly 2 seat hinge assembly 3 O ring 84 4 3 1 4 boss bolt M6 14 5 helmet box 6 assembling bolt M6 20 A Torque for bolt 4 5 9N m B Torque for bolt 6 5 9N m...

Page 106: ...s and screws to the required torque value for assembly After assembly check whether all the parts are correctly installed and operated Preparing Principles Item Standard Limit for use Gasoline tank ca...

Page 107: ...rack Remove the rear left right guard assembly Remove the rear rack and helmet box Remove the rear rack holder Turn the fuel switch to OFF Disconnect the fuel hose Remove the fuel tank Note For detai...

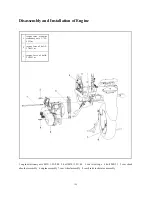
Page 108: ...280 2 bolt M10 1 25 40 3 seat steel rope 4 bolt M8 31 5 rear shock absorber assembly 6 engine assembly 7 rear wheel assembly 8 rear brake rocker arm assembly A torque force of engine stationary axis 1...

Page 109: ...be removed Preparing Principles Motor is not only kinetic resource of motorcycle but also driving part and main rear suspension device On one hand the motor with rotating action output by crankshaft g...

Page 110: ...he right suspension bolt and gasket Remove the left suspension bolt Remove the engine from the frame 10 3 2 Engine suspension standing clamp 10 3 2 1 Disassembly Remove spark plug cap Remove fuel tube...

Page 111: ...l bolt and nut of engine suspension temporarily 10 3 3 Installation Install according to reversed procedures of disassembly Note For details see P106 Torsion value of installation engine stationary ax...

Page 112: ...nder double head Motor fixing bolt Locking screw for the crankcase left cover shade Locking bolt for the crankcase left cover Locking nut for the drive wheel Locking nut for the driven wheel Locking n...

Page 113: ...l filter element assembly Note Worm gears and worm wheels shall rotate flexibly without being seized or imbalanced tightening A little axial movement shall be allowed for worm wheels Fuel pump O ring...

Page 114: ...il runs out continuously Function of the lubricating system the lubricating system of the engine is to provide lubricating oil to the frictional surface of each part which transforms dry friction into...

Page 115: ...1 Disassembly Loosen the bolt and remove the fan cowl assembly Loosen fan screws and remove the fan Remove the right cover Remove the worm wheel from the crank and also the fuel pump assembly Fan Scre...

Page 116: ...fuel pump base and disassemble the fuel pump Check the radial clearance between inner and outer rotors Limit for use 0 19mm Check the clearance between outer rotor and fuel pump base Limit for use 0 2...

Page 117: ...pan head screws2 locating pin 3 O ring 4 fuel pump base 5 inner rotor 6 outer rotor 7 fuel pump body 8 hexagon flange bolt 9 round pin 10 fuel pump gear assembly 11 fuel pump shaft 12 hexagon flange...

Page 118: ...3 needle valve assembly 4 float 5 float pin 6 main metering jet 7 idling jet 8 main foam pipe 9 idle adjusting screw Note Gasoline is very dangerous Fire is strictly forbidden in workplace After the c...

Page 119: ...ber of the carburetor shall be drained out since it may block the idling jet after deterioration which affects idle speed Carburetor functions Carburetor is a critical component in the fuel supply sys...

Page 120: ...locked idle speed system or choke system Abnormal plunger Secondary air suction into the air intake system Too dense mixed gas Interrupted spark at acceleration Abnormal enrichment valve Too dilute mi...

Page 121: ...enrichment valve assembly Loose screw and remove upper cover Remove spring and plunger assembly Check abrasion of plunger Replace it if abraded Check abrasion of oil needle Replace it if abraded Loose...

Page 122: ...Note the idle adjusting screw has been adjusted for the carburetor in factory which needs no adjustment usually In disassembly record the rotation number for installation Start and warm up for about...

Page 123: ...rcles to the maximum Readjust the idle adjusting screw to lower the engine speed to 1800 100rpm Pull the throttle to speed up for several times and check whether the idle speed is steady Test exhaust...

Page 124: ...spring 20 tappet adjusting screw 21 adjusting screw hold down nut 22 valve spring cup 23 valve collet 24 intake double end stud 25 carburetor insulator 26 paper washer of carburetor insulator 27adjus...

Page 125: ...k Function of the cylinder cover the cylinder cover is used to seal the cylinder and form the combustion chamber with the piston It bears HPHT gas and achieves air intake and exhaust through distribut...

Page 126: ...cover check Check whether cylinder cover is broken Check flarness of cylinder cover bottom surface Limit for use 0 04mm 12 5 Installation of cylinder cover Install it in reverse order Cylinder block a...

Page 127: ...127 1 piston 2 piston pin 3 cylinder block 4 cylinder gasket 5 cylinder cover 6 nut Note all parts shall be cleaned and blown by high pressure air before check...

Page 128: ...on chamber along with the cylinder cover It acts as slide valve for air inlet stop periodically compresses fresh mixed gas from the crankcase into the cylinder and discharges exhaust gas after combust...

Page 129: ...essure Abnormal noise of the piston Too much carbon deposit in the combustion chamber Damaged cylinder piston or piston ring Abrasive piston pin hole and piston pin 13 3 Cylinder block 13 3 1 Disassem...

Page 130: ...e piston ring Note Do not rupture or damage the piston ring Eliminate carbon deposit in the groove of the piston ring Remove the piston ring and install each piston ring on the cylinder bottom Note Pr...

Page 131: ...ed Note It is at 90 degree with the piston pin Measure the inner diameter of the cylinder at the top middle and bottom points Limit for use 37 01mm Measure the maximum clearance between the cylinder a...

Page 132: ...le to rotate freely in the piston ring groove Remove any residual spacer attached to the crankcase Note Do not make any object fall into the crankcase Install the piston piston pin and retainer ring N...

Page 133: ...t 2 spring 3 friction plate 4 check ring Note During operation the surface of the triangle belt can not be stained with any grease which must be removed It helps avoid slipping between the triangle be...

Page 134: ...4 idler shaft 5 start shaft assembly 6 kickstart shaft spring Note During operation the surface of the triangle belt can not be stained with any grease which must be removed It helps avoid slipping be...

Page 135: ...iven wheel Preparing Principles Unit mm Item Standard Limit for use Inner diameter of right half driven wheel 20 20 05 20 05 Outer diameter of the sliding sleeve 19 94 19 98 19 94 Width of the triangl...

Page 136: ...4 1 Disassembly Remove fixing nuts for drive face and the left half drive face Remove the triangle belt from the drive face Check whether the triangle belt is cracked and whether rubber or cotton yar...

Page 137: ...e the right half drive wheel assembly 14 4 2 Breakdown of right half drive wheel assembly Check abrasion of the ball Measure the outer diameter of the ball Limit for use 15 8mm Right half drive wheel...

Page 138: ...1 Disassembly Install the clutch sleeve with the fixer and remove fixing nuts Remove the clutch sleeve clutch driven wheel driven wheel clutch sleeve fixer socket spanner 14 5 2 Breakdown of clutch Re...

Page 139: ...6 Breakdown of clutch and driven wheel Clutch spring compressor must be used for disassembling the clutch spring Note Spring compressor must be used for disassembly to avoid damage to spring Install t...

Page 140: ...it for use 33 95mm Measure the inner diameter of the sliding sleeve on the left half driven wheel Limit for use 34 064mm 14 6 1 Replacement of the bearing on the right half driven wheel Remove the nee...

Page 141: ...ombination of clutch and driven wheel Eliminate any grease on the surface of the driven wheel Install the oil seal in the sliding sleeve of the left half driven wheel Apply grease evenly on the O ring...

Page 142: ...l the drive face clutch driven wheel in reverse order 14 8 Kickstart mechanism Disassembly Check Remove the left crankcase cover Loosen the screw and remove the guard Remove the start claw assembly Re...

Page 143: ...assembly 5 input shaft gear 6 intermediate shaft assembly 7 hex flange nut 8 rolling bearing 9 gasket 10 output shaft seal ring 11rolling bearing 12 gearbox cover 13 hex flange lock nut 14 O ring 15 a...

Page 144: ...decide final output torque and rotational speed 15 2 Failure diagnosis No run after engine startup Broken driving gear Burnt driving gear Leaked gear oil Too much gear oil Damaged oil seal 15 3 Gearbo...

Page 145: ...ed remove it from the gearbox cover Note Removed bearing cannot be used any more It shall be replaced Use special tools to dismantle the bearing and the oil seal Remove the oil seal from the gearbox a...

Page 146: ...g pin10 20 17 hex flange belt 18 deep groove ball bearing 19 rolling bearing 20 bearing 21 crankcase spacer 22 right box assembly 23 hex flange belt 24 stationary spring s shaft 25 plug 26 connecting...

Page 147: ...in function is to support the crankshaft clutch gearbox cylinder block and cylinder cover sustain combustion shock and inertia force from the movement of the connecting rod and form part of closed spa...

Page 148: ...e bolts and remove the fan flywheel and coil Remove right cover and fixing bolts of the crankcase Remove the left right crankcase Note Do not damage the spacer Remove the spacer and the locating pin R...

Page 149: ...ting rod Limit for use 0 3mm measuring point at the larger end of the connecting rod Measure the clearance of the larger end of the connecting rod X Y direction Limit for use 0 018mm Check whether cra...

Page 150: ...e Removed oil seal cannot be used any more Remove the oil seal with a special tool 16 4 Assembly Install the crankcase in reverse order Note Install the oil seal with special tools to avoid any damage...

Page 151: ...e gasket assembly 10 heat insulating rubber 11 muffler hoop 12 nut M6 13 exhaust pipe assembly 14 connecting flange gasket 15 screw M6 25 16 spring gasket 6mm 17 gasket 6mm 18 nut M6 19 screw without...

Page 152: ...nmental pollution We strictly accord with these exhaust emission standards and also make great effort in purifying air and reducing pollution This motorcycle has been strictly examined before delivery...

Page 153: ...adjustment etc 18 3 Mechanical function of the exhaust control system General This system adopts two stroke single cylinder engine carburetor and air conduction device to maintain qualified exhaust g...

Page 154: ...because of high temperature 2 Motorcycles with catalytic converter shall not be near flammable material 3 There is CO inside the exhaust pipe which is harmful to health So do not run the engine in cl...

Page 155: ...screws to live up to requirements and measure CO HC at the idle speed Periodic inspection maintenance plan Measure idle emission note 1 Adjust Carburetor note2 Remove and clean the carburetor SJ MJ SA...

Page 156: ...CLOCK OIL INDICATOR LIGHT 2W BEAM INDICATOR LIGHT 2W TURN SIGNAL INDICATOR LIGHT 3W RIGHT TURN LIGHT 10W R B INSTRUMENT LIGHT 2W 2 FUELMETER R W B G Y G B RG WG BBLGrYR WB G W B W BL BL B Gr B Y B Y...

Reviews: