background image

62

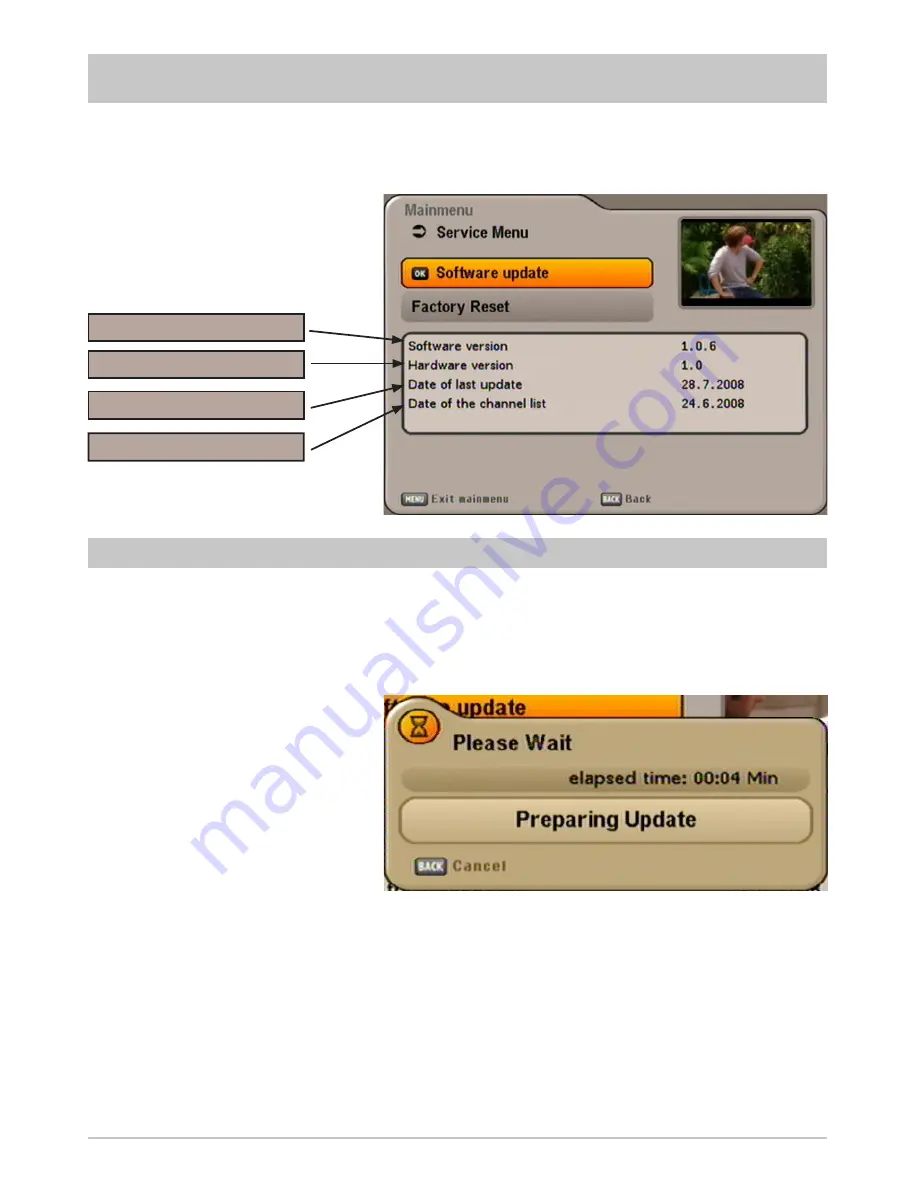
SERVICE MENU

Select the “Service” menu using the 

 button, the 

 buttons in the main menu and 

. The following 

display appears:

Current software version

Last update run

UPDATING SOFTWARE

You can also check manually whether new software is available.

Use the 

 buttons to switch to “Software Update” and to call it up press the 

 button. The following 

display appears:

Hardware version

Date of the channel list

Summary of Contents for UFS 640si

Page 1: ...Operating manual DVB Satellite Receiver UFS 640si ...

Page 2: ...ermsthatcannotbetranslated wehaveaddedashort glossary at the end of the manual The power switch is an environmentally friendly feature If you will not be using your receiver for an extended period you should use the power switch to disconnect it from the power supply and save energy For shorter breaks you can use the remote control to switch the receiver to standby which uses only a minimal amount...

Page 3: ...eiver is in stand by mode it can be switched off completely using the on off switch on the receiver front panel Do not press the on off button when the receiver is in operation This can lead to loss of data or damage to software The term DiSEqC which appears in this user manual is a registered trademark of the European Telecommunication Satellite Organization EUTELSAT IMPORTANT INFORMATION Electro...

Page 4: ... INFORMATION 32 CALLING UP THE OPTIONS CHANNEL 32 OPTION SELECTION 33 ERROR SIGNALLING 33 CHANNEL LIST TV RADIO 33 EPG ELECTRONIC PROGRAMME GUIDE 35 CALLING UP THE EPG 35 CURRENT VIEW 36 PREVIEW VIEW PROGRAMME LISTINGS 37 ADDITIONAL INFORMATION i BUTTON 38 RECORDING TIMER 39 RECORD ONCE 40 RECORD DAILY 40 RECORD WEEKLY 41 PLAN RECORDING 42 VIDEOTEXT TELETEXT 43 EDIT CHANNEL LIST 44 SELECTION OF TH...

Page 5: ... TOP BOX 56 DEFINE NEW PIN CODE 57 SETTINGS 58 TV SETTINGS TV PICTURE AND SOUND 59 CUSTOMIZE SCREEN MENU 60 DATE AND TIME 61 COMMON INTERFACE 61 ANTENNA CONFIGURATION 61 SERVICE MENU 62 UPDATING SOFTWARE 62 RESTORE FACTORY SETTINGS 64 CONNECTING UP THE VIDEO DVR 65 RECORDING 65 PLAYBACK 65 USING THE FRONT PANEL SERVICE 66 TECHNICAL APPENDIX 67 FEATURES 67 SCART SOCKET ASSIGNMENT 69 VHS S VHS SWITC...

Page 6: ...6 SAFETY INSTRUCTIONS IMPORTANT NOTES ...

Page 7: ...city The receiver is available in silver UFS 640si Remote control RC 671 Scart cable 2 batteries AAA 1 5 V IR sensor 230 V 12 V power supply unit 12 V connection cable with shock proof plug cigarette lighter and 12 V connection plug Mounting support User manual Safety notes DELIVERY SCOPE DISPLAY OF ANTENNA SIGNAL LEVEL AND EMISSION OF SEARCH TONE SAT FINDER ON THE TV SET Initial installation must...

Page 8: ...ols and Displays 1 LNB loop through input 2 LNB input 3 HDMI output 4 Scart socket for VCR AUX connection 5 Video output composite colour 6 Electrical data stream output SPDIF Sony Philips Digital Interface Format for Dolby Digital AC 3 audio 7 Audio outputs L R cinch sockets 8 Scart socket for TV connection 9 RJ 11 data interface connection port for an external IR sensor 10 Mains power cable VIEW...

Page 9: ...trip the insulation from the cables as shown in the following illustration and carefully screw the F standard connectors on to the ends of the cables until they are securely seated When fitting the connector make sure that no wires from the braid are touching the inner conductor so no short circuit can occur The quality of the reception signal depends on this connection The presets for the control...

Page 10: ... to operate the receiver during recording otherwise all the on screen displays will appear on your recording Connect the satellite receiver TV Scart socket and the TV set using a Scart cable see Connection Example If your TV has a stereo capability you can receive the sound in stereo via the Scart connection Use a further Scart cable to connect the satellite receiver VCR Scart socket to the video ...

Page 11: ...ate screws may be used Do not under any circumstance use flat head screws since these can damage the support see illustration no 5 Afterwards tighten all screws so that the mounting support does not move UNDER SHELF MOUNTING MOUNTING ON A FIXED EVEN SURFACE The mounting set can also be attached to the bottom of the receiver in order to prevent it from slipping or falling Mounting is then effected ...

Page 12: ...ntly not used red Recording in EPG editing in channel list Power on stand by Videotext Teletext OPT yellow Open channel options sound subtitles selection TV R blue Switch between TV radio Access Channel Notification Info AV mode Channel selection up down Confirm entry open channel list Cursor buttons Open EPG Electronic Programme Guide Changing channel in the programme preview EPG Stop recording T...

Page 13: ...ection and Set Up sections First switch your TV set on and select the AV channel slot Switch on your receiver at the power switch at the front of the unit The following display appears Also pay attention to the bars at the bottom of the on screen display Theseprovideinformation on what to do next Note If you are unsure whether you chose the right option from a previous menu you can go back a step ...

Page 14: ...the next line Use the buttons to select the country for which you wish to load the pre programmed channel list this is relevant only if you did not reject the pre programmed channel list Press the green button to move to the next menu The following display appears The following display appears Use the buttons here to select the settings for your TV set When doing this refer to the operating instru...

Page 15: ... you select the type of screen display depending on the setting of your TV format TV format 4 3 Pan Scan or Letterbox TV format 16 9 Automatic or Always 16 9 TV Scart Output Select the type of video signal at the TV Scart socket here Select the signal that your TV set can process FBAS composite colour signal or RGB Red Green Blue signal HDMI format Here please select the format resolution that wil...

Page 16: ...ved You can select a number from one to four satellites to be received The following display appears example When selecting the satellite s make sure that your reception position is aligned to the desired satellite s FIRST INSTALLATION DiSEqC 1 0 Use the buttons to select the first satellite slot Press the button to open the menu for the satellite settings ...

Page 17: ...cy for which your LNB was configured Test transponder To check whether the settings that you have made are correct use the buttons to move to the Test transponder field Use the buttons to select the required transponder from the various ones listed If your settings are correct you will see at the top right of the screen the live signal of a channel for the currently selected transponder If you do ...

Page 18: ... listed If your settings are correct you will see at the top right of the screen the live signal of a channel from the currently selected transponder If you are not receiving a signal check your settings again and if necessary call for expert help LNB settings Use the buttons here to select the LNB type used in your system The choice is between Universal and user defined Universal No further input...

Page 19: ...eption system you use a single cable LNB e g UAS 481 from Kathrein please select here the setting Wideband If you use a single cable matrix EXU 908 or a single cable changeover matrix EXR 551 or EXR 552 from Kathrein the LNB you use must be a Universal LNB Number of satellites Use the buttons to select how many satellites max 2 you would like to receive with your reception system Press the button ...

Page 20: ...red When you have completed all setting for the currently selected satellite press the button If you have selected more than one satellite repeat the previous Satellite and Position and LNB Type processes for the number of satellites you selected When you have completed the settings for all the satellites the following display appears FIRST INSTALLATION One Cable Use the buttons to select the desi...

Page 21: ...button Now press the green button The receiver will automatically display the menu for the channel search Continue with the item Perform channel search If no connection to the single cable system could be established you will receive the message Registration was abortive Check your settings and if necessary call for expert help If one or more receivers are already present on the system and an addi...

Page 22: ... the PIN is input Use the buttons to select the setting Yes A line with the text Password PIN is then displayed Press the buttons to select this line You can now use the number buttons to enter a PIN 0 255 Connected equipment Use the buttons to select the type of system to which they are connected or the single cable system components fitted refer to the manuals instructions and notes for the syst...

Page 23: ...em Perform channel search Test connection When you have completed all the settings press the buttons to switch to the Test connection selection field and press the button The receiver now tests whether a connection to the single cable system can be established or not As soon as the receiver has established a connection to the single cable system you will see the following display Check your settin...

Page 24: ...nue by selecting the item Perform channel search Transmission channel Use the buttons to select a free available transmission channel A maximum of four transmission channels are available 1400 1516 1632 and 1748 MHz Test connection When you have set a free transmission channel press the buttons to switch to the Test connection selection field then press the button The receiver now tests whether a ...

Page 25: ...the button Now press the green button The receiver will automatically display the menu for the channel search Continue with the section Execute channel search Transmission channel Use the buttons to select a free available transmission channel A maximum of two transmission channels are available 1400 and 1516 MHz Test connection When you have set a free transmission channel press the buttons to sw...

Page 26: ... free available transmission channel A maximum of eight transmission channels are available 1284 1400 1516 1632 1748 1864 1980 and 2096 MHz Secure channel with PIN The EXU 908 single cable matrix allows the transmission frequency to be protected by inputting a PIN No other receiver can then use that transmission frequency unless the PIN is input Use the buttons to select the setting Yes A line wit...

Page 27: ...channels The UFS 640si does not allow encrypted channels to be viewed because no Common Interface is fitted for insertion of the necessary CA modules and smart cards Press the button to move to the next selection item Network Search If you set the network search to Off only the factory stored transponders of the satellites you previously selected will be scanned for new and as yet unlisted channel...

Page 28: ... from summer and winter time If On is selected the receiver automatically sets itself to the right time If Off is selected the field for manual selection of summer and winter time is displayed below Press the buttons to perform the setting Press the green button to close First Installation and return to the TV picture Use the button to move to the next step of the first installation The following ...

Page 29: ...lf explanatory Pay attention to the bar at the bottom of the on screen display These provide information on what to do next Press the button to open the main menu and use the buttons to select the sub menus Press the button to access the sub menus Use the buttons to select the sub menu options The settings under the various options are made either by pressing the buttons or using the numeric pad Y...

Page 30: ...30 MENU TREE OPERATING INSTRUCTIONS Main Menu Open the menu by pressing the button ...

Page 31: ...to the right for entry of favourites names or search expressions by selectingnumeralsforthedesiredletters digits Youcanwrite withupperorlowercaseletters button Usethenumeric pad to select the desired character About two seconds after selection of the character the cursor moves automatically to the next position The button allows you to delete your entry character by character When you have selecte...

Page 32: ...on on the current channel if transmitted by the channel provider Use the buttons to scroll through the pages By pressing the buttons you can obtain information on the programmes to come on the current channel Press the or button to exit the display CHANNEL MESSAGES TV CHANNEL MESSAGES RADIO CHANNEL MESSAGES CHANNEL INFORMATION Time progression bar for the current programme Selected Favourites List...

Page 33: ...gainst the basic settings provided you had made a note of them as suggested ERROR SIGNALLING CHANNEL LIST TV RADIO ON SCREEN DISPLAYS OSD Also pay attention to the bars at the bottom of the on screen display These provide information on what to do next Press the button to access the channel list When you open this list the channel list selection sort order is displayed from where you selected the ...

Page 34: ...tial letter Use the buttons to make the selection Search function Press the button to start the search The numeric pad buttons allow you to input the desired search expression for the channel that is sought see also Operating instructions Alphanumeric input Press the button to start the search see screenshot below for an example of a search result Press to view the following items of information o...

Page 35: ...the selected channel Day of the week and period of time in which the highlighted programme is showing Date and time of the highlighted programme with category duration and picture format Channel names At this place you will be shown the age limitation of the highlighted programme if this is supplied by the channel provider Note If you selected a favourites list before opening the EPG you will see ...

Page 36: ... the cursor buttons The buttons allow you to select individual channels programs and the buttons allow you to scroll from page to page of the currently selected list Pressing the or the button exits the EPG again and returns to the TV picture You see information on the current or next following programmes in the EPG only if it is supplied by the channel provider CURRENT VIEW The Current view can b...

Page 37: ...Current list of selected channels Provided that EPG data has been supplied by the channel provider the receiver displays the programmes that will be shown on the selected channel for several days in advance You can use the cursor buttons to select the desired programme and if available you can use the button to open further information on the desired programme Using the buttons you can scroll thro...

Page 38: ...ammes in the order of the previously selected list see header This feature always assumes that the data has been supplied by the channel provider Using the red dot button you can load the selected programme into the recording settings see Recording section Press the or button to drop the additional information The additional information can always be called up by pressing the button whenever the i...

Page 39: ...to save the recording settings You can view the scheduled recordings in the timer list view of the EPG see section Timer list The red dot button allows you to set up a programme at any time for recording on an external recorder The programme to be recorded can be selected in any of the EPG views provided the red dot button appears at the bottom of the screen display If the programme is present in ...

Page 40: ...ength When all settings have been made press the button to save the recording settings You can view the scheduled recording in the timer list view of the EPG see section Timer list RECORD DAILY When all settings have been made press the button to save the recording settings You can view the scheduled recording in the timer list view of the EPG see section Timer list Use the buttons to select the r...

Page 41: ...DE When all settings have been made press the button to save the recording settings You can view the scheduled recording in the timer list view of the EPG see section Timer list Use the buttons to select the recording mode weekly see screenshot below Use the buttons to switch to the selection field Start and use the buttons or the number pad buttons to select the desired recording start time Use t...

Page 42: ...low the recordings to be sorted into once or repeated recordings The cursor buttons The cursor buttons allow you to select a recording allow you to select a recording The red dot button allows you to delete a recording that had been scheduled The Recording schedule view can be called up at any time in EPG by pressing the red button ...

Page 43: ... display even when the signal is encrypted When the search is finished the videotext Teletext being broadcast by the relevant encrypted provider appears You have several options for opening the desired pages Input with numeric pad Scroll backwards and forwards using the buttons Selection using the options indicated by the coloured buttons red green yellow and blue listed across the bottom of the s...

Page 44: ...utton Switch between radio and TV channels green button Open satellite channel lists yellow button Open the channel lists sorted alphabetically button Search for a specific channel input the search expression using the numeric pad on the remote control see also the sections Operating instructions Alphanumeric input The channel list chosen is generally that sorted by categories satellites favourite...

Page 45: ...nnel will be skipped when zapping through the channels Lock Channel can be viewed only by entering a PIN To favorite A channel can be assigned to any Favourites List Start Blockselection Several channels can be selected at the same time and edited together EDIT CHANNEL LIST As soon as you exit the menu under which you made the edit changes you will be asked if you wish to save the changes Use the ...

Page 46: ...d list Press the button to open the edit menu and use the buttons to select the Move function Confirm the command by pressing the button The channel you previously selected will now be shown inset slightly from the left Now use the cursor buttons or the number buttons to select the new desired position for the channel and confirm the new channel slot by pressing the button LAST FUNCTION MEMORY The...

Page 47: ... yellow field in the channels list The F shows that it is a favourite channel the black dot in the yellow field shows in which of the eight favourites lists the channel can be found See the item Editing Favourite Lists for information on how to delete a channel from a favourite list START BLOCKSELECTION HIGHLIGHTING SEVERAL CHANNELS Use the buttons to select the channel from which you want to high...

Page 48: ...tering a PIN Rename favorites list The favourites list can be renamed Start Blockselection Several channels can be selected at the same time and edited together REMOVE FROM THE FAVOURITES LIST Use the buttons to select the channel to be removed from the favorites list you have selected Press the button to open the edit menu and use the buttons to select the Remove from favourites list function Con...

Page 49: ...d will now be displayed with which you can enter the desired name alphanumerically using the numeric pad on the remote control See also the section Operating Instructions Alphanumeric Input START BLOCKSELECTION HIGHLIGHTING SEVERAL CHANNELS Use the buttons to select the channel starting from which you want to highlight further channels You can only select channels that are listed in succession in ...

Page 50: ... only the selected transponder for the satellite you selected will be searched Channel search with service ID Search for a specific channel using its service ID Use the buttons to select the desired type of search and confirm your selection using the button AUTOMATIC CHANNEL SEARCH The buttons allow you to select different sets of parameters for the scan Also pay attention to the bars at the botto...

Page 51: ...t selection item Network Search Use the buttons On Off to select whether a network scan should be performed If you set the network search to Off only the factory stored transponders of the satellites you previously selected will be searched for new as yet unlisted channels If you set the network scan to On the transponder network enables additional transponders that have not yet been stored to be ...

Page 52: ...es the newly found channels will be added to the end of the channel list Then press the button to exit the menu The channel list is opened on to the TV screen by pressing the button see also section On screen displays Channel list TV Radio MANUAL CHANNEL SEARCH SEARCH CHANNELS CHANNEL SEARCH After a scan of whatever type the receiver shows all newly found channels in the channel list under the rub...

Page 53: ...ode Use the buttons to select whether you wish to search free encrypted or only free channels Press the button to move to the next selection item Network Search Use the buttons On Off to select whether a network scan should be performed If you set the network search to Off only the factory stored transponders of the satellites you previously selected will be searched for new as yet unlisted channe...

Page 54: ...press the button to exit the menu The channel list is opened on to the TV screen by pressing the button see also section On screen displays Channel list TV Radio SEARCH CHANNELS CHANNEL SEARCH CHANNEL SEARCH WITH SERVICE ID After completion of the search you will see the following message example The buttons allow you to select different sets of parameters for the scan Satellite Use the buttons to...

Page 55: ...em is aligned to the selected satellite Press the button to move to the next selection item Transponder frequency Use the buttons or the keypad to select the transponder frequency on which the channel being sought is transmitted At the bottom right of the screen display the receiver shows the current signal strength and signal quality of the selected transponder Press the button to move to the nex...

Page 56: ...e blocked If the receiver is locked it can be operated only by entering the four digit PIN code after it is switched on factory setting 0000 Also pay attention to the bars at the bottom of the on screen display Theseprovideinformation on what to do next Press the button to exit the menu again Select the Parental Control menu using the menu button the buttons on the main menu and You are now prompt...

Page 57: ...once again Confirm the change of PIN code by pressing the button DEFINE NEW PIN CODE PARENTAL CONTROL Keep your PIN code in a safe place so that you always have access to your channels should you ever forget it If you have forgotten your PIN code you must contact your dealer who will be able to unlock your receiver for you ...

Page 58: ...ettings menu using the button the buttons in the main menu and Press to open the Video and Audio menu The following display appears see next page Use the buttons to select the further options If there is another sub menu layer press the button to open it If there are no more sub menus make the settings using the or numeric pad Press the button to save your settings and return to the previous menu ...

Page 59: ...e the buttons to select the picture format for your TV Either 4 3 or 16 9 format TV ASPECT RATIO TV SETTINGS TV PICTURE AND SOUND Use the buttons here to select the type of screen display Pan Scan Letterbox Full screen image PICTURE FORMAT SETTINGS Here you can use the buttons to specify whether your TV set is a PAL or NTSC set TELEVISION SYSTEM Here you can use the buttons to set the picture form...

Page 60: ... Not assigned Not assigned Not assigned Programme Guide Normal Select favourites Select options TV Radio Not assigned Programme Guide Use the buttons to select the time after which you want the on screen channel message display to be automatically cancelled The selections available are Off 1 2 3 4 5 or 6 seconds CHANNEL OSD DURATION Pressthe buttontoaligntheon screen displays on the TV screen Now ...

Page 61: ...he buttons to switch to the Automatic clock change field Automatic clock change Use the buttons to select whether the receiver should automatically change over to and from summer and winter time If On is selected the receiver automatically sets itself to the right time If Off is selected the field for manual selection of summer and winter time is displayed below The buttons are also used to perfor...

Page 62: ...ollowing display appears Current software version Last update run UPDATING SOFTWARE You can also check manually whether new software is available Use the buttons to switch to Software Update and to call it up press the button The following display appears Hardware version Date of the channel list ...

Page 63: ...t is available If you are unsure whether you wish to load the new software you can initially set the reply to No If you do agree to the changes you can then proceed to download the software Channel list If a new channel list is available but only then use the buttons No Yes to select whether you wish to load the new channel list that is available When you have made your settings use the buttons to...

Page 64: ...the main menu and Use the buttons to switch to Restore factory settings and to call them up press the button The following display appears Press the button to load the factory settings The channels and favourites lists remain unchanged SERVICE MENU The following display appears example ...

Page 65: ...ee EPG Recording timer section For VCR DVR playback you must have previously set the UFS 640si Scart socket to VCR mode Scart changeover using the button so that the signal path is set up from the VCR or DVR AUX Scart socket to the TV Scart socket In this setting the picture from the external recorder is switched through to the TV set during playback Pressing the button again restores priority to ...

Page 66: ...itches to the next channel down in the currently selected channel list button The channel up button switches to the next channel up in the currently selected channel list Because there are no numbered buttons no password PIN protected functions can be displayed If despite studying this operating manual you still have questions about getting started with the unit or using it correctly or if unexpec...

Page 67: ...D GB F I E CZ NL TR 14 timers convenient programming via EPG Language selection for programmes broadcast in several languages Electrical audio output for Dolby Digital data stream AC 3 Composite colour picture and RGB signal output programmable on Scart socket Cinch sockets for AV signal Videotext decoder with 800 page memory capacity and videotext generation Automatic 4 3 and 16 9 format recognit...

Page 68: ...S N dB 65 Power supply Supply voltage external power supply V AC Hz 230 50 10 DC voltage V 12 Power consumption operation stand by mode W 26 2 5 LNB supply vert horiz V mA 14 18 Max 400 Control signal kHz 22 DiSEqCTM 1 0 SCR single cable system Connections Sat IF input output loop through 2 x F type socket TV VCR output 2 x Scart socket Video output Cinch socket Video audio output digital 1 x HDMI...

Page 69: ...al C 15 X X Blanking signal 16 X X Video earth 17 X X Blanking signal earth 18 X X Video output FBAS Y 19 X X Video input 20 X Connector shield 21 X X The Scart sockets are switchable between VHS and S VHS The switch is made by selecting Main menu Settings TV Video and Audio VHS RGB The red signal is connected to terminal 15 the composite colour output to terminal 19 For S VHS Y C The Y output is ...

Page 70: ...70 Scart Scart Digitalton AC 3 elektrisch Infrarot Empfänger optional CONNECTION EXAMPLE TECHNICAL APPENDIX Hi fi system Infra red receiver optional Digital audio AC 3 electrical Dolby digital system ...

Page 71: ... ERA 14 ERA 14 LCD terr H low 0kHz V 1 2 V high 22kHz H 1 2 1 SCR 0 1400 MHz 2 SCR 1 1516 MHz 1 SCR 0 1400 MHz 2 SCR 1 1516 MHz EXR 552 ESU 33 002 BAYERN RADIO Twin ERA 14 H low V EXR 501 20510029 V high H A KLASSE CLASS Made in EC terr 1 4 1 SCR 0 1400 MHz 2 SCR 1 1516 MHz 3 SCR 2 1632 MHz 4 SCR 3 1748 MHz DC EXR 501 NCF 18 ESU 33 Single RTL Television 712 ESU 33 Single RTL Television 712 ESU 33 ...

Page 72: ...72 UAS 481 Single cable feed system ERA 14 ERA 14 ERA 14 TECHNICAL APPENDIX ...

Page 73: ...V high V low H low H high 18V 400mA Pos A H low V low V high H high 18V 400mA ESU 33 Single RTL Television 712 ESU 33 Single RTL Television 712 ERA 14 ESU 33 Single RTL Television 712 ESU 33 Single RTL Television 712 ESU 33 Single RTL Television 712 ESU 33 Single RTL Television 712 ERA 14 ESU 33 002 BAYERN RADIO Twin POWER PASS IN EBC 10 272859 5 2400MHz OUT OUT POWER PASS A K LASSE CLASS EXU 908 ...

Page 74: ...tching criteria are then ignored DVB MPEG 2 DVB is the abbreviation for Digital Video Broadcasting DVB S refers to the transmission method S satellite MPEG is the abbreviation for Moving Picture Experts Group a working group that formulates internationally applicable standards for the digital compression of video and audio MPEG 2 has established itself as the standard for compression of digital TV...

Page 75: ...channels on a single transmission frequency Digital transponders simultaneously transmit several TV and several radio programmes on a transmission frequency If a programme provider is broadcasting several TV channels via a digital transponder we refer to the provider s channel package The terms digital transponder and channel package have the same meaning PID The PID Packet IDentification number i...

Page 76: ...play PAL Analogue TV standard Pay TV Pay per view TV channels e g PREMIERE PCMCIA Standard for internal decoder interface for pay TV PID See Short technical glossary PIN Personal Identification Number Receivers Satellite receiver RGB Video signal made up of three individual colour signals red green blue Satellite IF signal Receiver input signal Scart cable 21 pin connecting cable e g receiver TV S...

Page 77: ...for the satellite in question High L O 10 600 GHz Low L O 9 750 GHz and Limit frequency L O 11 700 MHz and change as necessary Remote control no longer responding Receiver or remote control command set may have been unintentionally changed Set infrared code 1 simultaneously press the buttons Check the batteries Wrong time being displayed Summer Time setting wrong An incorrect time was imported fro...

Page 78: ...78 FOR YOUR NOTES ...

Page 79: ...79 FOR YOUR NOTES ...

Page 80: ...936 3469 A 1108 ZWT Technical data subject to change Internet http www kathrein de KATHREIN Werke KG Anton Kathrein Straße 1 3 P O Box 100 444 83004 Rosenheim GERMANY ...

Reviews: