background image


6. Maintenance


46

 
1.


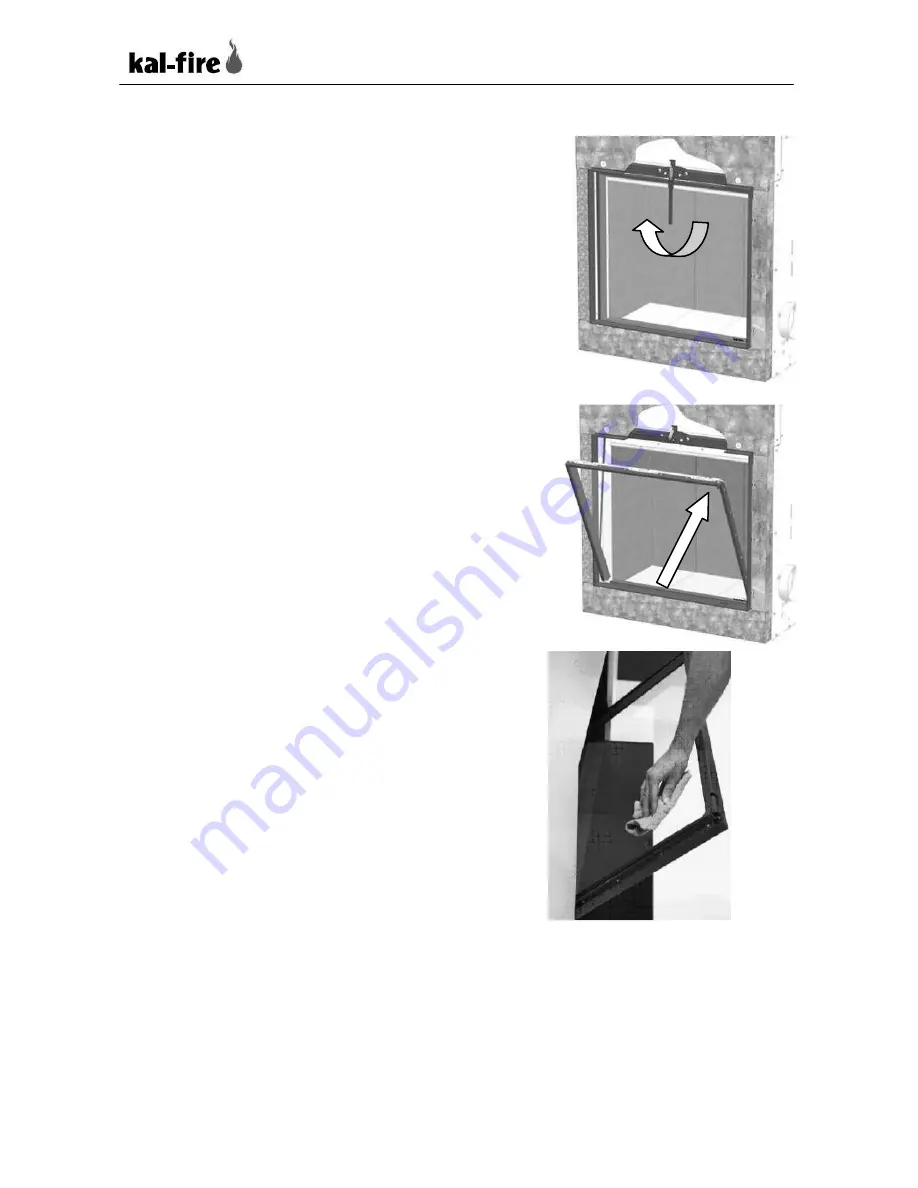
Move  the  handle  all  the  way  from 
right  to  left  (180  degrees)  in  one 
smooth movement. 

2.


The window is now released. 


3.


Carefully  tilt  the  window  forwards, 
using the small hole in the top right-
hand  corner  of  the  window.  The 
window  remains  open  at  an  angle  of 
approximately 45 degrees.  


4.


Use  a  cloth  or  piece  of  paper  to 
remove  the  worst  soiling  from  the 
glass.  

5.


Spray the cleaning agent onto a cloth 
or  piece  of  paper  and  wipe  the  glass 
clean.  Never  spray  the  cleaning 
agent directly onto the glass. 

6.


Wipe the window with a damp cloth 
to remove the cleaning agent. 
The  deposits  will  automatically  fall 
into  the  combustion  chamber  due  to 
the  tilted  position  of  the  door.  The 
area  in  front  of  the  Heat  Pure  will 
remain clean. 


To close the door again, tilt it back and move the handle all the way to 
the right. The Heat Pure will be hermetically sealed again by the three-
point closure.  
 

Summary of Contents for 45

Page 1: ...Installation User Manual Product Heat Pure Product group Wood burning fireplaces with lifting door Application Open and closed Models 45 60 70 71 85 100 105 110 120 Version April 2015 Language English...

Page 2: ...er cannot be held responsible for any damage as a result of faulty installation In case any problems occur or if you have any questions concerning the operation of your Heat Pure please contact your d...

Page 3: ...ting the feet 22 3 9 Baffle plate 25 4 Preparing for use 31 4 1 Type of wood 31 4 2 Storing the wood 32 4 3 Ventilation 32 5 Lighting the Heat Pure 33 5 1 Lighting the Heat Pure for the first time 33...

Page 4: ...es a number of symbols These symbols indicate possible damage to the product and or a life threatening situation if the procedures are not observed and followed carefully Warning of danger Warning of...

Page 5: ...at Pure functions correctly immediately after the installation Take the necessary preventive measures by using non combustible material in order to prevent overheating of floor boards or walls close t...

Page 6: ...r material should be at least 1 cm Nr 3 4 Make sure that curtains furniture and or other combustible materials are at least 120 cm removed from the Heat Pure If a fireguard is used this distance must...

Page 7: ...particles of insulation material circulating in the convection system Prevent any insulation material covering the convection air inlet Attach the insulation material firmly to prevent it from slippi...

Page 8: ...2 6 2 7 5 3 2 2 1 4 1 100 10 10 9 2 6 2 7 5 3 2 2 1 4 1 105 5 5 9 2 6 2 7 5 3 2 2 1 4 1 110 9 4 8 4 9 3 7 7 6 9 7 6 6 0 5 3 5 9 120 9 4 8 4 9 3 7 7 6 9 7 6 6 0 5 3 5 9 The floor on which the Heat Pur...

Page 9: ...ng materials behind the fire must also be shielded or insulated by insulation material The minimum thickness A of the insulation material depends on the model and type of Heat Pure Refer to Table 1 fo...

Page 10: ...n combustible materials The combustible floor in front of the door opening must be protected 30 cm on both sides and 50 cm in front of the appliance 2 Safety are at a distance of minimum 100 cm from E...

Page 11: ...rials must have a General Urban Development Permit of the German Institute of Building Technology DIBt For further details see DIN 18895 resp EN 13229 DIN 18160 Replacement insulation materials have v...

Page 12: ...er immediately 2 Remove the transport security screws with yellow sticker on the front of the convection casing 3 Check the following parts for correct working Lifting door up and down Forward tilting...

Page 13: ...lue for proper functioning minimum required draught suction is 12 Pa 2 Test the air slide valve for proper functioning this will work after the fire has burnt for 50 minutes see chapter 3 3 1 extreme...

Page 14: ...the rooms connected by ventilation ducts create an under pressure that remains below 0 04 mbar ATTENTION situation must also be safeguarded if easily accessible control equipment used for the ventilat...

Page 15: ...air enters the combustion chamber via the lower spoiler As the Heat Pure warms up the air flow will gradually decrease After approximately 50 minutes the Heat Pure is so warm that this air flow stops...

Page 16: ...room the appliance is installed in With an opened door the built in valve ensures that the passage to the combustion chamber is closed see figure The connected air is re routed to the convection casi...

Page 17: ...Fresh air connection base or rear The standard for the Heat Pure is that the fresh air connection is situated on the rear This connection can be relocated to the base Method 1 Demount the connecting c...

Page 18: ...n or against an opening for fresh air Use a ceramic cord to seal off the transition between the Heat Pure and the constructed opening Available as an option Examples The Heat Pure is positioned agains...

Page 19: ...xpansion joint between the metal of the mantel iron and the surround This convection set is ordered separately to the Heat Pure Instead of a grating openings for example recessed plinths can be used D...

Page 20: ...soiled walls and ceilings in the room There is always a risk of discolouration to walls and ceilings but this risk can be considerably reduced by correctly ventilating the room Mount the gratings at a...

Page 21: ...er sch so H e F sch F Fsch Fso Hsch e flue section in cm2 surface firebox in cm2 height of flue in metre measured from the upper side of the Heat Pure influence factor between 0 2 and 0 6 determined b...

Page 22: ...hen the door is opened smoke may escape back into the room or it may be more difficult to ignite the Heat Pure Take factors in the surrounding environment into acc which could cause a strong draught i...

Page 23: ...g a top flue exit into a rear flue exit 6 steps 1 Demount the upper part of the convection casing 2 The connection piece is now visible and the four bolts can be unscrewed 3 Turn the connecting piece...

Page 24: ...he Heat Pure is delivered as standard with a reducer ring This ring can be used to connect various flue systems to the Heat Pure Figure 2 Reducer ring Table 4 Diameter chimney connection collar Heat P...

Page 25: ...e Heat Pure can be controlled well using the air regulation see section 5 3 Attention Make sure that the position of the damper is visible for the end user For this purpose most of the operating knobs...

Page 26: ...a metal strip which facilitates the join between the surround and the Heat Pure These metal strips can be hidden from view on the front the lines of the surround then merge into the finishing strips...

Page 27: ...e room the appliance is installed in or with the chimneybreast The convection system is only in contact to the room in which the appliance is installed Situation 3 The combustion air cannot be connect...

Page 28: ...essary you can adjust the baffle plate as follows 1 Remove the baffle plate and see if this solves the problem If the problem still occurs then something else is the cause If removing the plate solves...

Page 29: ...the Heat Pure starts Condensation in the flue duct If necessary you can adjust the baffle plate as follows 1 Remove the baffle plate and see if this solves the problem If the problem still occurs the...

Page 30: ...Remove the baffle plate and see if this solves the problem If the problem still occurs then something else is the cause If removing the plate solves the problem proceed with the next step 2 Use a saw...

Page 31: ...you can adjust the baffle plate as follows 1 Remove the baffle plate and see if this solves the problem If the problem still occurs then something else is the cause If removing the plate solves the pr...

Page 32: ...content 11 1 10 1 10 5 10 6 9 72 Dust content at 13 O2 mg nm3 36 13 34 11 17 NOx at 13 O2 mg nm3 150 119 87 113 80 7 CnHm at 13 O2 mg nm3 58 58 74 61 25 6 Min flue draught Pa 12 12 11 12 11 6 Insulati...

Page 33: ...8 8 9 46 9 39 8 63 Dust content at 13 O2 mg nm3 22 11 54 44 NOx at 13 O2 mg nm3 116 118 105 104 CnHm at 13 O2 mg nm3 90 60 50 70 Min flue draught Pa 13 12 12 12 Insulation side panel cm AGI Q 132 tabl...

Page 34: ...re It will also form an environmental nuisance and a nuisance to the neighbours as a result of the excessive smoke odour that is released extremely dark smoke This is why you should always make sure t...

Page 35: ...5 Below are some tips from the Dutch decorative heating guild to avoid discolouration The area in which the Heat Pure is situated must be well ventilated Minimise the use of candles and oil lamps and...

Page 36: ...ing it only after the Heat Pure has completely cooled off If the glass adheres to the paint on the frame tilt it forward to en glass is not in contact with the frame see section 5 2 5 Lighting the fir...

Page 37: ...rt pin attached to the handle Then lift the handle upwards The first 3 cm can be quite difficult because the door has to be pulled out of the lock After this it will be easier The door can be left ope...

Page 38: ...mains clean When the draught in the chimney exceeds 12 Pascal and very dry wood is being burned you will be able to keep the window clean for a considerable length of time However soiling can occur on...

Page 39: ...the damper if present completely Only use the Heat Pure as an open fireplace if there is enough draught in the flue Preferably use the Heat Pure with a closed door This is better for the environment...

Page 40: ...he rear wall Place a smaller log on top Place some firelighters on top Place some finely chopped wood onto the logs Open the air regulation completely position on the extreme right Ignite the fireligh...

Page 41: ...on on the extreme right Ignite the firelighters using a long match Leave the door slightly open 1 2 cm for a couple of minutes When there is a glowing bed distribute the glowing ashes using poker Now...

Page 42: ...place 39 Do not use white spirits petrol oil or other liquid fuels Be aware that weather conditions air pressure temperature wind can influence combustion Minimize these influences by adjusting the se...

Page 43: ...f wood of approximately the same size The amount differs per type of Heat Pure See table below Table 5 Instructions for optimal burning per model Heat Pure 45 60 70 71 85 100 105 Weight per log g 850...

Page 44: ...as follows Heat Pure 45 Place the two wood logs in a V shape The Heat Pure 45 can be used both as an open or closed fireplace Remove both baffle plates before using the appliance with the door open to...

Page 45: ...on the logs in an A shape with the horizontal log at the base Heat Pure 100 110 120 Position the logs in an A with the horizontal log at the top The three logs are approx 29 cm long 5 Lighting the fir...

Page 46: ...the flue gas is exhausted correctly If the appliance is used with the door open straight away there is only a minimum of pull in the chimney The flue gasses will not be exhausted correctly but will fl...

Page 47: ...uation an external damper can be connected to the Heat Pure see section 3 6 Attention It is not necessary to install a damper in all situations After the installer has installed the damper you can ope...

Page 48: ...Pa REMARKS A Heat Pure with a slatted or patterned rear panel is more likely to be affected by pane pollution than a model with a Skamol rear panel Due to the relatively small surface area of Skamol t...

Page 49: ...rst soiling from the glass 5 Spray the cleaning agent onto a cloth or piece of paper and wipe the glass clean Never spray the cleaning agent directly onto the glass 6 Wipe the window with a damp cloth...

Page 50: ...ion of the wood The opening of the air gauge must never be obstructed or blocked The lower sealing cord must be free of ash so that the glass is able to lay against the sealing cord TIP Ash consists l...

Page 51: ...se Dust can easily collect here conveyed by the convection current 4 Make sure the cord in the lower frame is free of ash and soiling 5 If the cords no longer seal properly they can be replaced Contac...

Page 52: ...wear Check if the tilting mechanism is correctly locked Check if the secondary air regulation is in the maximum position to the right Damper is sticking Check if there is something blocking the damper...

Page 53: ...fire with water This will cause enormous clouds of steam As this happens so quickly the flue may crack due to the pressure Use sand or salt to extinguish the fire in the appliance Close the Heat Pure...

Page 54: ...s N P8 063 2009 N P8 003 2015 N P8 8017 2015 N P8 025 2011 N P8 001 2015 N P8 066 2010 N P8 8019 2015 N EZ 07 2213 02 N EZ 07 2213 01 and also meet the applicable essential requirements of directive 1...

Page 55: ...Appendix B Dimension Diagrams B1 APPENDIX B Dimension diagrams All dimensions shown in mm Dimensions subject to modification Side view Front view Top view Heat Pure 45...

Page 56: ...Appendix B Dimension Diagrams B2 Front view Side Top view All dimensions shown in mm Dimensions subject to modification Heat Pure 60 Appendix B Dimension Diagrams Side view...

Page 57: ...Appendix B Dimension Diagrams B3 Heat Pure 71 Side view Front view Heat Pure 70 All dimensions shown in mm Dimensions subject to modification Top view...

Page 58: ...Appendix B Dimension Diagrams B4 All dimensions shown in mm Dimensions subject to modification Front view Side view Top view...

Page 59: ...Appendix B Dimension Diagrams B5 Front view All dimensions shown in mm Dimensions subject to modification Heat Pure 85 Top view Side view...

Page 60: ...Appendix B Dimension Diagrams B6 All dimensions shown in mm Dimensions subject to modification Heat Pure 100 Top view Front view Side view...

Page 61: ...Appendix B Dimension Diagrams B7 Front view Heat Pure 105 Side view Top view All dimensions shown in mm Dimensions subject to modification...

Page 62: ...Appendix B Dimension Diagrams B8 All dimensions shown in mm Dimensions subject to modification Front view Side view Top view Top view Heat Pure 110...

Page 63: ...Appendix B Dimension Diagrams B9 Front view Side view Top view All dimensions shown in mm Dimensions subject to modification Heat Pure 120...

Page 64: ...__ Zip code Place ______________________________ Type of appliance Heat Pure ________________________________________ Manufacturing number this is found on the upper left in the combustion chamber on...

Page 65: ...t covered by this guarantee 5 This guarantee is only valid if the fireplace has been used normally and only if wood has been used as fuel 6 The guarantee covers the replacement or repair of all defect...

Page 66: ...out adequate packaging and protection 4 If the fireplace changes ownership 5 If the installation and or operating instructions given by the manufacturer have not been followed 6 If damage is caused by...

Reviews: