background image

Page 16

Installation Instructions Powador 1501xi/2501xi*/3501xi/4501xi/5001xi**_EN

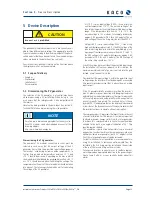
Connecting the PV generator using cable fi ttings

Connecting three or four strings to the inverter requires 
the double assignment of one or both connection terminals
(see fi gure 6.5).

Figure 6.5: 

Connection of three PV strings

Connecting the PV generator using MC or Tyco plug 
connectors

As an option, MC or Tyco plug connectors can be delivered with 
the inverter. These can be used instead of the cable fi ttings that 
were already installed upon delivery. These pre-installed cable 
fi ttings must fi rst be removed before installing the appropriate 
plug connectors.

Figure 6.6: 

Installation of Tyco sockets

The assembly of the Tyco and MC plug connectors is shown in 
fi gure 6.7 and 6.8 respectively.

Figure 6.7: 

Assembly of the Tyco plug connectors

S e c t i o n   6   ·


I n s t a l l a t i o n   a n d   S t a r t - u p

ATTENTION

To achieve protection class IP54, unused cable fi ttings must 
be closed off by using the included blind caps.

ACTION

Unscrew the cable fi ttings until you can insert the cables. 
Screw the ends of the cables into place in the connection 
terminals labelled “PV+” and “PV-”. When doing this, 
ensure that the polarity is correct. Tighten the cap of the 
cable fi ttings.

Always disconnect the inverter from the PV gen-
erator by operating the DC main switch before 
pulling the plug connector. Failure to observe this 
may cause arcing, which can result in a hazard to 
health and to the unit.

WARNING

ACTION

Unscrew the cable fi ttings from the cut-outs in the base 
plate of the inverter.
Insert the Tyco or MC sockets from the outside through 
the cut-outs and secure them from the inside using the 
counter nuts (see fi gure 6.6).

Summary of Contents for Powador 1501xi

Page 1: ...Powador 1501xi Powador 2501xi Powador 3501xi Powador 4501xi Powador 5001xi Operating instructions Operator Skilled and authorised electrician available only in France available only in Korea and Spain...

Page 2: ...nd Regulations 5 3 Notes on Installation and Operation 5 3 1 Intended use 5 3 2 Factory warranty and liability 5 3 3 Service 6 4 Operation 6 4 1 Overview of controls and displays 6 4 2 LED displays 6...

Page 3: ...ions are delivered together with the respective components and additional parts of the system 1 1 Retention of documents Please pass these operating and installation instructions on to the plant opera...

Page 4: ...nly be operated with a permanent connec tion to the public power grid The inverter is not intended for mobile use Any other or additional use is not considered the intended use The manufacturer suppli...

Page 5: ...occur in exceptional cases In such cases KACO new energy GmbH will provide you with the maximum possible support KACO new energy GmbH will make every effort to remedy such faults in an expeditious ma...

Page 6: ...s that the grid feed was stopped due to a fault The following faults activate LED 3 Line overvoltage or undervoltage Faulty line impedance or line frequency Generator voltage is too high Generator pow...

Page 7: ...that is currently being fed into the grid The respective day s peak power that was fed into the grid for a short time Displays the current heat sink temperature in C If the unit becomes too hot either...

Page 8: ...y pressing key 2 The address then returns to 1 The RS485 interface is used to communicate with the Powador proLOG If several inverters are connected to a Powador proLOG each address may only be used o...

Page 9: ...ys it in various diagram types as a daily or monthly representation The PC however must also run continuously Because of the amount of energy used this type of monitoring only makes sense over limited...

Page 10: ...been pressed for a longer period of time the power that is currently being fed into the grid is shown on the display You can use the control keys see section 4 3 to show the values and data that are...

Page 11: ...down Protective function of the inverter when too much generator power is supplied 13 Protection shutdown Protective function of the inverter for short lived line failures 14 Line failure Possible lin...

Page 12: ...y SMS text message fax or e mail remote access to the installation the representation of the PV installation on the Internet and much more are no problem whatsoever for the Powador proLOG Up to 32 inv...

Page 13: ...of the inverter s pre fuse should be somewhat higher than the maximum grid feed current The line fuse immediately trips when the inverter switches to grid feed mode after the start up period is comple...

Page 14: ...nerator power the grid separa tion relay is presumably faulty thus preventing the inverter from connecting Noise emission from the inverter Particular ambient condi tions When there are certain ambien...

Page 15: ...e inverter and the corresponding transport packaging are made from recyclable raw materials Device Do not dispose of faulty inverters or accessories together with household waste Ensure that the old u...

Page 16: ...tended use 6 3 2 Factory warranty and liability 6 3 3 Service 6 4 Technical Data 7 5 Device Description 11 5 1 Scope of delivery 11 5 2 Dimensioning the PV generator 11 5 3 Protection concepts 12 6 In...

Page 17: ...hown on the name plate ful ls the fundamental requirements of the following relevant directives Directive concerning electromagnetic compatibility Council Directive 2004 108 EC Low voltage directive C...

Page 18: ...from being inadvertently switched back on If measurements must be taken while the power supply is switched on never touch the electrical connections Remove all jewellery from your wrists and ngers Ens...

Page 19: ...g cases Use of the units in ways not intended Improper installation and installation that does not comply with standards Improper operation Operation of units with defective protective equipment Unaut...

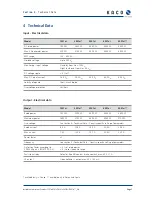
Page 20: ...ection Varistors Output Electrical data Model 1501xi 2501xi 3501xi 4501xi 5001xi Rated power 1500 W 2500 W 3300 W 4600 W 4600 W Maximum power 1650 W 2750 W 3600 W 5060 W 5100 W Line voltage See sectio...

Page 21: ...erter Mechanical and technical data Model 1501xi 2501xi 3501xi 4501xi 5001xi Visual displays LED PV generator green Grid feed green Fault red LCD 2 x 16 characters Controls 2 keys for operating the di...

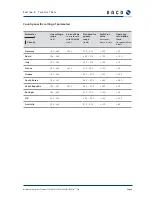
Page 22: ...in Hz Switch on value in seconds after a re start Operation resumption time in seconds after a fault Germany 190 264 253 V 47 5 50 2 180 30 Spain 196 254 49 0 51 0 180 180 Italy 190 264 49 7 50 3 180...

Page 23: ...ge Scale line current Scale line current Scale DC link Scale DC link S0 interface Save parameters Erase parameters Parameter menu A Section 4 Technical Data Country specific parameter menu Minimal lin...

Page 24: ...ange If the temperature increases from 25 C to 60 C the MPP voltage in 12 V modules decreases by approx 3 6 V per module 7 2 V for a 24 V module The MPP voltage of the entire string should be 125 V If...

Page 25: ...lecting the inverter s place of installation attention should be paid to the following items Ensure good access to the unit for installation or any service work that may later be required Maintain the...

Page 26: ...location the electrical connection to the unit can be established You must adhere to all mandatory safety regulations the currently required technical connection speci cations of the responsible power...

Page 27: ...mounted should be secured as follows 1 5 mm 16 A 2 5 mm 20 A 4 0 mm 25 A 6 0 mm 35 A NEOZED gL safety fuses should be used available only in France available only in Korea and Spain Section 6 Install...

Page 28: ...th the positive and the negative leads must be strictly isolated electrically from the earth potential PE ATTENTION Risk of damage Ensure that the polarity is correct when connecting the unit ACTION B...

Page 29: ...hown in gure 6 7 and 6 8 respectively Figure 6 7 Assembly of the Tyco plug connectors Section 6 Installation and Start up ATTENTION To achieve protection class IP54 unused cable ttings must be closed...

Page 30: ...nection On the inverter s control card rear panel of the door there are four terminals labelled RS485 A and B see gure 6 11 To connect several Powadors terminal A of one Powador is connected to termin...

Page 31: ...riod is required in order to ensure that the generator voltage is continuously above the power delivery limit of 125 V A quick start routine is provided for startup and test purposes This routine circ...

Page 32: ...ns Modifications may be made only in exceptional cases and only after having consulted with the manufacturer and the power supply company WARNING DANGER Disconnect the inverter from all power sources...

Page 33: ...ent All display values are checked and calibrated prior to shipment If the voltage or current value shown on the display does not correspond with the actual measured value it can be adjusted If the va...

Page 34: ...n verter When working on the photovoltaic module in ad dition to disconnecting from the grid the DC main switch on the generator terminal box or the DC plug connectors must always be disconnected at a...

Page 35: ...a short period For this reason the capacity of the inverter s pre fuse should be somewhat higher than the maximum grid feed current The line fuse immediately trips when the inverter switches to grid...

Page 36: ...ect the inverter it does not begin feeding into the grid until the input voltage once again falls below 500 V Noise emission from the inverter Particular ambient condi tions When there are certain amb...

Page 37: ...J HOHFWULFDO HTXLSPHQW GHVLJQHG IRU XVH ZLWKLQ FHUWDLQ YROWDJH OLPLWV 6DIHW RI WKH GHYLFH 1 1 UHJDUGLQJ FOHDUDQFH DQG FUHHSDJH GLVWDQFHV LUHFWLYH FRQFHUQLQJ HOHFWURPDJQHWLF FRPSDWLELOLW QWHUIHUHQFH LP...

Page 38: ...for photovoltaic systems with a single phase parallel coupling via an inverter in the public mains supply The automatic disconnection device is an integral part of the aforementioned inverter This se...

Page 39: ......

Page 40: ......

Page 41: ......

Page 42: ...31000580 01 090515 Gottfried Leibniz Stra e 1 74172 Neckarsulm Germany Phone 49 7132 3818 0 Fax 49 7132 3818 703 info kaco newenergy de www kaco newenergy de...

Reviews: