background image

Installation Instructions

SIMPLEX

®

3000 NARROW STILE

Summary of Contents for SIMPLEX 3000 NARROW STILE

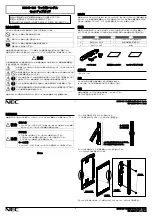
Page 1: ...Installation Instructions SIMPLEX 3000 NARROW STILE...

Page 2: ...sed by installation Caution Wear safety glasses when preparing door Combination lock assembly Instructions for changing combination Operating instructions Warranty card DF 59 keys Mounting screws 10 2...

Page 3: ...semble two cylinder positioning screws C Make sure the heads of these screws are below the underside of the cylinder cam See Figure 1 1 A 4 Reassemble the interposer assembly A Interposer arm should b...

Page 4: ...flush when properly positioned Note Before closing door refer to operating instructions to check out the operation of all lock functions Combination Lock Assembly A As shown on Each Drive Assembly 31...

Page 5: ...combination change sleeve C DF 59 See Figure 2 2 until trim plate is snug against stile The key can only be removed in vertical position Narrow Stile Combination Lock Side Narrow Stile Trim Plate Side...

Page 6: ...lock automatically when the thumb turn is released C 2 Gaining Access By Key Override Insert cylinder key into cylinder on combination lock side of door Turn the key in clockwise direction approximat...

Page 7: ...ly See Figure 3 6 Hold the key in that position and turn the thumb turn to the left counterclockwise Bring the key to the pull position and remove B To allow the latch to return to lock mode reinsert...

Page 8: ...is used with a wall bumper the warranty is null and void If a doorstop is required we recommend the use of a floor secured stop The environment and conditions of use determine the life of finishes on...

Page 9: ...CONTROL 2941 INDIANA AVENUE WINSTON SALEM NC 27199 3770 NO POSTAGE NECESSARY IF MAILED IN THE UNITED STATES BUSINESS REPLY MAIL FIRST CLASS MAIL PERMIT NO 1563 POSTAGE WILL BE PAID BY ADDRESSEE WINST...

Page 10: ...Room This lock is o New Installation o Replacing a conventional keyed lock o Replacing a Kaba Mechanical Pushbutton Lock o Replacing a Kaba Electronic Access Control o Replacing a Keyless Lock other...

Page 11: ...ly can be removed from lock D 4 Turn outside thumb turn counterclockwise to the left to stop position and release See Figure 4 2 This will clear the lock of previously depressed buttons D 5 Depress th...

Page 12: ...change sleeve and turning to the right clockwise until trim plate is snug against the stile of door The DF 59 key can be removed from control lock assembly in the vertical position only D 11 Before c...

Page 13: ...m They are not used in the combination See Figure 5 3 Note Shear line open position references the L shaped feet already align with the mating gear pocket E 5 Find the code gear pocket s e that is far...

Page 14: ...e Figure 5 4 The new combination is now set E 13 Look at the code gear pockets e The digits in the new combination should not be at the shear line open position See Figure 5 3 Reinstallation Replace t...

Page 15: ...13 Notes...

Page 16: ...Kaba Access Control 2941 Indiana Avenue Winston Salem NC 27105 USA Tel 800 849 8324 or 336 725 1331 Fax 800 346 9640 or 336 725 3269 www kabaaccess com PKG2586 0709...

Reviews: