


24
Menu Settings Using the Operation Buttons on the Camera Body
1.
Press the SET button to display the
SETUP MENU screen on the monitor.
2.
Press the UP or DOWN button to align
the cursor (>) with the item to be set.
Then press the SET button.
• The submenu for the selected item
appears.
3.
Press the UP or DOWN button to align
the cursor (>) with the item to be set.
4.
Press the LEFT or RIGHT button to
change the set value.
When the set value of an item is
changed, the change mark (
9
) appears
after the cursor (>).
When items followed by the “..”
indication are selected, press the SET
button.
* The selected item’s setting screen
appears.
5.
To exit the submenu, press the DOWN
button to align the cursor (>) with END.
Then press the SET button.
• The SETUP MENU screen returns.
To set other submenus, repeat steps
2.
to
5.
6.
To complete the menu settings, align the
cursor (>) with the END item on the
SETUP MENU and press the LEFT or
RIGHT button to select the way to end
the setting.
To save the setting contents, be sure
to select “MEMORY”.
Finally, press the SET button.
* “DATA SAVED” is displayed in the
lower part of the screen, and then the
normal screen returns.
MONITOR
LOCK
LEFT
RIGHT
SET
UP
AWC
DOWN
LEFT button
RIGHT button
SET button
UP button
DOWN button
NOT USED
NOT USED
L/L
ON
INT
OFF
TERMINATION
– –
I D E O
A D J U S T – –
V
I R I S
L E V E L
N O R M A L
N O R M A L
N O R M A L
C O L O U
L E V E L
R
E N H A
C E
L E V E L
N
A G C
O D E
2 0 d B
M
S U P E
A G C
O F F
R
B L C .
O F F
.
A V E R
G E : P E A K
8 : 2
A
E N D
WH I T
B A L A N C E
A T W
E
VIDEO ADJUST screen
– –
E T U P
M E N U – –
S
V I D E
A D J U S T . .
O
M O D E
S E L E C T . .
C O MM
N I C A T I O N . .
U
E N D
M E M O R Y
SETUP MENU screen
– –
E T U P
M E N U – –
S
V I D E
A D J U S T . .
O
M O D E
S E L E C T . .
C O MM
N I C A T I O N . .
U
E N D
M E M O R Y
SETUP MENU screen
Cursor
MEMO
Items followed by “..” are items that
have a submenu.
Submenu to be followed
Change mark
Item
Set value
SETUP MENU
25
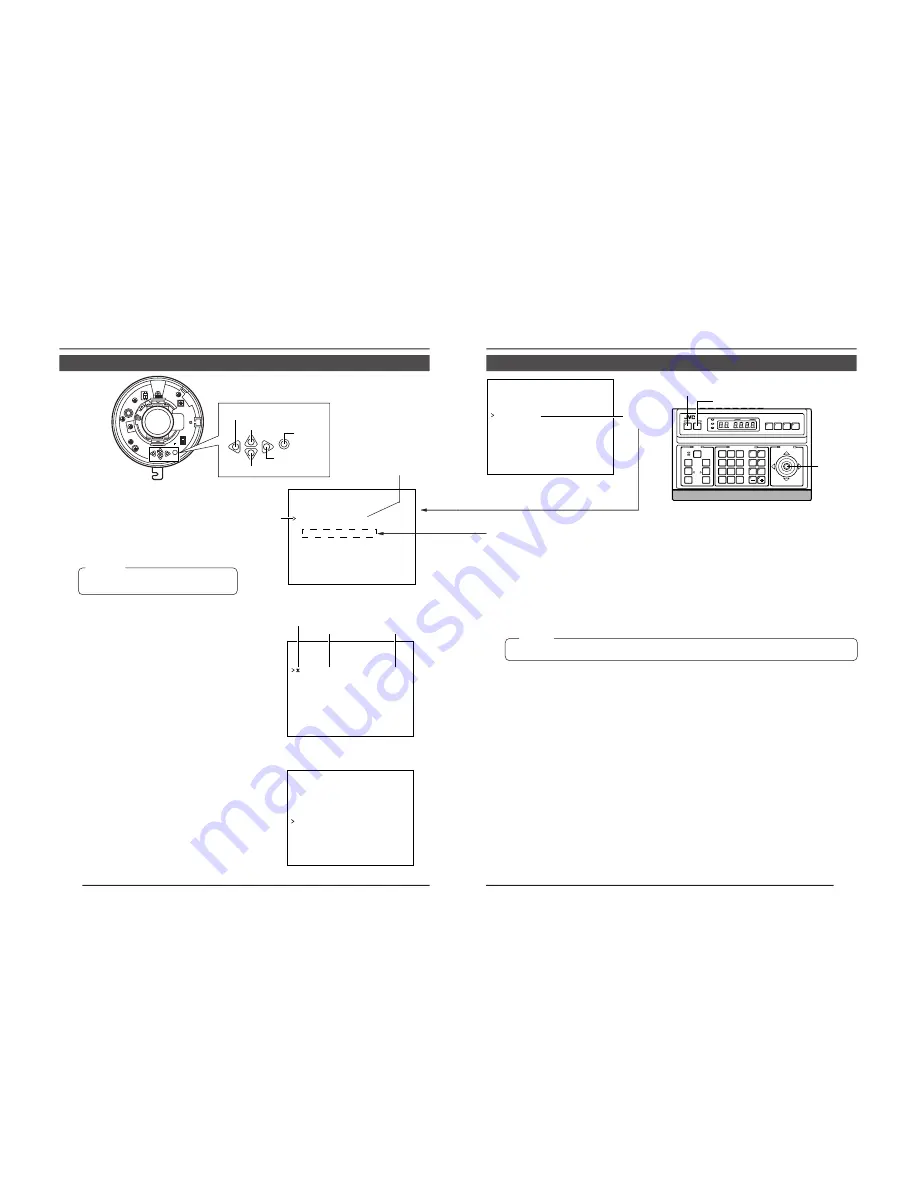
Menu Settings Using the RM-P2580
1.
Press the MENU button for about 3 seconds to display the remote control’s SETUP
screen on the monitor. (Above figure)
2.
Press the PAN/TILT control lever up (
6
) or down (
7
) to align the cursor (>) with the
CAMERA item. Then press the SET button.
• The SETUP screen appears. (See figures on the left.)
3.
Press the PAN/TILT control lever up (
6
) or down (
7
) to align the cursor (>) with the item
to be set. Then press the SET button.
• The selected itemís submenu appears.
MEMO
Items followed by “..” are items that have a submenu.
E T U P
. .
S
P O S I
I O N
S E T U P
T
C A M E
A . .
R
C O N T
O L
U N I T . .
R
SET button
SETUP
SETUP
MENU
MENU
SET
SET
SPEED
SPEED
IRIS
IRIS
AF
FOCUS
FOCUS
ZOOM
ZOOM
OPEN
OPEN
FAR
FAR
TELE
TELE
CLEAR
CLEAR
/HOME
/HOME
7
4
1
8
0
5
2
9
6
3
ENTER
ENTER
AUTO
AUTO
PAN
PAN
OPTION
OPTION
1
OPTION
OPTION
2
CAMERA
CAMERA
POSI-
POSI-
TION
TION
AUTO
AUTO
PATROL
PATROL
CLOSE
CLOSE
NEAR
NEAR
WIDE
WIDE
AUTO
AUTO
F-1
F-1
F-2
F-2
F-3
F-3
PAN/TILT
PAN/TILT
LENS
LENS
CAMERA/POSITION
CAMERA/POSITION
CAMERA
CAMERA
POSITION
POSITION
REMOTE CONTROL UNIT
REMOTE CONTROL UNIT
RM-P2580
RM-P2580
ALARM
ALARM
PO
POWER
WER
KEY LOCK
KEY LOCK
PAN/TILT
control lever
SET button
MENU
button
RM-P2580
SETUP screen from remote control
Select the
CAMERA
item.
When using the RM-P2580.
FUNCTION
4.
Press the PAN/TILT control lever up (
6
) or down (
7
) to align the cursor (>) with the item
to be set.
5.
Press the PAN/TILT control lever to the left (
8
) or to the right (
t
) to change the set value.
When the set value of an item is changed, the change mark (
9
) appears after the cursor
(>).
When items followed by the “..” indication are selected, press the SET button.
* The selected item’s setting screen appears.
6.
To exit the submenu, press the PAN/TILT control lever down (
7
) to align the cursor (>)
with END. Then press the SET button.
• The SETUP MENU screen returns.
To set other submenus, repeat steps
3.
to
6.
7.
There are two methods to complete the menu settings.
• Align the cursor (>) with the END item on the SETUP MENU and press the PAN/TILT
control lever to the left (
8
) or to the right (
t
) to select the way to end. Finally, press
the SET button.
• Press the MENU button while the SETUP MENU screen is displayed. In this case, the
menu setting is completed in accordance with the setting displayed for the END item.
●
To save the setting contents, be sure to select “MEMORY”.
• “DATA SAVED” is displayed in the lower part of the screen and then the normal screen
returns.
Summary of Contents for TK-C553E
Page 30: ......


