background image

33

English

From the remote control:

Before starting the procedure below, make sure you have selected FM station only using
the remote control. If not, the following RDS operating buttons do not work for tuner
operation. (Pressing FM/AM activates the remote control for tuner operation.)

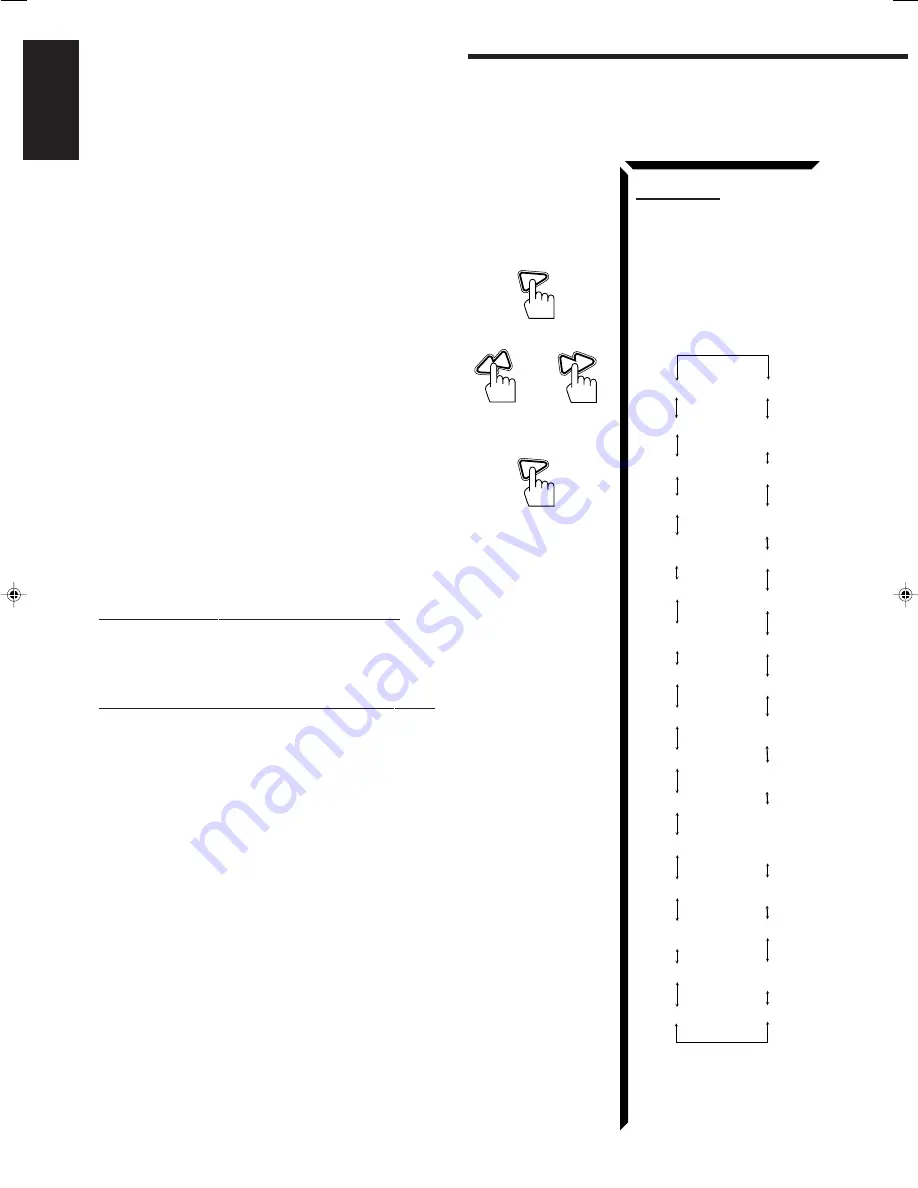
1. Press PTY SEARCH while listening to an FM

station.
“PTY SELECT” flashes on the display.

2. Press PTY +/– until the PTY code you want appears

on the display, while “PTY SELECT” is flashing.
The display gives you the PTY codes described to the
right.

3. Press PTY SEARCH again, while the PTY code

selected in the previous step is still on the display.
While searching, “SEARCH” and the selected PTY
code alternate on the display.
The receiver searches 40 preset channels, stops when it
finds the one you have selected, and tunes in that
station.

To continue searching after the first stop

Press PTY SEARCH again while the indications on the display are flashing.
If no program is found, “NOTFOUND” appears on the display.

To stop searching any time during the process

Press PTY SEARCH while searching.

When an emergency broadcast (ALARM signal) is sent from an FM station:
The receiver automatically tunes in the station except in the following cases:

When you are listening to non-RDS stations (all AM — MW/LW and some FM
stations).

When the receiver is in standby mode.

While receiving an emergency broadcast, “ALARM” appears on the display.

The TEST signal is used for equipment test — whether it can receive the ALARM
signal correctly.
The TEST signal makes the receiver work in the same way as the ALARM signal does.
If an TEST signal is received, the receiver automatically switches to the station
broadcasting the TEST signal.
While receiving an test signal, “TEST” appears on the display.

PLAY

PTY SEARCH

4

 / REW

PTY

or

FF / 

¢

PTY +

PLAY

PTY SEARCH

Note:

When selecting the PTY codes
by pressing PTY +, NEWS
always appears first. When
selecting the PTY codes by
pressing PTY –, ALARM always
appears first.

Receiving Radio Broadcasts

(INFORMATION)

(EDUCATION)

(POP MUSIC)

(ROCK MUSIC)

(NATIONAL MUSIC)

(FOLK MUSIC)

(LIGHT MUSIC)

(SOCIAL AFFAIRS)

(OTHER MUSIC)

(MIDDLE-OF-THE-

ROAD MUSIC)

Descriptions of the PTY
codes:

TRAVEL

AFFAIRS

PHONE IN

ROCK M

RELIGION

M.O.R. M

CHILDREN

CLASSICS

FINANCE

OTHER M

WEATHER

SOCIAL A

LIGHT M

NEWS

INFO

SPORT

EDUCATE

FOLK M

OLDIES

DRAMA

NATIONAL

CULTURE

JAZZ

VARIED

POP M

CONTRY

SCIENCE

LEISURE

ALARM

TEST

DOCUMENT

EN20_51.RX-774R[E]/1

98.3.31, 2:04 PM

33

Summary of Contents for LVT0014-001A

Page 1: ...EP AUDIO DVD MULTI DVD TV DBS VCR CD SEA MODE TEST REAR R REAR L DELAY TAPE MD FM AM PHONO 5 4 6 2 1 3 8 7 P 9 0 10 10 AUDIO TV VCR SET EXIT VCR TAPE CONTROL VOLUME CHANNEL MU TE FF PLAY PTY SEAR CH STOP DISPL AY MODE REC TV V IDEO TV VOLUM E PAUSE 4 REW TV CATV CNTR CNTR TONE ENTER MENU EFFECT CATV DBS FM MODE MUTE 100 RETURN SURROUND MODE PTY MENU PTY RX 774R AUDIO VIDEO CONTROL RECEIVER STANDBY...

Page 2: ...f this product is not supplied fitted with a mains plug then follow the instructions given below IMPORTANT DO NOT make any connection to the terminal which is marked with the letter E or by the safety earth symbol or coloured green or green and yellow The wires in the mains lead on this product are coloured in accordance with the following code Blue Neutral Brown Live As these colours may not corr...

Page 3: ...ischen Schlägen Brandgefahr usw 1 Keine Schrauben lösen oder Abdeckungen enternen und nicht das Gehäuse öffnen 2 Dieses Gerät weder Regen noch Feuchtigkeit aussetzen CAUTION To reduce the risk of electrical shocks fire etc 1 Do not remove screws covers or cabinet 2 Do not expose this appliance to rain or moisture PRECAUCIÓN Para reducir riesgos de choques eléctricos incendio etc 1 No extraiga los ...

Page 4: ...hakelaar om het apparaatgebruiksklaartezetten maartezorgendathetstroomverbruik minimaal blijft Neem in verband hiermee het volgende in acht 1 Bij de eerste ingebruikneming zorgt u eerst dat alle aansluitingen in orde zijn dan steekt u de stekker in het stopkontakt en dan zet u de POWER schakelaar in de ON stand Daarna kunt u het apparaat aan en uitschakelen met de STANDBY ON schakelaar 2 Wanneer u...

Page 5: ... Voldoende ruimte vrij houden Zijkanten Minstens 10 cm aan weerszijden vrij houden Bovenkant Niets bovenop plaatsen 10 cm speling geven Achterkant Minstens 15 cm ruimte achteraan vrij houden Onderkant Opstellen op een egaal horizontaal oppervlak Bovendien moet er rondom voldoende luchtdoorstroming zijn zoals in de afbeelding aangegeven Precaución Ventilación Adecuada Para evitar el riesgo de choqu...

Page 6: ...the Sound 22 Recording a Source 22 Basic Settings 23 Changing the Source Name 23 Adjusting the Front Speaker Output Balance 23 Listening at Low Volume Loudness 23 Using the Sleep Timer 24 Setting Center and Rear Speakers for DSP Modes 24 One Touch Operation 26 About the One Touch Operation 26 Using the One Touch Operation 26 Receiving Radio Broadcasts 27 Tuning in Stations Manually 27 Using Preset...

Page 7: ...stening at Low Volume Loudness 53 Adjusting the DSP Modes 53 Selecting Your Favorite SEA Mode 54 Creating Your Own SEA Mode 55 Setting the Center Speaker Size 55 Setting the Rear Speaker 56 Setting the Delay Time 56 Operating the Tuner 56 Storing the Preset Stations 57 Assigning Names to the Preset Stations 57 Checking the RDS Information 58 COMPU LINK Remote Control System 59 TEXT COMPU LINK Remo...

Page 8: ... 37 SOUND SELECT button 21 _ LOUDNESS SOURCE NAME button 23 ONE TOUCH OPERATION button and lamp 26 TUNER PRESET button 28 MULTI JOG control 23 SOURCE SELECTOR control 20 IMPORTANT To use the MULTI JOG control on the front panel What this control actually does depends on which function you are trying to adjust Before using this control select the function by pressing one of the buttons marked with ...

Page 9: ...onents 67 70 DISPLAY MODE button 31 MENU operation buttons SET EXIT fi 52 º ª Ÿ DISPLAY MODE TV VIDEO TV VOLUME RM SR774RU REMOTE CONTROL DBS SOUND CONTROL CD DISC VCR SLEEP AUDIO DVD MULTI DVD TV DBS VCR CD TEST REAR R REAR L TAPE MD FM AM PHONO 5 4 6 2 1 3 8 7 P 9 0 10 10 AUDIO TV VCR VCR TAPE CONTROL VOLUME CHANNEL MUTE TV CATV CNTR CNTR TONE ENTER MENU EFFECT DELAY CATV DBS FM MODE MUTE 100 RE...

Page 10: ...ELECTOR DVD MULTI 2CH FM AM TUNNING TUNER PRESET TUNER SEA MEMORY FM MODE DVD TV SOUND DBS PHONO TAPE MD VCR FM AM CD SOUND SELECT EON PTY SEARCH TA NEWS INFO DISPLAY MODE LOUDNESS ONETOUCHOPERATION SOURCENAME COMPULINK Remote _ ON OFF FRONT SPEAKERS Easy Set Up Operations If you are already familiar with audio components following four pages just you opened give you enough information to operate ...

Page 11: ...DE TEST REAR R REAR L DELAY TAPE MD FM AM PHONO 5 4 6 2 1 3 8 7 P 9 0 10 10 AUDIO TV VCR VOLUME CHANNEL TV CATV CNTR CNTR TONE ENTER MENU EFFECT FM MODE MUTE 100 RETURN SURROUND MODE AUDIO RM SR774RU REMOTE CONTROL DBS SOUND CONTROL CD DISC VCR SLEEP AUDIO DVD TV DBS DVD CD SEA MODE TEST REAR R REAR L DELAY TAPE MD FM AM PHONO 5 4 6 2 1 3 8 7 P 9 0 10 10 AUDIO TV VCR VOLUME CHANNEL TE TV CATV CNTR...

Page 12: ...A NEWS INFO DISPLAY MODE LOUDNESS ONETOUCHOPERATION SOURCENAME COMPULINK Remote _ ON OFF GND LEFT RIGHT SUBWOOFER OUT AUDIO PHONO LEFT RIGHT CD OUT REC IN PLAY TAPE MD VIDEO S VIDEO MONITOR OUT COMPU LINK 3 SYNCHRO TEXT COMPU LINK 1 MASTER UNIT 2 SLAVE UNIT TV SOUND DBS DVD VCR OUT REC IN PLAY CENTER DVD SUB WOOFER AM EXT AM LOOP GND GND ANTENNA FM 75 COAXIAL Easy Set Up Operations For Reproducing...

Page 13: ...V DBS VCR CD SEA MODE TEST REAR R REAR L DELAY TAPE MD FM AM PHONO 5 4 6 2 1 3 8 7 P 9 0 10 10 AUDIO TV VCR VOLUME CHANNEL TV CATV CNTR CNTR TONE ENTER MENU EFFECT FM MODE MUTE 100 RETURN SURROUND MODE AUDIO ON SCREEN CONTR O L SOUND CONTROL CD DISC DELAY 8 7 P 0 10 10 AUDIO TV VCR SET EXIT VCR TAPE CONTROL CHANNEL M UTE FF PLAY PTY SEARCH STOP DIS PLAY MODE REC TV V ID EO TV VOLUME PAUSE 4 REW EF...

Page 14: ...ween 5 and 35 C 23 and 95 F Make sure there is good ventilation around the receiver Poor ventilation could cause overheating and damage the receiver Handling the receiver Do not insert any metal object into the receiver Do not disassemble the receiver or remove screws covers or cabinet Do not expose the receiver to rain or moisture Checking the Supplied Accessories Check to be sure you have all of...

Page 15: ... best reception A B A Using the Supplied FM Antenna The FM antenna provided can be connected to the FM 75Ω COAXIAL terminal as temporary measure B Using the Standard Type Connector Not Supplied A standard type connector IEC or DIN45325 should be connected to the FM 75Ω COAXIAL terminal Extend the supplied FM antenna horizontally FM Antenna Outside FM Antenna Cable Note If reception is poor connect...

Page 16: ...For details see page 24 For each speaker except for subwoofer connect the and terminals on the rear panel to the and terminals marked on the speakers For connecting a subwoofer see page 12 Connecting the front speakers Cut twist and remove the insulation at the end of each speaker signal cable first and then connect the front speakers to the FRONT SPEAKERS terminals by using the cables You can con...

Page 17: ...a center speaker to the CENTER SPEAKER terminals by using the cables Connecting the subwoofer speaker You can enhance the bass by connecting a subwoofer Connect the input jack of a powered subwoofer to the SUBWOOFER OUT jack on the rear panel using a cable with RCA pin plugs Center speaker Right rear speaker Left rear speaker 1 Open the terminal and then insert the speaker signal cable 2 Close the...

Page 18: ... speakers does differ depending on whether both the FRONT SPEAKERS 1 and FRONT SPEAKERS 2 terminals are used or only one of them is used CASE 1 When you connect only one set of front speakers Use front speakers with 4 16 ohm impedance Front speaker 1 Front speaker 1 CASE 2 When you connect two sets of front speakers Usefrontspeakerswith8 16ohmimpedance Front speaker 1 Front speaker 2 Front speaker...

Page 19: ...LAY OUT REC CENTER DVD CD PHONO RIGHT LEF AUDIO SUBWOOFER OUT SUB WOOFER TAPE MD To audio output CD player Turntable To audio output To audio output To audio input Cassette deck or MD recorder If your audio components have a COMPU LINK 3 or TEXT COMPU LINK terminal See also page 59 for detailed information about the connection and the COMPU LINK 3 remote control system See also page 60 for detaile...

Page 20: ...video input terminal are output only through the composite video output terminals while the ones from the S video input terminal are output only through the S video output terminal Therefore if your DVD player is connected to the receiver only through the S video input terminal you cannot record the picture from the DVD player on the VCR In addition if the TV and the DVD player are connected to th...

Page 21: ...er To S video output for better playback picture quality To composite video output To front left right channel audio output or to audio mixed output if necessary GND VIDEO S VIDEO RIGHT LEFT IN PLAY OUT REC CENTER DVD CD PHONO RIGHT LEFT AUDIO SUBWOOFER OUT MONITOR OUT VCR IN PLAY OUT REC TV SOUND DBS DVD SUB WOOFER TAPE MD DVD To S video output for better playback picture quality DVD player To co...

Page 22: ...o audio output DBS tuner Note When connecting the DBS tuner to the TV SOUND DBS jacks change the source name which will be shown on the display when selected as the source to DBS See page 23 for details To audio output TV GND VIDEO S VIDEO RIGHT LEFT IN PLAY OUT REC CENTER DVD CD PHONO RIGHT LEFT AUDIO SUBWOOFER OUT MONITOR OUT VCR IN PLAY OUT REC TV SOUND DBS DVD SUB WOOFER TAPE MD Note When conn...

Page 23: ...RIGHT LEFT IN PLAY OUT REC CENTER DVD CD PHONO RIGHT LEFT AUDIO SUBWOOFER OUT MONITOR OUT VCR IN PLAY OUT REC TV SOUND DBS DVD SUB WOOFER TAPE MD VHS VCR To video input To audio output To video output To audio input VCR connection ...

Page 24: ...the mains supply switch allowing the receiver to connect to the mains supply To shut off the power completely press the POWER switch to set it in the OFF position The STANDBY ON button is a functional on off standby switch and does not disconnect the receiver from the mains supply A small amount of power is consumed even in standby mode for the receiver to accept signals from the remote control Pu...

Page 25: ...appears on the display Each time you press the button the DVD MULTI playback mode turns on and off and the DVD and DVD MULTI alternately appears on the display Select DVD when you play back a disc in stereo or the audio output setting of the DVD player is mixed to two front channels Select DVD MULTI when you play back a disc on the DVD player with its analog discrete output mode 5 1 CH reproductio...

Page 26: ...e display 2 Turn SOURCE SELECTOR to select the sounds except the TV sound while the indication of the above step is still on the display From the remote control Press one of the audio source selecting buttons CD TAPE MD PHONO FM AM while viewing the picture from a video component such as the VCR or DVD player etc Adjusting the Volume On the front panel To increase the volume turn MASTER VOLUME clo...

Page 27: ...e volume level indicator goes off To restore the sound press MUTE again so that OFF appears on the display Turning MASTER VOLUME or pressing VOLUME also restores the sound at the previous volume level Recording a Source You can record any source playing through the receiver to a cassette deck or a MD recorder connected to the TAPE MD jacks and the VCR connected to the VCR jacks at the same time Wh...

Page 28: ...t setting 2 Turn MULTI JOG to adjust the balance while the indication of the previous step is still on the display Turning it clockwise decreases the left channel output Turning it counterclockwise decreases the right channel output Listening at Low Volume Loudness Human ears are not sensitive to bass at low volume To compensate for this the loudness function automatically boosts the bass level as...

Page 29: ... you have to register the information about the speakers arrangement after all connections are completed Center Speaker Setting Register the center speaker size On the front panel only 1 Press SETTING repeatedly until CENTER SPK Center Speaker Size appears on the display The display changes to show the current setting 2 Turn MULTI JOG to select the appropriate item about your center speaker while ...

Page 30: ...n the front panel 1 Press SETTING repeatedly until DELAY TIME appears on the display The display changes to show the current setting 2 Turn MULTI JOG to select the delay time of the rear speaker output while the indication of the previous step is still on the display As you turn it the delay time changes as follows As the distance from you to your rear speakers decreases you will get the better su...

Page 31: ... MULTI playback mode settings see page 49 Using the One Touch Operation On the front panel only To store the sound settings 1 Press ONE TOUCH OPERATION The ONE TOUCH OPERATION lamp lights up then the previously memorized settings are recalled 2 Adjust the sound using the functions listed above The newly adjusted settings are memorized To recall the sound settings With the ONE TOUCH OPERATION lamp ...

Page 32: ...t up to 40 stations at random To store the preset stations On the front panel only 1 Tune in the station you want to preset see above If you want to store the FM reception mode for this station select the FM reception mode you want See page 29 for details 2 Press TUNER SEA MEMORY CH appears and the channel number position starts flashing on the display for about 5 seconds 3 Turn MULTI JOG to selec...

Page 33: ... Turn MULTI JOG to select a preset channel From the remote control 1 Press FM AM Each time you press the button the band alternates between FM and AM MW LW 2 Press 10 keys to select a preset channel number For channel number 5 press 5 For channel number 15 press 10 then 5 For channel number 20 press 10 then 10 For channel number 30 press 10 10 then 10 TUNER SEA MEMORY MULTI JOG FM AM TUNER PRESET ...

Page 34: ...monaural sounds This mode is also useful to suppress static noise between stations The MUTE AUTO indicator lights up on the display MONO Reception will be improved although you will lose the stereo effect In this mode you will hear noise while tuning into the stations The MUTE AUTO indicator goes off on the display From the remote control Press FM MODE MUTE to select the FM reception mode Each tim...

Page 35: ... characters listed below 5 Press TUNER PRESET while a character you want is flashing The next or previous character position starts flashing 6 Repeat steps 4 and 5 to enter up to four characters 7 Press TUNER SEA MEMORY while the last selected character is flashing after you have assigned a name To erase the input characters Insert spaces using the same procedure described above MULTI JOG CH CH TU...

Page 36: ...tion PS Program Service While searching PS appears and then the station names will be displayed NO PS appears if no signal is sent PTY Program Type While searching PTY appears and then the type of the broadcast program will be displayed NO PTY appears if no signal is sent RT Radio Text While searching RT appears and then text messages the station sends will be displayed NO RT appears if no signal ...

Page 37: ...y gives you the PTY codes described on page 33 3 Press PTY SEARCH again while the PTY code selected in the previous step is still on the display While searching SEARCH and the selected PTY code alternate on the display The receiver searches 40 preset channels stops when it finds the one you have selected and tunes in that station To continue searching after the first stop Press PTY SEARCH again wh...

Page 38: ...broadcast ALARM signal is sent from an FM station The receiver automatically tunes in the station except in the following cases When you are listening to non RDS stations all AM MW LW and some FM stations When the receiver is in standby mode While receiving an emergency broadcast ALARM appears on the display The TEST signal is used for equipment test whether it can receive the ALARM signal correct...

Page 39: ...time you press the button the display changes to show the following TA Traffic Announcement in your area NEWS News INFO Program the purpose of which is to impart advice in the widest sense CASE 1 If there is no station broadcasting the program you have selected The receiver continues playing the current source all sources except AM MW LW When a station starts broadcasting the program you have sele...

Page 40: ...om the display The receiver enters EON off mode and goes back to the previously selected source Each time you press EON the EON mode alternates between standby mode and off mode Notes EON data sent from some stations may not be compatible with this receiver In EON standby mode if you change the source to AM MW LW or if you carry out synchronized recording see page 59 EON standby mode is canceled t...

Page 41: ...e mid frequency range which the human voice is mostly made up of SEA MOVIE Adds breadth to sounds so you feel like you are in a movie theater SEA COUNTRY Enhances the high frequency range so that instruments such the violin and banjo are emphasized SEA JAZZ Gives a feeling of a live atmosphere Good for acoustic music SEA USERMODE Your original SEA adjustment see page 37 SEA OFF No SEA mode is appl...

Page 42: ...s still on the display Turning it clockwise increases the level Turning it counterclockwise decreases the level 3 Repeat step 1 and 2 to adjust other frequency ranges if necessary 4 Press TUNER SEA MEMORY while the indication of the previous step is still on the display Your adjustment is stored into SEA USERMODE To recall your own SEA adjustment See page 36 To erase a stored adjustment Storing a ...

Page 43: ...d gives you a real being there feeling On Surround mode With this receiver you can use two types of the surround mode Dolby Pro Logic Dolby Pro Logic has been developed to reproduce the important elements of the acoustic surround at home To watch the soundtracks of video software bearing the mark DOLBY SURROUND which includes the same encoded surround information as found in Dolby Stereo films the...

Page 44: ...here the action is fast and explosive 3D DRAMA Best for dramas and romantic movies where the action is slow and soft 3D THEATER Reproduces the sound field of a large theater DSP OFF No DSP mode is applied For the other modes see pages 41 and 44 If you need to make any adjustment go to the following steps 3 Press BALANCE SURROUND ADJUST repeatedly until DSP EFFECT appears on the display The display...

Page 45: ... As the number increases the selected 3D PHONIC mode becomes stronger 4 Select and play a sound source which was processed with Dolby Surround and is labeled with DOLBY SURROUND mark To cancel the 3D PHONIC mode Press SURROUND MODE repeatedly until OFF appears The 3D PHONIC DSP and PRO LOGIC indicators go off from the display Notes When you select DVD MULTI as the source to play you cannot select ...

Page 46: ...gh ceiling HEADPHONE Gives a spacious stereo effect when listening with headphones DSP OFF No DSP mode is applied For the other modes see pages 39 and 44 If you need to make any adjustment go to the following steps 3 Press BALANCE SURROUND ADJUST repeatedly until REAR LEVEL appears on the display The display changes to show the current setting 4 Turn MULTI JOG to adjust the rear speaker output lev...

Page 47: ...till on the display As you turn it the effect level changes as follows As the number increases the selected DAP mode becomes stronger To cancel the DAP mode Turn MULTI JOG until DSP OFF appears in step 2 The DSP indicator goes off from the display BALANCE SURROUND ADJUST DSP EFFECT 1 DSP EFFECT 2 DSP EFFECT 4 DSP EFFECT 3 DSP EFFECT 5 Note Once you have adjusted the DAP modes the adjustment is mem...

Page 48: ... cancel the DAP mode Press SURROUND MODE repeatedly until OFF appears The DSP indicator goes off from the display Notes When you select DVD MULTI as the source to play you cannot select the DAP modes The DAP mode is not used with the other DSP modes such as the Dolby Pro Logic and 3D PHONIC mode When the DAP mode is turned on the other DSP mode if used will be turned off SURROUND MODE HALL DANCE C...

Page 49: ...speaker output balance TEST TONE L starts flashing on the display and a test tone comes out of the speakers in the following order Notes When you select DVD MULTI as the source to play you cannot select the Surround modes The Surround mode is not used with the other DSP modes such as the DAP mode and 3D PHONIC mode When the Surround mode is turned on the other DSP mode if used will be turned off S...

Page 50: ... 7 Press EFFECT to select the effect level Each time you press the button the effect level changes as follows As the number increases the surround effect becomes stronger Notes You can adjust the speaker output levels and center tone without outputting the test tone You cannot adjust the left and right rear speaker output level separately You cannot adjust the center speaker level when CENTER SPK ...

Page 51: ...splay changes to show the current setting 2 Turn MULTI JOG to adjust the center speaker output level from 10 dB to 10 dB while the indication of the previous step is still on the display 3 If necessary adjust the rear speaker output level as follows 1 Press BALANCE SURROUND ADJUST repeatedly until REAR LEVEL appears on the display The display changes to show the current setting 2 Turn MULTI JOG to...

Page 52: ...The display changes to show the current setting 7 Turn MULTI JOG to select the effect level while the indication of the previous step is still on the display As you turn it the effect level changes as follows As the number increases the surround effect becomes stronger MULTI JOG BALANCE SURROUND ADJUST Note The center tone cannot be adjusted when CENTER SPK is set to NONE see page 24 SHARP1 SHARP2...

Page 53: ...UND mark To cancel the Surround mode For Dolby Pro Logic Press DOLBY SURROUND again so that SURROUND OFF appears on the display For Theater Surround Press DSP MODE then turn MULTI JOG until DSP OFF appears on the display From the remote control 1 Press SURROUND MODE repeatedly until PRO LOGIC or THEATER appears on the display When PRO LOGIC is selected the PRO LOGIC indicator also lights up on the...

Page 54: ...o the manual supplied with the DVD player If you need to make any adjustment go to the following steps 3 Press BALANCE SURROUND ADJUST repeatedly until CENTER LEVEL appears on the display The display changes to show the current setting Using the DVD MULTI Playback Mode This receiver provides the DVD MULTI playback mode for reproducing the analog discrete output mode of the DVD player Before playin...

Page 55: ...UND ADJUST repeatedly until CENTER TONE appears on the display The display changes to show the current setting 10 Turn MULTI JOG to select the center tone level while the indication of the previous step is still on the display The center tone level affects the mid frequency range which the human voice is mostly made up of As you turn it the display changes to show the following To make the dialogu...

Page 56: ...R L decreases the output level up to 10 dB Pressing REAR L increases the output level up to 10 dB 6 Press REAR R to adjust the right rear speaker output level Pressing REAR R decreases the output level up to 10 dB Pressing REAR R increases the output level up to 10 dB 7 Press CENTER TONE to select the center tone level Each time you press the button the display changes to show the following To mak...

Page 57: ...y source 1 Press any button of ON SCREEN CONTROL fi once The MAIN MENU appears on the TV 2 Press ON SCREEN CONTROL fi to move to VISUAL 3 Press ON SCREEN CONTROL to select a different video source When you select OSD see page 61 4 When you finish press EXIT The menu disappears from the TV Using the DSP Modes Also see pages 39 41 and 44 1 Press any button of ON SCREEN CONTROL fi once The MAIN MENU ...

Page 58: ...OUND CONTROL then press The SOUND CONTROL menu appears 3 Press ON SCREEN CONTROL fi to move to LOUDNESS 4 Press ON SCREEN CONTROL to turn the loudness ON or OFF 5 When you finish press EXIT repeatedly until the menu disappears from the TV Adjusting the DSP Modes Also see pages 39 41 and 44 1 Press any button of ON SCREEN CONTROL fi once The MAIN MENU appears on the TV 2 Press ON SCREEN CONTROL fi ...

Page 59: ...VD MULTI playback mode CENTER LEVEL Adjust the center speaker output level REAR L LEVEL Adjust the left rear speaker output level REAR R LEVEL Adjust the right rear speaker output level CENTER TONE Select the center tone level 7 When you finish press EXIT repeatedly until the menu disappears from the TV Selecting Your Favorite SEA Mode Also see page 36 1 Press any button of ON SCREEN CONTROL fi on...

Page 60: ...the setting into the SEA USERMODE If you press EXIT without pressing SET in this step you can return to the SEA menu The adjustment you have made is active but not stored 7 When you finish press EXIT repeatedly until the menu disappears from the TV Setting the Center Speaker Size Also see page 24 1 Press any button of ON SCREEN CONTROL fi once The MAIN MENU appears on the TV 2 Press ON SCREEN CONT...

Page 61: ...d 5 When you finish press EXIT repeatedly until the menu disappears from the TV Operating the Tuner 1 Press any button of ON SCREEN CONTROL fi once The MAIN MENU appears on the TV 2 Press ON SCREEN CONTROL fi to move to TUNER CONTROL then press The TUNER CONTROL menu appears 3 Press ON SCREEN CONTROL fi to move to the item you want to set or adjust then press ON SCREEN CONTROL On the TUNER CONTROL...

Page 62: ...ou want 7 Press SET to store the setting 8 When you finish press EXIT repeatedly until the menu disappears from the TV Assigning Names to the Preset Stations Also see page 30 1 Press any button of ON SCREEN CONTROL fi once The MAIN MENU appears on the TV 2 Press ON SCREEN CONTROL fi to move to TUNER CONTROL then press The TUNER CONTROL menu appears 3 Press ON SCREEN CONTROL fi to move to PRESET CH...

Page 63: ...u appears again 11 When you finish press EXIT repeatedly until the menu disappears from the TV Checking the RDS Information Also see page 31 1 Press any button of ON SCREEN CONTROL fi once The MAIN MENU appears on the TV 2 Press ON SCREEN CONTROL fi to move to TUNER CONTROL then press The TUNER CONTROL menu appears 3 Press ON SCREEN CONTROL fi to move to RDS INFORMATION then press The RDS INFORMAT...

Page 64: ...MD recorder will turn off standby Synchronized Recording Synchronized recording means the cassette deck or MD recorder starts recording as soon as a CD or a record begins playing To use synchronized recording follow these steps 1 Put a tape in the cassette deck or an MD in the MD recorder and a disc in the CD player or a record on the turntable 2 Press the record button and the pause 8 8 8 8 8 but...

Page 65: ... the cables with the stereo mini plugs not supplied with this receiver IMPORTANT Set the Master Slave Selector on the rear to 1 MASTER UNIT 2 SLAVE UNIT is just for the serviceman s use The TEXT COMPU LINK remote control system does not function with the selector set to 2 SLAVE UNIT 3 Connect your CD player MD recorder and this receiver using the cables with RCA pin plugs see page 14 4 Plug the AC...

Page 66: ...ion screen appears on the TV 1 Source name CD or MD 2 Select or then press SET to change the disc 3 Track numbers and track titles The current playing selected track is indicated in yellow When you move to a track number you can change the track information by pressing Each time you press the button track information alternates between its track title and its performer You can also start playing t...

Page 67: ...lternates between its performer an its disc title Going to the Disc Information screen see page 61 Press ON SCREEN CONTROL fi to move to a searched disc then press SET Showing unseen disc information if more than 5 discs are listed as a result of the search Press ON SCREEN CONTROL fi to move to or then press SET Going back to the PERFORMER SEARCH screen Press EXIT Search a disc by its disc title 1...

Page 68: ...H then press SET The DISC SEARCH screen appears on the TV 3 Press ON SCREEN CONTROL fi to move to GENRE then press SET The GENRE SEARCH screen appears 4 Press ON SCREEN CONTROL fi to move to the genre you want to search then press SET To show the unseen genres press ON SCREEN CONTROL fi until they appear Disc search starts then the SEARCH RESULT screen showing the disc titles appears 5 On the SEAR...

Page 69: ...you want then press SET The selected User File screen appears on the TV The disc information shown will be the disc title If no disc title information is recorded for the discs only the disc numbers will be shown 4 On this selected User File screen you can do the following Changing the indication of the disc information Press ON SCREEN CONTROL fi to move to a disc then press Each time you press th...

Page 70: ...ON SCREEN CONTROL fi to move in front of a character you want then press SET to enter the character If the current CD is a CD Text go to step 5 without entering the performer To use the lower case letters press ON SCREEN CONTROL fi to move to SHIFT then press SET To use the upper case letters again press ON SCREEN CONTROL fi to move to SHIFT then press SET 4 Repeat step 3 until you finish putting ...

Page 71: ... information screen by following the procedure on page 61 2 Press ON SCREEN CONTROL fi to move to TITLE INPUT then press SET The DISC TITLE INPUT screen appears on the TV 3 Enter the title referring to steps 3 and 4 on page 65 You can enter up to 32 character for the disc title 4 Press ON SCREEN CONTROL fi to move to the disc title you have just entered then press SET The disc title is stored into...

Page 72: ...de DELAY Selects the delay time of the rear speaker sound EFFECT Selects the effect level for the DSP modes TEST Turns on or off the test tone output for the Surround mode CNTR TONE Selects the center tone level for the Surround DVD MULTI playback modes CD player After pressing CD with the remote control mode selector set to AUDIO TV VCR you can perform the following operations on a CD player PLAY...

Page 73: ...porarily To release it press the PLAY button REC Press this button with the PLAY button to start recording Press this button with the PAUSE button to enter recording pause MD recorder After pressing TAPE MD or TAPE CONTROL with the remote control mode selector set to the AUDIO TV VCR position you can perform the following operations on the MD recorder PLAY Starts playing 4 4 4 4 4 Returns to the b...

Page 74: ...de selector set to AUDIO TV VCR you can perform the following operations on a DVD player PLAY Starts playing 4 4 4 4 4 Returns to the beginning of the current or previous track Skips to the beginning of the next track STOP Stops playing PAUSE Stops playing temporarily To release it press the PLAY button TV You can always perform the following operations with the remote control mode selector set to...

Page 75: ...TV DBS The following buttons can be used for operating the TV with the remote control mode selector set to AUDIO TV VCR TV CATV DBS Turns on and off TV TV VOLUME Adjusts the volume TV VIDEO Sets the input mode either TV or VIDEO After pressing TV DBS with the remote control mode selector set to AUDIO TV VCR you can perform the following operations on the TV CHANNEL Changes the channels 1 10 0 100 ...

Page 76: ...sing ENTER after selecting a channel number 6 Try to operate your CATV converter or DBS tuner by pressing TV CATV DBS When your CATV converter or DBS tuner turns on or off you have entered the correct code 7 If there are more than one code listed for your brand of CATV converter or DBS tuner try each one until the correct one is entered Note Refer also to the manual supplied with your CATV convert...

Page 77: ...s PAUSE Pauses REW Rewinds a tape FF Fast winds a tape REC Starts recording or enters recording pause 6 Try to operate your VCR by pressing VCR When your VCR turns on or off you have entered the correct code 7 If there are more than one code listed for your brand of VCR try each one until the correct one is entered O N SCREEN CONTRO L RM SR774RU REMOTE CONTROL DBS SURROUND MODE SOUND CONTROL CD DI...

Page 78: ...r 208 217 Formenti 037 087 Frontech 163 247 448 Fujitsu 072 Funai 179 GEC 037 043 072 217 Geloso 009 Genexxa 163 218 Goldstar 037 217 290 Goodmans 036 037 072 179 217 235 257 317 GPM 218 Graetz 163 Granada 037 072 146 201 208 217 339 Grandin 282 Grundig 070 195 Hanseatic 037 Harwood 257 HCM 009 282 Hinari 009 036 037 179 218 Hisawa 282 Hitachi 032 036 043 044 163 217 225 227 Hypson 037 282 ICE 217...

Page 79: ...321 355 Susumu 218 Sysline 037 Tandy 072 163 217 218 Tashiko 036 043 217 Tatung 037 072 217 249 Tec 217 247 Technics 250 Technol Ace 179 Telefunken 005 262 335 Teletech 009 Teleton 217 Tensai 218 317 Texet 218 Thorn 035 037 072 190 192 512 Tomashi 282 Toshiba 035 036 070 089 Triumph 177 Ultra 192 Universum 037 346 Vestel 037 Videosat 247 Videotechnic 217 Voxson 087 163 Waltham 217 Watson 037 Wega ...

Page 80: ...antz 081 Matsui 209 Memorex 000 037 104 Mitsubishi 043 067 081 Multitech 000 Murphy 000 NEC 067 Nechermann 081 Nokia 048 104 106 Nordmende 320 Oceanic 000 Orion 209 Osaki 000 037 Otto Versand 081 Palladium 037 Panasonic 226 Pentax 042 Perdio 000 Philips 081 Phonola 081 Pioneer 067 081 Proline 000 Pye 081 Quelle 081 Radiola 081 Roadstar 037 278 Saba 320 Saisho 209 Salora 043 106 Sansui 067 Sanyo 10...

Page 81: ...rclockwise three or four times then press STANDBY ON on the front panel If OVERLOAD does not disappear unplug the AC power cord then plug it back again Press STANDBY ON on the front panel then check the speaker wiring If OVERLOAD does not disappear unplug the AC power cord then plug it back again If speaker wiring is not short circuited contact your dealer Set the selector correctly either to AUDI...

Page 82: ...tts per channel min RMS driven into 4 ohms at 1 kHz with no more than 0 8 total harmonic distortion Total Harmonic Distortion 8 ohms 1 kHz 0 02 at 50 watts output Measured by JVC Audio Analysis System Audio Input Sensitivity Impedance 1 kHz PHONO MM 2 5 mV 47 k ohms CD TAPE MD TV SOUND DBS VCR DVD 200 mV 47 k ohms Audio Output Level TAPE MD VCR 200 mV Signal to Noise Ratio 66 IHF DIN PHONO 70 dB 6...

Page 83: ...µV 75 ohms Stereo 38 3 dBf 22 5 µV 75 ohms Signal to Noise Ratio IHF A weighted Monaural 80 dB at 85 dBf Stereo 73 dB at 85 dBf Total Harmonic Distortion Monaural 0 15 at 1 kHz Stereo 0 2 at 1 kHz Stereo Separation at REC OUT 40 dB at 1 kHz Capture Ratio 1 5 dB at 85 dBf Alternate Channel Selectivity 60 dB 400 kHz Frequency Response 30 Hz to 15 kHz 0 5 dB 3 dB AM MW LW tuner Tuning Range 522 kHz t...

Page 84: ...VICTOR COMPANY OF JAPAN LIMITED 0498OFMMDWJEM EN GE FR NL SP IT J VC ...

Reviews: