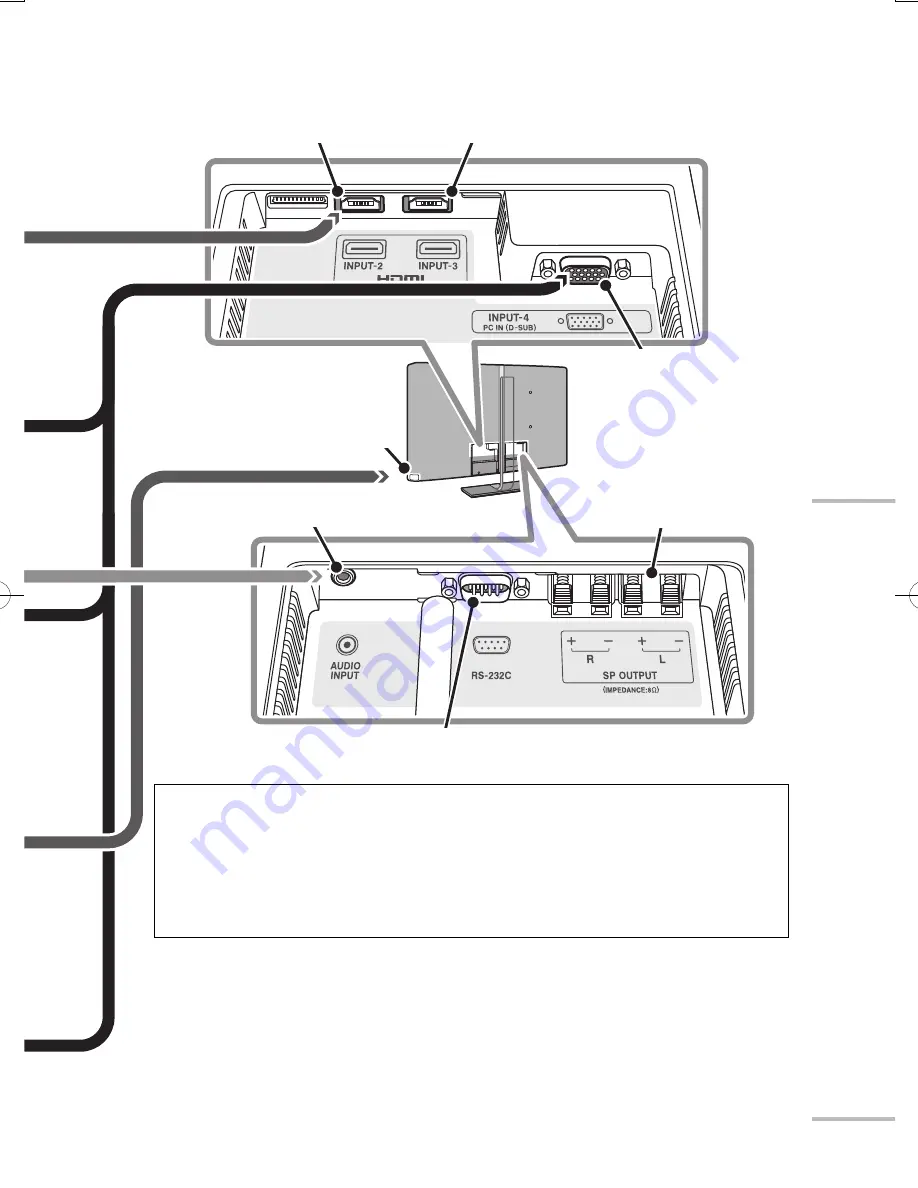
background image

09

Installation

INPUT-1: HDMI

TM


terminal

INPUT-2: HDMI

TM

 terminal

INPUT-3: HDMI

TM

 terminal

INPUT-4 terminal: 
D-sub 15 pin

AUDIO INPUT terminal

Speaker terminals (


page 05)

RS-232C terminal (For controlling the monitor from a computer. 
Contact qualified personnel for detailed information.)

A: Video cable (supplied)
B: Audio cable (supplied)
a: HDMI cable (separately purchased)
b: Component cable (separately 

purchased)

c: Audio cable (separately purchased)

d: Video cable (separately purchased)
e: DVI-HDMI cable (separately 

purchased)

f:

VGA cable (separately purchased)

g: Audio cable (separately purchased)

● 

When using the INPUT-4 terminal, set “ Input-4 Setting ” (

 page 33) properly 

according to the connected device.

 To reduce noise, use a VGA cable with core filters.

 When you connect a DVI device to INPUT-2 or INPUT-3, only the video signal is 

played back, and the sound signal is not.

 HDMI

TM

 (V.1.3, with Deep Color, with x.v.Colour

TM

, HDMI

TM

 CEC Support)

WX70̲inst̲eu.indb   09

WX70̲inst̲eu.indb   09

09.3.9   11:10:14 AM

09.3.9   11:10:14 AM

Summary of Contents for LT-42WX70EU

Page 1: ...ENGLISH INSTRUCTIONS LCD Monitor LT 42WX70EU ...

Page 2: ... unplugged The main power supply for this product is controlled by inserting or removing the power plug Do not use any power cord other than the provided with this product Use of power cords other than provided may cause fire or malfunction When several kinds of power cord are provided in the package use the one which fits your AC outlet Connect the power cord to a grounding outlet This plug will ...

Page 3: ...t on tall furniture bookshelf cupboard etc without proper fixing Do not install the product on a furniture covering cloth or the like Take care that children do not climb upon furniture to operate the product Take care when handling the glossy finish For more details see page vi Handle LCD panel with care Use a soft dry cloth when cleaning Hold the product so as not to scratch the screen Do not to...

Page 4: ...ualified personnel How to replace the fuse Open the fuse compartment with the blade screwdriver and replace the fuse For UK only If you accidentally cut the power cord Attach a new plug following the steps below If in doubt contact your local retailer Important Never connect to the larger terminal marked with an E the safety earth symbol or coloured green or green and yellow The wires in the mains...

Page 5: ...ch could otherwise be caused by inappropriate waste handling of these products For more information about collection points and recycling of these products please contact your local municipal office your household waste disposal service or the shop where you purchased the product Penalties may be applicable for incorrect disposal of this waste in accordance with national legislation Battery Notice...

Page 6: ...orcefully If the screen gets stained wipe it with a soft dry cloth or a soft cloth soaked in water or water diluted neutral detergent and wrung well Cleaning the cabinet Wipe stains off the cabinet with a soft cloth If the cabinet gets heavily stained wipe it with a soft cloth soaked in water diluted neutral detergent and wrung well then wipe with a soft dry cloth To avoid the deterioration or dam...

Page 7: ...ause damage to the product Keep space around the product as illustrated below at minimum for proper ventilation To prevent an accidental fall When hanging on a wall When attaching the monitor onto a wall use the optional wall mounting unit Consult qualified installers for installation When fixing to furniture 1 Thread a belt not supplied through the hole on the back of the stand 2 Fix the belt to ...

Page 8: ...des you with greater freedom of choice for installation More precise adjustment of picture quality with a wide range of adjustment properties page A 2 Quick response making video games more exciting Game Mode page A 5 Operating HDMI devices from the TV remote contoller HDMI CEC compatible page 13 ...

Page 9: ...e power 10 Initial settings 10 Parts identification 11 Controlling HDMI devices 13 Changing the settings 14 Picture 15 Sound 27 Setup 29 HDMI 36 Troubleshooting 38 Specifications 41 Index 48 Technical information Customize the picture to your taste A 2 Set up the monitor for your PC A 10 Enjoy SLR digital camera photographs A 11 Menu index by task A 12 You can search for picture sound menu items f...

Page 10: ...unit monitor and stand Speaker unit Screws for the speaker unit Remote control unit AAA size batteries Video cable D sub 15 pin RCA Audio cable 3 5 mm stereo mini RCA Power cable Instructions this book startup sheet other printed material ...

Page 11: ...check and may last shorter Attaching and connecting the speaker unit Attach the supplied speaker unit under the monitor using the supplied screws Refer to the startup sheet for details You can also connect speakers other than the supplied one In this case set PEQ to Off page 28 Impedance 8 Ω or larger Rated input power 10 W or larger Installation Install the unit properly referring to the cautions...

Page 12: ... device under the monitor 1 Detach the monitor from the stand 1 1 Spread a soft cloth on a flat table or floor to place the removed monitor on 2 Change the position of the hooks 2 1 Detach the two hooks from the monitor 1 2 Remove the screw connecting the monitor and the stand 1 3 Detach the monitor from the stand The monitor should be carried by two or more people Hook upper Hook lower ...

Page 13: ... stand 3 1 Hang the monitor to the stand After hanging the monitor on the stand swing the monitor from side to side a few times so that the hooks on the monitor and the pivots on the stand engage properly in position 3 2 Fasten the screw After fastening the screw swing the monitor a few times to check if it is hinged with the stand properly After that fasten the screw tight again Hook upper Hook l...

Page 14: ...ernal devices To connect a computer To connect a device with a composite terminal To connect a device with component terminals To INPUT 1 INPUT 2 INPUT 3 terminals Green To connect a DVI device To connect an HDMI device ...

Page 15: ...ased b Component cable separately purchased c Audio cable separately purchased d Video cable separately purchased e DVI HDMI cable separately purchased f VGA cable separately purchased g Audio cable separately purchased When using the INPUT 4 terminal set Input 4 Setting page 33 properly according to the connected device To reduce noise use a VGA cable with core filters When you connect a DVI devi...

Page 16: ...ial settings When you turn on the monitor for the first time initial settings start Select the menu language and the place of installation 1 Select the menu language 1 1 Select Menu Language and press the OK button 1 2 Select from the list the language you want using the buttons and press the OK button 1 3 Select Set and press the OK button 2 Select the place of installation 2 1 Select Place of In...

Page 17: ...hear a beep sound when the button is touched Turns the monitor on off on standby INPUT Switches the input MENU Opens the setting menu Functions as the down cursor key in the menu operations Functions as the left cursor key and the right cursor key in the menu operations Turns down the volume Functions as the BACK key in the menu operations Turns up the volume Functions as the OK key in the menu op...

Page 18: ...devices MENU Opens the setting menu page 14 Cursor keys Selects an item OK Confirms your selection BACK Goes back to the previous screen EXIT Exits from the menu ZOOM Changes the aspect page 30 Adjusts the volume Attenuates the sound INPUT 1 Switches the input INPUT 2 INPUT 3 INPUT 4 Buttons not mentioned above are equipped for the operations of a TV tuner ...

Page 19: ...ts recording Rec Stop Stops recording NAVIGATION Opens the playback menu of the HDMI device Function Opens the operation menu of the HDMI device Operation Panel Opens the operation panel To select the audio output When an HDMI CEC amplifier is connected to the monitor you can select either the monitor or the amplifier as the device to output the sound signal To output the sound from the amplifier ...

Page 20: ...mple to change the setting of Colour Temperature 1 Open the menu 2 Select Picture 3 Select Colour Temperature The item currently selected is shown in orange 4 Select the setting you want When the selected item is followed by an adjustment screen press the buttons to make adjustments 5 Finish the setting Picture page 15 Sound page 27 Setup page 29 HDMI page 36 ...

Page 21: ...A 1 Technical information Customize the picture to your taste A 2 Set up the monitor for your PC A 10 Enjoy SLR digital camera photographs A 11 Menu index by task A 12 ...

Page 22: ...setting 6 presets are assigned to each memory as follows Memory1 Standard Memory2 Dynamic Memory3 Theater Memory4 Monitor Memory5 Photo Pro Memory6 Game See page A 4 for the detail of each preset If you have modified the settings next page the settings of each memory are different from the default When the input is changed the memory used for the input last time is automatically applied Customize ...

Page 23: ...f picture settings select another memory in step 2 above and start adjustments To reset the settings If you do not like your current adjustments load either of the preset settings into the memory which you want to reset Settings of the selected memory are overwritten by those of the loaded preset setting 1 Open the menu 2 Select the memory you want to reset from Setting Memory in Picture 3 Select ...

Page 24: ...tching cinemas in a dark room Dynamic Makes pictures colourful and bright suitable for watching in a well lighted room Standard Suitable for watching TV programs and DVDs in a living room Characteristics of the 6 presets A 4 ...

Page 25: ...uitable for game consoles Monitor Does not apply colour adjustments or noise reductions Input video signals are displayed as they are Suitable for monitoring purpose Photo Pro Suitable for watching still pictures of SLR digital cameras See the following pages for the setting values of each preset A 5 ...

Page 26: ...t Setting Black Stretch Medium High Dynamic DC Offset On On Auto Contrast Off On Brightness 0 0 Sharpness 0 10 Enhancer Mode 3 Mode 3 Enhancer Setting Detail 5 0 H Sharp 10 15 V Sharp 10 15 Backlight 10 30 Backlight Setting Smart Picture On Off Dynamic Backlight Medium High Colour System Auto Auto Colour Matrix Auto Auto Colour Space Auto Auto Colour Temperature Normal Cool2 A 6 ...

Page 27: ...0 0 0 2 0 0 0 0 0 0 0 0 0 0 0 Low Off Off Off On Off Off Off Off Off Off Off 0 0 0 0 0 30 0 15 Mode 4 Mode 5 Mode 5 Mode 5 0 0 15 0 5 0 5 0 0 0 0 0 0 0 10 10 On Off Off On Low Off Off Off Auto Auto Auto Auto Auto Auto Auto Auto Normal Normal sRGB Auto Warm2 Warm2 Warm2 Cool2 A 7 ...

Page 28: ...our 0 0 Green Hue Green Colour 0 0 Cyan Hue Cyan Colour 0 0 Skin Hue Skin Colour 0 0 Colour Bright Area 0 0 Colour Dark Area 0 0 Gamma Mode 2 Mode 1 Picture Management Medium High Noise Reduction Digital VNR Auto Auto MPEG NR Low Low 3DY C On On Natural Cinema Auto Auto Picture Delay Time Normal Normal PC Monitor Mode Off Off Eco Mode Off Off Other Real Bit Driver On On 100 120Hz CMD On On A 8 ...

Page 29: ... 0 Mode 3 Off Off Mode 2 0 0 0 0 0 0 0 0 0 0 0 0 0 0 0 0 0 0 0 0 0 0 0 0 0 0 0 0 Mode 4 Mode 4 Mode 4 Mode 3 Low Off Off Medium Auto Off Auto Auto Low Off Off Low On Off On On Auto Off Off Off Normal Normal Normal Middle Off Off Off Off Off Off Off Off On On On On On On Off On A 9 ...

Page 30: ... to Std page 34 For signals in WVGA60 Set Sampling Mode to Wide page 34 For signals in WXGA 1280 WXGA 1360 and WXGA60 1 Set Sampling Mode to Wide page 34 2 Set WXGA Select as follows page 34 For signals in WXGA 1280 1280 768 For signals in WXGA 1360 1360 768 For signals in WXGA60 1366 768 For signals in SXGA60 Set SXGA SXGA to SXGA page 34 For signals in SXGA 60 Set SXGA SXGA to SXGA page 34 A 10 ...

Page 31: ...ing PC Position Adjustment until the upper left corner of the picture is positioned at the upper left corner of the display 3 Adjust the size of the picture using H Size and V Size until the bottom right corner of the picture is positioned at the bottom right corner of the display For JPEG pictures select sRGB or AdobeRGB under the setting of Colour Space page 20 according to the setting of your c...

Page 32: ...tting Red Colour Yellow Colour etc 22 Brightness backlight Total brightness of pictures Backlight 18 Reduces backlight in bright scenes Backlight Setting Smart Picture 19 Reduces backlight in dark scenes Backlight Setting Dynamic Backlight 19 Adjusts backlight depending on the luminance of the room Eco Mode 26 Brightness signal Total brightness of pictures Brightness 17 Adjusts the gain of the sig...

Page 33: ...adjustment based on the loaded settings Select a preset and press Load to load a preset Dynamic Makes pictures colorful and bright suitable for watching in a well lighted room Standard Suitable for watching TV programs and DVDs in a living room Theater Suitable for watching cinemas in a dark room Monitor Applies no colour corrections or noise reductions Input video signals are displayed as they ar...

Page 34: ...nput to the HDMI terminal The setting is fixed to 0 and unadjustable when PC Monitor Mode is set to On BY Gain Adjusts the amplitude of the B Y colour difference signal You can modify the total colouring of the picture 30 30 Small amplitude Large amplitude BY RY Angle Adjusts the demodulation angle between the B Y colour difference signal and the R Y colour difference signal You can modify the tot...

Page 35: ...functions are not available when PC Monitor Mode is set to On Black Stretch Emphasizes darker areas depending on the characteristics of a picture to make contrast clearer High Medium Low Off Dynamic DC Offset Controls the blackness of the picture automatically depending on the total brightness On Off Auto Contrast Emphasizes brighter areas depending on the characteristics of a picture to make cont...

Page 36: ...d for low resolution picture Emphasizes higher frequency band for high resolution picture Enhancer Setting Adjusts the effects of Enhancer in detail All the settings are unadjustable when Enhancer is set to Off Detail Adjusts texture of surface 15 15 Weaker Stronger H Sharp Adjusts sharpness of horizontal outlines 15 15 Weaker Stronger V Sharp Adjusts sharpness of vertical outlines 15 15 Weaker St...

Page 37: ... INPUT 4 from composite terminal The setting is adjustable only when Input 4 Setting is set to Composite page 33 The setting is unadjustable when PC Monitor Mode is set to On Auto An appropriate colour system is automatically applied depending on the type of the input signal Normally select this PAL 50 When the colour system is PAL PAL 60 When the colour system is PAL 60 SECAM When the colour syst...

Page 38: ...ion 601 The colour matrix conforming ITU R BT 601 is used for conversion Colour Space Changes the range of colour representation sRGB or AdobeRGB is selectable when PC Monitor Mode is set to On Even when Auto is selected the setting may not switch to x v Colour automatically depending on the connected device or the connection status Auto Normally applies Wide When the xvYCC signal is input to the ...

Page 39: ...fixed to Warm2 and unadjustable when PC Monitor Mode is set to On Cool1 Cool2 Normal Warm1 Warm2 Higher temperature Lower temperature White Balance Setting Adjusts colour temperature in detail subtle control of RGB gradations These settings are independent of the setting of Colour Temperature R Drive G Drive B Drive Adjusts the depth of R G B on bright areas 30 30 Dilute Dense R Cutoff G Cutoff B ...

Page 40: ...ure Mode 3 Improving the total toning of colours Suitable for low colour temperature Off Deactivates the function Colour Mngmt Setting Adjusts the total colouring of pictures in detail All the settings are fixed to 0 and unadjustable when Colour Management is set to Off All the settings are fixed to 0 and unadjustable when Colour Space is set to sRGB AdobeRGB or x v Colour All the settings are fix...

Page 41: ... of skin colours 15 15 Red Yellow 30 30 Dilute Dense Colour Bright Area Adjusts the colour depth of bright areas 15 15 Dilute Dense Colour Dark Area Adjusts the colour depth of dark areas 15 15 Dilute Dense Gamma Adjusts the gamma correction value and controls the brightness and gradation of intermediately bright areas Mode 1 Mode 2 Mode 3 Mode 4 γ 2 2 Mode 5 Mode 6 Brighter Darker Picture Managem...

Page 42: ... suitable noise reduction processing High Medium Low Off MPEG NR Reduces noise on MPEG pictures such as mosquito noise and block noise High Low Off 3DY C Detects the type of the picture signal movie or still picture which is input to INPUT 4 from composite terminal and applies a suitable Y C separation process to each type Unavailable when Picture Delay Time is set to Short Unavailable when the fo...

Page 43: ...he delay time becomes shorter though picture quality is down when the processes are skipped The setting is fixed to Short and unadjustable when PC Monitor Mode is set to On Normal The picture improving processes are fully applied giving priority to picture quality Middle Some picture improving processes are skipped to decrease the delay time Short Most of picture improving processes are skipped to...

Page 44: ...on Other Real Bit Driver Makes the gradation of 8 bit signals natural and smooth Also effective on signals not in 8 bit On Off 100 120Hz CMD Doubles the number of frames per second to reduce image blur The setting is fixed to Off and unadjustable when Colour Space is set to sRGB or AdobeRGB The setting is fixed to Off and unadjustable when Picture Delay Time is set to Short The setting is fixed to...

Page 45: ...treble tone 6 6 Weaker Stronger Balance Adjusts sound balance L10 10R To the left To the right Auto Volume Control Turns down the volume automatically when an excessive strong sound signal is input On Off Lip Sync Adjusts the delay time of sound 3 3 The sound starts earlier The sound starts later ...

Page 46: ...nt volume to the initial If the setting value surpass that of Volume Limit the initial volume at turning on becomes the maximum value set for Volume Limit Amplifiers connected to an HDMI terminal ignore this setting Volume Limit Sets the maximum volume to prevent unexpectedly loud sound reproduction 0 50 Amplifiers connected to an HDMI terminal ignore this setting Reset Restores the settings of So...

Page 47: ...e On Making the buttons on the monitor ineffective Off Making the buttons on the monitor effective You can turn on off the power by pressing and holding the button on the monitor for more than 3 seconds even when the setting is On You can change the setting to Off by pressing and holding the MENU button on the monitor for more than 3 seconds The settings returns to Off after disconnecting the powe...

Page 48: ...e left and right side of the picture Panoramic Zooming a picture to the width of the monitor without unnatural deformation 14 9 Zoom Zooming a 14 9 aspect picture in the way that the upper and lower black bands are edged out Black areas remain at the left and right side of the picture You cannot select 14 9 Zoom for signals in 480i and 480p 16 9 Zoom Zooming a picture in the way that the upper and...

Page 49: ...d right side of the picture Panoramic Zoom Zooming a picture without unnatural deformation in the way to edge out the black parts around a 4 3 aspect cinema program transferred through 16 9 aspect signal Options when the current input signal is from a PC You cannot select Just and 1 1 for some input signals Full Stretching a picture to the width of the monitor Just No modifying of aspect Black are...

Page 50: ...ed off The positioning is reset as the signal format changes The positioning is reset as the signal aspect changes Power Indicator Sets the action of the power indicator On The power indicator remains lit while the power is on Off The power indicator does not light The power indicator lights regardless of this setting if no signal is input while the power is on Information Displays the source indi...

Page 51: ... monitor cannot detect the aspect of a picture Regular Displays the picture in Regular Panoramic Displays the picture in Panoramic 1080 Auto Setting Selects the default aspect for 1080i p signals Full Expands the picture to the full display size Full Native Displays the picture in the same magnification 100 scan Input 4 Setting Selects the signal type for the INPUT 4 terminal D sub 15 pin Use the ...

Page 52: ...NPUT 3 Sampling Mode Sets the display size for an analog input signal Std For VGA60 and XGA60 signals Wide For WVGA60 WXGA 1280 WXGA 1360 and WXGA60 signals WXGA Select Sets the display size for an analog input signal 1280 768 For WXGA 1280 signal 1360 768 For WXGA 1360 signal 1366 768 For WXGA60 signal SXGA SXGA Sets the display size for an analog input signal SXGA For SXGA60 signal SXGA For SXGA...

Page 53: ...s on the screen look blurred or swaying The adjustment is kept after turning off the power 0 31 PC Position Adjustment Adjusts the picture position on the monitor The adjustment is kept after turning off the power Auto Position Adjustment Adjusts the picture position automatically Reset Restores the settings of PC Setting to the initial Reset Restores the settings of Setup to the initial ...

Page 54: ...r and change its source to the component The setting is fixed to Off and unadjustable when Control with HDMI is set to Off Dedicated HDMI components cooperate with the monitor regardless of the setting On Off Power Off Link Turning off the monitor automatically turns off an HDMI CEC compatible external component The setting is fixed to Off and unadjustable when Control with HDMI is set to Off Dedi...

Page 55: ...gh the monitor The setting is fixed to Off and unadjustable when Control with HDMI is set to Off On Off Input 1 Audio Selects the audio signal type for INPUT 1 Auto Detects the type automatically Digital For HDMI equipment Analogue For DVI equipment Reset Restores the settings of HDMI to the initial ...

Page 56: ... will disappear after a while The following symptoms are problems only when pictures or sounds are not played back normally A slight electric shock occurs when you touch the monitor The top and or rear panel of the monitor becomes hot The monitor emits a cracking noise The monitor emits a mechanical noise If the monitor does not operate normally perform the following to reset the monitor Turn off ...

Page 57: ...control and the monitor No picture from a connected device Select the correct input on the monitor Connect the external device properly Turn on the external device and start playback No sound Check the speaker cord connection page 05 Press the MUTE button Check the amplifier connection When AMP is selected under Speaker the sound is output from the amplifier and not from the speakers of the monito...

Page 58: ... computer is strange Adjust the items under PC Setting page 34 The source indication stays on the display Turn on the selected external device and start playback When no signal is input you cannot turn off the source indication The picture and the sound do not synchronize Adjust Lip Sync page 27 Adjust Picture Delay Time page 25 Colours are strange Adjust the items under Picture page A 2 Load one ...

Page 59: ...io TYP 4000 1 Horizontal vertical frequency computer signal Horizontal 31 469 kHz 75 000 kHz Vertical 60 Hz 5 Hz Compliant video signal formats page 44 Audio output Speakers 10 W 10 W Impedance 8 Ω Operating environment Operating temperature 0 C 40 C Operating humidity 20 80 non condensing Slightly variable depending on ambient conditions for installation Power requirements AC 100 V 240 V 50 Hz 60...

Page 60: ...or registered trademarks of their respective companies Notice on transportation This monitor is precision equipment and needs dedicated packing material for transportation Never use any packing material supplied from sources other than JVC or JVC authorized dealers Dimensions page 43 Mass 12 0 kg without the speaker unit and the stand 17 8 kg including the stand 19 0 kg including the speaker unit ...

Page 61: ...ecifications Dimensions unit mm 1 990 0 2 716 8 1 689 3 2 661 8 3 3 400 0 4 117 0 1 89 5 2 62 0 3 5 400 0 6 200 0 7 42 5 8 599 8 9 170 0 1 At the high position 2 At the middle position 3 At the low position ...

Page 62: ...0 XGA 60 1 60 00 48 363 65 000 XGA 70 70 07 56 476 75 000 XGA 75 75 03 60 023 78 750 WXGA 1280 2 3 59 87 47 776 79 500 WXGA 1360 2 4 60 02 47 712 85 500 WXGA 60 2 5 60 00 48 363 86 715 SXGA 60 6 60 02 63 981 108 000 SXGA 60 7 60 02 63 981 108 000 SXGA 60 60 00 65 220 122 614 1280x720 60 00 45 000 74 250 1920x1080 60 00 67 500 148 500 1 Set Sampling Mode to Std 2 Set Sampling Mode to Wide 3 Set WXG...

Page 63: ...Standard 1664 798 1280 768 1792 795 1360 768 VESA Standard 1793 806 1366 768 1688 1066 1280 1024 VESA Standard 1688 1066 1400 1050 1880 1087 1400 1050 1650 750 1280 720 2200 1125 1920 1080 Signals in a format not listed above may not be displayed properly Change the resolution setting on the PC Some signals may not be displayed properly even if their format is in the list above Because signals in ...

Page 64: ...6 25 148 5 1080 24p 23 976 24 26 973 27 74 176 74 25 1080 25p 25 000 28 13 74 25 1080 30p 29 97 30 33 716 33 75 74 176 74 25 Compliant signal formats 2 INPUT 4 terminal composite Signal Frequency Vertical Hz Horizontal Hz PAL 50 50 00 15 63 PAL 60 59 94 15 73 SECAM 50 00 15 63 NTSC3 58 59 94 15 73 NTSC4 43 59 94 15 73 PAL M 59 94 15 73 PAL N 50 00 15 63 INPUT 4 terminal component Signal Frequency ...

Page 65: ... 262 263 720 480 2200 1125 1920 1080 864 625 720 576 1980 750 1280 720 2640 562 563 1920 1080 864 312 313 720 576 2640 1125 1920 1080 2750 1125 1920 1080 2640 1125 1920 1080 2200 1125 1920 1080 Signals in a format not listed above may not be displayed properly Change the resolution setting on the PC Some signals may not be displayed properly even if their format is in the list above ...

Page 66: ...anagement 22 Colour Matrix 20 Colour Mngmt Setting 22 Colour Space 20 Colour System 19 Colour Temperature 21 Component 08 Composite 08 Computer 08 A 10 Connection 08 Contrast 17 Contrast Setting 17 Control with HDMI 36 D Digital camera A 11 DVI 08 E Eco Mode 26 Enhancer 18 Enhancer Setting 18 EXIT 14 F Front Panel Lock 29 G Gamma 23 H HDMI 36 HDMI CEC 13 Hue 16 Hue Setting 16 I Information 32 Inpu...

Page 67: ...e A 2 15 Picture Delay Time 25 Picture Management 23 Position Adjustment 32 Power cable 10 Power indicator 11 Power Indicator 32 Power Off Link 36 Power switch 10 R Remote control unit 12 Remote sensor 11 Reset 28 35 37 S Setup 29 Sharpness 18 Sound 27 Speaker unit 05 T Touch sensor panel 11 Treble 27 Turn On Volume 28 V Video game A 5 Volume Limit 28 W White Balance Setting 21 Z Zoom 30 ZOOM 12 ...

Page 68: ......

Reviews: