background image

13

© 2017, JUN-AIR

We reserve the right to make any alterations which may be due to any technical improvements

Printed in the USA

87R-4P Compressor System User Guide


6190900  (Rev B) 

Pressure-Switch Adjustment

WARNING

Exceeding the maximum pressure may result in a reduced 

system life. Contact Gast Manufacturing for information 

regarding operation at higher pressure.

Equipment Alert: The factory set cut-in and cut-out 

pressures are approximately 6 bar (87 psi) and 

8 bar (116 psi), respectively.

Equipment Alert: The system should operate 

at 50% duty cycle or less.

1.  Turn the system off and disconnect it from electrical 

power.

2.  Remove the handle bolts (4) and loosen the cover 

screws (4) to tip the cover forward.

3.  Remove the screw retaining the pressure-switch cover 

and remove the cover.

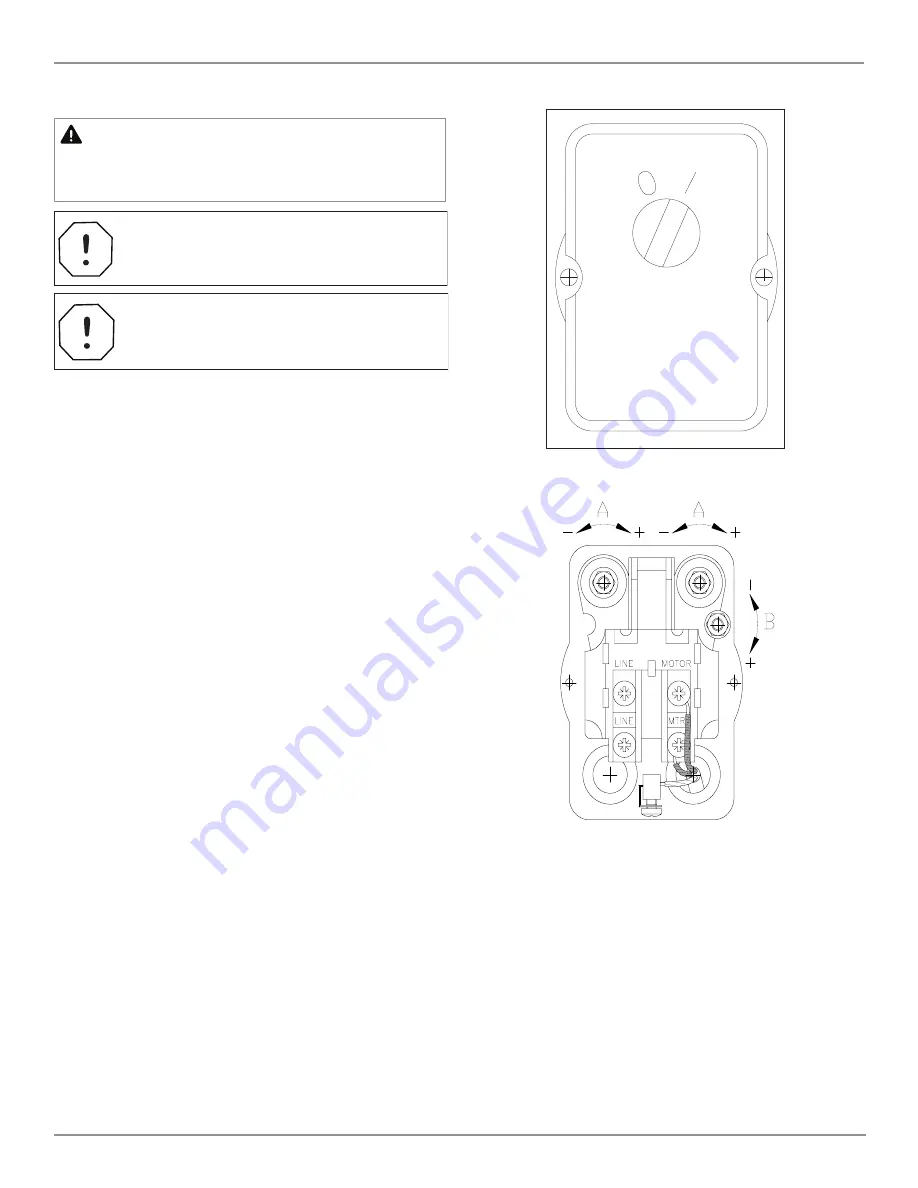
4.  To increase the cut-in pressure, use a 7 mm wrench or 

socket to turn each of the two nuts on the large springs 
(A) clockwise; both springs should be adjusted equally. 
Each half-turn raises the cut-out pressure approxi-
mately 0.25 bar (3.5 psi). The cut-in pressure can be 
reduced by turning the springs in the opposite direc-
tion.

5.  Set the cut-out pressure by adjusting the pressure dif-

ferential (the difference between the cut-in and cut-out 
pressures). To increase the pressure differential turn 
the nut on the small spring (B) clockwise. Decrease the 
pressure differential by turning the nut counter-clock-
wise. Ensure that the cut-out pressure does not exceed 
the maximum rated pressure of the system.

6.  Replace and secure the pressure-switch cover to pro-

tect against electric shock.

7.  Reconnect the system power and charge the tank and 

verify that the compressor switches off at the desired 
cut-out pressure. Should the pressure reach 9.3 bar 
(135 psi) ±3%, the safety relief valve will open and purge 
the tank.

8.  Drain air from the system through the regulator to 

verify that the compressor switches on at the desired 
cut-in pressure.

9.  Disconnect power and repeat steps 3-8, if necessary.
10.  Replace the cover and reinstall the handle bolts and 

cover screws.

11.  Reconnect the system to electrical power.

Pressure Switch ’1’ on or ’O’ off

Adjustment of Pressure Switch Section

Summary of Contents for 87R-4P

Page 1: ...90900 Rev B Registered Trademark Trademark of JUN AIR Inc Copyright 2017 JUN AIR Manufacturing Inc All Rights Reserved WWW JUN AIR COM ISO 9001 CERTIFIED 87R 4P Compressed Air System Operation Maintenance Manual ...

Page 2: ...ial Compressed Air System This system s intended purpose is for industrial and laboratory compression applications It is to be used in accordance with UL1450 CSA 22 2 standards along with all applicable codes The system utilizes an oil less rocking piston compressor that produces clean dry oil free pressurized air flow when connected to an indus trial or laboratory device The tank ensures that a c...

Page 3: ...ve relative aux appareils à pression simple 2006 42 EC Directive sur la sécurité des machines 2014 30 EU Directive sur la compatibilité électro magnétique 2006 95 EC Directive sur les basses tensions 2011 65 EU Directive RoHS 2012 19 EU Directive DEEE 1907 2006 et 340 2008 Réglementation REACH ES El fabricante Gast Manufacturing Inc declara que el compresor está conforme con 2014 68 EU Directiva d...

Page 4: ...ot avoided CAUTION Indicates a potentially hazardous situation which may result in minor or moderate injury if not avoided It may also be used to alert against unsafe practices WARNING To Avoid Serious Burns Do not touch surface during operation ON OFF I O Indicates the ON and OFF position for the equipment power switch Indicates package should be handled with these symbols pointing up FRAGILE Han...

Page 5: ...System User Guide 6190900 Rev B SYSTEM FEATURES Cover Tank Compressor IEC plug fuse Power supply switch Air outlet Output pressure regulator Power indicator light Over temp indicator Hour meter Pressure switch 5 µm autodrain filter System intake filter Drain solenoid Dump solenoid Compressor intake filter Thermostat Terminal block Heat exchange ...

Page 6: ... Air Filtration 5 µm Safety Relief Valve Pressure 9 3 bar 135 psi High Temperature Indication 60 C 140 F in compressor chamber Air Connections 1 4 in BSPP Current A 5 0 5 8 4 8 5 3 2 6 2 9 Power Consumption W 450 550 500 600 550 650 Fuse Specifications 12 5 A 250 Vac time delay Sound Level dB A 46 48 46 48 46 48 Operating Ambient Conditions 10 C to 40 C 50 F to 104 F 10 95 RH Storage Ambient Condi...

Page 7: ...m the carton and remove the lid and cardboard inserts 2 Visually inspect the entire system for shipping damage and verify that the following accessories have been included two 2 locking casters two 2 non locking casters four 4 vibration isolation feet four 4 studs four 4 washers and one 1 power cable a If the contents were damaged during shipping contact the freight carrier to file a claim b If pa...

Page 8: ...irm that both devices are connected to isolated separated circuits per ELECTRICAL CONNECTIONS in this manual If the problem still occurs then the two devices should be moved as far apart as possible Finally if the problem cannot be eliminated contact JUN AIR CAUTION Routinely inspect any and all power cords for cuts and abrasions Discontinue use and have an authorized service representative replac...

Page 9: ...f 30 cm 12 in on the top and sides of the system for service access and cooling Ensure that the system is placed on a surface with an incline that does not exceed 10 Indicates the ON and OFF position for the equipment power switch system breaker When ON the indicator light will illuminate and current WILL be supplied to system When OFF the indicator light will NOT illuminate and current WILL NOT b...

Page 10: ... around the cord and secure it to the back panel using the screw provided ensuring enough slack in the cord to connect it to the system 2 Plug the male IEC connector on the power cord into the female connector on the back panel of the system ensuring it is seated securely 3 Plug the opposite end of the cord into an outlet provid ing the voltage and frequency required by the system per specificatio...

Page 11: ...itch settings Contact your authorized dealer before adjust ing the cut in cut out pressures to values outside the preset range 3 The pressure of the output air can be adjusted using the regulator knob 4 When the system is not in use it should be turned off using the power switch on the back panel The indicator light on the system cover will turn off when the system is powered down WARNING Discharg...

Page 12: ...ng up slightly and rotat ing it into place Verify that the drain tube is not kinked or damaged 8 Ensure that the drain tube passes through the base plate and into the evaporator tray 9 Replace the cover and reinstall the handle bolts and cover screws 10 Reconnect the electrical power to the system Replacing the Evaporator Tray Element 1 Turn the system off and disconnect it from electrical power 2...

Page 13: ...cut out pressure approxi mately 0 25 bar 3 5 psi The cut in pressure can be reduced by turning the springs in the opposite direc tion 5 Set the cut out pressure by adjusting the pressure dif ferential the difference between the cut in and cut out pressures To increase the pressure differential turn the nut on the small spring B clockwise Decrease the pressure differential by turning the nut counte...

Page 14: ...e performed after any maintenance or service 1 Close the valve to the facility plumbing 2 Run the system until it reaches the maximum operating pressure approximately 8 bar 116 psi 3 Turn the system off 4 Let the system rest for five minutes 5 If the pressure drops more than 0 5 bar 7 5 psi within five minutes then leaks must be repaired 6 Use soapy water to locate leaks and repair them as necessa...

Page 15: ... AS620A Filter kit annual Intake filters and evaporator filter K964 Compressor rebuild kit O rings seals cups cylinders AS623 Rubber mounting feet kit Four 4 rubber isolation feet and washers Preventive Maintenance Schedule Interval Action P N Monthly Remove and clean system intake filter Annually Replace system intake filter AS562 Annually Replace autodrain filter element 4071009 Annually Replace...

Page 16: ...16 6190900 Rev B 87R 4P Compressor System User Guide 2017 JUN AIR We reserve the right to make any alterations which may be due to any technical improvements Printed in the USA Model 1770008 ...

Page 17: ...17 2017 JUN AIR We reserve the right to make any alterations which may be due to any technical improvements Printed in the USA 87R 4P Compressor System User Guide 6190900 Rev B Models 1770009 1770010 ...

Page 18: ...18 6190900 Rev B 87R 4P Compressor System User Guide 2017 JUN AIR We reserve the right to make any alterations which may be due to any technical improvements Printed in the USA Model 1770018 ...

Page 19: ...re Gauge 0 8 Bar 0 to 120 psi 4 Liter Tank SAFETY RELIEF VALVE 9 3 BAR 135 psi Pressure Switch CUT IN 6 0 BAR 87 psi CUT OUT 8 0 BAR 116 psi System Outlet 1 4 BSPT Drain Line Adjustable Pressure Regulator Dump Solenoid Valve Compressor Chamber X Pneumatic Tube Connection Letter Check Valve AS613 X 6mm OD Tubing AS614 X 8mm OD Tubing AT697 Hose Evaporator Tray Manifold Block 8 B Tank Purge Timer So...

Page 20: ...tch Pressure DPST Indicator Light Over Temp Yellow w Timer Capacitor A K2 K1 H J E D C B B F K3 K4 K5 K6 S T Z X W G Brown Brown Brown Blue Blue Brown Blue White Solenoid Yellow Brown Yellow Brown Blue Green Yellow Blue Brown Blue Brown Blue Brown Blue Brown Enclosure Cover Connector L2 L1 L4 L3 L6 L5 Brown Blue Blue Brown Blue Brown Green Dump Valve w Timer M WAGO Green Green WAGO WAGO K Black Bl...

Page 21: ...e voltage is below the minimum required a buck boost transform er must be installed Solenoid valve does not open when the compression cycle ends Contact an authorized dealer for service Power supply cable is too small See SITE REQUIREMENTS for the current draw for the applicable system and select the appropriate wire gauge size Loose electrical connections Contact an authorized dealer for service ...

Page 22: ...fects in parts workmanship and materials for 8 000 hours of operation or two 2 years from date of purchase whichever occurs first This warranty excludes normal expected service items such as but not limited to filters filter kits o rings and hoses It also excludes add on accessories that carry their own specific manufacturer s warranty TROUBLESHOOTING Continued Problem Possible Cause s Possible So...

Page 23: ...s per SITE REQUIREMENTS and ELECTRICAL CONNECTIONS requirements o Verify incoming line voltage meets minimum and maximum values o Turn on power to dedicated circuit and ensure unit starts If not refer to TROUBLESHOOTING GUIDE o Perform system checks per SYSTEM CHECKS AND TESTS Gast Manufacturing P O Box 97 2300 M139 Highway Benton Harbor MI 49023 0097 Ph 269 926 6171 Fax 269 925 8288 www JUN AIR c...

Reviews: