


– 101 –
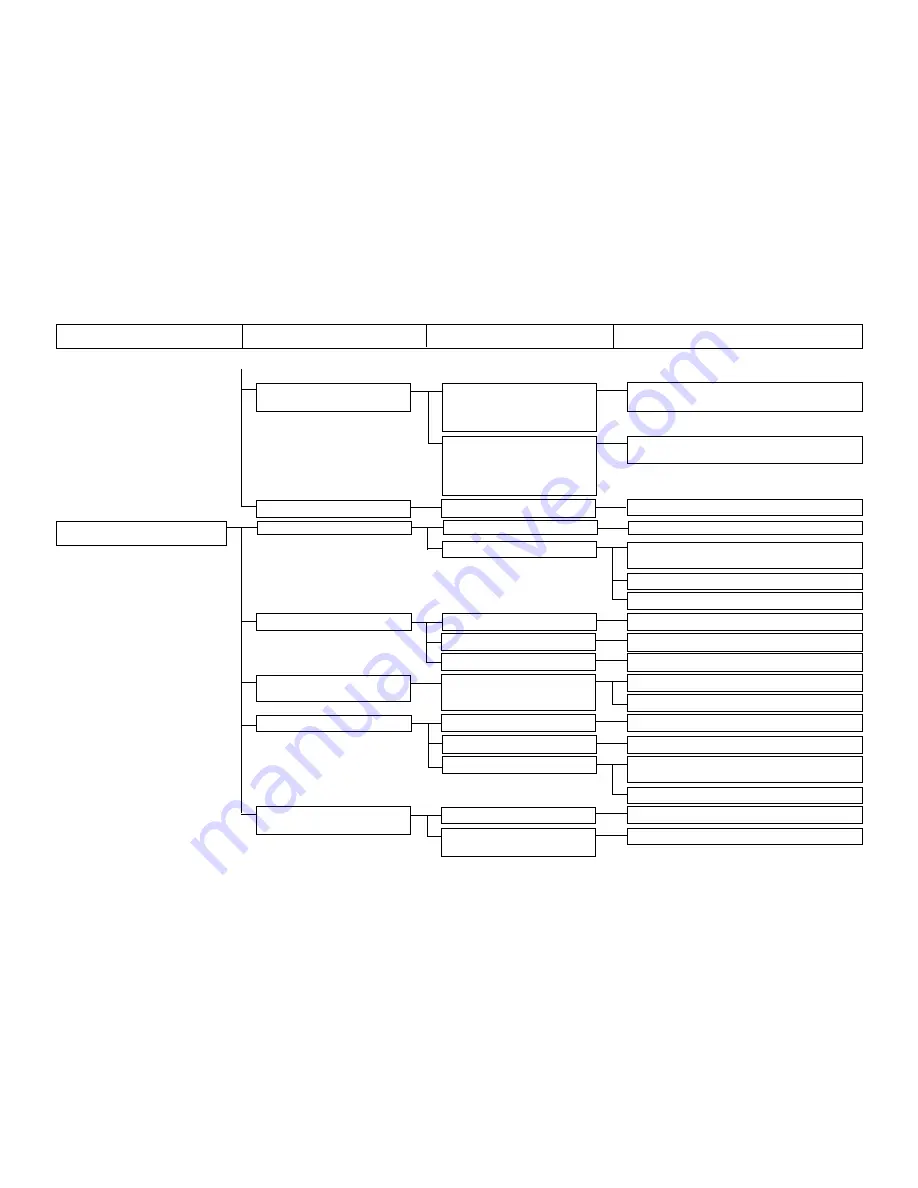
7-7) Shape of the feed plate is
7-A) Material to be sewn is stiff and
Raise the material to be sewn by means of the feed
defective.
closely contacted with the throat
plate.
plate, and there is no clearance
between them to pass the thread.
7-B) Material to be sewn is highly
Raise the material to be sewn by means of the feed
elastic and closely contacted
plate.
with the throat plate, and there
is no clearance between
them to pass the thread.
7-8) Feed timing is defective
8-A) Feed timing is too fast.
Use the memory switch to change the feed timing.
8. Defective stitches with the synthetic
8-1) Thread breakage due to heat
1-A) The sewing speed is too fast.
Slow down the maximum speed.
thread
1-B) The needle used is too thick.
Use a thin needle or a super needle for the synthetic
thread.
Use silicon.
Use a needle cooler.
8-2) Thread makes burrs.
2-A) Thread path is defective.
Polish the thread path of each component with polishing powder.
2-B) Finish of the needle hole is defective.
Replace the needle.
2-C) Loop of the needle thread falls down.
Move the thread guide A to the left.
8-3) Thread floating occurs at the
3-A) Penetration registance of the
Use a thinner needle. (Lower the number of needle to be used.)
sewing start.
thread against the cloth is too
small.
Needle thread clamp device ON.
8-4) Stitch skipping due to the heat.
4-A) Sewing speed is too fast.
Change the maximum speed (electrical components.)
4-B) Needle is too thin.
Use a thicker needle. (Raise the number of needle to be used.)
4-C) Loop of the needle thread falls down.
Attach the needle with the long groove orienting slightly
to the right (approximately 20
°
).
Use a needle cooler.
8-5) Uneven stitch tightness due
5-A) Sewing speed is too fast.
Reduce the speed by means of the speed variable resistor.
to the stretch of thread.
5-B) Tension of the tension controller
Decrease the tension of tension controller No. 2.
No. 2 is excessive.
Trouble
Cause (1)
Cause (2)
Check and corrective measures
From the previous page
Summary of Contents for LK-1900A
Page 20: ... 16 10 Hook adjustment Standard Adjustment 0mm 0mm 7 5mm 0 05 0 1mm For DPX5 For DPX17 ...
Page 90: ... 86 Grease Grease Grease Grease Grease 8 Needle thread clamp mechanism area ...
Page 91: ... 87 Grease Grease A Grease Grease Grease Grease 9 LK 1901A relations ...
Page 92: ... 88 10 LK 1903A relations Grease Grease ...
Page 114: ... 111 12 Circuit diagrams 1 Block diagram A ...
Page 115: ... 112 2 Power supply circuit diagram A ...
Page 116: ... 113 3 Power supply circuit diagram B ...
Page 117: ... 114 4 Power supply circuit diagram C ...
Page 118: ... 115 5 Servo motor circuit diagram ...
Page 119: ... 116 6 Sensor pedal VR circuit diagram ...
Page 120: ... 117 7 MAIN PANEL board circuit diagram ...
Page 121: ... 118 8 Motor solenoid circuit diagram Thread trimmer Lifting the work clamp foot motor ...