background image

20

5

5.5

ELECTRICAL

5.5.1

Mains.

a.

The heater is supplied with mains cable (PVC sheathed, heat resisting to 85

o

C), 3-core Brown-Blue-

Green/Yellow, 6A, 0.75mm

2

), connected to a terminal block and exiting through the heater at the top left

hand front. The cable is suitable for a 230V 50Hz supply and shall be connected to the fixed wiring
using a double pole switched, fused spur, incorporating a protective earth link. The fuse fitted shall be
rated 5A to BS1362. Connections shall be in accordance with the current edition of I.E.E Regulations BS
7671.

b.

SYSTEM E-T MODELS

: An electronic controller (Thermista-stat) is supplied which acts as a room

thermostat.

c.

BASIC CONTROL MODELS

: A 24V room thermostat (not supplied), that complies with BS800,

BS3955 and BS4201 is essential to ensure close control of comfort conditions. An anticipator is located
within the thermostat and is graded in amps. The anticipator should be checked and adjusted to 0.3.

d.

To gain access to the control panel to make the Thermista-stat/Room Thermostat connections, remove the
air filter and the front cover from the air heater, release the 2 x securing screws and hinge down the
electrical panel.

5.5.2

Thermista-stat/Room Thermostat and its location.

a.

The Thermista-stat/Room Thermostat should be located where there is free air circulation approx. 1.5m
(5ft) from the floor.

b.

Avoid the following locations:-

i.

In a room where temperature is greatly affected by the sun or any other heat source, e.g. radiant
fire, wall light fittings or TV set.

ii.

Near an outside door or windows, or on an outside wall.

iii.

Where affected by warm air ducts, diffusers, waste pipes or the heater itself.

iv.

Where subject to vibration.

c.

Connect Thermista-stat/Room thermostat wires to control panel terminals ‘7’ and ‘8’ (see Fig. 6a/b
or  7a/b).

5.3

GAS 

(See BS5864 and BS6891)

5.3.1

An independent gas supply pipe from the meter is to be preferred wherever possible. When this is not possible,
the pipe must be capable of taking the complete input of the heater and all other gas appliances being served by
this same pipe. This supply should be suitably sized to conform to British Standards requirements of no more than
1.0 mbar (0.4in wg) pressure drop (See table of discharge in BS6891).

5.3.2

The 1/2in union gas cock (supplied) must be fitted to the gas inlet of the heater for easy isolation during
servicing. The gas pipe should be so fitted and installed as to be durable, substantial and gas tight. To assist in
determining where a gas connection may not be tight, a leak detection fluid should be applied around the
connection. Under no circumstances should a flame be used to locate a gas leak.  Gas entry to the air heater is
through either side to a Rc1/2 (1/2in BSP. external [taper] thread).

6.

COMMISSIONING

6.1

PREPARATION:

6.1.1

Ensure that:

a.

Gas and Electrical supplies are 

OFF

.

b.

Filter, fan and fan compartments are free from obstructions.

c.

All registers or grilles are open and conform to design specifications.

d.

Return, relief and ventilation air installations are adequate.

6.2

SETTING OF FAN SPEED:

6.2.1

Remove air filter and air heater front door.

SYSTEM E-T MODELS:  

On the electronic control module, set:

6.2.2

Rate Switch to ‘

MAX

’,

6.2.3

Cleanflow switch  to ‘

0

’. (If not fitted)

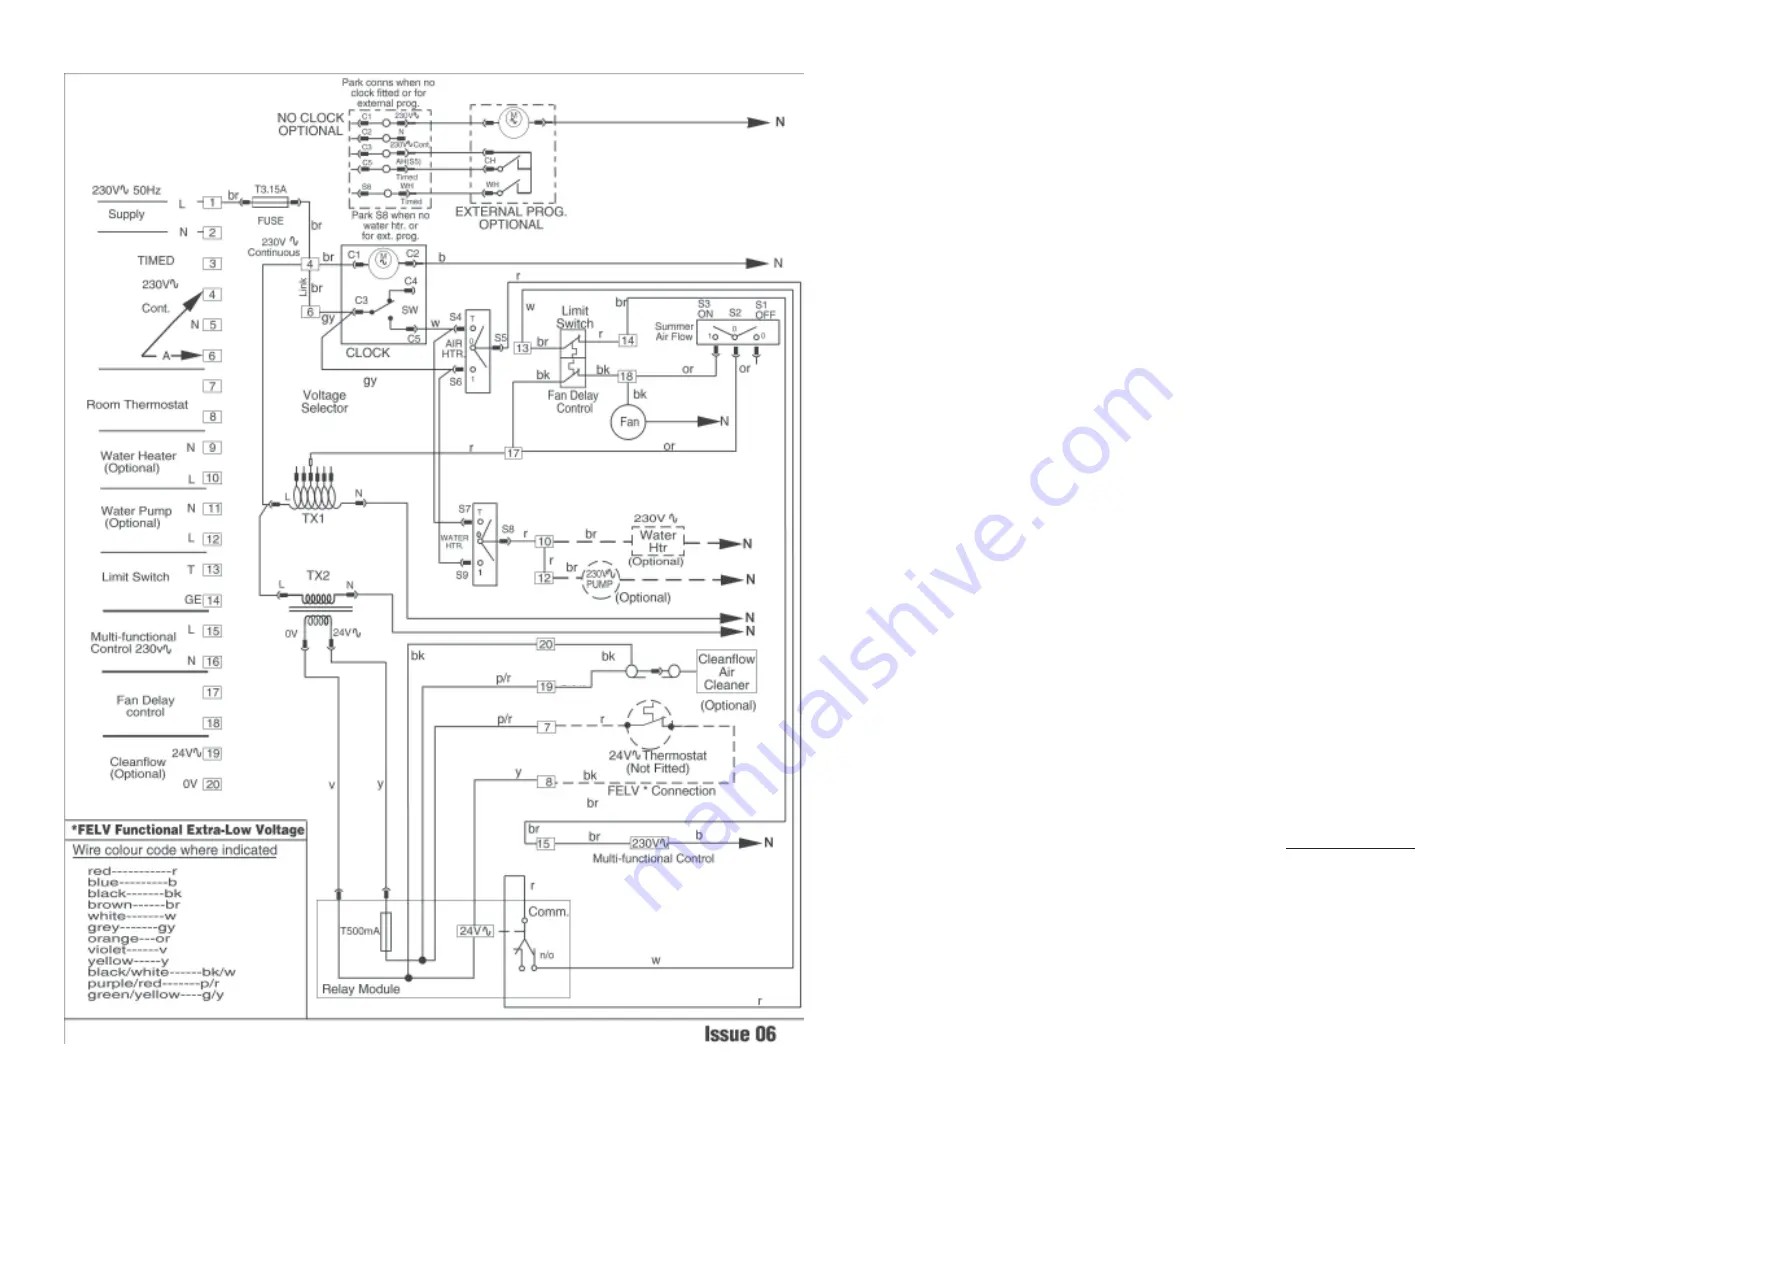
Fig. 6b, BASIC CONTROL FUNCTIONAL DIAGRAM

r

Summary of Contents for HI-SPEC J25SC Series

Page 1: ...PARES HI SPECJ25SC KEY G CNo MFR SNo DESCRIPTION QTY 1 BOS02064SP Fan Assembly 1 2 T193 0145000 FilterAssembly 1 3 378466 BOS02031 Time Control 1 4 381627 1000 0701140 Multifunctional Control 1 5 2329...

Page 2: ...ent must be not less than 75mm 3 in However if clearances are less than 75mm the internal surface of the compartment must be lined with non combustible material The compartment must be of a fixed rigi...

Page 3: ...he air filter front cover and the air circulation fan 5 1 2 Cut a hole in the chosen side of the fan compartment The knock outs will determine the size and position 5 1 3 Remove and the filter frame r...

Page 4: ...5 4 4 Apply a suitable mastic not provided to the spigot flanges and insert them into their respective apertures and seal them to the face of the SE duct wall 5 4 5 Position the larger rope ring seal...

Page 5: ...door or windows or on an outside wall iii Where affected by warm air ducts diffusers waste pipes or the heater itself iv Where subject to vibration c Connect Thermista stat Room thermostat wires to c...

Page 6: ...MAXIMUM 6 3 11 Ensure that the main burner has now ignited 6 3 12 Test for gas leakage at the supply Multifunctional control Pilot and Main burners using proprietary detection fluid and sealing any le...

Page 7: ...ch OFF the electrical supply to the air heater 6 8 3 Release the securing screw and hinge down the fan chamber door 6 8 4 Disconnect the air circulation fan as follows a System E T models disconnect t...

Page 8: ...s etc Outlet faces may require partial blanking in order to achieve this 6 9 3 Set the SUMMERAIRFLOW switch to O 6 9 4 Ignite the Pilot and Main burners as detailed in sub paras 6 3 4 to 6 3 7 6 9 5 S...

Page 9: ...arry out a complete functional test of the appliance in accordance with Commissioning Instructions at Sect 6 1 to 6 8 inclusive Replace any sealing gasket or insulation that is damaged before re commi...

Page 10: ...Thermocouple lock nut from the Pilot Burner Assembly and Multifunctional Control and withdraw the Thermocouple taking care to avoid damage to the capillary 8 5 3 Release the Igniter electrode lock nut...

Page 11: ...0 3 Disconnect terminals 21 to 33 from the Electronic module 8 10 4 Release the 2 x screws and nuts securing Electronic module to Electrical assembly and remove module 8 10 5 Refitting or replacement...

Page 12: ...YSTEM E T models a When carrying out any electrical testing a test meter MUST be used since low resistance test devices can cause damage to the Electronics module b Before commencing defect diagnosis...

Page 13: ...YSTEM E T models a When carrying out any electrical testing a test meter MUST be used since low resistance test devices can cause damage to the Electronics module b Before commencing defect diagnosis...

Page 14: ...0 3 Disconnect terminals 21 to 33 from the Electronic module 8 10 4 Release the 2 x screws and nuts securing Electronic module to Electrical assembly and remove module 8 10 5 Refitting or replacement...

Page 15: ...Thermocouple lock nut from the Pilot Burner Assembly and Multifunctional Control and withdraw the Thermocouple taking care to avoid damage to the capillary 8 5 3 Release the Igniter electrode lock nut...

Page 16: ...arry out a complete functional test of the appliance in accordance with Commissioning Instructions at Sect 6 1 to 6 8 inclusive Replace any sealing gasket or insulation that is damaged before re commi...

Page 17: ...s etc Outlet faces may require partial blanking in order to achieve this 6 9 3 Set the SUMMERAIRFLOW switch to O 6 9 4 Ignite the Pilot and Main burners as detailed in sub paras 6 3 4 to 6 3 7 6 9 5 S...

Page 18: ...ch OFF the electrical supply to the air heater 6 8 3 Release the securing screw and hinge down the fan chamber door 6 8 4 Disconnect the air circulation fan as follows a System E T models disconnect t...

Page 19: ...MAXIMUM 6 3 11 Ensure that the main burner has now ignited 6 3 12 Test for gas leakage at the supply Multifunctional control Pilot and Main burners using proprietary detection fluid and sealing any le...

Page 20: ...door or windows or on an outside wall iii Where affected by warm air ducts diffusers waste pipes or the heater itself iv Where subject to vibration c Connect Thermista stat Room thermostat wires to c...

Page 21: ...5 4 4 Apply a suitable mastic not provided to the spigot flanges and insert them into their respective apertures and seal them to the face of the SE duct wall 5 4 5 Position the larger rope ring seal...

Page 22: ...he air filter front cover and the air circulation fan 5 1 2 Cut a hole in the chosen side of the fan compartment The knock outs will determine the size and position 5 1 3 Remove and the filter frame r...

Page 23: ...ent must be not less than 75mm 3 in However if clearances are less than 75mm the internal surface of the compartment must be lined with non combustible material The compartment must be of a fixed rigi...

Page 24: ...PARES HI SPECJ25SC KEY G CNo MFR SNo DESCRIPTION QTY 1 BOS02064SP Fan Assembly 1 2 T193 0145000 FilterAssembly 1 3 378466 BOS02031 Time Control 1 4 381627 1000 0701140 Multifunctional Control 1 5 2329...

Reviews: