background image


STARTING THE MACHINE


1- Verify that there are sufficient levels of detergent and rinse 
additive. The end weight at the end of the red (detergent) and blue 
(rinse) supply tubes must be at the bottom of the chemical 
containers. The chemicals will automatically dispensed at the 
appropriate times. 
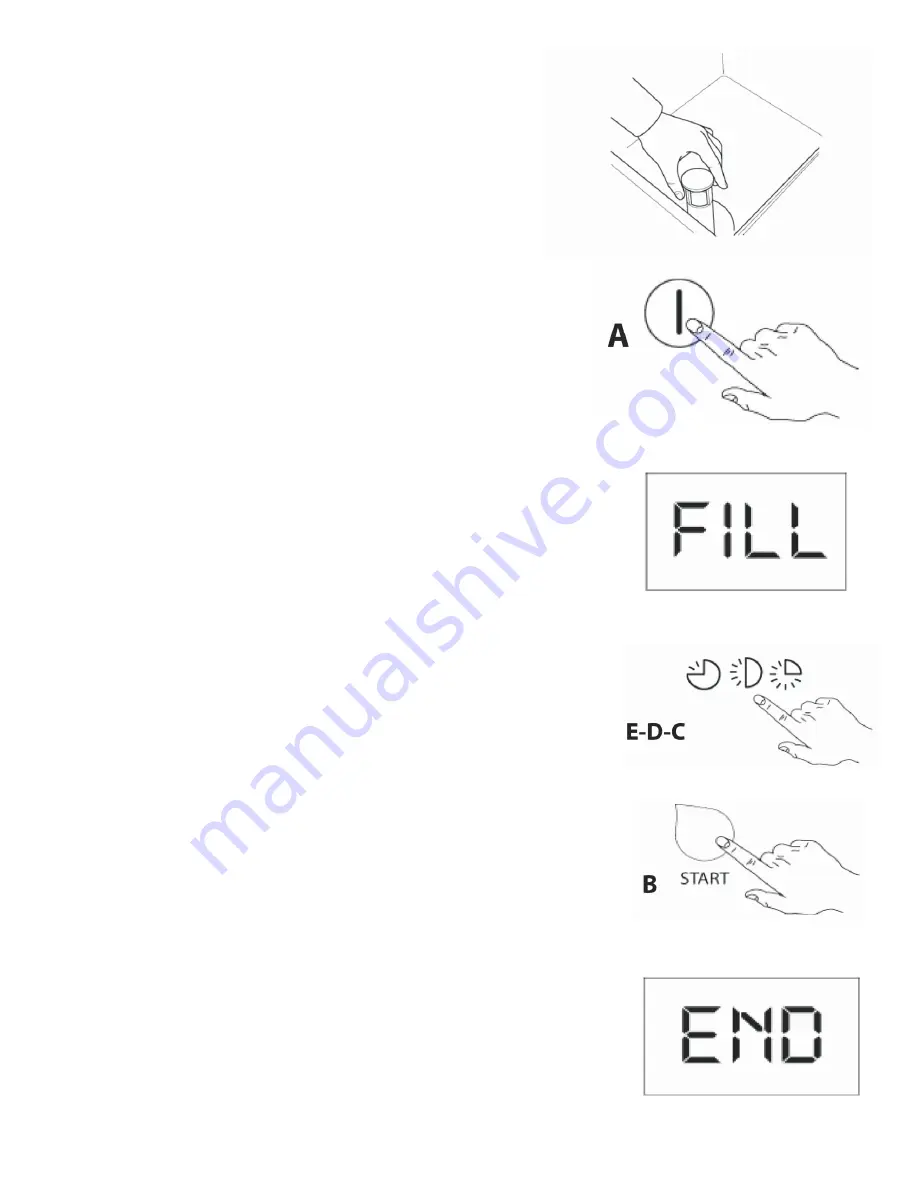
2- Open the dishwasher door and verify that all internal components, 
filters, wash arms and drain tube, are in their correct positions. 
(Fig.1) 
3- 

Close the door and press button “A” to turn ON the machine. 

(Fig.2) The dishwasher will start to fill. During the fill process, the 

display will show “FILL”. (Fig.3) 
 - 

If during this process the door is opened, “CLOSE DOOR” is 

displayed. Closing the door will continue the fill process. 
4- Once the dishwasher has filled, the rinse water will heat to 185°F 
and then the wash water will heat to 165°F. When this initial heating 
process is finished (approximately 20-30 minutes), the Start Washing 

Cycle (button “B”) will change colors from AMBER to GREEN. The 
machine is now ready to use.


– WASHING CYCLE 
The wash cycle includes a hot water washat 165°F with detergent and a 
rinse cycle with sanitizing hot water at 185°F with rinse aid.  
When the machine reaches the correct temperature and it is ready to start 
a new cycle, the button "B" will turn green, then:  
1- Open the door. 
2- Slide the pre-rinsed, soiled dish basket in the dishwasher and close the 
door. 
3- Press one of the 

available cycles between button “C-2 minutes”, “D-3 

minutes” or “E-4 minutes”. (Fig.4) 
4- 

Press button “B” start washing cycle. (Fig.5) 

5- 

Wait until the Display Panel (Q) shows “END” indicating that the cycle 

finished (Fig.6). Open the dishwasher door and remove clean dish 
basket.The dishes will air dry in several minutes. 
 - 

During the wash cycle, the GREEN indicator light is blinks (button “B”) 

and remaining time is displayed. 
 - If during this process the door is opened, the washing cycle is 
interrupted 

and “CLOSE DOOR” is displayed. To start a new cycle press 

button “B” start cycle. 
N.B.: The machine is equipped with different washing cycles, from 2 to 4 
minutes. Choose button “C” short cycle for light soiled dishes. Button “D” 
medium cycle for medium s

oiled dishes. Button “E” long cycle for very 

soiled dishes.


12


Fig. 1


Fig. 2


Fig. 3


Fig. 4


Fig. 5


Fig. 6


Summary of Contents for 727E

Page 1: ...OWNER S MANUAL DISHWASHER INSTALLATION AND MAINTENANCE Model 727E For operator Do not discard 2013 08 RM...

Page 2: ...red in this manual Specific information on our current and older models is available upon request model by model If you find any discrepancy or can t find certain information please contact us We will...

Page 3: ...AL INSTALLATION GUIDELINES 6 CONNECTING YOUR 727E 7 8 CHEMICAL PUMP ADJUSTMENT 9 10 CONTROL PANEL 11 STARTING THE MACHINE 12 13 DAILY CLEANING END OF WORK 14 WARNING MESSAGES DISPLAYED ON THE CONTROL...

Page 4: ...Corp will not be held responsible The installation of any generic part will not be valid and therefore voids this warranty All authorized labor coverage shall be limited to regular h ourly rates only...

Page 5: ...5...

Page 6: ...6...

Page 7: ...ier Make sure that the water is free from calcium and hard water deposits For these situations an inline water cartridge system is highly recommended Build up of calcium and lime deposits in the washe...

Page 8: ...ne and lift the panel G The terminal block is located inside the back cover Pass the cable through the cable strain relief and connect the wires to the terminals L1 brown wire L2 blue wire Ground yell...

Page 9: ...Pry open towards you Do this on both sides The red blue hoses connected to the pumps must be routed out of the bottom of the dishwasher The red tube is for detergent and the blue tube is for rinse ad...

Page 10: ...must reach to the bottom of the container If the filter or tube is blocked remove and soak in warm water to dislodge the obstruction 2 There may be air in the pump To Prime the pumps remove the air t...

Page 11: ...EGEND A On Off B StartWashingCycle C Short Washing Cycle D Medium Washing Cycle E Long Washing Cycle G Drain Water Tank I Wash Temperature Indicator L Rinse Temperature Indicator Q Display Panel E D C...

Page 12: ...HING CYCLE The wash cycle includes a hot water washat 165 F with detergent and a rinse cycle with sanitizing hot water at 185 F with rinse aid When the machine reaches the correct temperature and it i...

Page 13: ...ion of the dishes When the Thermo Stop function is working SAFE is displayed ion the control panel until final rinse temperature is reached and the cycle is finished Fig 7 STANDARD LOADING RACKS 1 Loa...

Page 14: ...will drain rinse the wash tank and drain again It will turn OFF automatically after completing this process FILTER CLEANING 1 Turn OFF the machine by pressing button A On Off 2 Manually remove side or...

Page 15: ...LL TECHNICAL SERVICE ASSISTANCE TANK TEMPERATURE LIMIT CALL TECHNICAL SERVICE ASSISTANCE DRAIN ANOMALY Drain anomaly water draining not completed during the time limit Verify water flow device is remo...

Page 16: ...it with rinse aid product 3 Verify the quality and the quantity of the rinse aid used and check with the assistance service 4 Verify the rinsing temperature is between 176 F to 194 F degrees CONDENSAT...

Reviews: