background image

59

MONTAGE 

INSTALLATION / MONTAGE / MONTAJE / MONTAGGIO / MONTAGE / MONTAŻ / MONTAJ

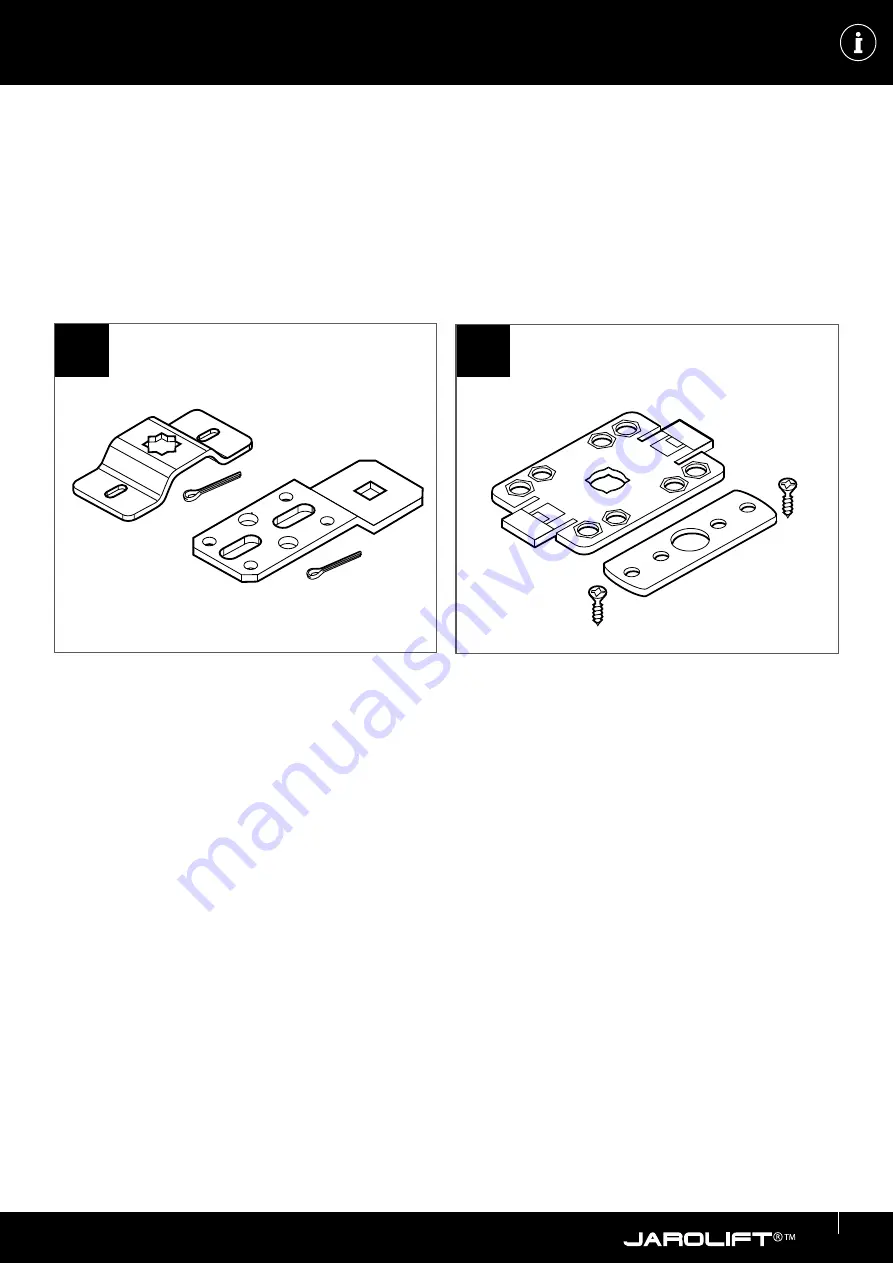
Montage van het kliklager (35 mm-aandrijvingen):

U kunt, afhankelijk van het motortype en de montagesituatie, kiezen tussen verschillende motorlagers.

U kunt kiezen voor de montage van de standaard stervormige of vlakke lagers (fig. 1), waarin de vierkan-

te pen in de motorkop wordt gestoken en geborgd met een borgpen, of u gebruikt het kliklager (fig. 2) 

dat bij de 35 mm-aandrijvingen wordt meegeleverd, waarbij u de motorkop in het lager kunt "klikken", 

zonder extra borging met een borgpen.

1

2

Summary of Contents for TDEF10-14

Page 1: ...i original ES Instrucciones originales IT Manuale d uso originale NL Originele gebruiksaanwijzing PL Oryginalna instrukcja obs ugi TR Orijinal letme Talimat EINFACHE MONTAGE EXTREM LAUFRUHIG G ltig f...

Page 2: ...i i Montage 33 72 Installation Montage Montaje Montaggio Montage Monta Montaj Elektroanschluss 73 88 Electrical connection Raccordement l ctrique Conexi n el ctrica Allacciamento elettrico Elektrische...

Page 3: ...und bergeben Sie diese bei einem Besitzer wechsel an den neuen Besitzer Dieses Ger t kann von Kindern ab 8 Jahren sowie von Personen mit verringer ten physischen sensorischen oder mentalen F higkeiten...

Page 4: ...reischaltvor richtung Sicherung vorhanden sein Das Netzkabel darf um Gef hrdungen zu vermeiden nur durch den Hersteller seinen Kundenservice oder eine hnlich qualifizierte Person ersetzt werden Dabei...

Page 5: ...CTIES OG LNE INSTRUKCJE BEZPIECZE STWA GENEL G VENLIK TALIMATLARI ACHTUNG Folgende Montagehinweise unbedingt beachten Vergleichen Sie vor der Montage die Angaben zur Netzspannung frequenz auf dem Type...

Page 6: ...8 years and older as well as persons with re duced physical sensory or mental capabil ities or lack of experience and knowledge if they are supervised or have been instructed in the safe use of the d...

Page 7: ...e Take safety precautions to make sure that the equipment cannot be switched on acci dently Before working on the unit disconnect all connection cables to be fitted from the electricity supply and sec...

Page 8: ...with that of the local electricity network When the operating direction is changed the changeover time must be at least 0 5 seconds The switches or controls used must not ex ecute an UP DOWN command...

Page 9: ...triques selon les sch mas des connexions du pr sent manuel ALLGEMEINE SICHERHEITSHINWEISE GENERAL SAFETY INSTRUCTIONS INFORMATIONS DE S CURIT INDICACIONES GENERALES DE SEGURIDAD AVVERTENZE GENERALI D...

Page 10: ...taire Avant toute intervention sur l installa tion d branchez tous les c bles de raccorde ment installer de l alimentation lectrique et prot gez les contre toute remise sous tension involontaire Retir...

Page 11: ...ans les ordures m nag res Renseignez vous sur les possibilit s locales de retour et de recyclage utilisez les points de collecte existants dans votre r gion pour l limi nation ATTENTION Respecter imp...

Page 12: ...CHERHEITSHINWEISE GENERAL SAFETY INSTRUCTIONS INFORMATIONS DE S CURIT INDICACIONES GENERALES DE SEGURIDAD AVVERTENZE GENERALI DI SICUREZZA ALGEMENE VEILIGHEIDSINSTRUCTIES OG LNE INSTRUKCJE BEZPIECZE S...

Page 13: ...a evitar encendidos accidentales Antes de trabajar en el sistema desco necte todos los cables de conexi n de la fuente de alimentaci n y aseg relo frente a reconexiones involuntarias Retire todos los...

Page 14: ...para su funciona miento Inf rmese acerca de las opciones de devoluci n y reciclaje a nivel local y utilice los puntos de recogida existentes en su entorno para su elimina ci n ATENCI N Hay que respet...

Page 15: ...elettricisti autorizzati secondo gli schemi elettrici riportati nel presente manuale ALLGEMEINE SICHERHEITSHINWEISE GENERAL SAFETY INSTRUCTIONS INFORMATIONS DE S CURIT INDICACIONES GENERALES DE SEGUR...

Page 16: ...misure di sicurezza contro l attiva zione involontaria Prima di effettuare lavori sull impianto scollegare la corrente da tutti i cavi di col legamento da montare e proteggerli dalla riattivazione in...

Page 17: ...zzare i punti di raccolta presenti sul territorio ATTENZIONE Osservare scrupolosamente le seguenti indicazioni di montaggio Prima di iniziare il montaggio confrontare le specifiche di tensione frequen...

Page 18: ...ogen uitsluitend door een elektricien ALLGEMEINE SICHERHEITSHINWEISE GENERAL SAFETY INSTRUCTIONS INFORMATIONS DE S CURIT INDICACIONES GENERALES DE SEGURIDAD AVVERTENZE GENERALI DI SICUREZZA ALGEMENE V...

Page 19: ...e doeld inschakelen Schakel voor werkzaamheden aan de installatie alle te monteren aansluitkabels spanningsloos en beveilig de installatie te gen onbedoeld opnieuw inschakelen Verwijder alle niet beno...

Page 20: ...olgende installatievoorschrif ten in acht Vergelijk v r de installatie de speci ficaties van de netspanning frequentie op het typeplaatje met die van uw plaatselijke elektriciteitsnet De omschakeltijd...

Page 21: ...zez uprawnionych ALLGEMEINE SICHERHEITSHINWEISE GENERAL SAFETY INSTRUCTIONS INFORMATIONS DE S CURIT INDICACIONES GENERALES DE SEGURIDAD AVVERTENZE GENERALI DI SICUREZ ZA ALGEMENE VEILIGHEIDSINSTRUCTIE...

Page 22: ...przed nieupowa nionym w czeniem Przed wykonywaniem prac na instalacji nale y od czy od napi cia wszystkie mon towane przewody przy czeniowe i zabez pieczy instalacj przed przypadkowym ponownym w czeni...

Page 23: ...klingu i oddawa sprz t do utylizacji w wyznaczo nych lokalnych miejscach zbi rki UWAGA Bezwzgl dnie przestrzega poni szych wskaz wek monta owych Przed przyst pieniem do monta u nale y por wna podane n...

Page 24: ...u saklay n ve cihaz n sahibi de i ti inde yeni sahibine verin Bu cihaz g venli kullan m ve kullan ma ba l tehlikeler konusunda e itim verildi i takdirde 8 ya st ocuklar ve fiziksel duy gusal veya zihi...

Page 25: ...emdeki al malardan nce monte edilecek t m ba lant kablolar n gerilimsiz hale getirin ve kontrols z ekilde devreye al nmamas i in emniyete al n Gerekli olmayan t m kablolar ortadan kald r n Motor ile h...

Page 26: ...e geri d n m alternatifleri hak k nda bilgi al n ve imha etmek i in evrenizdeki toplama noktalar ndan yararlan n D KKAT A a da sunulan montaj talimatlar mut lak ekilde dikkate al nmal d r Montaj faali...

Page 27: ...0 49 A 116 watts 4 min IP 44 433 92 MHz 35 mm 70 dB A TDEF10 13 10 Nm 13 rpm 230 V 50 Hz 0 60 A 136 watts 4 min IP 44 433 92 MHz 45 mm 70 dB A TDEF20 13 20 Nm 13 rpm 230 V 50 Hz 0 68 A 155 watts 4 mi...

Page 28: ...diowa rednica rury os onowej Poziom emitowane go ci nienia akustycz nego TDEF10 14 10 Nm 14 obr min 230 V 50 Hz 0 49 A 116 W 4 min IP 44 433 92 MHz 35 mm 70 dB A TDEF10 13 10 Nm 13 obr min 230 V 50 Hz...

Page 29: ...ollst ndige oder nicht den An gaben entsprechende Ger te d rfen nicht in Betrieb genommen werden Devices that are incomplete or do not comply with the information must not be put into operation ACHTUN...

Page 30: ...ENT ADVERTENCIA Les appareils incomplets ou non conformes aux sp cifications ne doivent pas tre mis en service Si los aparatos presentan datos incompletos o que no se corresponden con los datos no pue...

Page 31: ...RSCHUWING Gli apparecchi incompleti o non con formi alle specifiche non devono esse re messi in funzione Onvolledige apparaten of apparaten die niet aan de specificaties voldoen mogen niet in bedrijf...

Page 32: ...aj cy zamontowany na sta e Ba lant kablosu sabit monte edilmi tir OSTRZE ENIE UYARI Nie zezwala si na uruchamianie urz dze niekompletnych lub nieodpowia daj cych danym na tabliczce znamio nowej Eksili...

Page 33: ...en k rzesten Weg zur n chs ten Abzweigdose da Leitungen im Rollladenkasten nicht verlegt werden d rfen 4 Die Endschaltersteuerung erfolgt ber den vollst ndig aufgeschobenen Kunststoffring Stellen Sie...

Page 34: ...hlen Entweder Sie entscheiden sich f r die Montage des Standard Stern oder Flachlagers Abb 1 in welche der am Motorkopf befindliche Vierkant Zapfen eingef hrt und mit einem Splint gesichert wird oder...

Page 35: ...NG Verwenden Sie niemals andere als die im Lieferumfang enthaltenen Schrauben 3 Montieren Sie das Klicklager Kunststoff an der Seitenwand Ihres Rollladen Kastens Achten Sie darauf dass das Lager mitti...

Page 36: ...m Abb 2 komplett mit dem Laufring in der Welle eingeschoben ist Ver wenden Sie sich hierzu niemals einen Hammer Adapter und Mitnehmer sind unter Umst n den nicht ganz leichtg ngig einzuschieben dennoc...

Page 37: ...e Programmier taste Abb 5 gut zug nglich bleibt ACHTUNG Bitte verwenden Sie zur Befestigung des Rollladens an der Welle Stahlband aufh nger welche auch Sicherungsfe dern genannt werden Beim Einbau von...

Page 38: ...he nearest junction box as cables must not be laid in the roller shutter casing 4 The end position is determined when the plastic ring is fully pushed on Always ensure that the motor can be pushed int...

Page 39: ...to mount the standard star or flat bracket Fig 1 into which the square motor head pin is inserted and secured with a split pin or you use the click bracket supplied with the 35 mm motors Fig 2 where...

Page 40: ...ick bracket plastic on the side panel of your roller shutter casing Make sure that the bracket is mounted in a centered posi tion In the case of external elements you can leave the round pin in the si...

Page 41: ...ring ring as shown in Fig 2 Never use a hammer for this purpose Under certain circumstances it may not be easy to push in the adapter and carrier but you must not hit the motor 7 Now check whether the...

Page 42: ...Fig 5 remains easily accessible ATTENTION Please use steel strip hangers also called retaining springs to fix the roller shutter to the shaft When installing 35 mm motors in 40 mm roller shutter shaf...

Page 43: ...s le chemin le plus court jusqu la bo te de d rivation car les lignes ne doivent pas tre pos es dans le coffre du volet roulant 4 L interrupteur de fin de course est command par l anneau en plastique...

Page 44: ...ez les supports appropri s Soit vous optez pour le support standard en toile ou plat fig 1 dans lequel s ins re l ergot carr situ sur la t te du moteur et fix l aide d une goupille soit vous utilisez...

Page 45: ...es vis que celles four nies 3 Montez le support encliquetable plastique sur la paroi lat rale de votre bo tier de volet rou lant Veillez au montage central du support Dans le cas d l ments saillants v...

Page 46: ...ns l arbre du volet roulant jusqu ce qu il soit compl tement ins r selon fig 2 avec la bague de roulement dans l arbre Pour ce faire n utilisez jamais un marteau Il se peut que l adaptateur et l entra...

Page 47: ...c s ais au bouton de programmation fig 5 ATTENTION Pour fixer le volet roulant l arbre utilisez des crochets bande d acier galement appel s ressorts d arr t Lors de l installation d entra nements de 3...

Page 48: ...rto hasta la siguiente caja de derivaci n ya que no se pueden tender cables dentro del caj n para persiana enro llable 4 El control del interruptor final se realiza mediante el anillo de pl stico comp...

Page 49: ...motor Puede decantarse por el montaje del cojinete plano o en estrella est ndar Fig 1 en el cual se introduce el perno cuadrado que se encuentra en la cabeza del motor y se asegura con una chaveta o...

Page 50: ...nillos que no sean los incluidos en el volumen de suministro 3 Monte el cojinete encajable pl stico en la pa red lateral de su caj n para persiana enrollable Aseg rese de que el cojinete est montado d...

Page 51: ...ro del eje de la persiana enrollable hasta que est completamente introdu cido en el eje con el anillo de rodadura seg n la Fig 2 Nunca use un martillo para ello En algu nos casos los adaptadores y arr...

Page 52: ...ible ATENCI N Para la fijaci n de la persiana enrollable al eje use colgadores de fleje tambi n llamados resortes de seguridad Al instalar accionamientos de 35 m en ejes de persiana enrollable de 40 m...

Page 53: ...l percorso pi breve verso la scatola di derivazione poich all interno del cassettone degli avvolgibili non devono essere posati cavi 4 Il comando dell interruttore di fine corsa avviene mediante l ane...

Page 54: ...zione di mon taggio O si decide di montare il cuscinetto standard a stella o piatto fig 1 in cui il perno quadrato situato sulla testa del motore viene inserito e fissato con una coppiglia oppure si u...

Page 55: ...rse da quelle incluse nella fornitura 3 Montare il supporto a scatto in plastica sulla parete laterale del cassettone per avvolgibi le Assicurarsi che il cuscinetto sia montato centralmente Nel caso d...

Page 56: ...1 6 Inserire il motore nel rullo dell avvolgibile fino a quando inserito completamente secondo la Fig 2 con l anello di guida nel rullo Non utiliz zare in nessun caso un martello In determinati casi...

Page 57: ...ig 5 rimanga facilmente accessibile ATTENZIONE Per fissare l avvolgibile al rullo si prega di utilizzare dei ganci a nastro d acciaio chiamati anche molle di sicurezza Quando si installano azionamenti...

Page 58: ...kast moet worden ge nstalleerd Kies altijd de kortste weg naar de volgende aftakdoos er mogen namelijk geen kabels in de rolluikkast worden gelegd 4 De eindschakelaar wordt bediend via de volledig opg...

Page 59: ...kiezen tussen verschillende motorlagers U kunt kiezen voor de montage van de standaard stervormige of vlakke lagers fig 1 waarin de vierkan te pen in de motorkop wordt gestoken en geborgd met een borg...

Page 60: ...ebruik nooit ande re schroeven dan de meegeleverde schroeven 3 Monteer het kliklager kunststof op de zijwand van uw rolluikkast Zorg ervoor dat het lager in het midden gemonteerd is Bij de voorbou wel...

Page 61: ...in de as van het rolluik tot hij er volledig in zit zoals in fig 2 met de loopring in de as Gebruik hiervoor nooit een hamer De adapter en meenemer glijden er misschien niet zo soepel in maar de motor...

Page 62: ...erd wordt dat de programmeer knop fig 5 goed bereikbaar blijft LET OP Gebruik stalen bandhangers ook wel borgveren genoemd om het rolluik aan de as te bevestigen Bij montage van 35 mm aandrijvin gen i...

Page 63: ...rodku skrzyni rolety jest niedozwolone dlatego zawsze trzeba wybiera najkr tsz drog do najbli szej puszki elektroinstalacyjnej 4 Do sterowania prze cznikami kra cowymi wykorzystuje si ca kowicie nasun...

Page 64: ...azdowego lub p askiego ilustr 1 W rodek o yska wsuwa si przytwierdzony do g owicy silnika czop czworok tny i zabezpiecza si go zawleczk Mo na te zastosowa uwzgl dnione w zakresie dostawy do nap d w 35...

Page 65: ...o ysko zatrzaskowe z tworzywa sztucznego na cianie bocznej skrzyni rolety o ysko musi by zamontowane po rodku W przypadku rolokaset mo na pozostawi umieszczony w cz ci bocznej czop o przekroju okr g y...

Page 66: ...towym schowa si ca kowicie w wale Pod adnym pozorem nie wolno u ywa do tego m otka Operacja wsuwania adaptera i zabiera ka czasami przebiega do opornie ale uderza nie silnika jest mimo wszystko niedop...

Page 67: ...a rolety na wale pro sz u y wieszak w z ta my stalowej zwanych r wnie spr ynami zabez pieczaj cymi Do monta u nap d w 35 mm w wa ach o rednicy 40 mm albo nap d w 45 mm w wa ach o rednicy 50 mm najlepi...

Page 68: ...her zaman en yak ndaki da t m kutusuna olan en k sa yolu se in 4 Limit alter tetiklemesi sonuna kadar yerle tirilmi plastik halka zerinden ger ekle ir Motorun aft zerine son konuma kadar ge irilebildi...

Page 69: ...fas nda bulunan d rt k e muyluya sokulan ve bir kopilya ile sabitlenen standart y ld z veya yas s yata n ekil 1 veya motor kafas n kopilya ile sabitlemeye gerek duymadan do rudan yata a ge i rebildi i...

Page 70: ...nmay n 3 Ge meli yata plastik panjur kasan z n yan duvar na monte edin Yata n ortaya monte edilmesine dikkat edin n montaj elemanla r nda yan par ada bulunan yuvarlak muyluyu bu muylu ge meli yata n o...

Page 71: ...a ge irin bkz ekil 2 Bunun i in kesinlikle bir eki kullanmay n Adapt r ve tutucu ok kolay yer le tirilemeyebilir buna ra men motora eki ile vurulamaz 7 zerine monte edilmi motor bulunan aft n sorunsuz...

Page 72: ...zerinde sabitlemek i in l tfen emniyet yaylar olarak da adlan d r lan elik bant ask lar kullan n 35mm motorlar n 40mm panjur aftla r na veya 45mm motorlar n 50mm pan jur aftlar na monte edilmesi s ra...

Page 73: ...arf kei ne Fremdspannung angelegt werden Wenn Sie keinen Taster anschlie en isolieren Sie die graue und schwarze Steuerleitung B1 und B2 EINZELN mit Wago oder L ster klemmen Anschlussplan Antrieb mit...

Page 74: ...e auf www jalousiescout de Die Antriebe der Baureihe TDEF sind kompatibel zu allen Jarolift TDRC Sendern ab Produktionsdatum 03 2010 Sie k nnen bis zu 15 Sender in den Empf nger der TDEF Antriebe einl...

Page 75: ...tage may be applied to the control cables B1 and B2 If you do not con nect a pushbutton insulate the gray and black control cables B1 and B2 INDIVID UALLY with Wago or luster terminals Connection plan...

Page 76: ...ousiescout de The motors of the TDEF series are compatible with all Jarolift TDRC transmitters from production date 03 2010 You can teach up to 15 transmitters into the receiver of the TDEF motors and...

Page 77: ...ande B1 et B2 Si vous ne connectez pas de bouton pous soir isolez les lignes de commande grise et noire B1 et B2 INDIVIDUELLEMENT avec des bornes Wago ou Luster Sch ma des connexions Entra nement avec...

Page 78: ...ousiescout de Les moteurs de la s rie TDEF sont compatibles avec tous les metteurs Jarolift TDRC partir de la date de production 03 2010 Vous pouvez m moriser jusqu 15 metteurs dans le r cepteur des e...

Page 79: ...tensi n ajena Si no se conecta un pulsador a sle los cables de control gris y negro B1 y B2 INDIVIDUALMENTE con clema o pinzas de jaula Plano de conexiones accionamiento con interruptores finales ele...

Page 80: ...a 15 emisores en los receptores de los accionamientos TDEF y ejercer un control individual por grupos y centralizado de sus persianas enrollables Con ayuda del emisor programado inicialmente puede pro...

Page 81: ...essere applicata alle linee di comando B1 e B2 Se non si collega alcun tasto isolare INDIVIDUALMENTE le linee di comando gri gie e nere B1 e B2 con i morsetti Wago o Luster Schema dei collegamenti Az...

Page 82: ...li azionamenti TDEF e re alizzare cos ad esempio il controllo individuale di gruppo e centrale dei vostri avvolgibili Si pu usare il primo trasmettitore di cui stato eseguito l apprendimento per effet...

Page 83: ...rklemmen Aansluitschema Aandrijving met elektronische eindschakelaars en ge ntegreerde draadloze ontvanger L1 N PE groen geel Zwart Grijs B1 B2 L1 N PE B1 bedieningskabel zwart B2 bedieningskabel grij...

Page 84: ...andrijvingen programmeren en zo bijv individuele groeps en centrale bediening van uw rolluiken mogelijk maken U kunt de eerste geprogrammeerde zender gebruiken om een andere extra zender in het geheug...

Page 85: ...ak caj ce Je li nie zdecyduj si Pa stwo na pod czenie przycisku szary i czarny prze w d sterowniczy B1 i B2 nale y POJE DYNCZO zaizolowa zaciskami Wago lub g wkowymi Schemat po cze nap d z elektronicz...

Page 86: ...w TDEF mo na przyuczy maksymanie 15 nadajnik w by stworzy np uk ady jednostkowego grupowego i centralnego sterowania roletami Za pomoc pierwszego przyuczonego nadajnika mo na wprowadzi do pami ci nap...

Page 87: ...AT B1 ve B2 kumand harici gerilim ba lan mamal d r Bir d me ba lama d n z takdirde gri ve siyah kumanda hatt n B1 ve B2 birbirinden ayr ola rak Wago veya vidal klemensler ile izole edin Ba lant plan E...

Page 88: ...escout de sitesinde bulabilirsiniz TDEF serisi motorlar 03 2010 ve sonras retim tarihli t m Jarolift TDRC uzaktan kumandalar ile uyumludur TDEF motorlar n n al c lar na en fazla 15 uzaktan kumanda tan...

Page 89: ...Sekunden gleichzei tig die AUF und AB Taste und anschlie end sofort die STOPP Taste Ihres Senders 4 Der Motor Rollladen vibriert erneut Der Code wurde erfolgreich eingelernt Programmiertaste Pr fen S...

Page 90: ...Seite 12 beachten ndern der Drehrichtung des Motors M glichkeit A 1 Dr cken Sie die Programmiertaste am Motorkopf f r ca 3 Sekunden Der Motor wird kurz vibrieren Die Drehrichtung des Motors ist ge nd...

Page 91: ...fnungen der Welle zu befestigen Hierzu dr cken Sie die Taste AB an Ihrem Sender und be obachten die Drehung der Welle Sobald die Welle die notwendige Position zum Einh ngen der Stahlbandaufh nger erre...

Page 92: ...oberen Endpunkts durch kurzes Vibrieren best tigen AUF STOPP AUF u AB 2 x STOPP AUF Lassen Sie den Rollladen zur Probe mehrmals komplett auf und abrollen Stoppt der Rollladen an den eingestellten End...

Page 93: ...eichzeitig die AUF und AB Taste 5 Dr cken Sie anschie end kurz die STOPP Taste am neu einzulernenden Sender Der Motor wird zur Best tigung erneut kurz vibrieren Der Code wurde nun auf den neuen Sender...

Page 94: ...en um die L ftungsschlitze zu ffnen Erst wenn Sie die AUF Taste l nger als ca 3 Sekunden gedr ckt halten wird der Antrieb in Selbsthaltung angesteuert und der Behang vollst ndig ge ffnet Aktivieren De...

Page 95: ...rwendet werden Einstellen Programmieren der Zwischenposition 1 Fahren Sie den Rollladen mit der Taste AUF oder AB in die gew nschte Position 2 Stoppen Sie den Rolladen mit der STOPP Taste 3 Dr cken Si...

Page 96: ...e end 4x die STOPP Taste 4 Dr cken Sie innerhalb von 10 Sekunden die AUF Taste Der Motor wird das L schen des oberen Endpunktes durch kurzes Vibrieren best tigen AUF u AB AUF u AB 4 x STOPP 4 x STOPP...

Page 97: ...nsmitter 4 The motor roller shutter vibrates again The code has been successfully taught in Programming button Then check the function with the UP STOP DOWN buttons The direction of rotation of the mo...

Page 98: ...mming button on the motor head for approx 3 seconds The motor will vibrate briefly The direction of rotation of the motor has changed Programming button Option B if the programming button on the motor...

Page 99: ...button on your transmitter and observe the rotation of the shaft As soon as the shaft has reached the necessary position for hanging the steel strip hangers press the STOP button 2 Hang the curtain wi...

Page 100: ...the upper end point by vibrating briefly UP STOP UP and DOWN 2 x STOP UP Let the roller shutter roll up and down completely several times as a test If the roller shutter stops at the set end points t...

Page 101: ...same time on the new transmitter to be taught in 5 Then briefly press the STOP button on the transmitter to be taught in The motor will vibrate briefly again as confirmation The code has now been cop...

Page 102: ...er shutters to open the ventilation slots Only when you keep the UP button pressed for longer than approx 3 seconds is the motor controlled in press and release mode and the curtain is fully opened Ac...

Page 103: ...ght slots Setting programming the intermediate position 1 Move the roller shutter to the desired position using the UP or DOWN button 2 Stop the roller shutter using the STOP button 3 Press the STOP b...

Page 104: ...Then press the STOP button 4x 4 Press the UP button within 10 seconds The motor will confirm the deletion of the upper end point by vibrating briefly UP and DOWN UP and DOWN 4 x STOP 4 x STOP UP DOWN...

Page 105: ...on STOP de votre metteur 4 Le moteur volet roulant vibre nouveau Le code a t m moris Touche de programmation V rifiez ensuite le fonc tionnement l aide des touches HAUT STOP BAS Le sens de rotation du...

Page 106: ...de moteur pendant envi ron 3 secondes Le moteur vibre bri vement Le sens de rotation du moteur a t modifi Touche de programmation Possibilit B en cas d acc s impossible la touche de programmation du...

Page 107: ...metteur et observez la rotation de l arbre D s que l arbre atteint la position n cessaire la suspension du crochet bande d acier appuyez sur la touche STOP 2 Suspendez le tablier l aide des crochets b...

Page 108: ...ge du point final sup rieur HAUT STOP HAUT et BAS 2 fois STOP HAUT Pour tester le volet roulant l enrouler et le d rouler compl tement plusieurs fois Si le volet roulant s arr te aux points finaux d f...

Page 109: ...BAS de l metteur m moriser 5 Appuyez ensuite bri vement sur la touche STOP de l metteur m moriser Le moteur vibre nouveau bri vement pour confirmer Le code est copi sur le nouvel metteur HAUT et BAS...

Page 110: ...but d ou vrir la fente d a ration Ce n est que lorsque vous appuyez sur le bouton HAUT pendant plus de 3 secondes environ que l entra nement est activ en mode maintien et que le tablier s ouvre compl...

Page 111: ...ation de la position interm diaire 1 D placez les volets roulants vers la position souhait e l aide des touches HAUT ou BAS 2 Arr tez le volet roulant l aide de la touche STOP 3 Appuyez 4 fois sur la...

Page 112: ...touche STOP 4 Vous disposez de 10 secondes pour appuyer sur la touche HAUT Une br ve vibration du moteur confirme la suppression du point final sup rieur HAUT et BAS HAUT et BAS 4 fois STOP 4 fois ST...

Page 113: ...emisor 4 El motor persiana enrollable vibra de nuevo El c digo se ha progra mado correctamente Tecla de programaci n A continuaci n comprue be el funcionamiento con las teclas ARRIBA PARA DA ABAJO El...

Page 114: ...la cabeza del motor durante aprox 3 segundos El motor vibrar brevemente El sentido de giro del motor se ha modificado Tecla de programaci n Posibilidad B si no es posible acceder a la tecla de progra...

Page 115: ...en su emisor y observe el giro del eje En cuanto el eje haya alcanzado la posici n necesaria para colgar los colgadores de fleje pulse la tecla PARADA 2 Cuelgue la colgadura en el eje con los colgador...

Page 116: ...a vibraci n breve ARRIBA PARADA ARRIBA y ABAJO 2 veces PARADA ARRIBA Pruebe a enrollar y desenrollar la persiana enrollable completamente varias veces Si la persiana enrollable se detiene en los punto...

Page 117: ...or que se est programando 5 A continuaci n pulse brevemente la tecla PARADA en el emisor que se est programando El motor vibrar brevemente de nuevo para confirmarlo Ahora se ha copiado el c digo en el...

Page 118: ...persianas enrollables para abrir una ranura de ventilaci n Solo si se mantiene pulsada la tecla ARRIBA durante m s de aprox 3 segundos se activa el accionamiento en porte aut nomo y se abre completam...

Page 119: ...ertas Ajuste programaci n de la posici n intermedia 1 Desplace la persiana enrollable con la tecla ARRIBA o ABAJO a la posici n deseada 2 Detenga la persiana enrollable con la tecla PARADA 3 Pulse 4 v...

Page 120: ...uaci n pulse 4 veces la tecla PARADA 4 Pulse la tecla ARRIBA en un plazo de 10 segundos El motor confirma el borrado del punto final superior mediante una vibraci n breve ARRIBA y ABAJO ARRIBA y ABAJO...

Page 121: ...o STOP sul trasmettitore 4 Il motore avvolgibile vibra nuovamente L apprendimento del codice avvenuto con successo Tasto di programmazione Poi controllare la funzione con i tasti SU STOP GI Il senso d...

Page 122: ...zione sulla testa del motore per ca 3 secondi Il motore vibrer brevemente La direzione di rotazione del motore modificata Tasto di programmazione Possibilit B se non possibile accedere al tasto di pro...

Page 123: ...pulsante GI sul trasmettitore e osservare la rotazione del rullo Non appena il rullo ha raggiunto la posizione necessaria per sospendere il ganci a nastro d acciaio premere il tasto STOP 2 Appendere...

Page 124: ...impostazione del punto finale superiore vibrando breve mente SU STOP SU e GI 2 x STOP SU Lasciare che l avvolgibile si arrotoli su e gi completamente diverse volte per testarlo Se l avvolgibile si fe...

Page 125: ...ap prendimento contemporaneamente i tasti SU e GI 5 Infine premere brevemente il tasto STOP sul trasmettitore su cui eseguire l ap prendimento Il motore vibrer ancora brevemente per confermare Il cod...

Page 126: ...lo degli avvol gibili per aprire le fessure di ventilazione Solo quando si tiene premuto il pulsante SU per pi di 3 secondi circa l azionamen to viene attivato in modalit autotenuta e la tenda si apre...

Page 127: ...er mente aperte Impostazione programmazione della posizione intermedia 1 Portare l avvolgibile con il tasto SU o GI nella posizione desiderata 2 Arrestare l avvolgibile con il tasto STOP 3 Premere 4 v...

Page 128: ...re 3 Premere infine 4 volte il tasto STOP 4 Premere entro 10 secondi il tasto SU Il motore confermer la cancellazione del punto finale superiore vibrando breve mente SU e GI SU e GI 4 x STOP 4 x STOP...

Page 129: ...nop van uw zender 4 De motor rolluik trilt opnieuw De code is succesvol gepro grammeerd Programmeerknop Controleer vervolgens de werking met de OMHOOG STOP OMLAAG knoppen De draairichting van de motor...

Page 130: ...id A 1 Houd de programmeerknop op de motorkop 3 seconden lang ingedrukt De motor zal kort trillen De draairichting van de motor is gewijzigd Programmeerknop Mogelijkheid B indien u niet bij de program...

Page 131: ...ender en observeert u de rotatie van de as Zodra de as de vereiste positie voor het ophangen van de stalen bandhangers heeft bereikt drukt u op de STOP knop 2 Hang het pantser met de stalen bandhanger...

Page 132: ...en door kort te trillen OMHOOG STOP OMHOOG en OMLAAG 2 x STOP OMHOOG Laat het rolluik enkele malen volledig op en afrollen om te testen Als het rolluik op de ingestelde eindpunten stopt is de eindscha...

Page 133: ...nder die moet worden geprogrammeerd 5 Druk vervolgens kort op de STOP knop van de zender die moet worden gepro grammeerd De motor zal opnieuw kort trillen ter bevestiging De code wordt nu naar de nieu...

Page 134: ...fortabele bediening van rolluiken om de ventilatiesleuven te openen Alleen wanneer u de OMHOOG knop langer dan ongeveer 3 seconden ingedrukt houdt wordt de aandrijving in de modus zelfstandig geactive...

Page 135: ...eopende lichtspleten Instellen programmeren van de tussenpositie 1 Zet het rolluik in de gewenste positie met de OMHOOG of OMLAAG knop 2 Stop het rolluik met de STOP knop 3 Druk 4 keer op de STOP knop...

Page 136: ...p de STOP knop 4 Druk nu binnen 10 seconden op de OMHOOG knop De motor zal het wissen van het bovenste eindpunt bevestigen door kort te trillen OMHOOG en OMLAAG OMHOOG en OMLAAG 4 x STOP 4 x STOP OMHO...

Page 137: ...dajniku 4 Silnik roleta ponownie zawibruje To znak e przyuczanie kodu zako czy o si powodzeniem Przycisk programuj cy Nale y od razu przeprowa dzi test dzia ania u ywa j c przycisk w ROZ STOP Z Kierun...

Page 138: ...Nacisn przycisk programowania na g owicy silnika i przytrzyma przez ok 3 sekundy Silnik kr tko zawibruje To znak e nast pi a zmiana kierunku obrot w silnika Przycisk programuj cy Mo liwo B gdy nie ma...

Page 139: ...przycisk Z w nadajniku i obserwowa jak obraca si wa Kiedy tylko wa znajdzie si w pozycji umo liwiaj cej zacze pienie wieszak w z ta my stalowej nacisn przycisk STOP 2 Na wieszakach z ta my stalowej na...

Page 140: ...e uda o si ustawi g rny punkt ko cowy ROZ STOP ROZ i Z 2 x STOP ROZ Na pr b kilkakrotnie nawin i rozwin do ko ca rolet Zatrzymywanie si rolety w zaprogramowanych punktach ko cowych oznacza e prze czni...

Page 141: ...ROZ i Z na nowo przyuczanym nadajniku 5 Nast pnie nacisn kr tko przycisk STOP na nowo przyuczanym nadajniku Silnik ponownie kr tko wibruje w celu potwierdzenia Kod zosta skopiowany na nowy nadajnik RO...

Page 142: ...letami w celu rozwarcia szczelin wentylacyjnych Dopiero gdy wci ni ty przycisk ROZ przytrzyma si d u ej ni przez ok 3 sekundy nap d przejdzie w tryb samopodtrzymania funkcji ca kowicie otwieraj c zas...

Page 143: ...ymi szczelinami wentylacyjnymi Ustawianie programowanie pozycji po redniej 1 Za pomoc przycisku ROZ albo Z ustawi rolet w dowolnie wybranej pozycji 2 Zatrzyma ruch rolety przyciskim STOP 3 Nacisn 4x p...

Page 144: ...na nadajniku 3 Nast pnie 4x przycisn przycisk STOP 4 W ci gu 10 sekund nacisn przycisk ROZ Silnik kr tko zawibruje aby potwierdzi pomy lne usuni cie g rnego punktu ko cowego ROZ i Z ROZ i Z 4 x STOP 4...

Page 145: ...ve A A I tu una ve ard ndan hemen DURDUR MA tu una bas n 4 Motor panjur yeniden titre ir Kod ba ar yla tan t lm t r Programlama tu u Ard ndan YUKARI DUR DURMA A A I tu lar ile al may kontrol edin Moto...

Page 146: ...kafas ndaki programlama tu unu yakla k 3 saniye bas l tutun Motor k sa s reli ine titre ecek Motorun d nme y n de i tirilmi tir Programlama tu u Se enek B Motordaki programlama tu una eri ilemedi i ta...

Page 147: ...A I tu una bas n ve aft n d nmesini g zlemleyin aft elik bant ask lar n as lmas i in gerekli pozisyona gel di i anda DURDURMA tu una bas n 2 Panjuru elik bant ask lar ile afta as n 3 Gerekti inde YUK...

Page 148: ...r st son noktan n ayarland n k saca titre erek onaylar YUKARI DURDURMA YUKARI ve A A I 2 defa DURDURMA YUKARI Panjuru test amac yla birka defa tamamen kapat n ve a n Panjur ayarlanm son noktalarda dur...

Page 149: ...inde ayn anda YUKARI ve A A I tu una bas n 5 Ard ndan yeni tan t lacak uzaktan kumandada k saca DURDURMA tu una bas n Motor onay i in yeniden k sa s reli ine titre ir imdi kod yeni uzaktan kumandaya k...

Page 150: ...lar n rahat bir ekilde kumanda edilmesini de sa la maktad r YUKARI tu una yakla k 3 saniyeden uzun s re bas ld takdirde motor kendili in den durma zelli inde etkinle tirilir ve panjur tamamen a l r Ka...

Page 151: ...olarak kullan labilir Ara pozisyonun ayarlanmas programlanmas 1 Panjuru YUKARI veya A A I tu u ile istedi iniz pozisyona g t r n 2 Panjuru DURDURMA tu u ile durdurun 3 4 defa DURDURMA tu una bas n Mot...

Page 152: ...RDURMA tu una bas n 4 10 saniye i erisinde YUKARI tu una bas n Motor st son noktan n silindi ini k sa s reli ine titre erek onaylar YUKARI ve A A I YUKARI ve A A I 4 defa DURDURMA 4 defa DURDURMA YUKA...

Page 153: ...Netzspannung fehlt L sung Pr fen Sie mit einem Spannungsmessger t ob die Versorgungsspannung 230 V anliegt und berpr fen Sie die Verdrahtung Beachten Sie besonders die Angaben zu den unzul ssigen Ansc...

Page 154: ...lag Der Netzanschluss des Motors und alle Arbeiten an elektrischen Anlagen d rfen nur durch eine zugelassene Elektrofachkraft nach den jeweiligen Anschlusspl nen des Ger ts erfolgen F hren Sie alle Mo...

Page 155: ...city supply Solution Use a voltage meter to check the availability of mains voltage 230 V and check the wiring Pay special attention to the information on unapproved types of connection Check the inst...

Page 156: ...njury from electric shock Connecting the motor to the mains and any work on electrical equip ment must only be carried out by an approved electrical specialist in ac cordance with the connection plans...

Page 157: ...e d un voltm tre la pr sence de la ten sion d alimentation 230V et contr lez le c blage V rifiez notamment les indications concernant les types de raccordement non autoris s V rifier l installation Le...

Page 158: ...let roulant ou obstacle dans le rail Solution Retirer le givre ou l obstacle D gager le volet roulant en l abaissant AVERTISSEMENT Tout travail sur des installations lectriques comporte un risque d le...

Page 159: ...de medici n de la tensi n si hay suministro de tensi n 230 V y compruebe el cableado Tenga especialmente en cuenta los datos so bre los tipos de conexiones permitidas Comprobar la instalaci n El moto...

Page 160: ...ble congelada u obst culo en el carril Soluci n Eliminar la congelaci n o el obst culo Desplazar libremente la persiana enrollable en direcci n descendente ADVERTENCIA En todos los trabajos en el sist...

Page 161: ...rete Soluzione Verificare con un voltmetro se presente la tensione di alimentazione 230 V e controllare il cablaggio Controllare specialmente le indicazioni relati ve ai collegamenti non consentiti C...

Page 162: ...o oppure ostacolo nella guida Soluzione Rimuovere il gelo o l ostacolo Portare l avvolgibi le verso il basso AVVERTIMENTO Durante tutti i lavori agli impianti elettrici sussiste il pericolo di morte a...

Page 163: ...et Mogelijke oorzaak Er is geen netspanning Oplossing Controleer met een spanningsmeter of er spanning 230V aanwezig is en controleer de bedrading Let vooral op de informatie over niet toege stane aan...

Page 164: ...Bevroren rolluik of obstakel in de rails Oplossing Verwijder het ijs of obstakel Laat het rolluik naar beneden WAARSCHUWING Bij alle werkzaamheden aan elektri sche installaties is sprake van levens ge...

Page 165: ...dzia a Mo liwa przyczyna Brak napi cia w sieci Rozwi zanie Przy u yciu woltomierza sprawdzi obecno napi cia zasilania 230 V i skontrolowa pod czone przewody Nale y ci le przestrzega informacji dotycz...

Page 166: ...enie rolety b d przeszkoda w szynie jezdnej Rozwi zanie Usun oblodzenie wzgl dnie przeszkod Uwol ni rolet przesuwaj c w d OSTRZE ENIE Podczas wszelkich prac przy urz dzeniach elektrycznych istnieje gr...

Page 167: ...ep ebeke gerilimi yok z m Bir gerilim l me cihaz ile besleme geriliminin 230 V mevcut olup olmad n ve kablo ba lan t lar n kontrol edin zellikle m saade edilmeyen ba lant ekille rine ili kin bilgileri...

Page 168: ...hareket ray nda bir engel var z m Buzlanmay veya engeli ortadan kald r n Panjuru a a y nde hareket ettirerek bo a kar n UYARI Elektrik sistemlerinde ger ekle tirilen t m al malarda elektrik arpmas son...

Page 169: ...06 42 EU Radio Equipment Directive 2014 53 EU RED Richtlinie 2014 53 EU Electromagnetic compatibility directive EMC 2014 30 EU Richtlinie Elektromagnetische Vertr glichtkeit 2014 30 EU Restriction of...

Page 170: ...hinery directive 2006 42 EC Maschinenrichtlinie 2006 42 EU Radio Equipment Directive 2014 53 EU RED Richtlinie 2014 53 EU Electromagnetic compatibility directive EMC 2014 30 EU Richtlinie Elektromagne...

Page 171: ...42 EC Directive sur les machines 2006 42 EU Radio Equipment Directive 2014 53 EU Directive sur les quipements radio 2014 53 UE Electromagnetic compatibility directive EMC 2014 30 EU Directive Compatib...

Page 172: ...14 30 UE Restriction of the use of certain Hazardous Substances directive 2011 65 EU and 2015 863 EU Directivas RoHS 2011 65 UE y 2015 863 UE The following standards were applied to assess the conform...

Page 173: ...30 UE Restriction of the use of certain Hazardous Substances directive 2011 65 EU and 2015 863 EU Direttive RoHS 2011 65 UE e 2015 863 UE The following standards were applied to assess the conformity...

Page 174: ...atibiliteit 2014 30 EU Restriction of the use of certain Hazardous Substances directive 2011 65 EU and 2015 863 EU RoHS richtlijnen 2011 65 EU en 2015 863 EU The following standards were applied to as...

Page 175: ...E Restriction of the use of certain Hazardous Substances directive 2011 65 EU and 2015 863 EU dyrektywy RoHS 2011 65 UE i 2015 863 UE The following standards were applied to assess the conformity Zgod...

Page 176: ...of the use of certain Hazardous Substances directive 2011 65 EU and 2015 863 EU 2011 65 AB ve 2015 863 AB RoHS Y netmeliklerir The following standards were applied to assess the conformity Uygunluk a...

Page 177: ...177 NOTIZEN NOTES NOTES NOTAS NOTE AANTEKENINGEN NOTY NOTLAR...

Page 178: ...178 NOTIZEN NOTES NOTES NOTAS NOTE AANTEKENINGEN NOTY NOTLAR...

Page 179: ...179 NOTIZEN NOTES NOTES NOTAS NOTE AANTEKENINGEN NOTY NOTLAR...

Page 180: ...en Ware abweichen Irrt mer vorbehalten F r Druckfehler wird keine Haftung bernommen Es gelten unsere allgemeinen Gesch ftsbedingungen Eine aktuelle Version dieser Anleitung finden Sie auf http www jar...

Reviews: