background image

Iridium Extreme® User Manual        

133

12: U

sing the C

all H

ist

or

y M
enu

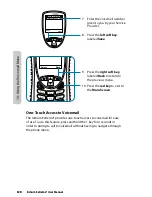
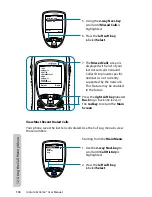
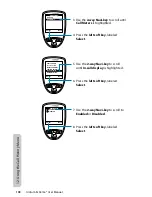
The duration of the last call is 
displayed.

7.  Press the right soft key 

labeled Back to return to the 
previous menu.

8. Press the red key to return to 

the Main Screen.

02:56:15

Call Time

Back

Note: The last call timer shows the elapsed time of the most recent call 
made since your phone was turned on. This information is not saved 
when you turn off the phone.

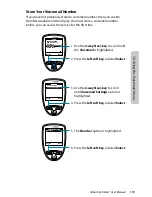
Show Total Time for All Calls
This capability displays your total airtime since you last reset the call timer.

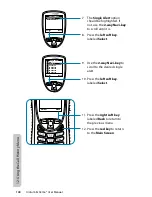
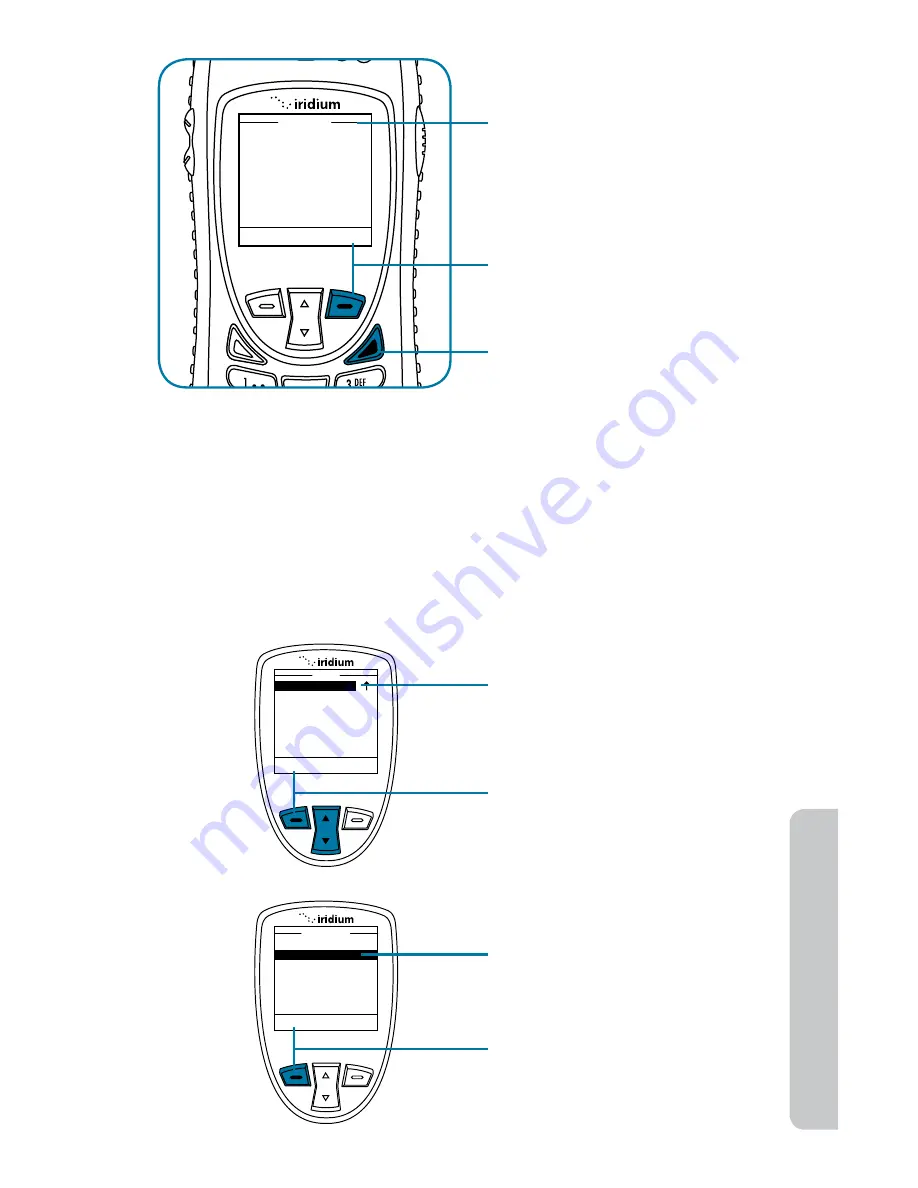
Starting from the Main Menu:

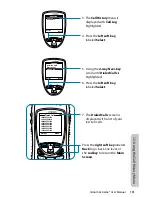
1. Use the 2-way Navi-key to 

scroll until Call History is 
highlighted.

2. Press the left soft key

labeled Select.

3. Use the 2-way Navi-key to 

scroll until Call Meters is 
highlighted.

4. Press the left soft key

labeled Select.

Select

Back

Menu

Call History

Setup

Security

Help

Select

Back

Call Log

Call Meters

Call History

Summary of Contents for EXTREME

Page 1: ... using the Iridium Extreme read and understand this User Manual including the safety warnings and information Failure to do so could result in serious injury or death Iridium Iridium Extreme the Iridium Logo and any other trademark or service mark referred to or displayed in this document are trademarks or registered trademarks of Iridium Satellite LLC Phone voice 881631581124 To dial 011 8816 315...

Page 2: ...contact the U S Department of Commerce Bureau of Industry and Security or visit www bis doc gov Disclaimer Every effort has been made to ensure the correctness and completeness of the material in this document No company shall be liable for errors contained herein The information in this document is subject to change without notice No warranty of any kind is made with regard to this material inclu...

Page 3: ...IUM SATELLITE SERVICES IN NO EVENT SHALL IRIDIUM BE LIABLE WHETHER IN CONTRACT OR TORT OR ANY OTHER LEGAL THEORY INCLUDING WITHOUT LIMITATION STRICT LIABILITY GROSS NEGLIGENCE OR NEGLIGENCE FOR ANY DAMAGES IN EXCESS OF THE PURCHASE PRICE OF THE Iridium Extreme INCLUDING HARDWARE SOFTWARE AND OR FIRMWARE AND OR ACCESSORIES AND OR THE COST OF IRIDIUM SATELLITE SERVICES PROVIDED NOR SHALL IRIDIUM BE ...

Page 4: ...purchase of any Iridium products shall not be deemed to grant either directly or by implication or otherwise any license under copyrights patents or patent applications of Iridium or any third party software provider except for the normal nonexclusive royalty free license to use that arises by operation of law in the sale of a product Please refer to Chapter 18 of this User Manual for Limited Warr...

Page 5: ...reas 7 Potential Explosive Atmospheres 8 Electronic Devices 8 Product Operation 8 Radio Interference 8 Implantable Medical Devices 9 Hearing Aids 10 Other Medical Devices 10 Aircraft 10 Vehicles 10 Vehicles Equipped with an Air Bag 10 Adult Use Only 11 Glass Parts 11 Extended Exposure to Loud Noise 11 3 Iridium Extreme Overview 13 Guide Overview 13 Phone Overview 14 Front View 14 Side View 15 Back...

Page 6: ...Card Care 29 Insert the SIM Card 30 Remove the SIM Card 30 Battery Pack Information 31 Battery Charging 32 Battery Disposal 32 Remove and Install the Battery Pack 33 To Remove the Battery Pack 33 To Install the Battery Pack 34 Charging the Battery 35 Charge the Battery Pack 35 Checking Battery Charge Level 35 Low Battery Warning 35 Start up Procedure 36 Power on Message 37 Phone Operation 39 Norma...

Page 7: ... Navi key 55 The Keypad 56 Using the Menus 56 To Access the Main Menu 56 To Access Main Menu Options 57 To Return to a Menu 58 Entering Characters 58 6 Traditional Text Entry 61 Entering Characters 61 Keypad Guide 62 Entering Punctuation 63 Entering Numbers and Symbols into Text 64 7 Predictive Text Entry 67 LetterWise Text mode 70 WordWise Text mode 72 Digit mode 123 74 Punctuation mode 74 8 Usin...

Page 8: ...he Inbox Menu 101 Read a Message 101 Reply to Sender 102 Forward a Received Message 103 Call a Number from a Received Message 106 Delete a Message 106 Using the Drafts Menu 108 Using the Settings Menu 111 Enter Service Center Number 111 Set Expiry Period 112 Select Delivery Reports 114 10 Using the Voicemail Menu 117 Locating the Voicemail Menu 117 About the Voicemail Menu 117 Voicemail Notificati...

Page 9: ...s and Tones 147 Adjust the Ringer Volume 147 Adjust the Speaker Volume 149 Adjust the Ring Tone 150 Setting the Call Alert Mode 152 Setting the Keypad Tone 153 Set the Phone to Ring and or Vibrate 155 Time and Date Settings 156 Select the Time Zone 156 Select the Time Format 158 Select the Date Format 159 Selecting the Display Language 160 Setting Backlights 162 Setting Contrast 163 Using the Key ...

Page 10: ...and Unlocking Your Phone 192 Enable or Disable the SIM lock 193 Using the Change PIN Menu 195 Change the Phone PIN Code 195 Change the SIM PIN Code 197 Change the SIM Card PIN2 Code 198 Call Barring PIN 200 16 Troubleshooting 203 17 Certification and Compliance Information 209 Export Compliance 209 Standards Compliance Information 209 FCC Compliance 209 EU Regulatory Conformity 209 Canada Regulato...

Page 11: ...e and the available facilities Prior to using the Iridium Extreme read and understand this User Manual including the safety warnings and information Failure to do so could result in serious injury or death Related Documents The following Iridium product documentation is available to help you Iridium Extreme Specification Sheet Iridium Extreme Quick Start Guide Refer to www iridiumextreme com for y...

Page 12: ...xii Iridium Extreme User Manual 1 Introduction ...

Page 13: ...onventions are used in this User Manual Warning Failure to comply with this warning could result in death or serious injury Before doing this task be sure to familiarize yourself with appropriate safety practices personal protective equipment and have a plan in case of accident Caution Failure to follow directions carefully could result in injury Care must be taken Do not let your battery charger ...

Page 14: ... of public exposure to RF electromagnetic energy International Commission on Non Ionizing Radiation Protection ICNIRP Verband Deutscher Elektrotechniker VDE United States Federal Communications Commission FCC Radio Frequency Exposure Guidelines National Radiological Protection Board of the United Kingdom American National Standards Institute ANSI IEEE C95 1 1992 National Council on Radiation Prote...

Page 15: ... the highest certified power level the actual SAR of the phone while operating can be below the maximum value Before a phone model is available for sale to the public it is tested to confirm compliance with the guidelines The tests are performed in positions and locations e g at the ear and worn on the body that conform to a uniform testing methodology determined by an expert standards body The hi...

Page 16: ...eath caused by fire explosion leakage or other hazard Make sure to follow all of the following safety guidelines Do not disassemble crush puncture shred or otherwise attempt to change the form of the battery Do not let the phone or battery come in contact with water Water can lead to corrosion of the phone s circuits Do not allow the battery to touch metal objects Contact with metal objects can ca...

Page 17: ...only important for safety but also benefits the environment Consumers should recycle used batteries and telephones in accordance with applicable national state or local laws and regulations Under EU requirements all electrical and electronic products must be taken to separate collection at the end of their working life and must not be disposed of as unsorted municipal waste WARNING Do not dispose ...

Page 18: ...stration signal strength on display dial Triple Zero 000 or 112 depending upon your service provider s instructions and press the green send key Verbally report the situation and your location to the operator for assistance The Iridium service does not provide enhanced emergency calling service which automatically identifies the caller location EMERGENCY CALLS IN ALL OTHER LOCATIONS You will need ...

Page 19: ...tellite telephone may cause distraction Discontinue a call if you cannot concentrate on driving Check the laws and regulations on the use of wireless telephones in the areas where you drive Always obey them Many local governments prohibit the use of mobile telephones while driving Observe the following guidelines when using your phone while driving Give full attention to driving driving safely is ...

Page 20: ...cumstances your mobile device may cause interference with other devices Turn off your phone in any location where posted notices instruct you to do so For optimal performance and to be sure that exposure to RF energy does not exceed guidelines set forth in the relevant standards discussed in Exposure to Radio Frequency Signals on page 4 and Specific Absorption Rate Data on page 4 always follow the...

Page 21: ...r more of the following measures Reorient or relocate the receiving antenna Increase the separation between the equipment and receiver Connect the equipment into an outlet on a circuit different from that to which the receiver is connected Consult the dealer or an experienced radio TV technician for help Implantable Medical Devices If you have an implantable medical device such as a pacemaker or d...

Page 22: ...t could be sensitive to external RF energy Aircraft Airline regulations prohibit using your phone while in the air Check and comply with the policy of your airline regarding the use of your phone while the aircraft is on the ground Switch OFF your phone before boarding an aircraft Vehicles RF signals may affect improperly installed or inadequately shielded electronic systems in motor vehicles Chec...

Page 23: ...ld break if the product is dropped on a hard surface or receives a substantial impact If glass breaks do not touch or attempt to remove Stop using the phone until the glass is replaced by a qualified service center WARNING Extended Exposure to Loud Noise Exposure to loud noise from any source for extended periods of time may affect your hearing The louder the volume sound level the less exposure i...

Page 24: ...our phone Discontinue use or consult a physician if any of the following symptoms occur convulsion eye or muscle twitching loss of awareness involuntary movements or disorientation Failure to heed this warning could result in serious injury or death Repetitive Motion When you repeatedly perform actions such as pressing keys or entering finger written characters you may experience occasional discom...

Page 25: ...l the features and components that you need to operate your phone to its full potential For ease of use the chapters in this manual are divided by menu options Each section of the chapter is then divided by the same sub menu options as your phone Just follow the sequence of menus on your phone the manual will follow along making the startup process a simple one aA ...

Page 26: ...hone Overview Front View On Off Button Earpiece SOS Indicator LED Left Soft Key Volume Keys Green Key 2 way Navi key Display Microphone Key pad Convenience Key Right Soft Key Red Key Status Indicator LED Programmable SOS Button Accessory Connector ...

Page 27: ...Iridium Extreme User Manual 15 3 Overview Side View Volume Up Key Volume Down Key Convenience Key Headset Jack Accessory Connector Accessory Connector Front side ...

Page 28: ...16 Iridium Extreme User Manual 3 Overview Back View Battery Pack Battery D Ring Speaker Phone ...

Page 29: ...signed to provide a robust and flexible approach to using external accessories with the Iridium Extreme Adapter 1 Charging USB This adapter is to be used for charging the phone or connecting to a laptop via USB data cable when the phone s antenna is used Adapter 2 Charging USB External Antenna This adapter is to be used for charging the phone or connecting to a laptop via USB data cable when a wir...

Page 30: ...the bottom of your phone and move it to the back of your phone securing it to the rear retaining features Select the appropriate adapter and orient it with the bottom of the phone so the Iridium brand is facing forward Then press the adapter up until the side clasps are locked into place and the adapter is securely fastened to your phone Use of the adapter Once the appropriate adapter is installed...

Page 31: ...with your left hand and grasp the adapter on both sides Press the bottom portions of the side clasps with your thumb and index fingers and pull the adapter away from the phone Last move the accessory connector cover back to the accessory connector and press it so it is securely in place Notice Ensure accessory connector cover is fully and securely installed Failure to do so could result in dust an...

Page 32: ...y is depleted The battery must be installed when using the charger to power the phone Includes five international plug adapters for use in many countries around the world Allows you to use the Iridium Extreme while recharging the battery The battery should not be allowed to discharge fully Headset The convenient headset provides both an earphone and microphone in one small piece for simple hands f...

Page 33: ...le inside an enclosed area in close proximity to an open view of the sky The External Antenna screws on to the TNC connector on your Accessory Adapter To install hold the Accessory Adapter s TNC connector in place while attaching the External Antenna and take care not to twist the wires Then attach the Accessory Adapter with connected External Antenna to your phone and place the External Antenna i...

Page 34: ...ensure the bottom of the case is open and insert the phone through the bottom and push it towards the top The leather case is designed to be used either with our without the accessory adapters so an extended leather flap and Velcro is provided for this purpose Use caution to ensure that your SOS cap cover and audio accessory cover are fully installed while inserting the phone through the case to a...

Page 35: ... installation instructions are provided on your included CD ROM or can be obtained from your service provider The USB Data Cable plugs directly into the mini USB connector on the left side of your Accessory Adapter Make sure your Accessory Adapter is connected to your phone the USB cable is attached to your laptop and software is installed for use Airtime charges apply for data service usage Acces...

Page 36: ... is Indicates Alternating red and green Call in progress ringing dialing or in call Flashing green Network is available and SIM status okay Phone is idle Flashing red No connection to network or valid SIM card is required SOS Indicator LED The SOS Indicator LED at the top of the phone has the following meanings aA Status Indicator LED SOS Indicator LED ...

Page 37: ...has been sent more than five minutes ago Display Status Indicators and Icons The following icons appear in your display to provide you with information about the phone s activity Main Screen Components Menu Help 15 40 09 JUL 13 T Registered SOS Battery charge level Date Signal Strength Real Time Network SIM status Left and right soft key functions Message Icons Indicates keypad is locked Indicates...

Page 38: ...w Menu Components Call SMS Edit Delete New Phonebook Select Back Arrow indicates to scroll up or down for additional options Black bar scrolls up and down when using the 2 way Navi key Menu Title Menu Options Left and right soft key functions ...

Page 39: ...Iridium Extreme User Manual 27 4 Getting Started ...

Page 40: ...28 Iridium Extreme User Manual 4 Getting Started ...

Page 41: ...ing phone book entries and messages Your phone has limited functionality without the SIM card so you want to install the card before using your phone SIM Card Care You may want to keep your card with you when you are not using your phone This helps keep your personal information secure and gives you access to your service even if your phone is not available Important Do not bend or scratch your SI...

Page 42: ...3 3 To open SIM door first slide door towards top of phone and then lift door up approximately 75 degrees Use caution not to over extend SIM door beyond 75 degrees as this will result in damage to the SIM door 4 Slide the SIM card into the SIM card slot with the gold contact facing down and the 45 degree angle corner oriented towards the right 5 Place the slide door back down level with the phone ...

Page 43: ...bjects can cause the battery to heat and possibly explode Do not place your battery near a heat source Excessive heat can damage the phone or battery by causing it to swell leak or malfunction Do not dry a wet or damp battery with an appliance or heat source such as a hair dryer or microwave oven Do not leave your phone in an automobile or other vehicle with high temperatures Do not drop the batte...

Page 44: ... your battery near room temperature Never expose batteries to temperatures below 0 C 32 F or above 45 C 113 F when charging New batteries are not fully charged and may take more time to charge Battery Disposal Proper battery disposal is not only important for safety but also benefits the environment Consumers should recycle used batteries and telephones in accordance with applicable national state...

Page 45: ... Battery Pack The back panel of the phone is the battery pack You need to remove the battery pack to insert the SIM card or replace the battery To Remove the Battery Pack 1 Lift D ring up and rotate counterclockwise 90 degrees 2 Pull D ring forward and remove battery pack ...

Page 46: ...on of the battery in ensuring that the D ring pin is aligned properly when pressed into the phone 4 Once the battery is fully inserted rotate the D ring clockwise 90 degrees and put the D ring into the stowed position 5 To complete installation cradle the phone with both hands and press the battery down firmly with both thumbs until the battery fully seated in the phone and even with the adjacent ...

Page 47: ...he LCD display flashes Note Calls can still be made or received while the battery is charging however the battery charges faster if the phone is turned off When the Iridium Extreme is not in use the battery takes approximately 4 hours to fully charge You must wait a minimum of 5 seconds before powering on the Iridium Extreme after you have disconnected from the charger Checking Battery Charge Leve...

Page 48: ...harge your battery as soon as possible after you receive the low battery warning Start up Procedure 1 Insert your SIM card if necessary 2 Turn the phone on by pressing and holding the On Off button for 5 seconds When you turn your phone s power on the display screen goes through a short animated sequence Battery icon Menu Help 15 40 09 JUL 13 Low Battery T ...

Page 49: ...Account Contact your service provider Phone PIN The phone has been locked To unlock the phone you must enter the correct Phone PIN number PIN Blocked When the PIN number has been entered incorrectly three times in a row the phone automatically blocks the PIN To unblock the pin enter the PUK1 code for the phone by entering 05 from the main screen PIN 2 Blocked When the PIN2 number has been entered ...

Page 50: ...oll down and select Do not use and you will then be asked to confirm that you do not wish to use the GEOS Service by selecting OK Next you will then be prompted to store an emergency call and emergency message recipient for the SOS button You are responsible for the accuracy of these entries and the responsiveness of any emergency contacts that you designate and program in your phone CAUTION Emerg...

Page 51: ...ntact with the antenna affects call quality and may cause the phone to operate at a higher power level than otherwise needed 6 Do not wear the phone on your body while making calls with the headset accessory Wearing the phone on the body can interfere with proper phone operation since the antenna requires a clear unobstructed view of the sky to access the Iridium satellite network 7 Once you compl...

Page 52: ...number using the key pad As you begin entering digits you see Options displayed above the left soft key and Clear displayed above the right soft key The phone number must be entered in international format or 00 country code phone number Your Iridium Extreme will automatically enter a for the international access code so the only numbers that are required to add are the country code and phone numb...

Page 53: ...Calling followed by the number you dialed appears in the display Calling 12155551212 Mute Speaker Note You receive this message when the antenna is not fully extended from the Iridium Extreme 1 2 ABC 3 DEF 4 GHI 5 KL 6 MNO 7 PQR 8 UVW 9 XYZ 0 Alert Deploy the antenna and make sure it is oriented towards the sky ...

Page 54: ...w minutes Could not place call No connection to the network The phone is unable to access the network Restricted Area The phone is unable to access the network Move to an area where calls are allowed Note If you have disabled the timer the word Connected is displayed End a Call 1 2 ABC 3 DEF 4 GHI 5 KL 6 MNO 7 PQR 8 UVW 9 XYZ 00 00 01 Select Back 4 A timer keeps track of the duration of each call ...

Page 55: ...1 The phone must be powered on 2 A valid SIM card must be inserted 3 The phone must be connected with the network There are two scenarios for receiving calls depending on the antenna position 1 Antenna extended 2 Antenna stowed that is in the down position 1 215 555 1212 Options Clear Number T Press the green key twice ...

Page 56: ...Manual 4 Getting Started Receiving a call with the Antenna Extended Incoming Call Options T 1 Phone sounds or vibrates 2 Status indicator alternates red and green 3 Phone displays incoming call Red key Left soft key Green key ...

Page 57: ...y the following message appears Message Directive Call Failed The antenna is not properly positioned or the network signal is not strong enough Connected Options T 1 Extend antenna directly up and rotate the antenna top left or right until it locks into position 2 Press the left soft key or the green key 3 Phone displays Connected ...

Page 58: ...o extend the antenna Incoming Call Options T 3 Extend the antenna directly up prior to rotating left or right 4 After several seconds your phone rings or vibrates and displays Incoming Call Select Options located above the left soft key then select Accept or Reject using the 2 way Navi key and making selection with the left soft key or directly answer by pressing the green key Green key 2 way Navi...

Page 59: ...Started If the call does not connect properly the following message appears Message Directive Call Failed The antenna is not properly positioned or the network signal is not strong enough Connected Mute Speaker T 5 The phone displays Connected ...

Page 60: ...se the speaker volume by pressing the upper volume control key during a call Once you are satisfied with the volume press OK If Options Options To mute the call Select Options using the left soft key and then use the 2 way Navi key to scroll to Mute Select Mute using the left soft key To un mute the call Press the left soft key again scroll using the 2 way Navi key to UnMute and then press the lef...

Page 61: ...n the display indicates the volume level the higher the graph the louder the volume Ringer Volume The ringer volume may be adjusted with the Volume and Tones menu located under the Setup menu Increase the ringer volume by pressing the upper volume control key Decrease the ringer volume by pressing the lower volume control key Volume OK Back Upper volume control increases speaker volume Lower volum...

Page 62: ...ed calls Messages from Missed Calls If you are not able to answer your phone or are not connected to the network callers can leave you a voice message which can be accessed from the voicemail system When connected to the network a message icon appears on your screen indicating a new voicemail message For more information on retrieving messages see Using the Voicemail Menu on page 117 Volume OK Bac...

Page 63: ...ming call by pressing the green key or the left soft key when the keypad is locked Keypad locked Keypad locked 1 Press the left soft key labeled Menu 2 Press the key to lock the keypad A message will flash indicating the keypad is locked To prevent accidental phone usage you can lock the keypad by Menu Help 16 28 14 May 13 T 3 The Main Screen will now have a lock symbol ...

Page 64: ...g Started Unlocking the Keypad Unlock Help Keypad Unlocked Keypad Unlocked 1 Press the left soft key labeled Unlock 2 Press the key A message flashes indicating the keypad is unlocked and the lock symbol no longer appears on the main screen ...

Page 65: ...Iridium Extreme User Manual 53 5 Using Menus and Keys ...

Page 66: ...54 Iridium Extreme User Manual 5 Using Menus and Keys ...

Page 67: ...e function varies depending on the menu The 2 way Navi key Press the 2 way Navi key up to step through the options on a menu screen Important When an arrow appears on the bottom of any menu screen it indicates more options to follow To see all options you must continue to press the 2 way Navi key Menu Help 16 28 14 May 13 T Right soft key Left soft key My Phonebook SIM Phonebook Messages Voicemail...

Page 68: ...r text numbers and punctuation marks into various fields in display screens See entering characters on page 61 for more information Menu Help T 16 28 14 May 13 My Phonebook SIM Phonebook Messages Voicemail Data Modem Menu Select Back Press the Left soft key labeled Menu Starting from the Main Screen The Main Menu appears The Main Menu consists of My Phonebook SIM Phonebook Messages Voicemail Data ...

Page 69: ...ges Voicemail Data Modem Menu Select Back Select Back New Entry Memory Status My Phonebook Starting from the Main Menu use the 2 way Navi key to scroll to the desired menu option until it is highlighted Press the left soft key labeled Select The option you selected appears Continue this procedure for each sub menu ...

Page 70: ...esses To enter this information you need to use the keys on the keypad Entry of text with the keys on the keypad is discussed in detail in Traditional Text Entry on page 61 and Predictive Text Entry on page 67 Space on SIM Used 0 out of 155 Space on phone Used 0 out of 100 Phonebook Status OK Back When the right soft key is labeled Back the key will take you to the previous screen When the key is ...

Page 71: ...g The up volume key takes you backwards through text when you are editing a phone book entry If you are editing a message it moves you up a line of text Choosing Up on the 2 way Navi key moves backwards through message text The down volume key takes you forward through text when you are editing a phone book entry If you are editing a message it moves you down a line of text Choosing Down on the 2 ...

Page 72: ...60 Iridium Extreme User Manual 5 Using Menus and Keys ...

Page 73: ...y represents a set of letters Multi tap is the default setting for text entry Save Clear New Entry Bob For Example Use the number 2 key for letters A B and C Press 1 time for A Press 2 times for B Press 3 times for C To enter characters via traditional method 1 Enter a character by pressing the appropriate keys on the keypad See keypad guide below 2 The cursor moves to the next character position ...

Page 74: ... Available Characters 1 period 1 2 A B C 2 3 D E F 3 4 G H I 4 5 J K L 5 6 M N O 6 7 P Q R S 7 8 T U V 8 9 W X Y Z 9 0 _ space Punctuation and symbols menu Toggle capitalization and digits Right Soft Key backspace exit Entering Numbers In Multi tap mode you can easily enter digits into a message by pressing the key until the digit entry mode 123 is shown in the upper left corner of the screen Then...

Page 75: ...symbols menu with a list of the most commonly used punctuation marks and symbols Select Back Edit ʻ I ç è ė ê ë ò ó ö ù ú à á A bracket indicates the current symbol selected Use the 2 way Navi key to scroll down through the listing Press the left soft key labeled Select 2 way Navi key Press the key to open the symbols menu ...

Page 76: ...left soft key labeled Select 4 If you selected Insert symbol the symbol display will appear and you will use the 2 way Navi key to highlight the desired symbol and then use the left soft key to select it The screen will change back to the message and your selected symbol will be displayed 5 If you selected Enter digits the original text now appears but you are in the number entry mode Enter the de...

Page 77: ...til Enter letters is highlighted 8 Press the left soft key labeled Options 9 The original text screen now appears and you can continue to enter text in the letter entry mode Select Back Options Send Insert symbol Enter letters Save as draft Exit abc New 145 Options Clear You can reach me at 111 222 3333 tomorrow morning ...

Page 78: ...6 Traditional Text Entry 66 Iridium Extreme User Manual ...

Page 79: ...hat it provides standard Western characters To choose predictive text select one of English Français Español Once you have made this change all SMS entry and entry of contacts incorporate Predictive Text capabilities specific to the selected language Once selected select the Back option twice then scroll up to Messages to use Predictive Text entry for messaging To change back to Multi Tap in the f...

Page 80: ...ntry mode can be selected by pressing the Convenience key on the side of the Iridium Extreme The active text entry mode will be displayed on the screen as indicated in the illustrations on the following page The 1 key can be used for entering punctuation however for full and efficient punctuation entry you can switch to Punctuation mode 123 Pressing the Pound key switches between lower and upper c...

Page 81: ... User Manual 69 7 Predictive Text Entry Options Clear New ww 1000 Options Clear New lw 1000 Options Clear New 1000 Convenience key WordWise predictive LetterWise predictive Options Clear New 123 1000 Digit Punctuation ...

Page 82: ...t key Clear for backspace and Space key for space Press the Shift key to switch between lower and upper case Note Apostrophe for English entry and hyphen for Russian entry are treated as letters that is can be predicted by LetterWise and are found on key 5 Example Entering don t 1 Press key 3 Desired letter did not come up 2 Press Next key for desired letter Proceed to next letter of the word Desi...

Page 83: ...dictive Text Entry 3 Press key 6 Desired letter appears 4 Press key 6 again Desired letter appears 5 Press key 5 for apostrophe Apostrophe is predicted along with letters in English Options Clear do Options Clear T don Options Clear T don ...

Page 84: ...t is possible that an alternate word which happens to require the same key presses appeared instead Just press Next key until the desired word appears If the word you are entering is not found in any dictionary you can switch to LetterWise mode by pressing the convenience key and viewing the top left corner of the screen During use of WordWise the 1 key can be used to insert punctuation without ch...

Page 85: ...1 Press key 7 Even if the correct letter r has not appeared proceed with the next letter in the word 2 Press key 3 twice for the next two letters c d The word see comes up which is more common than red The underline indicates there are other words to choose from 3 Press Next Key The word red appears Options Clear T s ...

Page 86: ...the Convenience key on the side of the phone or with the Options menu in the Create Message editor to Enter digits Punctuation mode Punctuation mode may be entered either by pressing the Convenience key on the side of the phone or with the Options menu in the Create Message editor to Insert symbol During use of WordWise the 1 key can be used to insert punctuation without changing text entry modes ...

Page 87: ...ual 75 7 Predictive Text Entry Once you have selected the appropriate symbol for your message you may return to your preferred text entry mode by pressing the side convenience key and viewing the top left corner of the screen ...

Page 88: ...76 Iridium Extreme User Manual 7 Predictive Text Entry ...

Page 89: ...is provided to you by your service provider and or organization The entries for the SIM Phonebook are stored directly on the SIM card using programming software and are used with your phone thus you cannot create them or edit them from your phone Phone Memory SIM Card Memory Personal Numbers 100 entries 155 entries Fixed Dial Numbers No entries 40 entries Phone Number Digits 24 20 Name Characters ...

Page 90: ...n do the following functions using the Phonebook menu 2 The Main Menu is now displayed with My Phonebook highlighted press the left soft key labeled Select to enter the Phonebook menu My Phonebook SIM Phonebook Messages Voicemail Data Modem Menu Select Back Call SMS Edit Delete New Bob Smith Select Back Call an entry Create and send a text message SMS Edit an entry Delete an entry Add an entry Che...

Page 91: ... highlighted 5 Press the left soft key labeled Select to proceed To add information to the Phonebook use the New option Start at the Main Menu with My Phonebook highlighted 1 Press the left soft key labeled Select 2 The Phonebook is displayed 3 Press the left soft key labeled Options My Phonebook SIM Phonebook Messages Voicemail Data Modem Menu Select Back Options Back Ada Adams Bob Smith Cat Stev...

Page 92: ...3456789 1112223333 msmith aol com Save Clear New Entry Mary Smith 9373354415 9373321234 123456789 1112223333 msmith aol com 7 Use the 2 way Navi key to scroll to each field and the keypad to enter information into the fields Save Clear New Entry Mary Smith 9373354415 9373321234 123456789 1112223333 msmith aol com 8 Press the left soft key labeled Save Note While entering or editing contact informa...

Page 93: ... Press the red key to return to the Main Screen Starting at the Main Menu using the 2 way Navi key highlight the Phonebook you want to use 1 Press the left soft key labeled Select 2 The Phonebook entries are now displayed in alphabetical order Locating Entries My Phonebook SIM Phonebook Messages Voicemail Data Modem Menu Select Back Options Back Ada Adams Bob Smith Cat Steven Davy Jones Eddy Fishe...

Page 94: ...ng an Entry Select Back Ada Adams Bob Smith Cat Steven Davy Jones Eddy Fisher Phonebook Starting at the Main Menu using the 2 way Navi key highlight the Phonebook you want to use 1 Press the left soft key labeled Select 2 The Phonebook is displayed Use the 2 way Navi key to scroll until the desired entry is located 3 With the entry highlighted press the left soft key labeled Options Note You can a...

Page 95: ...d 5 With the Call option highlighted press the left soft key labeled Select Note If an entry has more than one number for example Home Work and Mobile then all numbers are displayed Using the 2 way Navi key highlight the number to be called and press Select Note If your antenna is not extended you receive an alert message telling you to extend the antenna 6 Calling followed by the number you diale...

Page 96: ...key highlight the number to be called and press Select To send a text message Start at the Main Menu using the 2 way Navi key highlight the Phonebook you want to use 1 Press the left soft key labeled Select 2 The Phonebook is displayed Use the 2 way Navi key to scroll until the desired entry is located 3 Press the left soft key labeled Options 4 Use the 2 way Navi key until SMS is highlighted 5 Pr...

Page 97: ... Send a SMS message Insert symbols into your message Insert your current location Enter digits Save as a draft to send later Switch between wordwise and multi tap entry Exit the messaging menu and return to main menu Note Use the Back option with the right soft key to return to message editing Options Clear New abc 1000 Select Back Options Send Insert symbol Insert location Enter digits Save as dr...

Page 98: ... the message to additional recipients by following the process covered on this page in Adding an SMS Message Recipient 3 If no recipient is listed you need to add a recipient as covered on this page in Adding an SMS Message Recipient 4 Press the left soft key Send to send your message to your recipient Adding an SMS Message Recipient 1 To add a SMS message recipient highlight the New Recipient on ...

Page 99: ...options and press the left soft key for the desired selection 3 For a contact select the desired number if the contact has more than one number listed For manual entry enter the numbers direct For Quick GPS List select the desired option Use the left soft key Select for all selections 4 Once you are satisfied with the recipient s press left soft key labeled Send To change information in the Phoneb...

Page 100: ... appears Edit the entry as needed using the 2 way Navi key to scroll to the required field s Use the side volume keys to navigate backwards up key and forwards down key without deleting and the right soft key labeled Clear to delete characters Use the keypad to enter new characters 7 Press the left soft key labeled Save Options Back Ada Adams Bob Smith Cat Steven Davy Jones Eddy Fisher Phonebook S...

Page 101: ...een Delete an Entry My Phonebook SIM Phonebook Messages Voicemail Data Modem Menu Select Back Options Back Ada Adams Bob Smith Cat Steven Davy Jones Eddy Fisher Phonebook To remove an entry in the Phonebook use the Delete option Start at the Main Menu 1 Press the left soft key labeled Select 2 The Phonebook is displayed Use the 2 way Navi key to scroll until the desired entry is highlighted 3 Pres...

Page 102: ...u want to delete the entry Press the left soft key labeled Yes If you press No the screen reverts to the previous menu 7 A message briefly appears to indicate the entry was deleted The main Phonebook menu then appears 8 Press the red key to return to the Main Screen Select Back Phonebook Call SMS Edit Delete New Yes No Delete Entry Are you sure you want to delete Bob Smith Success Entry Bob Smith ...

Page 103: ...r Phonebook Select Back Bob Smith Memory Status Notes Use this capability to see how many Phonebook memory locations are available in the SIM card memory and phone memory Start at the Main Menu 1 Press the left soft key labeled Select 2 The Phonebook is displayed 3 Press the left soft key labeled Options 4 Use the 2 way Navi key until Memory Status is highlighted 5 Press the left soft key labeled ...

Page 104: ...sed 0 out of 155 Space on phone Used 0 out of 100 Phonebook Status Adding Notes to a Phonebook Entry My Phonebook SIM Phonebook Messages Voicemail Data Modem Menu Select Back Options Back Ada Adams Bob Smith Cat Steven Davy Jones Eddy Fisher Phonebook Use this capability to add information regarding an entry Start at the Main Menu 1 Press the left soft key labeled Select 2 The Phonebook is display...

Page 105: ...count in the top right corner counts down as you enter text 7 Press the left soft key labeled Options 8 A My Phonebook screen appears with Save highlighted 9 Press the left soft key labeled Options and select Save when done using 2 way Navi key and left soft key labeled Select Note The text you entered is now stored in the Note option for this entry Restricted Phonebook When the Phonebook is restr...

Page 106: ...94 Iridium Extreme User Manual 8 Using the Phonebooks ...

Page 107: ...k My Phonebook SIM Phonebook Messages Voicemail Data Modem Menu Starting from the Main Screen 1 Press the left soft key labeled Menu 2 The Main Menu is displayed Use the 2 way Navi key to scroll until Messages is highlighted 3 Press the left soft key labeled Select You can perform the following functions using the Messages menu Create messages Read reply delete call and forward messages Edit store...

Page 108: ...nu with Messages highlighted 1 Press the left soft key labeled Select 2 The Create Message option should be selected If not then use the 2 way Navi key to scroll until it is highlighted 3 Press the left soft key labeled Select 4 Enter your message Note You must begin your text message with the recipients email address leaving a space between the email address and the beginning of your message When...

Page 109: ...ey to scroll until it is highlighted 10 Press the left soft key labeled Select 11 In the Number field after the prefix of 00 or enter 2 12 Press the left soft key labeled OK 13 Press the left soft key labeled Send to send the message Add Send To New Recipient Select Back Enter Number Quick GPS List Ada Adams Bob Smith Cat Steven Select Recipient OK Clear Number Send To 2 Send Add Number Send To 2 ...

Page 110: ...r New abc 120 your email message will appear here Start at the Main Menu with Messages highlighted 1 Press the left soft key labeled Select 2 The Create Message option should be selected If not then use the 2 way Navi key to scroll until it is highlighted 3 Press the left soft key labeled Select 4 Enter your message 5 When your message is complete press the left soft key labeled Options 6 The Send...

Page 111: ...ne number listed you are presented with their phonebook entry Use the 2 way Navi key to highlight their email address and press the left soft key labeled Select 13 The Select Recipient screen appears with the recipient s name highlighted To add another recipient use the 2 way Navi key to highlight the next recipient and repeat step 10 Add Send To New Recipient Select Back Enter Number Quick GPS Li...

Page 112: ...lete a Message on page 104 to make room for the new message What Messages Contain You can receive short text or numeric messages in your Personal Mailbox Text messages may contain up to 1 000 characters Numeric messages typically phone numbers may contain up to 20 digits Standard SMS messages are up to 160 characters Long SMS messages up to 1000 characters are divided into smaller 160 character me...

Page 113: ...ead a Message Select Back My Phonebook SIM Phonebook Messages Voicemail Data Modem Menu Select Back Reply Forward Call Delete Delete All Message Select Back Create Message Inbox 1 unread Drafts Outbox Settings Messages Reply to a message Forward a message Call the number that left the message Delete one or all messages Start at the Main Menu with Messages highlighted 1 Press the left soft key labe...

Page 114: ... soft key labeled Back to return to the previous menu Read Back Text message Text message Text message Inbox Reply to Sender While reading the Message Screen 1 Press the left soft key labeled Options 2 Use the 2 way Navi key to scroll until Reply is highlighted 3 Press the left soft key labeled Select Options Back 18665551212 Message Select Back Reply Forward Call Delete Delete All Message ...

Page 115: ... left soft key labeled Options 6 The Send option should be highlighted If not use the 2 way Navi key to scroll until Send is highlighted 7 Press the left soft key labeled Select to send the message Options Back 18665551212 Message Select Back Send Insert symbol Enter digits Save as draft Exit Options Options Back Text message will appear here Message While reading the Message 1 Press the left soft...

Page 116: ...s highlighted 6 Press the left soft key labeled Select to send the message 7 A Send To screen appears 8 Press the right soft key labeled Add 9 Use the 2 way Navi key until the desired recipient from your phonebook is highlighted 10 Press the left soft key labeled Options Reply Forward Call Save number Delete Delete All Message Select Back Select Back Send Insert symbol Enter digits Save as draft E...

Page 117: ...er listed the recipient s information screen appears Use the 2 way Navi key to scroll to the number you would like to forward to 12 Press the left soft key labeled Select The number is added to a recipient list 13 The Select Recipient screen appears with the recipient s name highlighted To add another recipient use the 2 way Navi key highlight the next recipient and repeat step 8 14 Once all recip...

Page 118: ...e Delete All Message Select Back My Phonebook SIM Phonebook Messages Voicemail Data Modem Menu While reading the Message Screen 1 Press the left soft key labeled Options 2 Use the 2 way Navi key to scroll until Call is highlighted 3 Press the left soft key labeled Select Delete a Message Start at the Main Menu with Messages highlighted 1 Press the left soft key labeled Select ...

Page 119: ... to view the selected message 6 Press the left soft key labeled Options 7 Use the 2 way Navi key to scroll until Delete is highlighted To delete all messages highlight Delete All 8 Press the left soft key labeled Select Select Back Create Message Inbox 1 unread Drafts Outbox Settings Messages Read Back Text message Text message Text message Inbox Options Back 18665551212 Message Select Back Reply ...

Page 120: ...box Yes No Delete message Message Using the Drafts Menu To edit and send a stored message use the Draft menu Start at the Main Menu with Messages highlighted 1 Press the left soft key labeled Select 2 Use the 2 way Navi key to scroll until the Drafts option is highlighted 3 Press the left soft key labeled Select Select Back My Phonebook SIM Phonebook Messages Voicemail Data Modem Menu Select Back ...

Page 121: ... you are finished editing press the left soft key labeled Options 8 The Send option should be highlighted If not use the 2 way Navi key to scroll until Send is highlighted 9 Press the left soft key labeled Select to send the message Options Back Draft message Draft message Draft message Drafts Select Back Edit Delete Delete All Message Options Clear Edit abc 120 Edit your message here Select Back ...

Page 122: ... appears Use the 2 way Navi key to scroll to the number you would like to forward to 15 Press the left soft key labeled Select The number is added to a recipient list 16 As you select recipients they will be listed on the Send To screen Continue to add recipients as outlined in step 10 until all recipients have been added Add Send To New Recipient Select Back Enter Number Quick GPS List Ada Adams ...

Page 123: ...h Cat Stevens Select Back Create Message Inbox 1 unread Drafts Outbox Settings Messages Select Back My Phonebook SIM Phonebook Messages Voicemail Data Modem Menu 17 When finished selecting recipients press the left soft key labeled Send Start at the Main Menu with Messages highlighted 1 Press the left soft key labeled Select 2 Use the 2 way Navi key to scroll until the Settings option is highlight...

Page 124: ...ft key labeled OK The screen returns to the Settings menu Select Back Service Center Expiry Period Delivery Reports Settings OK Clear Number Service Center 881662900005 Select Back My Phonebook SIM Phonebook Messages Voicemail Data Modem Menu Set Expiry Period Use this capability to specify the amount of time your un delivered messages should wait before auto expiring Start at the Main Menu with M...

Page 125: ... Period Delivery Reports Settings 2 Use the 2 way Navi key to scroll until the Settings option is highlighted 3 Press the left soft key labeled Select 4 Use the 2 way Navi key to scroll until the Expiry Period option is highlighted 5 Press the left soft key labeled Select 6 Use the 2 way Navi key to scroll until the desired period of time is highlighted 7 Press the left soft key labeled Select The...

Page 126: ...key labeled Select 4 Use the 2 way Navi key to scroll until the Delivery Reports option is highlighted 5 Press the left soft key labeled Select 6 Use the 2 way Navi key to turn the Delivery Report OFF or ON 7 Press the left soft key labeled Select The screen returns to the Settings menu Select Back My Phonebook SIM Phonebook Messages Voicemail Data Modem Menu Select Back Create Message Inbox 1 unr...

Page 127: ...Iridium Extreme User Manual 115 10 Using the Voicemail Menu ...

Page 128: ...116 Iridium Extreme User Manual 10 Using the Voicemail Menu ...

Page 129: ...Select Back Call Voicemail Voicemail Settings Voicemail Registered Menu Help 16 28 14 May 13 T Select Back My Phonebook SIM Phonebook Messages Voicemail Data Modem Menu Starting from the Main Screen 1 Press the left soft key labeled Menu 2 The Main Menu is displayed Use the 2 way Navi key to scroll until the Voicemail is highlighted 3 Press the left soft key labeled Select Listen to your voicemail...

Page 130: ... until the Voicemail is highlighted 2 Press the left soft key labeled Select 3 Call Voicemail is highlighted 4 Press the left soft key labeled Select Follow the audio prompts for additional capabilities Call Cancel Voicemail New Voicemail Call Voicemail Press the left soft key labeled Call to call and retrieve voicemail OR Press the right soft key labeled Cancel Select Back My Phonebook SIM Phoneb...

Page 131: ...Select Back My Phonebook SIM Phonebook Messages Voicemail Data Modem Menu Select Back Number Voicemail Settings Select Back Call Voicemail Voicemail Settings Voicemail 1 Use the 2 way Navi key to scroll until the Voicemail is highlighted 2 Press the left soft key labeled Select 3 Use the 2 way Navi key to scroll until Voicemail Settings option is highlighted 4 Press the left soft key labeled Selec...

Page 132: ...abeled Save 9 Press the right soft key labeled Back to return to the previous menu 10 Press the red key to exit to the Main Screen 881662990000 Voicemail Number Save Clear One Touch Access to Voicemail The Iridium Extreme provides one touch access to voicemail for ease of use To use this feature press and hold the 1 key for 2 seconds in order to prompt a call to voicemail without having to navigat...

Page 133: ...Iridium Extreme User Manual 121 11 Using the Data Modem Menu ...

Page 134: ...11 Using the Data Modem Menu ...

Page 135: ...nly reports the connection status of the USB The instructions provided are optional and are to be followed if desired prior to plugging in the USB cable to the phone and to your computer Locating the Data Modem Menu Note All instructions for the Data Modem menu start from the Main Menu as shown Registered Menu Help 16 28 14 May 13 T Select Black Menu My Phonebook SIM Phonebook Messages Voicemail D...

Page 136: ...ted to the USB cable you are prompted to connect While connected to the USB cable it is important to not remove the battery If you need to remove the battery first disconnect from the USB cable power down the Iridium Extreme and then remove the battery Cancel Data Modem Connect USB cable ...

Page 137: ...Iridium Extreme User Manual 125 12 Using the Call History Menu ...

Page 138: ...126 Iridium Extreme User Manual 12 Using the Call History Menu ...

Page 139: ...e Call History menu Select Back Call Log Call Meters Call History Registered Menu Help 16 28 14 May 13 T Select Back Menu Call History Setup Security Help Starting from the Main Screen 1 Press the left soft key labeled Menu 2 The Main Menu is displayed Use the 2 way Navi key to scroll until Call History is highlighted 3 Press the left soft key labeled Select View the amount of time spent talking o...

Page 140: ...o scroll until Call History is highlighted 2 Press the left soft key labeled Select 3 The Call History menu is displayed with Call Log highlighted 4 Press the left soft key labeled Select 5 The Call Log menu is displayed with Received Calls highlighted 6 Press the left soft key labeled Select Select Back Menu Call History Setup Security Help Select Back Call Log Call Meters Call History Received C...

Page 141: ...12 651225551212 331225551212 321225551212 Received Calls Select Back View Missed Calls Your phone saves a list of calls you ve missed when the phone is busy or were not able to get to it The phone does not show calls that you missed when the phone is turned OFF or not registered on the network Starting from the Main Menu 1 Use the 2 way Navi key to scroll until Call History is highlighted 2 Press ...

Page 142: ... with a list of your last missed calls Inbound Caller ID to provide specific numbers is not currently supported by the network This feature may be enabled in the future Press the right soft key labeled Back to go back one level or the red key to return the Main Screen View Most Recent Dialed Calls Your phone saves the last ten calls dialed Use the Call Log menu to view those numbers Starting from ...

Page 143: ... the left soft key labeled Select 7 The Dialed Calls screen is displayed with a list of your last ten calls Press the right soft key labeled Back to go back one level or the red key to return the Main Screen Select Back Call Log Call Meters Call History 881225551212 011225551212 881425551212 881765551212 991445551212 651225551212 331225551212 321225551212 Dialed Calls Select Back Select Back Recei...

Page 144: ...il Call History is highlighted 2 Press the left soft key labeled Select 3 Use the 2 way Navi key to scroll until Call Meters is highlighted 4 Press the left soft key labeled Select 5 Last call time is highlighted If not use the 2 way Navi key until it is 6 Press the left soft key labeled Select Select Back Menu Call History Setup Security Help Select Back Call Log Call Meters Call History Last cal...

Page 145: ...your phone was turned on This information is not saved when you turn off the phone Show Total Time for All Calls This capability displays your total airtime since you last reset the call timer Starting from the Main Menu 1 Use the 2 way Navi key to scroll until Call History is highlighted 2 Press the left soft key labeled Select 3 Use the 2 way Navi key to scroll until Call Meters is highlighted 4...

Page 146: ... 7 Press the right soft key labeled Back to return to the previous menu 8 Press the red key to return to the Main Screen 02 56 15 Call Time Back Last call time Total call time Reset call timer Lifetime call time In call display Audible timers Call Meters Select Back Reset all Timers Reset your timers at the beginning of each billing cycle to keep track of your spending Starting from the Main Menu ...

Page 147: ...ay Navi key to scroll until Reset call timer is highlighted 6 Press the left soft key labeled Select The screen displays Reset call timers 7 Press the left soft key for Yes or the right soft key for No 8 If you press Yes the display reads Call meters reset Reset call timers Reset Yes No Select Back Last call time Total call time Reset call timer Lifetime call time In call display Audible timers Ca...

Page 148: ...Timer This capability displays a running clock of the total call time for the phone since being activated Starting from the Main Menu 1 Use the 2 way Navi key to scroll until Call History is highlighted 2 Press the left soft key labeled Select 3 Use the 2 way Navi key to scroll until Call Meters is highlighted 4 Press the left soft key labeled Select Select Back Menu Call History Setup Security He...

Page 149: ... 02 56 15 Call Time Back Last call time Total call time Reset call meter Lifetime call time In call display Audible timers Call Meters Select Back Note The Lifetime timer can not be reset Showing the In call Display This capability enables or disables the call timer that displays the amount of time that has passed since placing a specific call Starting from the Main Menu 1 Use the 2 way Navi key t...

Page 150: ...y to scroll until In call displ ay is highlighted 6 Press the left soft key labeled Select 7 Use the 2 way Navi key to scroll to Enabled or Disabled 8 Press the left soft key labeled Select Select Back Call Log Call Meters Call History Last call time Total call time Reset call meter Lifetime call time In call display Audible timers Call Meters Select Back Select Back Enabled Disabled Call Timer ...

Page 151: ...e the 2 way Navi key to scroll until Call History is highlighted 2 Press the left soft key labeled Select 3 Use the 2 way Navi key to scroll until Call Meters is highlighted 4 Press the left soft key labeled Select 5 Use the 2 way Navi key to scroll until Audible timers is highlighted 6 Press the left soft key labeled Select Select Back Menu Call History Setup Security Help Select Back Call Log Ca...

Page 152: ...se the 2 way Navi key to scroll to the desired single alert 10 Press the left soft key labeled Select 11 Press the right soft key labeled Back to return to the previous menu 12 Press the red key to return to the Main Screen Select Back Message Deleted Message Single Alert Repetitive Alert Audible Timers Select Back Select Back Single Alert Off 1 minute 5 minutes 10 minutes 15 minutes 30 minutes 60...

Page 153: ...2 Press the left soft key labeled Select 3 Use the 2 way Navi key to scroll until Call Meters is highlighted 4 Press the left soft key labeled Select 5 Use the 2 way Navi key to scroll until Audible timers is highlighted 6 Press the left soft key labeled Select Select Back Menu Call History Setup Security Help Select Back Call Log Call Meters Call History Last call time Total call time Reset call ...

Page 154: ... to scroll to the desired repetitive alert 10 Press the left soft key labeled Select 11 Press the right soft key labeled Back to return to the previous menu 12 Press the red key to return to the Main Screen Select Back Message Deleted Message Select Back Single Alert Repetitive Alert Audible Timers Repetitive Alert Off 1 minute 5 minutes 10 minutes 15 minutes 30 minutes 60 minutes Select Back ...

Page 155: ...Iridium Extreme User Manual 143 13 Using the Setup Menu ...

Page 156: ...144 Iridium Extreme User Manual 13 Using the Setup Menu ...

Page 157: ... 2 The Main Menu is displayed Use the 2 way Navi key to scroll until Setup is highlighted 3 Press the left soft key labeled Select Menu Call History Setup Security Help Select Back Location Options Call Options Volume and Tones Time and Date Language Backlight Contrast Setup Select Back Key Setup Number Entry Phone Information Reset to defaults Setup Set Location Options Set call options Set volum...

Page 158: ...Select Back Setup Location Options Call Options Volume and Tones Time and Date Language Note The Setup menu consists of three screens Scroll past the Language option using the 2 way Navi key for more options Note Location options will be covered in more detail on Chapter 14 Setting Call Options The Call Options menu allows you to enable or disable various call capabilities Starting from the Main M...

Page 159: ...Select Back Location Options Call Options Volume and Tones Time and Date Language Setup Select Back Setting Volumes and Tones Adjust the Ringer Volume The Volumes and Tones menu allows you to adjust the sound tone and volume level as well as to set the phone to ring or vibrate for incoming call notification Starting from the Main Menu 1 Use the 2 way Navi key to scroll until Setup is highlighted 2...

Page 160: ...e selected audio level as part of the selection process 8 Press the left soft key labeled OK when you have the desired setting or you may cancel the changes by pressing the right soft key labeled Back to return to the Volume and Tones Menu 9 You may exit the settings and return to the Main Screen by selecting the red key Select Back Message Deleted Message Ringer Volume Speaker Volume Ring Tone Al...

Page 161: ...ounds the new volume level as you adjust it Starting from the Main Menu 1 Use the 2 way Navi key to scroll until Setup is highlighted 2 Press the left soft key labeled Select 3 Use the 2 way Navi key to scroll until Volumes and Tones is highlighted 4 Press the left soft key labeled Select 5 Use the 2 way Navi key to scroll to Speaker Volume 6 Press the left soft key labeled Select Ringer Volume Sp...

Page 162: ...by pressing the right soft key labeled Back to return to the Volume and Tones Menu 9 You may exit the settings and return to the Main Screen by selecting the red key Select Back Message Deleted Message OK Back Volume Menu Call History Setup Security Help Select Back Adjust the Ring Tone This capability adjusts the tone of the ringer The phone sounds the new tone as you adjust it Starting from the ...

Page 163: ... selection process 8 Press the left soft key labeled OK when you have the desired setting or you may cancel the changes by pressing the right soft key labeled Back to return to the Volume and Tones Menu 9 You may exit the settings and return to the Main Screen by selecting the red key Location Options Call Options Volume and Tones Time and Date Language Setup Select Back Select Back Ringer Volume ...

Page 164: ...e new tone as you adjust it Starting from the Main Menu 1 Use the 2 way Navi key to scroll until Setup is highlighted 2 Press the left soft key labeled Select 3 Use the 2 way Navi key to scroll until Volumes and Tones is highlighted 4 Press the left soft key labeled Select 5 Use the 2 way Navi key to scroll until Alert Tone is highlighted 6 Press the left soft key labeled Select Select Back Ringer...

Page 165: ...ressing the right soft key labeled Back to return to the Volume and Tones Menu 9 You may exit the settings and return to the Main Screen by selecting the red key Select Back Message Deleted Message Select Back Tone 1 Tone 2 Tone 3 Tone 4 Alert tone Setting the Keypad Tone This capability selects the keypad tone You can select to have a single tone DTMF tones or no tones when the keypad is pressed ...

Page 166: ...t of the selection process 8 Press the left soft key labeled OK when you have the desired setting or you may cancel the changes by pressing the right soft key labeled Back to return to the Volume and Tones Menu 9 You may exit the settings and return to the Main Screen by selecting the red key Select Back Message Deleted Message Ringer Volume Speaker Volume Ring Tone Alert Tone Keypad Tone Vibrate ...

Page 167: ...ment The vibrate function notifies you of incoming calls with discreet vibrations Starting from the Main Menu 1 Use the 2 way Navi key to scroll until Setup is highlighted 2 Press the left soft key labeled Select 3 Use the 2 way Navi key to scroll until Volumes and Tones is highlighted 4 Press the left soft key labeled Select 5 Use the 2 way Navi key to scroll until Vibrate is highlighted 6 Press ...

Page 168: ... Tones Menu 9 You may exit the settings and return to the Main Screen by selecting the red key Select Back Ring Only Vibrate Only Vibrate then Ring No Ring or Vibrate Vibrate Options Time and Date Settings Select the Time Zone Your phone uses the satellite network to obtain the time and date information However you need to select the time zone in which you are located Starting from the Main Menu 1...

Page 169: ...e red key to return to the Setup Menu 7 Use the 2 way Navi key until the required time zone is highlighted 8 Press the left soft key labeled Select to confirm or press the right soft key labeled Back to return to the Time and Date Menu 9 You may exit the settings and return to the Main Screen by selecting the red key Select Back Location Options Call Options Volume and Tones Time and Date Language...

Page 170: ...ed 2 Press the left soft key labeled Select 3 Use the 2 way Navi key to scroll until Time and Date is highlighted 4 Press the left soft key labeled Select 5 Use the 2 way Navi key to scroll until Time format is highlighted 6 Press the left soft key labeled Select Select Back Location Options Call Options Volume and Tones Time and Date Language Setup Select Back Select time zone Time format Date fo...

Page 171: ... Date Menu 9 You may exit the settings and return to the Main Screen by selecting the red key Select the Date Format Menu Call History Setup Security Help Select Back Starting from the Main Menu 1 Use the 2 way Navi key to scroll until Setup is highlighted 2 Press the left soft key labeled Select 3 Use the 2 way Navi key to scroll until Time and Date is highlighted 4 Press the left soft key labele...

Page 172: ...Menu 9 You may exit the settings and return to the Main Screen by selecting the red key Select Back Select time zone Time format Date format Time and Date Select Back 01 Jan 13 DD MM YY DD MM YY DD MM YY MM DD YY YY DD MM Date Format Selecting the Display Language Your phone contains 23 languages Use this capability to select the language in which your phone displays menus and messages Menu Call H...

Page 173: ...ou may exit the settings and return to the Main Screen by selecting the red key Select Back Location Options Call Options Volume and Tones Time and Date Language Setup English Czech Cestina Danish Dutch Finnish Suomi French German Language Select Back Tip If you accidentally select a language other than English and are unable to read the phone menus follow these steps to change back to English 1 P...

Page 174: ...e 2 way Navi key to scroll until Backlight is highlighted 4 Press the left soft key labeled Select 5 Use the 2 way Navi key to scroll until the required Backlight is highlighted 6 Press the left soft key labeled Select to confirm selections or press the right soft key labeled Back to return to the Setup Menu 7 You may exit the settings and return to the Main Screen by selecting the red key Select ...

Page 175: ...key labeled Select 3 Use the 2 way Navi key to scroll until Contrast is highlighted 4 Press the left soft key labeled Select 5 Use the 2 way Navi key to scroll until to increase or decrease the contrast 6 Press the left soft key labeled OK to confirm selections or press the right soft key labeled Back to return to the Setup Menu 7 You may exit the settings and return to the Main Screen by selectin...

Page 176: ...honebook Setup the Convenience Key Function Menu Call History Setup Security Help Select Back Starting from the Main Menu 1 Use the 2 way Navi key to scroll until Setup is highlighted 2 Press the left soft key labeled Select 3 Use the 2 way Navi key to scroll until Key Setup is highlighted 4 Press the left soft key labeled Select 5 Convenience Key is highlighted 6 Press the left soft key labeled S...

Page 177: ... the Main Screen by selecting the red key No Action Start Call End Call Redial Convenience Key Select Back Setup the Right Soft Key Function Menu Call History Setup Security Help Select Back Starting from the Main Menu 1 Use the 2 way Navi key to scroll until Setup is highlighted 2 Press the left soft key labeled Select 3 Use the 2 way Navi key to scroll until Key Setup is highlighted 4 Press the ...

Page 178: ...roll until the desired action is highlighted 8 Press the left soft key labeled Select to confirm selections or press the right soft key labeled Back to return to the Setup Menu 9 You may exit the settings and return to the Main Screen by selecting the red key Set Number Entry Prefix This capability allows you to set your preferred international access code and can automatically attach 00 or to any...

Page 179: ...d action is highlighted 6 Press the left soft key labeled Select to confirm selections or press the right soft key labeled Back to return to the Setup Menu 7 You may exit the settings and return to the Main Screen by selecting the red key View Phone Information This capability allows you to view technical information about the Iridium Extreme Satellite Phone software hardware versions and the IMEI...

Page 180: ...oft key labeled Back to return to the Setup menu Setup Backlight Contrast Key Setup Number Entry Phone Information Select Back Back Phone Information F w HT08001 IMEI 399999999999999 Reset Phone Options to Factory Defaults This capability resets all settings to their original default settings Menu Call History Setup Security Help Select Back Starting from the Main Menu 1 Use the 2 way Navi key to ...

Page 181: ...s Reset Phone settings reset 3 Use the 2 way Navi key to scroll past the Key Setup option until Reset to defaults is highlighted 4 Press the left soft key labeled Select 5 Press the left soft key labeled Yes 6 A message appears briefly indicating the phone settings have been reset 7 Press the red key to return to the Main Screen ...

Page 182: ...170 Iridium Extreme User Manual 13 Using the Setup Menu ...

Page 183: ...rammed Quick GPS contacts or a new message contact Online portal integration with 3rd party providers enables the transmission of the phone s location information on a scheduled interval via short burst data SBD to 3rd party portal providers for online tracking Note Standard usage fees apply for sharing location via messaging or placing a phone call via the programmable SOS button Location Options...

Page 184: ... key to select Setup 3 With Location Options highlighted press the left soft key labeled Select to enter the Location Options menu 4 Within the Location Options menu are GPS Options Portal Options Emergency Options Message Options Format and Current Location Menu Call History Setup Security Help Select Back Select Back Location Options Call Options Volume and Tones Time Date Language Setup Select ...

Page 185: ...cy rate and turn GPS On or Off 1 Press the left soft key labeled Select Within the GPS Options menu enable the GPS Settings Lock to prevent modifications to GPS settings unless the GPS Settings Lock PIN is entered 1 Press the left soft key labeled Select The default setting for GPS Settings Lock is Disabled To enable GPS Settings Lock move the 2 way Navi key until the Enabled option is highlighted...

Page 186: ...gs Lock PIN is entered press the left soft key labeled OK Within the GPS Options menu the GPS Update Options will allow you to set how frequently a GPS position is updated for viewing the Current Location on the phone screen To access Update Options use the 2 way Navi key to scroll and highlight this feature 1 Press the left soft key labeled Select Within the Update Options menu the options are pr...

Page 187: ...e by having the SOS button call and message a destination automatically programmed for you in the phone through the menus You will also be prompted to register for service by visiting www geosalliance com iridium to review and accept the terms of use and enter your emergency Within the GPS Options menu the GPS On Off will allow you to turn the built in GPS receiver on or off in your phone Features...

Page 188: ...e GEOS also offers optional add on Membership Benefits to enhance your safety and security worldwide including GEOS Search and Rescue SAR and GEOS MEDIVAC Plus service The GEOS Emergency Response Service GEOS Search and Rescue SAR Membership and the GEOS MEDIVAC Plus are services offered and provided exclusively by GEOS and not by Iridium which is a separate unrelated company Neither GEOS nor Irid...

Page 189: ...Options menu the Emergency Mode allows you to initiate an emergency call and or message to your programmed contacts The more direct way to initiate Emergency Mode is to press the red SOS button located on the top of your phone If Emergency Mode is active this menu item can be used to cancel Emergency Mode When Emergency Mode is activated the option to cancel Emergency To initiate Emergency Mode fr...

Page 190: ...tion provided is an approximate location based on Iridium location that is only an approximate location within an accuracy of 90 miles The date year month day and time UTC The of phone battery charge remaining The language of the phone menu setting to give some indication of the language of the user ex en is English Iridium User After selecting Enter Emergency Mode the countdown screen appears You...

Page 191: ... programmed contacts in the event that Emergency Mode is started by pressing the red SOS button on the top of the phone or by selecting Emergency Mode from the menu Yes No Are you sure you want to exit emergency mode Cancel Emergency While in Emergency Mode the dedicated SOS LED will illuminate and SOS icon on the phone screen will appear The SOS LED will change colors from red to green depending ...

Page 192: ... SMS numbers not all wireless carriers have interoperability arrangements and therefore these numbers should be tested prior to relying upon them for emergencies Email addresses should also be tested To change the default setting to either Message Only or Call Only use the 2 way Navi key highlight the preferred option and press the left option key labeled Select Note If the GPS Settings Lock is en...

Page 193: ...recipient If Delete is selected it will delete the previously highlighted Message Recipient listing If Delete All is selected all Message Recipient listings will be deleted Once the desired action is highlighted using the 2 way Navi key press the left option key labeled Select Next if Edit is selected the Select Recipient screen will appear providing the options to Enter Number Enter Email or sele...

Page 194: ...ed at the beginning of the dialing string to automatically insert the international access code therefore 00 is not required The call recipient number must include the country code and number ex 12125551212 or emergency number ex 911 Note that Iridium only supports 911 in the US and 000 in Australia and these numbers will not work in other geographies To select an existing address use the 2 way Na...

Page 195: ...ick GPS will allow you to send one 1 single location update to up to five 5 recipients programmed in your phone via messaging To initiate a Quick GPS press the Convenience Key located on the right side of your phone obtain an updated location select Share with the left soft key and select Quick GPS with the left soft key To program Message Options press the left soft key labeled Select Select Back...

Page 196: ...empty listing for programming Press the left soft key labeled Options in order to Edit Delete or Delete All of the Update Recipient listing Next if Edit is selected the Select Recipient screen will appear providing the options to Enter Number Enter Email or select an existing address from your Phonebook To Enter Number press the left soft key labeled Select and enter the number To Enter Email use ...

Page 197: ...empty listings will appear To add a new recipient highlight the empty listing that you would like to change and press the left soft key labeled Select To Enter Number Enter Email or select an existing address from your phonebook follow the same instructions as programming an Update Recipient as described above Select Back Regular Updates Quick GPS List Message Options Select Back GPS Options Emerg...

Page 198: ... From the Position screen to modify the setting for position format use the 2 way Navi Key to highlight and the preferred format and then use the left soft key labeled Select From the Format screen to modify the setting for Altitude format press the left soft key labeled Select Select Back Position Altitude Format Select Back Decimal Degree Deg Min Sec Position Select Back Position Altitude Format...

Page 199: ...ill appear in less than 30 seconds If GPS and the GPS Settings Lock are disabled you will be asked if you want to enable GPS if so the screen will be loaded with blank position data and with the message Acquiring location in place of Age of fix If you choose not to enable GPS or if GPS is disabled and the GPS Settings Lock is on then a No location information available message will be displayed te...

Page 200: ...the menu under Portal Options to Register or obtain Portal Status of the phone and information on your designated provider If Share is selected the Share Location Options will appear The available options are Quick GPS to send your location to your preconfigured list of up to five 5 contacts see Quick GPS List section for programming instructions New message to append your location to a new messag...

Page 201: ...Iridium Extreme User Manual 189 15 Using the Security Menu ...

Page 202: ...190 Iridium Extreme User Manual 15 Using the Security Menu ...

Page 203: ...rectly three times If a PIN becomes blocked you must enter a Personal Unblocking Key PUK to restore the SIM to service which is obtained from your service provider Locating the Security Menu Registered Menu Help 16 28 14 May 13 T Starting from the Main Screen 1 Press the left soft key labeled Menu 2 The Main Menu is displayed Use the 2 way Navi key to scroll until Security is highlighted 3 Press t...

Page 204: ...nd Unlocking Your Phone This capability helps prevent unwanted use of your phone Menu Call History Setup Security Help Select Back Starting from the Main Menu 1 Use the 2 way Navi key to scroll until Security is highlighted Note Scroll one down from Setup to view the Security option 2 Press the left soft key labeled Select 3 The Phone lock option is highlighted If not use the 2 way Navi key to scr...

Page 205: ...to enter your Phone PIN Once you do the phone is fully operational Enable phone lock Disable phone lock Phone Lock Select Back Phone PIN Enter PIN Select Clear Enable or Disable the SIM lock When you activate the SIM lock capability your phone requests your SIM PIN whenever your phone is powered on To change this setting you need to enter the SIM PIN code that your service provider gave you Menu C...

Page 206: ...ct Clear 3 Use the 2 way Navi key to scroll until SIM lock is highlighted 4 Press the left soft key labeled Select 5 Use the 2 way Navi key until the action you prefer is highlighted 6 The Enter PIN screen appears Using the keypad enter the PIN number 7 Press the left soft key labeled Select The message SIM lock disabled or SIM lock enabled briefly appears then returns to the SIM Lock menu ...

Page 207: ...g from the Main Menu 1 Use the 2 way Navi key to scroll until Security is highlighted 2 Press the left soft key labeled Select 3 Use the 2 way Navi key to scroll until Change PINs highlighted 4 Press the left soft key labeled Select 5 The Change PIN menu appears Phone PIN is highlighted 6 Press the left soft key labeled Select Phone lock Sim lock Change PINs Security Select Back Phone PIN SIM PIN ...

Page 208: ...ge PIN Yes No 7 Enter your current PIN in the Old PIN field the default PIN is 1234 Use the 2 way Navi key to move to the next field and enter your new PIN into the New PIN field Move to the Verify PIN field and enter the new PIN again 8 When all fields are complete press the left soft key labeled OK 9 The screen displays PIN changed OK then returns to the Change PIN menu ...

Page 209: ... scroll until Security is highlighted Note Scroll one down from Setup to view the Security option 2 Press the left soft key labeled Select 3 Use the 2 way Navi key to scroll until Change PINs is highlighted 4 Press the left soft key labeled Select 5 Use the 2 way Navi key to scroll until SIM PIN is highlighted 6 Press the left soft key labeled Select Phone lock Sim lock Change PINs Security Select...

Page 210: ...in Menu 1 Use the 2 way Navi key to scroll until Security is highlighted Note Scroll one down from Setup to view the Security option 2 Press the left soft key labeled Select 3 Use the 2 way Navi key to scroll until Change PINs is highlighted 4 Press the left soft key labeled Select 5 Use the 2 way Navi key to scroll until SIM PIN 2 is highlighted 6 Press the left soft key labeled Select Phone lock...

Page 211: ...ge PIN Yes No 7 Enter your current PIN in the Old PIN field the default PIN is 1111 Use the 2 way Navi key to move to the next field and enter your new PIN into the New PIN field Move to the Verify PIN field and enter the new PIN again 8 When all fields are complete press the left soft key labeled OK 9 The screen displays PIN changed OK then returns to the Change PIN menu ...

Page 212: ...ng from the Main Menu 1 Use the 2 way Navi key to scroll until Security is highlighted Note Scroll one down from Setup to view the Security option 2 Press the left soft key labeled Select 3 Use the 2 way Navi key to scroll until Change PINs is highlighted 4 Press the left soft key labeled Select 5 Use the 2 way Navi key to scroll until Call barring PIN is highlighted 6 Press the left soft key labe...

Page 213: ...nged OK Change PIN Yes No 7 Enter your current PIN in the Old PIN field Use the 2 way Navi key to move to the next field and enter your new PIN into the New PIN field Move to the Verify PIN field and enter the new PIN again 8 When all fields are complete press the left soft key labeled OK 9 The screen displays PIN changed OK then returns to the Change PIN menu ...

Page 214: ...202 Iridium Extreme User Manual 16 Troubleshooting ...

Page 215: ...o the sky and there are no buildings trees or other objects interfering Is Restricted displayed Check the Call Barring setting Has a new SIM card been inserted Check that no new restrictions have been imposed Check to see if your fixed dialing list is enabled If so you can only make calls to numbers or prefixes that are on the list You can t receive calls Check to see that your phone is powered on...

Page 216: ...inserted the correct way Is the card visibly damaged or scratched Return the card to your service provider Check the SIM and card contacts If they are dirty clean them with an antistatic cloth You can t cancel Call Forwarding or Call Barring Wait until you are in an area with good network coverage and try again The message indicator is flashing There is not enough memory available to store another...

Page 217: ...treme temperatures At extreme hot or cold temperatures battery performance is significantly reduced You find your phone becoming warm during use You may notice this during long calls or during charging The heat is produced by the electronic components within your phone and is quite normal Phone is not responding to user controls including the power keys Remove the battery from the phone and then r...

Page 218: ...ts original setting Power on the phone 1 Press the red key three times 2 Press the left soft key 3 Scroll down six times 4 Press the left soft key again 5 Scroll down four times 6 Press the left soft key and then press it a second time The English option is at the top so press the left soft key a final time to confirm change back to English ...

Page 219: ...ceive a signal If your phone was powered on inside of a building or area with an obstructed view of the sky just prior to attempting a call outside the phone may be temporarily in a power saving mode to conserve battery life You may either wait for it to automatically exit the power saving mode within a minute or two on its scheduled interval or just simply turn off your phone and turn it on again...

Page 220: ...208 Iridium Extreme User Manual 17 Certification Compliance Info ...

Page 221: ...s Compliance Electromagnetic Compatibility and AC Safety in the United States European Union Canada and Mexico FCC Compliance The Iridium Extreme is certified under 47 CFR Part 25 as FCC ID Q639575 It also complies with Part 15 of the FCC Regulations Operation is subject to the condition that this device does not cause harmful interference Any unauthorized antennas modifications or attachments cou...

Page 222: ...210 Iridium Extreme User Manual 17 Certification Compliance Info ...

Page 223: ...materials equivalent to new in performance and reliability Any replacement product or part will also have functionality at least equal to that of the product or part being replaced Replacement products and parts are warranted to be free from defects in material or workmanship under normal usage for the remainder of the applicable warranty period of the original Product for which a replacement prod...

Page 224: ...provider in relation to problems with the Product and Accessories and Iridium will assist your Product and Accessories provider to resolve them including replacement where required Exclusions This Limited Warranty does not apply in the following circumstances Normal wear and tear Periodic maintenance repair or replacement of parts due to normal wear and tear are excluded from coverage Batteries On...

Page 225: ...sical Media No warranty is made that any software will meet your requirements or will work in combination with any hardware or software applications provided by third parties that the operation of the software will be uninterrupted or error free or that all defects in the software will be corrected Privacy and Data Security Privacy and data security are important to everyone Some features of your ...

Page 226: ... availability and response times may vary from country to country and may be subject to registration requirements in the country of purchase Your Iridium Service Provider can provide details This Limited Warranty gives you specific legal rights You may also have other rights that may vary from state to state country to country Some states countries do not allow or acknowledge the existence limitat...

Page 227: ...CLUDINGWITHOUTLIMITATIONTHOSEUSINGTHE SERVICEANDTHEPRODUCTINANYMANNERINCONJUNCTION WITHEMERGENCY911 U S EMERGENCYTRIPLEZERO 000 112 AUSTRALIA ORANYOTHERDISTRESSCALLINGOREMERGENCY SERVICES BOTHPUBLICORPRIVATELYOPERATED ACKNOWLEDGE ANDAGREEASACONDITIONOFTHEPROVISIONOFSERVICEAND PRODUCTBYIRIDIUMTHATTHEYWILLMAKENOCLAIM WHETHERIN CONTRACT INDEMNITY TORTORANYOTHERLEGALTHEORYAGAINST IRIDIUMFORBODILYINJUR...

Page 228: ...ent any Iridium term or condition conflicts with any Service Provider term or condition the Iridium term or condition shall govern Service provider will be provided with notice of any new terms and conditions or any changes in these terms and conditions All terms and conditions will be effective as of your receipt of the notices of new or modified terms and conditions and your continued use of the...

Page 229: ... to see if damage to the Iridium system occurs Warranty Claim Process Should your Product require service within the warranty period or for warranty questions repairs or for the return of the Product please contact your Service Provider or any other Service Provider in your country Do not contact Iridium For warranty claims you will be required to provide the following proof of purchase documentat...

Page 230: ...secrets of Iridium or its suppliers or licensors including but not limited to the specific internal design and structure of individual programs and associated interface information Except as otherwise expressly provided you shall have no right and you specifically agree not to i transfer assign or sublicense your license rights to any other person or entity other than in compliance with any Iridiu...

Page 231: ...SE THE SOFTWARE WHICH IS BEING UPGRADED AND 3 THE MAKING AND USE OF ADDITIONAL COPIES IS LIMITED TO NECESSARY BACKUP PURPOSES ONLY Proprietary Notices You agree to maintain and reproduce all copyright and other proprietary notices on all copies in any form of the Software in the same form and manner that such copyright and other proprietary notices are included on the Software Except as expressly ...

Page 232: ...mmercial computer software and commercial computer software documentation as such terms are used in FAR 12 212 Consistent with FAR 12 212 and DoD FAR Supp 227 7202 1 through 227 7202 4 and notwithstanding any other FAR or other contractual clause to the contrary in any agreement into which this Limited Warranty may be incorporated you may provide to Government end user or Government end user will ...

Page 233: ...Iridium Extreme User Manual 221 18 Warranty Service and Support ...

Page 234: ...222 Iridium Extreme User Manual 18 Warranty Service and Support ...

Reviews: