IPLink Technology IP-WDL-RT1T1R-B User Manual Download Page 65


IPLINK Technology Corp.


  IP-WDL-RT1T1R-B 150M Wireless N ADSL2+ Router 
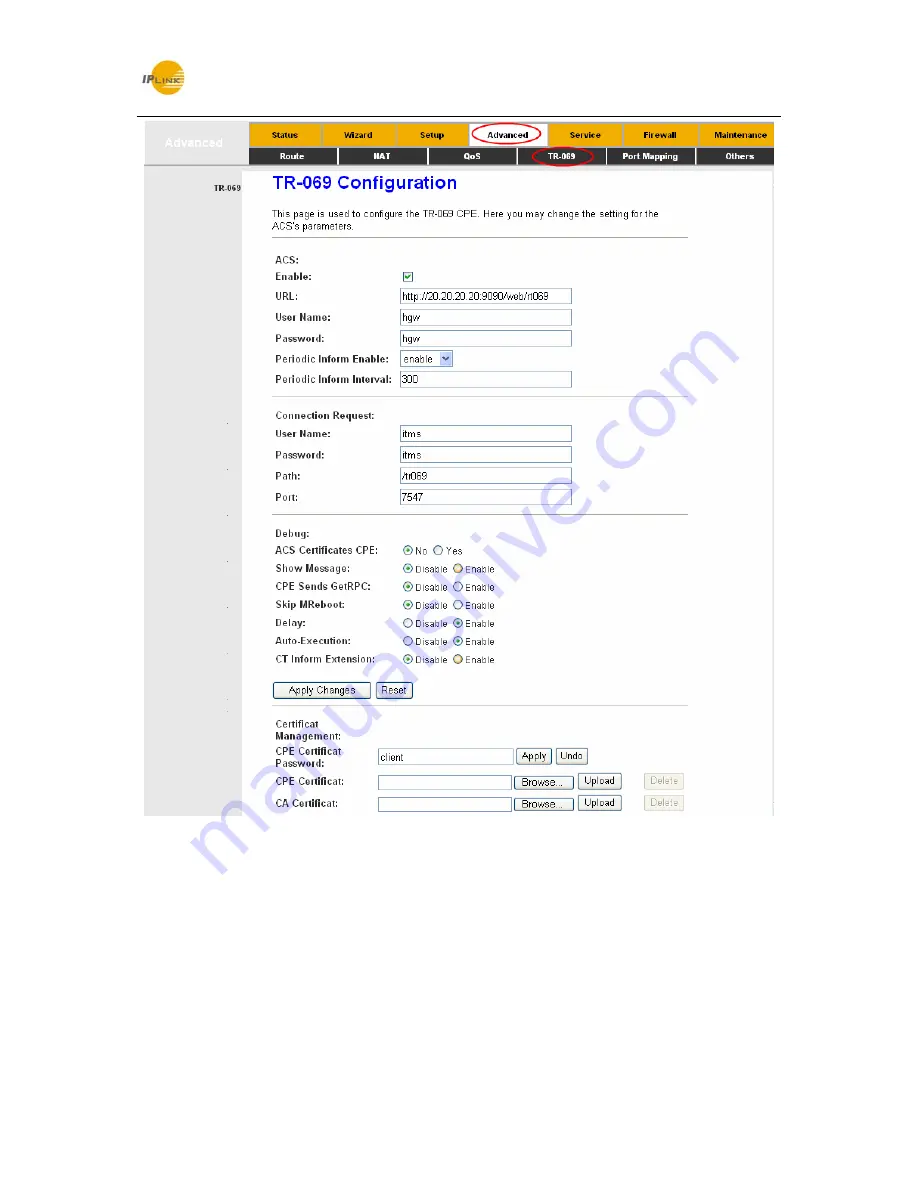
 

Figure 4-40 

ACS parameters 


Enable:

 Enable or disable the CWMP. 


URL:

 Enter the website of ACS which is provided by your ISP. 


User Name/Password:

 Enter the User Name and password the device should use when 

connecting to the ACS. 


Periodic Inform Enable:

 When this field is enabled, the device will send an Inform RPC to 

the ACS server at the system startup, and will continue to send it periodically at an interval 

60 

Summary of Contents for IP-WDL-RT1T1R-B

Page 1: ...Rev 2 0 0 1910020564...

Page 2: ...n experienced radio TV technician for help This device complies with part 15 of the FCC Rules Operation is subject to the following two conditions 1 This device may not cause harmful interference 2 Th...

Page 3: ...p IP WDL RT1T1R B 150M Wireless N ADSL2 Router CE Mark Warning This is a Class B product In a domestic environment this product may cause radio interference in which case the user may be required to t...

Page 4: ...he Back Panel 5 2 3 Installation Environment 6 2 4 Connecting the Router 6 Chapter 3 Quick Installation Guide 8 3 1 Configure PC 8 3 2 Login 11 Chapter 4 Software Configuration 15 4 1 Status 15 4 1 1...

Page 5: ...4 4 DNS 68 4 4 5 DDNS 70 4 4 6 FTP Server 71 4 5 Firewall 72 4 5 1 MAC Filter 72 4 5 2 IP Port Filter 73 4 5 3 URL Filter 75 4 5 4 ACL 76 4 5 5 DoS 80 4 6 Maintenance 81 4 6 1 Update 82 4 6 2 Passwor...

Page 6: ...B 150M Wireless N ADSL2 Router One Power Adapter for IP WDL RT1T1R B 150M Wireless N ADSL2 Router Quick Installation Guide One RJ45 cable Two RJ11 cables One ADSL splitter One Resource CD which inclu...

Page 7: ...supplied and friendly help messages are provided for the configuration Network and Router management is done through the Web based Utility which can be accessed through local Ethernet using any web b...

Page 8: ...ver ALG IGMP Proxy Snooping Protection against Denial of Service attack IP Packet filtering MAC filtering URL filtering IP QoS Dynamic DNS UPnP support System log support can record the state of the r...

Page 9: ...s data being transmitted WLAN Off The wireless function is disabled On There is a successful connection on the corresponding 1 4 LAN port but no activity Flash Data is being transferred over the 1 4 L...

Page 10: ...hold the Reset button for at least 5 seconds And the Router will reboot to its factory default settings Method two Restore the default setting from Maintenance Reboot of the Router s Web based Utilit...

Page 11: ...nd keep your hands dry You can follow the steps below to install it Step 1 Connect the ADSL Line Method one Plug one end of the twisted pair ADSL cable into the ADSL LINE port on the rear panel of IP...

Page 12: ...p 4 Attach the power adapter Connect the power adapter to the power connector on the rear of the device and plug in the adapter to an electrical outlet or power extension The electrical outlet shall b...

Page 13: ...T1T1R B or connect your adapter to a Hub Switch which has connected to the Router you need to configure your PC s IP address Follow the steps below to configure it Step 1 Click the Start menu on your...

Page 14: ...IPLINK Technology Corp IP WDL RT1T1R B 150M Wireless N ADSL2 Router Figure 3 2 Step 3 Select General tab highlight Internet Protocol TCP IP and then click the Properties button Figure 3 3 9...

Page 15: ...cally and Obtain DNS server address automatically in the screen above Now you can run the Ping command in the command prompt to verify the network connection Please click the Start menu on your deskto...

Page 16: ...s adapter should be lit 2 Is the TCP IP configuration for your PC correct If the Router s IP address is 192 168 1 1 your PC s IP address must be within the range of 192 168 1 2 192 168 1 254 3 2 Logi...

Page 17: ...next screen Figure 3 8 Step 2 Configure the Router with the information provided by your ISP including VPI VCI Connection Mode and the following parameters Take PPPoE for example you need to enter Use...

Page 18: ...u need to create a name for your wireless network It s recommended that the name be unique and easy to remember You can also keep default without the device being affected Select an Encryption and Aut...

Page 19: ...IPLINK Technology Corp IP WDL RT1T1R B 150M Wireless N ADSL2 Router 14 Figure 3 10 Step 4 Click the Apply Changes button to finish the wizard Figure 3 11...

Page 20: ...ty submenus will be available after you click one of the main menus On the center of the Web based Utility there are the detailed configurations or status information To apply any settings you have al...

Page 21: ...gy Corp IP WDL RT1T1R B 150M Wireless N ADSL2 Router 16 Figure 4 1 Click the Refresh button to refresh immediately 4 1 1 2 ADSL Choose Status Device Info ADSL menu and you will be able to view the ADS...

Page 22: ...M Wireless N ADSL2 Router 17 Figure 4 2 Click the Retrain button to retrain the information again Click the Refresh button to refresh immediately 4 1 2 Statistics Choose Status Statistics menu and you...

Page 23: ...2 Router 18 Figure 4 3 Click the Refresh button to refresh immediately 4 1 3 Wizard Please refer to 3 2 Login 4 2 Setup Choose Setup you can see the next submenus WAN LAN and WLAN Click any of them an...

Page 24: ...ure 4 4 Figure 4 4 Current ATM VC Table ATM settings are used to connect to your ISP Your ISP provides VPI Virtual Path Identifier VCI Virtual Channel Identifier settings to you In this Device there i...

Page 25: ...r your PPPoE PPPoA connection Password Enter your password for your PPPoE PPPoA connection Type Select Continuous Connect on Demand or Manually for the network connection Continuous means the Internet...

Page 26: ...ified Delete Click this button to delete your existed VC First choose the desired VC and then click this button thus your existed VC will be deleted Undo Click this button to abandon your operation Re...

Page 27: ...Size Please configure them according to your needs Click Apply Changes to save your configuration Note After configuration you need to click the Save button appeared on the left panel so that your con...

Page 28: ...LAN interface for the device IP Address The Router s local IP Address You can access to the Web based Utility via the IP Address the default value is 192 168 1 1 You can change the IP address if need...

Page 29: ...C address to the Current Allowed MAC Address Table To add a new MAC address enter the MAC address and then click Add button Current Allowed MAC Address Table Displays the current allowed MAC address C...

Page 30: ...IP address of the Modem Router Subnet Mask Displays the subnet mask of the Modem Router DHCP Mode Options available are None DHCP Relay and DHCP Server 1 None In this mode the Modem Router will do no...

Page 31: ...relay In this mode the DHCP requests from local PCs will be forwarded to the DHCP server running on WAN side Figure 4 10 Relay Server Enter the IP Address of the DHCP server running on WAN side 3 DHC...

Page 32: ...ssigned a new one The default is 1440 minutes Domain Name Specify a user friendly name to refer to the group of hosts subnet that will be assigned addresses from this pool DNS Servers The IP address o...

Page 33: ...n view and add a static address for client via the next screen shown in Figure 4 13 When you specify a static IP address for a PC on the LAN that PC will always receive the same IP address each time w...

Page 34: ...4 2 3 WLAN There are six submenus under the WLAN menu Basic Security Access Control List Advanced WPS and WDS Click any of them and you will be able to configure the corresponding function 4 2 3 1 Bas...

Page 35: ...yboard Make sure this setting is the same for all stations in your wireless network Type the desired SSID in the space provided Channel Width Select the width you want to use from the drop down List T...

Page 36: ...save your changes Note After configuration you need to click the Save button appeared on the left panel so that your configuration can still take effect after the Router reboots 4 2 3 2 MSSID Choose S...

Page 37: ...can select Shared Key or Open System authentication type automatically based on the wireless station s capability and request 4 2 3 3 Security Choose Setup WLAN Security menu and you will see the Wire...

Page 38: ...key algorithm as described in the IEEE 802 11g standard To configure WEP settings select follow the steps below Step 1 Select WEP from the Encryption drop down list The following available options wil...

Page 39: ...e button appeared on the left panel so that your configuration can still take effect after the Router reboots 2 WPA WPA2 WPA Wi Fi Protected Access and WPA2 WPA version 2 are based on Radius Server Th...

Page 40: ...quired For Pre Shared Key Format Passphrase and Hex 64 characters are provided You then need to create a key for your Router in Pre Shared Key filed The least length of the key will change according t...

Page 41: ...not be able to connect to you access point Click Apply Changes to save your configuration MAC Address Enter the MAC address of the client you want to allow or deny Current Access Control List Shows t...

Page 42: ...et RTS threshold size the RTS CTS mechanism will not be enabled The Router sends Request to Send RTS frames to a particular receiving station and negotiates the sending of a data frame After receiving...

Page 43: ...ttings are only for more technically advanced users who have a sufficient knowledge about wireless LAN They should not be changed unless you know exactly what will happen for the changes on your Acces...

Page 44: ...guration 1 PBC If the wireless adapter supports WPS and the Push Button Configuration PBC method you can add it to the network by PBC with the following two methods Method One Step 1 Press the WPS WLA...

Page 45: ...k Start PBC button in Figure 4 23 Step 2 For the configuration of the wireless adapter please choose Push the button on my access point in the configuration utility of the WPS as below and click Next...

Page 46: ...thod you can add it to the network by PIN with the following two methods Method One Enter the PIN into my Router Step 1 For the configuration of the wireless adapter please choose Enter a PIN into my...

Page 47: ...PIN from my Router Step 1 Get the Current PIN code of the Router from Self PIN Number in Figure 4 24 each Router has its unique PIN code Here takes the PIN code 12345670 of this Router for example Ste...

Page 48: ...4 2 3 7 WDS Choose Setup WLAN WDS menu and you will see the WDS settings screen shown in Figure 4 25 WDS short for Wireless Distribution System uses wireless media to communicate with other Access Po...

Page 49: ...hanges button to save the MAC address to Current WDS AP List Note If changes are made after clicking Apply Changes button a Save button will appear on the left panel You need to click the Save button...

Page 50: ...the next hop through which traffic will forward the destination Interface Select the interface to which a static route is to be applied Click the Add Route button to add the new route in the Static R...

Page 51: ...igure the RIP settings in the next screen shown in Figure 4 28 RIP is an internet protocol you can set up to share routing table information with other routing devices Figure 4 28 RIP Select to enable...

Page 52: ...After adding a new entry a Save button will appear on the left panel You need to click the Save button to make your changes take effect 4 3 2 NAT 4 3 2 1 DMZ Choose Advanced NAT DMZ you can configure...

Page 53: ...ecified service to the Internet for example Web server or FTP server which you can make visible to the outside world even though NAT makes your whole inside network appear as a single machine to the o...

Page 54: ...after the Router reboots For example If you want to set up a FTP Server on LAN host 192 168 1 33 you can configure a virtual server rule as follows Step 1 Select FTP from Usual Service Name drop down...

Page 55: ...vanced NAT Port Trigger and then you can configure the port trigger rules in the screen as shown in Figure 4 32 Port trigger is used to restrict certain types of data packets from your local network t...

Page 56: ...ters Match Port Trigger Protocol Relate Port and Open Protocol will be automatically filled You can also define the application by yourself in the User defined Application Name field But you need to f...

Page 57: ...igure 4 33 NAT IP mapping allows you to configure one IP pool for specified source IP address from LAN so a packet whose source IP is in range of the specified address will select one IP address from...

Page 58: ...dress Note After configuration you need to click the Save button appeared on the left panel so that your configuration can still take effect after the Router reboots 4 3 3 QoS Choose Advanced QoS you...

Page 59: ...ity the traffic will be send out WFQ 4 3 2 1 Traffic with different priority will be send in proportion of its priority the four priority traffic will be send out in proportion to 4 3 2 1 Apply Click...

Page 60: ...rt The source port number of the rule If the Protocol filed is not been selected or is selected as ICMP the Src Port filed can t be configured Dest Port The destination port number of the rule If the...

Page 61: ...e sure 802 1q is enabled in specified WAN interface otherwise 802 1p tag will not be tagged Apply After filling the parameters click this button to add a new rule QoS Rule List Shows the current rules...

Page 62: ...N ADSL2 Router 57 Figure 4 36 Step 2 Click 802 1p config button to enter the 802 1p Set screen as shown in Figure 4 37 Figure 4 37 Step 3 Fill in the above parameters according to the guides below 80...

Page 63: ...filed will be assigned this priority Step 4 Click Modify to save your priority configuration 4 3 3 3 DSCP If the QoS policy is DSCP based you should configure the DSCP setting Press the DSCP config b...

Page 64: ...es the DSCP filed will be assigned this priority Dscp rule list Shows the current rules on the device 4 3 4 TR 069 Choose Advanced TR 069 you can configure the TR 069 function in the screen shown in F...

Page 65: ...r the website of ACS which is provided by your ISP User Name Password Enter the User Name and password the device should use when connecting to the ACS Periodic Inform Enable When this field is enable...

Page 66: ...button to delete your entering Note After configuration you need to click the Save button appeared on the left panel so that your configuration can still take effect after the Router reboots 4 3 5 Por...

Page 67: ...u can configure the mapping group as follow steps 1 Select a group Group 1 Group 2 Group3 or Group 4 from the table then you can see the available interface LAN and WAN and grouped interface list 2 Se...

Page 68: ...Others Bridge Setting you can configure the bridge setting in the screen shown in Figure 4 42 Bridge Setting allows you to configure the bridge parameters Here you can change the settings or view some...

Page 69: ...es can access to the internet Here you can enable or disable the client limit function and the maximum device to access to the internet Figure 4 44 Client Limit Capability Enable or disable the client...

Page 70: ...hown in Figure 4 46 Here you can enable or disable the IGMP proxy function on all WAN interface and you can also set the parameters of the IGMP function IP hosts use Internet Group Management Protocol...

Page 71: ...u can configure the UPnP in the screen shown in Figure 4 47 UPnP Universal Plug and Play is a distributed open networking standard that uses TCP IP for simple peer to peer network connectivity between...

Page 72: ...configuration you need to click the Save button appeared on the left panel so that your configuration can still take effect after the Router reboots 4 4 3 SNMP Choose Service SNMP you can see the SNM...

Page 73: ...of SNMP trap Community name read only Name of the read only community This read only community allows read operation to all objects in the MIB Community name read write Name of the read write communit...

Page 74: ...d then you need to configure the DNS IP address manually Note After configuration you need to click the Save button appeared on the left panel so that your configuration can still take effect after th...

Page 75: ...4 5 DDNS Choose Service DDNS you can configure the DDNS function in the screen shown in Figure 4 51 The router offers a Dynamic Domain Name System DDNS feature The feature lets you use a static host n...

Page 76: ...entry of this device Click the Add button to add the DDNS entry Click the Remove button to delete the existed DDNS entry Note After configuration you need to click the Save button appeared on the left...

Page 77: ...see the next screen shown in Figure 4 53 In order to management your local network better you can use the MAC address filter function to control the internet access Here you can set the MAC filtering...

Page 78: ...s button to add your rule into Current MAC Filter Table Current MAC Filter Table It shows the current MAC filtering rules You can delete the entry on the list Delete Check the desired rule and then cl...

Page 79: ...this entry it can be IP ICMP TCP and UDP Direction The direction of this entry it can be Outgoing and Incoming Source IP Address Mask Address The source IP address and mask address of the entry Dest...

Page 80: ...n can still take effect after the Router reboots 4 5 2 2 IPv6 Port Filter Choose Firewall IP Port Filter IPv6 Port Filter menu and you will see the next screen shown in Figure 4 55 Here you can set th...

Page 81: ...You can delete the selected entry For example If you want to forbid the user to access the website including yahoo com Step 1 Select Enable shown in Figure 4 56 Step 2 Enter yahoo com in the Keyword f...

Page 82: ...orp IP WDL RT1T1R B 150M Wireless N ADSL2 Router 77 Figure 4 57 Direction Select The direction of the ACL entry it can be LAN or WAN 1 LAN If LAN is selected you can see the next screen shown in Figur...

Page 83: ...Address The IP address of the host 0 0 0 0 means any IP Service Allowed LAN side The allowed services which the host can access It can be any or any specified service such as web telnet ftp tftp snmp...

Page 84: ...pecify the service and opened port for this service on WAN side The host access the specified port can obtain the specified service the router provides Current ACL Table It shows the current ACL setti...

Page 85: ...Corp IP WDL RT1T1R B 150M Wireless N ADSL2 Router Figure 4 60 4 5 5 DoS Choose Firewall DoS you can see the next screen shown in Figure 4 61 Here you can enable DoS Prevention Click Apply Changes to...

Page 86: ...logy Corp IP WDL RT1T1R B 150M Wireless N ADSL2 Router 81 Figure 4 61 4 6 Maintenance Choose Maintenance you can see the next submenus Click any of them and you will be able to configure the correspon...

Page 87: ...Type the exact path of the update file into the Select File field Or click the Browse button to locate the update file Step 2 Click the Upload button Note 1 When you upgrade the router s firmware you...

Page 88: ...RT1T1R B 150M Wireless N ADSL2 Router 83 Figure 4 63 To backup the Router s current settings Step 1 Click the Save button shown in Figure 4 63 to proceed Figure 4 64 Step 2 Save the file as the appoin...

Page 89: ...the file for the device or enter the exact path in Load Settings from File field Step 2 Click the Upload button to complete 4 6 2 Password Choose Maintenance Password you can configure the user accoun...

Page 90: ...h current settings or restore to factory default settings in the screen shown in Figure 4 67 Figure 4 67 4 6 4 Time Choose Maintenance Time you can configure the system time in the screen shown in Fig...

Page 91: ...Corp IP WDL RT1T1R B 150M Wireless N ADSL2 Router Figure 4 68 1 Manually You need to set the date and time corresponding to the current time And then click Apply Changes button to save your configurat...

Page 92: ...ne The time zone in which the device resides Get GMT Time After setting the NTP configuration correctly click this button to start the NTP function Then you can see the GMT time obtained from NTP serv...

Page 93: ...licking Apply Changes button a Save button will appear on the left panel You need to click the Save button to make your changes take effect 4 6 6 Diagnostics The router provides several useful diagnos...

Page 94: ...6 Choose Maintenance Diagnostics Ping6 you can ping a specified address shown in Figure 4 73 Figure 4 73 After setting the host click the PING button to start the ping process then the ping result wil...

Page 95: ...which the trace route is to be applied For example you can set the host to www baidu com and then click the traceroute button to start the trace route process Several times later you can see the trac...

Page 96: ...ment F5 End to End F4 Segment or F4 End to End VPI The VPI number you want to do the loopback diagnostics VCI The VCI number you want to do the loopback diagnostics 4 6 6 5 ADSL Diagnostic Choose Main...

Page 97: ...agnostic and then wait several minutes later you will see the test result 4 6 6 6 Diag Test Choose Maintenance Diagnostics Diag Test you can select an interface to run diagnostic in Figure 4 77 The Di...

Page 98: ...INK Technology Corp IP WDL RT1T1R B 150M Wireless N ADSL2 Router 93 Figure 4 77 Click the Run Diagnostic Test button to start the test and then wait several times later you can see the diagnostic resu...

Page 99: ...gotiation RJ45 ports Auto MDI MDIX One RJ11 port LEDs Power ADSL Internet WLAN 1 2 3 4 LAN WPS Network Medium 10Base T UTP category 3 4 5 cable 100Base TX UTP category 5 Max line length 6 5Km Data Rat...

Reviews: