background image

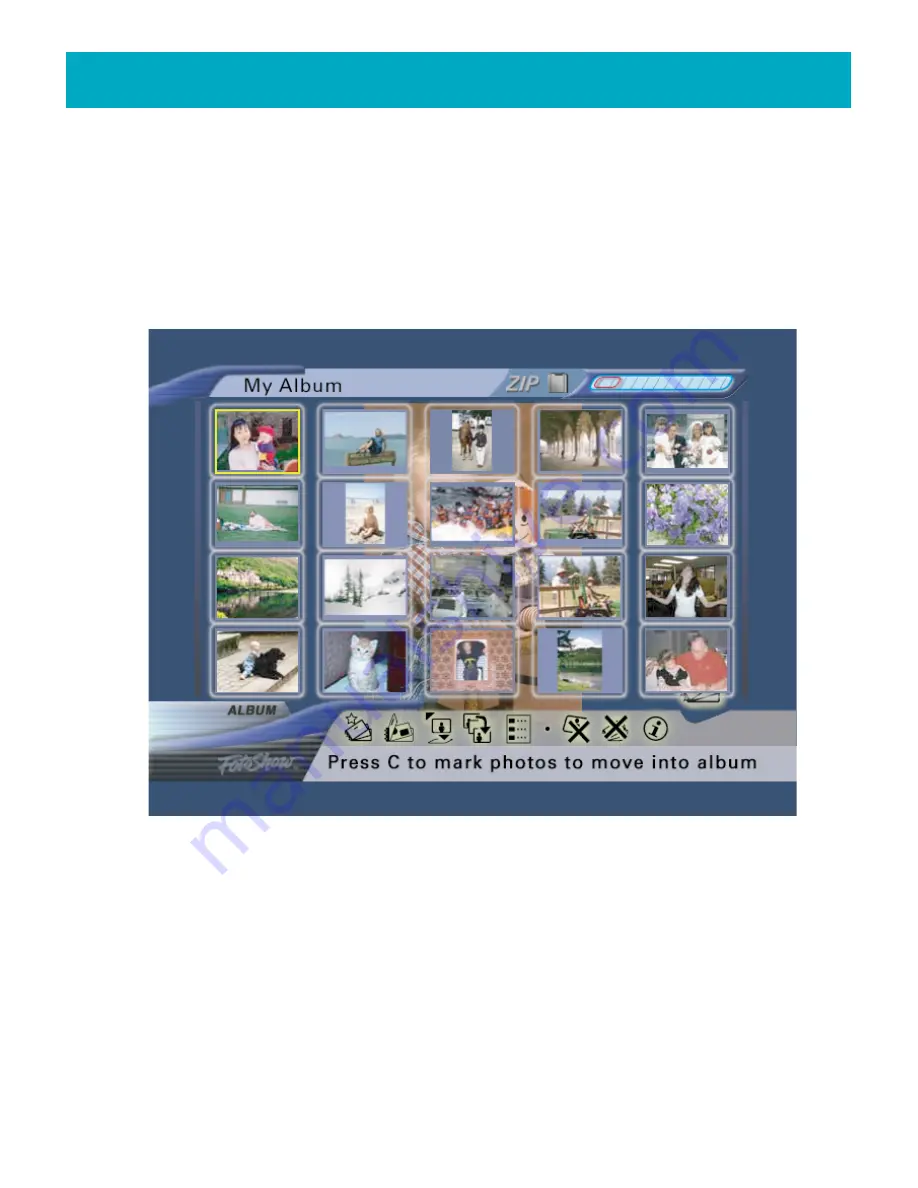
and operate in basically the same way. The main grid is the 

Photo Grid

. It displays

miniatures of your photos arranged in columns, and can be accessed easily from any of
the three sections of FotoShow

software by pressing the 

PHOTO GRID

button on your

FotoShow remote control.  

The Photo Grid is a browsing tool that allows you to get an overall view of the current
set of photos, and can be invoked from each of the three rooms: Album, Edit, and
Slideshow. In the Album and Slideshow rooms, the Photo Grid shows only the photos in
the current album or slideshow. In the Edit room, the Photo Grid shows all the photos on
the Zip

®

disk.

There are four other grid types used in your FotoShow

Image Center:

• The 

Arrange Grid

is used to reorder the photos within the current album or

slideshow.

• The 

Move In/Out Grid

is used to move photos between albums and add or remove

photos from slideshows.

• The 

Delete Grid

is used to select and mark photos for deletion.

• The 

Copy Grid

is used to view and select those pictures you would like to copy to

your Zip disk.

For a complete description of these grids, including instructions on how to use them,
please refer to the User Manual sections associated with them.

24

FotoShow

Digital Image Center User’s Manual

Summary of Contents for FotoShow Digital Image Center

Page 1: ...age Center with a TV set or digital camera For more information on using your FotoShow Image Center as an external Zip 250 USB drive please view the Zip drive Manual on the Zip disk that came with your FotoShow Digital Image Center To view the Zip Drive Manual you must have Microsoft Internet Exlplorer 4 0 or higher or Netscape Navigator 4 5 or higher installed on your system ...

Page 2: ...taining Warranty Service You must notify Iomega within the warranty period to receive warranty service For information on warranty service visit our website at http www iomega com supportpolicy html call 1 888 4 IOMEGA write to Iomega Customer Service at 1821 W Iomega Way Roy UT 84067 USA or contact your local Iomega dealer Iomega s specific customer support policies including fees for services an...

Page 3: ...eyboard 26 The Album Room 27 Alternate Photo Album Views 28 Using the Zoom Tool 28 Opening an Existing Album 29 Creating a New Album 29 Adding Photos to an Album 29 Removing Photos From an Album 30 Rearranging Photos in an Album 30 Choosing a Theme for Your Album 31 Deleting Unwanted Photos 31 Deleting an Entire Album 32 Using Album Info to Customize Your Album 32 Editing Your Pictures 33 Rotating...

Page 4: ...ow Image Center Automatically Eject A Zip Disk as Soon as I Insert it 58 What are the Zip Folder and All my Photos 58 How Do I Delete Photos from All My Photos 58 Why Doesn t the FotoShow Image Center Respond When I Press the Buttons on the Remote Control 58 Why Can t I Locate a Photo I saved in the Edit Room Yesterday 59 Why Do Some of My Photos Appear Sideways 59 How can I save the Changes witho...

Page 5: ...to albums that can be viewed on your TV Create slideshows and presentations that can be displayed on any TV Some TVs may require a special adapter sold separately Rotate crop and correct your digital photos Remove red eye from portraits Add effects such as sepia tone antique or black and white to your digital photos Display and edit JPEG graphics on your TV Be used as an alternative to expensive c...

Page 6: ... included with your FotoShow Image Center to hear any sound Auto Adapter Your FotoShow Image Center can be used to transfer digital photos from digital film SmartMedia CompactFlash cards and IBM Microdrives when it is not connected to either a TV or computer The FotoShow Auto Adapter allows you to plug your FotoShow Image Center into your car s cigarette lighter or power outlet This accessory allo...

Page 7: ...ntrols and Connectors 1 Power Connector 2 USB Connector For use with computers only NOTE This port is only used when connecting the FotoShow Image Center to a computer Do not use this port to connect other devices to your FotoShow Image Center 3 S Video Connector 4 Composite RCA Video Out Connector 5 Emergency Disk Eject Button recessed 6 Left Mono Audio Channel Out Connector 7 Right Audio Channel...

Page 8: ...ector on the back of your TV VCR or AV receiver 2 Connect the yellow RCA cable to the yellow RCA VIDEO OUT connector on the back of your FotoShow Image Center 3 Connect the RCA audio connector to the AUDIO IN connector on the back of your TV VCR AV receiver or stereo system Make sure you match the white cable connector with the white left mono AUDIO IN connector on the back of your TV VCR AV recei...

Page 9: ...ou connected the Red right RCA connector in step 3 make sure that you connect the red cable connector to the red right AUDIO OUT connector on the back of your FotoShow Image Center The red connector is optional 5 Connect the power supply to your FotoShow Image Center and then plug it into an outlet Press the POWER button on the FotoShow remote control Ensure the green power light on the front of t...

Page 10: ...e you will need to determine which connection type is appropriate for you Refer to the manual that came with your TV VCR or AV receiver or look at the back of the device to which you will be hooking your FotoShow image Center to determine the type of connectors that are available Select the appropriate connector for your TV VCR or AV receiver pictured below S Video Cable Your FotoShow Digital Imag...

Page 11: ...ulator instead of the TV Set your TV to the channel that you set on the RF modulator usually 3 or 4 Using an S Video Connector 1 Connect the S Video cable to the S VIDEO IN connector on the back of your TV VCR AV receiver 2 Connect the S Video cable to the S VIDEO OUT connector on the back of your FotoShow Image Center 3 Connect the RCA audio connector to the AUDIO IN connector on the back of your...

Page 12: ...nector is optional 5 Connect the power supply to your FotoShow Image Center and then plug it into an outlet Press the POWER button on your FotoShow remote control Ensure the green power light on the front of the FotoShow Image Center comes on after you have connected the power supply cable 6 Turn on your TV set and set it to the appropriate video input Most TVs will have either AUX auxiliary or VI...

Page 13: ...nter will be used for portable downloads without a TV when it is connected to the auto adapter When used for portable downloads you can transfer the content of your digital camera s SmartMedia or CompactFlash card to the FotoShow Image Center s Zip drive 1 Connect the FotoShow Auto Adapter to the power connector on your FotoShow Image Center and then plug it into your vehicle s cigarette lighter o...

Page 14: ... the up and down arrow buttons to select the slideshow titled Auto then press GO 5 Use the right and left arrow buttons to select Start Show Manual Auto then press GO 6 Use the right and left arrow buttons to select Start Show Manual then press GO 7 Use the arrow buttons to navigate through the slideshow Use either the down or right arrow button to move to the next slide Press either the up or lef...

Page 15: ...hing stops before pressing the COPY button Copying Selectively The FotoShow Image Center provides a simple way to transfer only the photos you want from your digital camera to your Zip disk You must have your FotoShow Image Center connected to a TV to copy your photos selectively from your digital film Follow these steps to transfer your important data 1 If your FotoShow Image Center is off turn i...

Page 16: ...PEG files will be copied to an album titled Album date Any non JPEG files will be copied to a folder titled Camera_Misc Non JPEG files will not be visible on your FotoShow Image Center You must have a computer to view the contents of the Camera_Misc folder Copying Everything the Simple Way The simplest way to copy the entire contents of your digital film involves little more than inserting your me...

Page 17: ...w these steps to transfer your photos quickly 1 If your FotoShow Image Center is on turn it off by pressing the POWER button on your remote control Make sure the power light on the front of your device is off NOTE The POWER button enables and disables the software only When the software is active the power light is on your FotoShow Image Center not only copies the files but prepares them to be dis...

Page 18: ...your Computer If your Computer is already equipped with a Zip drive insert a Zip disk into the drive 2 Save your JPEG photos or images to the Zip disk NOTE JPEG is the most common file format used by digital cameras The FotoShow Image Center is compatible with most JPEG formats however some less common JPEG formats such as CMYK JPEG progressive JPEG motion JPEG and JPEG 2000 JBIG are incompatible ...

Page 19: ...Move Photos In pg 29 Arrange Photos pg 30 Choose Theme pg 31 Delete Photos pg 30 Album Info pg 32 Rotate pg 33 Rotate Right pg 33 Rotate Left pg 33 Auto Fix pg 33 Remove Red Eye pg 34 Add Effect pg 34 Crop pg 35 Save pg 36 Save a Copy pg 36 Save Over pg 36 Undo Changes pg 35 Revert to Original pg 35 Undo Last Change pg 35 Photo Info pg 36 Name Photos Caption Name Caption Date Size Delete Albums pg...

Page 20: ...ul Flashing Red Not enough space on the Zip disk no files copied Solid Red Copy failed Verify all media and try again Flashing Yellow Reading your digital film Wait until the flashing stops before pressing the COPY button Using the Remote Control 1 Power Button activates the FotoShow software 2 A B and C Buttons perform various tasks in the FotoShow software depending on the screen 3 Back Button C...

Page 21: ...k Button Cancels the current task and returns to the previous screen 4 PHOTO GRID Button accesses the Photo Grid screen or marks all photos when in the Photo Grid screen 5 Directional Navigation arrow Buttons used to make on screen selections 6 GO Button selects current option 7 Menu Buttons the EDIT ALBUM and SLIDESHOW buttons change rooms in the FotoShow software 8 Help Button Accesses the FotoS...

Page 22: ...ure below NOTE Make sure the positive symbol on each battery lines up with the symbol inside the battery compartment 3 Replace the battery compartment door Your FotoShow remote control can be used up to 10 m 30 ft from the FotoShow Image Center See the next section for a description of the buttons on your remote control 300 1 0 m e te rs 3 0 ft 22 FotoShow Digital Image Center User s Manual ...

Page 23: ...tton to accept changes NOTE Your FotoShow Image Center has an internal battery that maintains the date and time however you may want to change the date and time for daylight savings To change the date and time remove the Zip disk then press the C button on the remote control to bring up the Set Clock dialog box View the FotoShow Image Center Tutorial Insert the Zip disk that came with your FotoSho...

Page 24: ...photos in the current album or slideshow In the Edit room the Photo Grid shows all the photos on the Zip disk There are four other grid types used in your FotoShow Image Center The Arrange Grid is used to reorder the photos within the current album or slideshow The Move In Out Grid is used to move photos between albums and add or remove photos from slideshows The Delete Grid is used to select and ...

Page 25: ...folder while using your Zip disk with a computer By default the FotoShow software opens in the Album room and then automatically selects the most recent album you used or opened If you are new to the program and there are no photos on the Zip disk you will need to copy some onto the disk before proceeding Feel free to use the sample photos that Iomega has provided on your FotoShow Zip disk If ther...

Page 26: ...mbols on the keyboard A Backspace B Space C Brings up the keyboard Accepts changes when done GO Enters current character into the text field BACK Discards changes NOTE The FotoShow software allows you to enter long names but may not display the full album name or caption If you want the whole album name or caption to be displayed make sure your album names are under 30 characters long Album names ...

Page 27: ...tos The A and B buttons turn the album pages two different images will be displayed The PHOTO GRID button allows you to see all of the photos in a grid of miniature sized images The Album room toolbar pictured here features effective easy to use tools to help you organize and display your favorite photos The Broken File icon will appear when a photo is unavailable for viewing Broken Files include ...

Page 28: ...hen you are in full screen mode the Zoom tool allows you to view high resolution photos in more detail This is not a cropping tool your photo will revert to its original condition when you stop using the Zoom tool You can view other photos in the same album without leaving full screen mode Use the arrow buttons to scroll through your photos in either direction 1 Select the photo you would like to ...

Page 29: ...e If you want the whole album name to be displayed make sure your album names are under 30 characters long 1 If the Album room toolbar is not visible press the ALBUM button on your FotoShow remote control 2 Press the Left and Right buttons to select the Open Create Album icon 3 Press GO 4 Select Create Album from the submenu 5 Press GO to bring up the Album List It will automatically highlight an ...

Page 30: ...e them to To delete the photo select the Delete Photos icon on the toolbar 1 Open or create an album see instructions above This will be the album that your photos will be removed from 2 Use the Left and Right buttons to highlight the Move Photos In Out icon 3 Press GO 4 Select the Photos Out icon in the submenu and press GO to automatically bring up the Photo Grid 5 Use the arrow buttons to move ...

Page 31: ...rrent album Press BACK to cancel and return without changes Deleting Unwanted Photos Use this tool to permanently delete photos from the Zip disk If you would like to remove the photos from an album keeping them for future use use the Move Photos Out tool on the Album room toolbar 1 Open the album containing the photos you want to delete 2 If the Album room toolbar is not visible press the ALBUM b...

Page 32: ...ation such as album name and the number of pictures an album contains You can also use this tool to modify the album s appearance You can show or hide photo captions and dates Use this tool to rename your photo album If you would like to add a caption to a photo use the Photo Info tool on the Edit room toolbar 1 Open or create an album 2 If the Album room toolbar is not visible press the ALBUM but...

Page 33: ...ckwise If you do not like the resulting rotation you can either continue rotating rotate in the opposite direction or use the Undo tool 1 Select the photo you would like to edit 2 If the edit room toolbar is not visible press the EDIT button on your FotoShow remote control to toggle on the toolbar 3 Press the Left and Right buttons to highlight the Rotate icon 4 Press Go 5 Select Rotate Left or Ro...

Page 34: ...d B buttons to zoom in or out in the Preview window 8 To fine tune the selection of the red eye press the arrow buttons to position the crosshair over the red area in the target eye 9 Press C to remove the red eye You can move the crosshair and press C again to get a better result if the eye was not selected properly 10 Press GO to accept the changes to the eye Press BACK to discard the changes 11...

Page 35: ...the arrow buttons to move the crop box to the desired position 8 Press Go to crop the photo Press BACK to cancel the operation 9 Save the cropped image using the Save tool on the Edit room toolbar NOTE The crop tool will always maintain a set aspect ratio the same aspect ratio as your TV You can change the scale but not the shape of the crop box Undoing Your Changes The Undo tool allows you to exp...

Page 36: ...oolbar 3 Press the Left and Right buttons to highlight the Save icon 4 Press GO to bring up the Save Photo dialog box 5 Select Save Over or Save a Copy explained above 6 Press GO to save your photo The Zip Disk icon in the upper right corner of the photo grid will help give you an idea of how much memory space is left on the current Zip disk The red portion of the Zip disk icon represents how much...

Page 37: ...ite photos Creating a New Slideshow Use this tool to create a new slideshow When your new slideshow is created you can add photos from any album on the Zip disk Adding photos to a slideshow does not move the photo from the album Instead the slideshow references the photo from the album that contains it When you delete a slideshow or one of the photos in it the slideshow quits referencing the photo...

Page 38: ...on the toolbar 2 Press the Left and Right buttons to highlight the Open Create Slideshow icon 3 Press GO 4 Press the Right or Left buttons to select the Create from Album icon from the submenu 5 Press GO to bring up the Album List 6 Choose the album you would like to save as a slideshow 7 Press GO to create the slideshow NOTE When you have created a slideshow from a album the new slideshow will au...

Page 39: ...will not remove the photo from its original location Slideshows reference and display your photos without moving them 1 Open or create the slideshow to which you want to add your photos 2 Press the Left and Right buttons to highlight the Add Remove Photos icon 3 Press GO 4 Highlight the Add Photos icon in the submenu and press GO to bring up the Album List 5 Choose an album to select photos from a...

Page 40: ...Repeat as necessary 7 Press GO when you have completed rearranging your photos Choosing a Theme for Your Slideshow Use this tool to select and apply a special theme to your slideshow The first choice listed on the Slideshow List is a full screen option it has no background color special border or other decoration The business themes are sized to work well with business presentations and uses muted...

Page 41: ...olbar is not visible press the SLIDESHOW button on your FotoShow remote control to toggle on the toolbar 3 Press the Left and Right buttons to highlight the Slideshow Info icon 4 Press GO to bring up the Slideshow Info box 5 Use the arrow buttons to select the tab that contains the information you wish to edit Name Delay or Transition 6 Press the C button to start editing For more information see ...

Page 42: ...lates NOTE When creating a Microsoft PowerPoint presentation for use with your FotoShow Image Center use bold sans serif fonts such as Arial Bold and Verdana Bold in sizes over 20 points 2 After you have saved your presentation select Save As from the File menu 3 In the Save As dialog box find or create the folder where you want to save your presentation You may want to save your presentation dire...

Page 43: ... and left arrow buttons to select Add Photos then press GO 16 Mark the slides that you want in your presentation Use the arrow buttons to move between images Use the C button to mark an image Press the Photo Grid button to mark all of the photos Use the GO button to add all of the marked images 17 Use the right and left arrow buttons to select Choose Theme then press GO 18 Use the up and down arro...

Page 44: ...rt the SmartMedia Reader the CompactFlash Microdrive Reader and the Copy Button Inserting Zip Disks When you insert a Zip disk the green activity light also the eject button on the Zip drive will flash momentarily then go out If the light continues to blink slowly push the disk eject button to eject the Zip disk then reinsert it CAUTION Never put anything into your Zip drive except 250MB or 100MB ...

Page 45: ...rectly may cause irreparable damage to either the media or the reader Inserting a CompactFlash card or Microdrive into the Zip drive slot may damage either the Zip drive or the media Inserting SmartMedia Cards Insert a 3 3v SmartMedia card into your FotoShow Image Center s SmartMedia card reader slot with the notch to the left and facing the drive When your digital film is properly seated in the r...

Page 46: ...e Center must be powered on for normal disk insertion and removal If you need to eject a disk during a power failure disconnect the power supply from the FotoShow Image Center and push a pen into the emergency disk eject hole on the back of the drive CAUTION Never use the emergency eject procedure while the power supply is connected to the FotoShow Image Center Never force a disk into or out of th...

Page 47: ...at has a Zip drive or you can attach your FotoShow Image Center to your computer and use it as an external Zip 250MB USB drive You can use your Zip disk to transfer files from your digital Camera to your computer for editing NOTE Your FotoShow Image Center s copy feature will allow you to copy any files that you have stored on your SmartMedia or CompactFlash card to a Zip disk however you will onl...

Page 48: ... about using 250MB and 100MB Zip disks and drives together 1 If the Zip 250 drive appears to hang when you are writing to a 100MB Zip disk you can verify that the drive is operating correctly by checking that the green activity light is blinking irregularly A slow steady blink may indicate a problem with the drive If there is a slow steady blink try pushing the disk eject button to eject the disk ...

Page 49: ...tMedia CompactFlash and Microdrive memory see Copying Files to the FotoShow Image Center on page 15 It is also important to backup the albums and slideshows you have created with your FotoShow Image Center In order to backup the files contained on your Zip disk you will need a computer The simplest way to copy your Zip disks is with the Iomega CopyDisk tool for PCs only Mac OS Users Follow the ins...

Page 50: ...matting Instructions for Mac OS Users NOTE You can use any Zip 250 drive that is connected to a computer to format your Zip disk If your computer does not already have a Zip drive follow the instructions on the the purple side of the FotoShow Digital Image Center QuickStart Guide to use your FotoShow Image Center with your computer 1 Follow the instructions on the purple side of the QuickStart Gui...

Page 51: ...pe from Mac to PC 6 Click Start to start formatting the Zip disk Using Read Write Protected Zip Disks IomegaWare software includes a special read write protect feature that requires a password in order for a disk to be accessed Your FotoShow Image Center cannot use disks that have any sort of read write protection Follow the steps below to disable your Zip disk s read write protection on a compute...

Page 52: ... you select the Save a Copy option Shutting Down the FotoShow Image Center The POWER button enables and disables the FotoShow software only When the software is active the power light is on your FotoShow Image Center not only copies the files but prepares them to be displayed on the TV When the software is inactive the power light is off your FotoShow Image Center will copy all of the files from y...

Page 53: ...sks in your Zip drive They will cause severe damage to the drive CAUTION Never put anything into your Zip drive except genuine 250MB or 100MB Zip disks Using disks that do not have these symbols may cause damage to your drive or loss of data For best results operate your FotoShow Image Center on a level surface when a Zip disk is inserted and in use If you wish to set your FotoShow Image Center on...

Page 54: ...e for your camera resolution and Zip disk size Resolution in Resolution in Zip 100 Zip 100 Zip 250 Zip 250 Megapixels pixels High Quality Good Quality High Quality Good Quality 0 3 640 x 480 375 730 940 1825 0 8 1024 x 768 170 390 425 974 1 2 1280 x 960 110 270 280 680 1 9 1600 x 1200 75 185 185 460 3 1 2048 x 1536 45 115 115 295 When creating a Microsoft PowerPoint presentation for use with your ...

Page 55: ...ep your FotoShow Image Center out of direct sunlight that can cause damage to Zip disks digital film or the FotoShow Image Center Direct sunlight may also cause your Zip disk to eject unexpectedly from the FotoShow Image Center Since the FotoShow Image Center is still active when the power light is off it will consume up to 4 Watts of electricity When using your FotoShow Image Center with the auto...

Page 56: ...TV VIDEO TV VCR or INPUT This button switches between video inputs If you are unsure about the type of video input your TV uses check the manual that came with your TV Your FotoShow Image Center has sound as well as video If you can hear sound but can t see any video double check the connection of the yellow RCA connector S Video connector or RF connector depending on your connection type If the p...

Page 57: ...ill not be cropped when it is viewed in a mode other than full screen If you wish to display your entire photo without cropping use the themes provided in both the Album and Slideshow rooms Why Doesn t My FotoShow Digital Image Center Display the Pictures I Take with My Digital Camera Your FotoShow Digital Image Center is capable of displaying JPEG images only Some digital cameras can use file typ...

Page 58: ... but you cannot change them in any way This is where your viewable digital negatives are stored Zip is the Root folder it contains all the images you have saved to the Root folder while using your Zip disk with a computer How Do I Delete Photos from All My Photos The photos in All My Photos actually can be deleted just not directly from All My Photos Use the Delete Photos tool in the Album room to...

Page 59: ...ut changing the original image stored on the Zip disk By default the copied version will be placed in the same album or folder as the original Use the Move Photos In Out tool to move the photo to another album How Can I Undo the Changes I ve Made to My Picture Whether you want to get rid of the last couple of changes or cancel all of your edits use the Undo tool on the Edit room toolbar Selecting ...

Page 60: ... table below for the estimated number of images you can save for your camera resolution and Zip disk size Resolution in Resolution in Zip 100 Zip 100 Zip 250 Zip 250 Megapixels pixels High Quality Good Quality High Quality Good Quality 0 3 640 x 480 375 730 940 1825 0 8 1024 x 768 170 390 425 974 1 2 1280 x 960 110 270 280 680 1 9 1600 x 1200 75 185 185 460 3 1 2048 x 1536 45 115 115 295 To get an...

Page 61: ...ll of the tools in every situation You would never for example need to undo changes if you have not yet made any Why Don t the Photos I Add to an Album Automatically Appear in the Slideshow I Created from that Album When you create a slideshow from an album you are referencing photos from an album as it currently exists Photos added at a later date will not be recognized until they are added with ...

Page 62: ...tent of the PictIQ folder may effect the way that your photos are displayed or cause long startup delays as the FotoShow software rebuilds to contents of the folder What is the Deleted_Albums Folder that I Found on My Zip Disk The FotoShow software moves any Non JPEG content of deleted albums to the Deleted_Albums folder when an album is created For example if you accidently delete an album that c...

Page 63: ...uct If the manual you select is a PDF file you will need Adobe Acrobat Reader to view it If you don t already have Adobe Acrobat Reader installed on your system you can download it from the Adobe Systems Incorporated web site http www adobe com Download the latest Iomega software The software that shipped with your Iomega product may be updated over time Choose Software Download from the Iomega we...

Page 64: ...m to 9 p m and Saturday from 7 a m to 2 p m Mountain Time Technical support hours are subject to change without notice Product Return or Repair For information on returning your Iomega product for warranty service or repair after the warranty period please visit our web support site at www iomega com support or call the Iomega Customer Service Hotline at 1 888 4 IOMEGA 1 888 446 6342 Because many ...

Page 65: ...u can purchase Iomega products Online at http www iomegadirect com U S Only Calling 1 800 MY STUFF 1 800 697 8833 U S Only Visiting your local computer store When purchasing Iomega products over the phone and on the Internet you can use your credit card Visa MasterCard American Express or Discover Simply select the option of interest to you 1 800 MY STUFF 1 800 697 8833 is available in the U S and...

Page 66: ...nce will not occur in a particular installation Interference can be determined by turning the equipment off and on while monitoring radio or television reception The user may be able to eliminate any interference by implementing one or more of the following measures Reorient the affected device and or its receiving antenna Increase the distance between the affected device and the computer equipmen...

Page 67: ...e not supported on systems running Windows 95 or Windows NT 4 0 Install IomegaWare software before you connect your Zip 250 drive CAUTION If you are running Windows 95 or Windows NT 4 0 only Iomega devices are supported on the USB connections after IomegaWare software is installed IomegaWare software enables you to use Iomega USB devices on computers with a built in USB connection running Windows ...

Page 68: ...The performance of all USB devices decreases as additional USB devices are connected You can ensure maximum performance by connecting your Zip drive directly to one of the USB connections on your computer instead of a USB hub or keyboard You can improve the reliability of your Zip USB drive by unplugging and reconnecting the power supply after a system crash or hang You can avoid some system locku...

Reviews: