background image

60126903-A

16

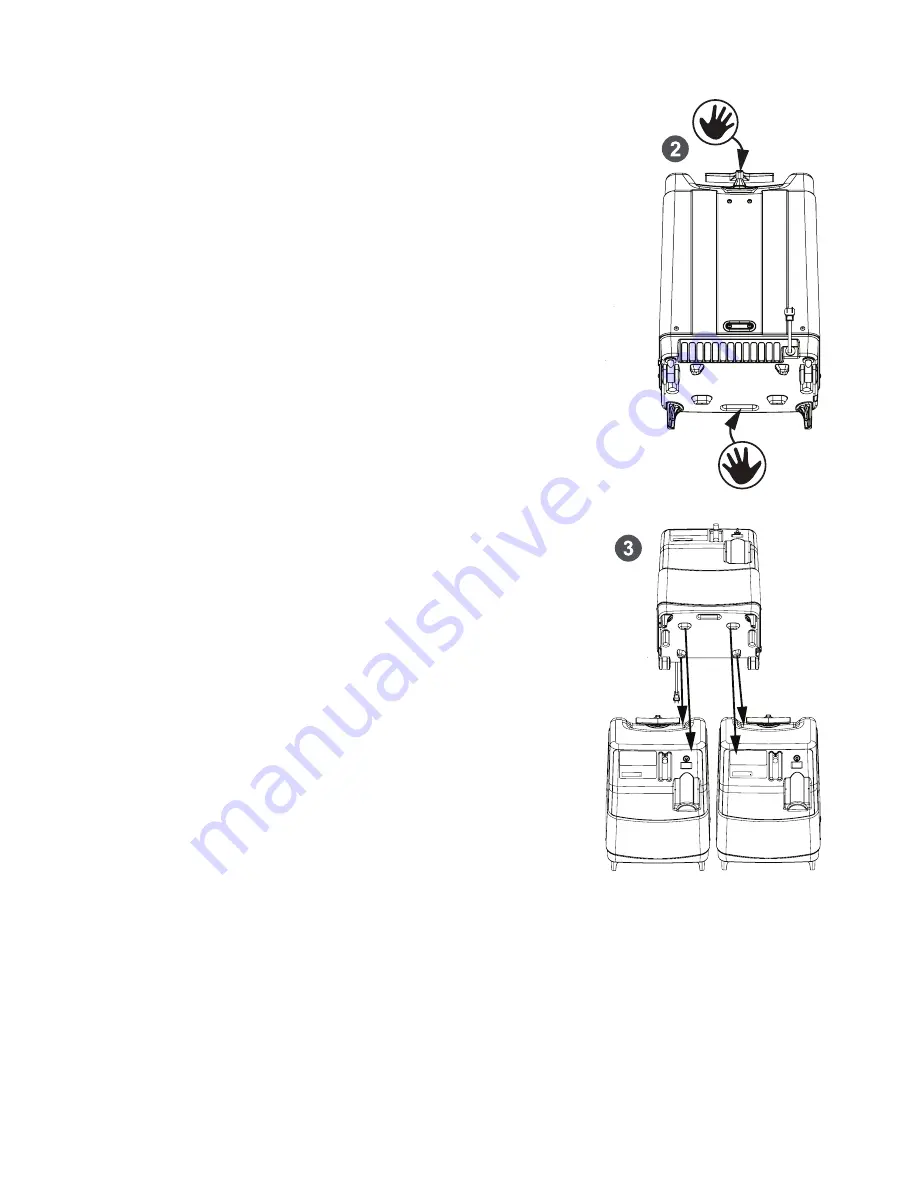
 2.  Lift a single unit by the top handle (in locked and retracted 

position) and front base hand cavity.

Fig. 4-2 Lifting hand positions

 3.  Place the unit on top of both units using alignment posts on 

the base of the top unit to nest the unit into the shroud 
indentations of the bottom two units.

Fig. 4-3 Aligning the top unit

Invacare® Platinum® 5NXG Oxygen Concentrator

Summary of Contents for Platinum 5NXG

Page 1: ...NXG Oxygen Concentrator P5NXG1 P5NXGC1 en Stationary Oxygen Concentrator User Manual This manual MUST be given to the user of the product BEFORE using this product this manual MUST be read and saved f...

Page 2: ...Elapsed Time Meter Hour Meter 28 6 Maintenance 29 6 1 Service Life 29 6 2 Cleaning the Cabinet 29 6 3 Disinfecting the Cabinet 29 6 4 Cleaning the Cabinet Filter 30 6 4 1 Vacuum the Filter 30 6 4 2 Wa...

Page 3: ...is section of the manual provides additional information about this label 1 Plug in the device 2 The start stop button will illuminate on the display 3 Press the start stop button on the display 4 Adj...

Page 4: ...nsport and Storage Temperature 15 MIN 95 MAX Transport and Storage Humidity Recycle Manufacturer Serial Number Reference Number 1 3 Intended Use The Invacare Platinum 5NXG oxygen concentrator is inten...

Page 5: ...s ONLY a licensed medical practitioner may order the purchase or use of this device 1 7 Patient Population Patients requiring supplemental oxygen at flow rates of 1 to 5 liters per minute 1 8 Descript...

Page 6: ...rease greasy substances and other combustibles are easily ignited and burn with great intensity in oxygen enriched air and when in contact with oxygen under pressure Smoking during oxygen therapy is d...

Page 7: ...off when not in use to prevent oxygen enrichment DANGER Risk of Death Injury from Electric Shock To reduce the risk of burns electrocution death or injury to persons DO NOT disassemble Refer servicing...

Page 8: ...ury or damage from misuse NEVER leave concentrator unattended when plugged in Make sure concentrator is off when not in use CAUTION Risk of Minor Injury Discomfort or Damage Use of this device at an a...

Page 9: ...G is to be used only for filling oxygen cylinders with the HomeFill Home Oxygen Compressor The outlet fitting does not affect concentrator performance Refer to the HomeFill System user manual for con...

Page 10: ...tion is needed Normal for operation WHITE WITH YELLOW DOT 50 82 Running Alarms Continue to use the concentrator unless the unit has shut down Inspect the device l Check cannula for kinks and check can...

Page 11: ...s and highlight the Error Code icon If there is no active error the display will show the last active error code Refer to 8 4 Error Codes page 37 for more information WHITE N A Firmware Version Press...

Page 12: ...for a description of the symbols on the Troubleshooting label 3 4 1 Symbols on the Labels DO NOT use oil grease or any other lubricants including hand lotion The color of the circle with diagonal bar...

Page 13: ...fier bottle etc used to deliver oxygen to the patient need to include a means to reduce the propagation of fire in the accessories for the safety of the patient and others If a commercially available...

Page 14: ...arton pull the strip around the entire carton Carefully lift off the top portion of the carton and remove any loose contents Remove the concentrator Unless the oxygen concentrator is to be used IMMEDI...

Page 15: ...Not moved transported or repositioned when stacked Any other use of stacking feature is considered misuse of the product and may cause instability damage or injury Units shall not be operated while i...

Page 16: ...nd front base hand cavity Fig 4 2 Lifting hand positions 3 Place the unit on top of both units using alignment posts on the base of the top unit to nest the unit into the shroud indentations of the bo...

Page 17: ...g image Increase in the horizontal direction never stacking units more than 2 high 3 on bottom 2 on top 4 on bottom 3 on top etc Follow steps 1 4 for correct placement of additional units Fig 4 5 Stac...

Page 18: ...out your concentrator and will serve as a reference as you use your concentrator 5 2 Transport The rear casters A and handle B allow for easy transport of the concentrator The handle adjusts and locks...

Page 19: ...Data page 41 Usage in environments other than those described may result in the need for increased equipment maintenance The air intake of the unit should be located in a well ventilated area to avoid...

Page 20: ...different from that to which the other device s is connected For additional information refer to 9 2 Electromagnetic Compatibility EMC page 43 5 4 Setting Up the Concentrator 5 4 1 Setting up the Hum...

Page 21: ...ottle 3 Thread the cap onto the humidifier bottle CAUTION Risk of Damage Confirm the humidifier bottle cap is not cross threaded on the humidifier bottle Fig 5 7 Thread the cap onto the bottle 4 Using...

Page 22: ...humidifier bottle adapter tube to the oxygen outlet connector on the concentrator When using tubing connections longer than 7 ft 2 1 m in length position the humidifier bottle as close to the patient...

Page 23: ...red individuals WARNING Risk of Injury or Death To reduce the risk of injury or death from illness Replace the nasal cannula on a regular basis Check with your home care provider or physician to deter...

Page 24: ...in 1 Plug in power cord to an electrical outlet 2 Press the start stop button A on the display to turn the unit on The panel lights will come on and the concentrator will beep confirming that the indi...

Page 25: ...KWISE Decrease the flow rate l COUNTERCLOCKWISE Increase the flow rate To properly set the flowmeter B locate the prescribed flowrate line on the flowmeter Next turn the flow knob until the ball C ris...

Page 26: ...d l Flow of oxygen Place the cannula over your ears and position the prongs in your nose as instructed by your home care provider or cannula manufacturer l No Flow of oxygen Check all cannula connecti...

Page 27: ...r or cannula manufacturer l No bubbles Check all cannula connections including humidifier bottle and accessories if applicable and repeat the procedure Contact a provider if bubbles are not present 3...

Page 28: ...is displayed on the display the unit is in normal operating mode and has reached an oxygen concentration of greater than 82 Once in normal operating mode the lights will be controlled depending on th...

Page 29: ...let openings DO NOT spray or apply any cleaning agent directly to the cabinet DO NOT hose down the product CAUTION Risk of Damage Harsh chemical agents can damage the concentrator To avoid damage DO N...

Page 30: ...he dirt is not removed with the vacuum follow the instructions in the next procedure for washing the filter 6 4 2 Washing the Filter Fig 6 1 Washing the Filter 1 Press the filter assembly on both side...

Page 31: ...oroughly with hot water 3 Air dry thoroughly To limit bacterial growth air dry the humidifier bottle thoroughly after cleaning when not in use Refer to 5 4 Setting Up the Concentrator page 20 6 6 Prev...

Page 32: ...replace every 3 years or between patients Patient Outlet HEPA Filter 3 years or 26 280 hours Replace every 3 years or between patients Estimated life and replacement cleaning intervals can vary due to...

Page 33: ...nula and extension tubing Check replace humidifier bottle tubing and connector if prescribed Check replace cannula mask and tubing Check clean or replace cabinet filter s Inspect cabinet for damage Ch...

Page 34: ...g for disposal 7 2 Wear and Tear Invacare reserves the right to ask for any item back that has an alleged defect in workmanship See Warranty that shipped with the product for specific warranty informa...

Page 35: ...Check the cannula for kinks blockages or obstructions l B Check the filter Clean the filter if dirty 2 If there is low or restricted oxygen flow check the following items l A Check the cannula for kin...

Page 36: ...XXXX 1 Check if flowmeter is set between 1 0 5 0 L min 2 Inspect cabinet filter 3 Inspect for kinks or blockages kinked cannula blocked vents etc 4 Restart unit using stop start button 5 Ensure device...

Page 37: ...th yellow dot Single audible beep with less than 20 second interval Oxygen Sensor Heater Short Failure L2010 Oxygen Sensor Out of Range High Failure L2020 Oxygen Sensor Out of Range Low Failure L2030...

Page 38: ...0 5 0 L min 2 Inspect cabinet filter 3 Inspect for kinks or blockages kinked cannula blocked vents etc 4 If alarm is still present contact provider White with red dot Constant Audible Alarm Low Oxyge...

Page 39: ...ocked vents etc 4 If alarm is still present contact provider White with red dot Constant Audible Alarm High Temperature Shut Down H4000 1 Inspect for blocked vents 2 Ensure device is in specified oper...

Page 40: ...ill present contact provider White with red dot Constant Audible Alarm x numeric value defined in the service manual Alarm Error Code Solution Symbol Indicator Light Color Sound Indication Notificatio...

Page 41: ...L min maximum For flowrates less than 1 L min we recommend the use of the Invacare PreciseRx Pediatric Flowmeter IRCPF16 Potential Obstruction Alert 0 L min to 0 5 L min The concentrator detects a con...

Page 42: ...CSA C22 2 60601 1 ISO 80601 2 69 Placement No closer than 12 in 30 5 cm from any wall furniture draperies or similar surfaces to assure sufficient air flow Avoid deep pile carpets and heaters radiato...

Page 43: ...XG Concentrator is intended for use in the electromagnetic environment specified below The customer or the user of the Platinum 5NXG Concentrator should assure that it is used in such an environment E...

Page 44: ...kV line s to earth Mains power quality should be that of a typical commercial or hospital environment Voltage dips short interruptions and voltage variations on power supply input lines IEC 61000 4 11...

Page 45: ...distance in meters m Field strengths from fixed RF transmitters as determined by an electromagnetic site survey ashould be less than the compliance level in each frequency range bInterference may occ...

Page 46: ...z 28 V m 870 18 Hz 28 V m 930 18 Hz 28 V m 1720 217 Hz 28 V m 1845 217 Hz 28 V m 1970 217 Hz 28 V m 2450 217 Hz 28 V m 5240 217 Hz 9 V m 5500 217 Hz 9 V m 5785 217 Hz 9 V m Portable and mobile RF comm...

Page 47: ...g to frequency of transmitter m 80 to 800 MHz d 3 5 10 P 800 MHz to 2 7 GHz d 7 10 P 710 745 780 5240 5500 5785 d 6 9 P 385 450 810 870 930 1720 1845 1970 2450 d 6 28 P 0 01 0 035 0 070 0 067 0 021 0...

Page 48: ...L4Z 4G4 Canada 800 668 5324 www invacare ca United States Invacare Corporation One Invacare Way Elyria Ohio 44035 Tel 800 333 6900 www invacare com Invacare Corporation One Invacare Way Elyria OH 440...

Reviews: