Interlogix TruVision NVR 20 Quick Start Manual Download Page 7


TruVision NVR 20 Quick Start Guide


7  -   EN   

To customize the settings for each camera press the 

Configuration parameters

 text to enter into the full 

configuration mode for the TVN 20. Please refer to the 
TVN 20 User Manual in the 

TVN 20 System Basics


section for complete instructions. 

Manual Add 

On the right-hand side of the main Config window is an 
area called IP Camera Config.  In this area the user can 
manually add in IP cameras one at a time. 


To manually add an IP camera: 

1.  Click on the channel number to add (D1, D2, 

D3…..). 

2.  The User can now populate the fields necessary on 

the IP Camera Config panel. 

3.  Under Login Mode select either 

IP

 Address or 

Domain

 Name. 

4. Under 

IP Address

 field input the IP address or the 

Domain name.  

5. Under 

Manufacturer

 select the Manufacturer’s 

name for the camera you wish to add (or specific 
type) from the dropdown list. 

6. Under 

Port

 select the communication port used by 

the IP camera. 

7.  Enter the IP Camera’s 

User Name

 and 

Password. 

8.

 Channel 

No. 

should be selected as

 1. 

9. Click 

Modify 

to add the camera.  The camera will 

appear in the display if the parameters entered are 
correct. 

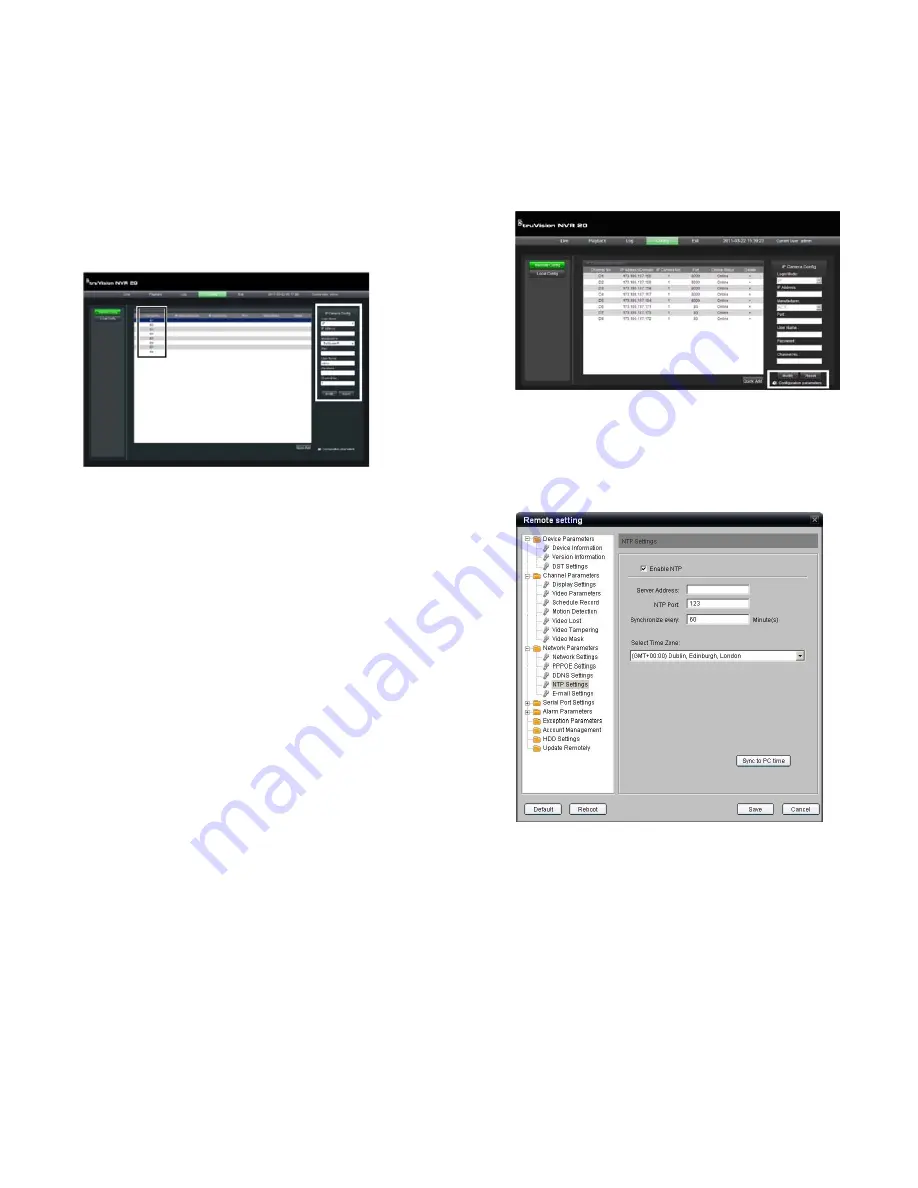
Time synchronization 

It is very important to have all IP devices in the system 
synchronized to the same time clock (TVN 20, IP 
Cameras, TVN 20 Browser PC).  The system provides 
two methods for time synchronization:  

• 

To the TVN 20 Browser PC’s time OR 

• 

To a NTP (Network Time Server) 

To setup time synchronization: 

1.  From the main Config page, select the Configuration 

parameters text to open the full device configuration 
pages. 


2.   From the left navigation window, select NTP 

settings. 

3.   The display will show the NTP/TimeSync options 

page. 


To Sync to the TVN Browser PC’s time: 

1. Make 

sure 

Enable NTP

 is NOT checked. 

2.  Near the bottom of the page click the button 

Sync to 

PC time

3. Press 

Save

The system will return to main 

Config

 page.  From here 

the User can select the Live or Playback tabs to view 
video or go back into the 

Configuration parameters

 for 

more detailed system configuration. 

Summary of Contents for TruVision NVR 20

Page 1: ...rews TruVision NVR 20 Quick Start Guide TruVision NVR 20 User Manual IP Camera Compatibility document WEE Compliance Declaration Battery Declaration The TruVision NVR 20 product documentation CD which...

Page 2: ...software 6 All hard drives are pre configured into a single recording group and allow all connected cameras to record the same duration of video across all cameras i e all cameras will record for the...

Page 3: ...ve to USB operation A buzzer alarm will sound if an incompatible USB device is detected Blue Archiving 7 Channel LEDs Shows the connected status of IP cameras to the TVN 20 also provides indication of...

Page 4: ...k needs This tool automatically identifies TruVision devices that support auto discovery anywhere on the network even different subnets The User can view and modify the IP address of any discovered de...

Page 5: ...ew in 9 Up with 4CIF VGA Camera OR Live view in 4 Up with up to 2 0 MpX Camera Intel E6550 Dual Core class Processor at 2 33 Ghz 4MB Cache 1GB RAM HD Video Card with 256 MB POWER USER OPERATION Live v...

Page 6: ...se cameras not discovered Quick Add 1 Login in to the TVN 20 using the default User Name and Password 2 The TVN 20 Browser will display the default Live Preview page 3 Click on the Config tab at the t...

Page 7: ...used by the IP camera 7 Enter the IP Camera s User Name and Password 8 Channel No should be selected as 1 9 Click Modify to add the camera The camera will appear in the display if the parameters enter...

Page 8: ...s local PC recording of all cameras active in the display 6 Stops Recording Stops manual recording of the displayed streams Item Name Description 7 8 Previous Page Next Page Allows the user to sequenc...

Page 9: ...l slider if audio is available 7 Expand Screen The display can be expanded to screen by pressing the Expand button in the upper right hand corner of the display 8 Recording Mode LEDs Recording Mode LE...

Page 10: ...ime stamp of the video The archive function simply copies the selected video to the USB device There are two methods available to archive video from the TVN 20 using a USB memory stick plugged into th...

Page 11: ...the archive off function is proceeding 12 When the device is full the ARCHIVE LED stops flashing the archive is completed and the device can be removed safely from the device Please do not remove the...

Page 12: ...EN 12 TruVision NVR 20 Quick Start Guide...

Reviews: