background image

42

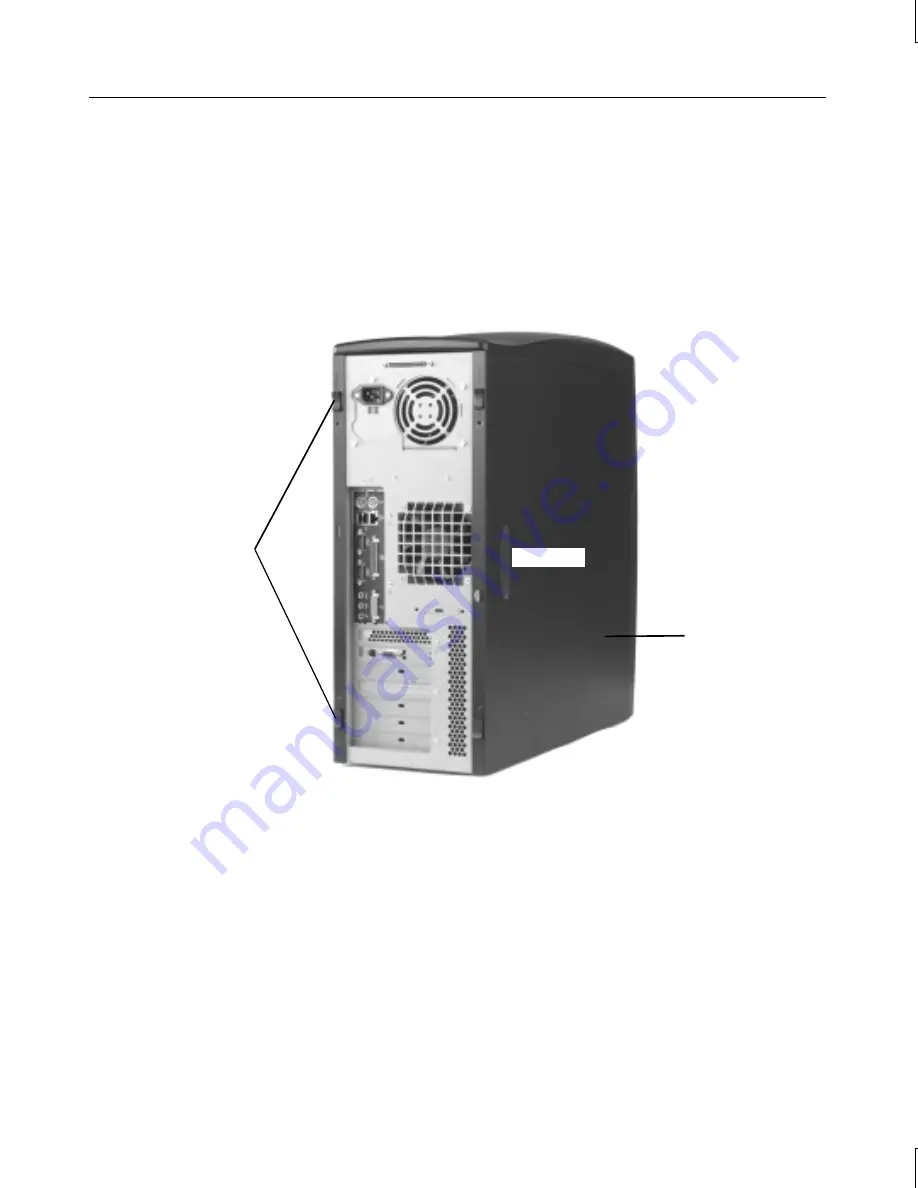
Removing and Replacing Side Panels

WARNING

The system is always on when connected to AC power.  Before opening the
system, disconnect the system’s power cord from its AC power outlet.

 WARNING Replace both side panels before operating the system.  This ensures proper

airflow for cooling and reduces electromagnetic interference (EMI) emissions.

NOTE

You can gain access to most internal components by removing the left side panel.

To remove a side panel:

1.


Slide both lock clips on the side panel away from each other (

UNLOCK

).

2.


Grasp the handhold on the panel, and pull the panel back and away from the chassis.

To replace a side panel:

1.


Ensure both lock clips on the side panel are in the 

UNLOCK

 position.

2.


Replace the panel onto the base unit, aligning the tabs on the inside of the panel with the
openings at the top and bottom of the chassis, and push the panel forward until it slides into
place against the faceplate.

3.


Slide both lock clips toward each other (

LOCK

).

Lock Clips

(2 each side)

Left Side Panel

Handhold

Summary of Contents for Zx10 Ultra-Tower

Page 1: ...Zx10 Ultra Tower System Guide May 2000 D1AA0033A...

Page 2: ...Tower are trademarks of Intergraph Computer Systems Intel and Pentium are registered trademarks of Intel Corporation ServerSet is a trademark of ServerWorks Corporation Microsoft Windows and Windows N...

Page 3: ...not use a tool for purposes other than instructed Internal components may be at high temperatures Allow time for them to cool before handling them Internal components can be damaged by static electri...

Page 4: ......

Page 5: ...SCSI Controller Driver Diskette 13 Creating an Emergency Repair Disk 13 Installing Driver Software 13 Installing QFE Software 13 What s Next 14 3 Configuring the System 15 Configuring the Video Displa...

Page 6: ...ve Errors 35 Miscellaneous Hardware 35 6 Reinstalling the Operating System 37 Before You Begin 37 Finding Driver Software 37 Installing the Operating System 38 Updating the Operating System 39 7 Gaini...

Page 7: ...sis Intrusion Alarm Switch 69 Power Switch System LEDs and Light Pipe 70 10 System Hardware and Specifications 73 Functional Diagram 73 Internal Peripheral Cabling 74 EIDE Cabling 74 SCSI Cabling 75 F...

Page 8: ...viii...

Page 9: ...ounter when using the system Chapter 6 Reinstalling the Operating System describes how to reinstall the operating system and associated system software if required Chapter 7 Gaining Access to System C...

Page 10: ...omer Support Intergraph Computer Systems hardware has a factory warranty ranging from 30 days to three years A detailed warranty description is available on the World Wide Web You can also take advant...

Page 11: ...ite to Intergraph Computer Systems You use your service number for warranty or maintenance calls Your Customer Personal Identification Number CPIN You get a CPIN the first time you call the Customer R...

Page 12: ...xii...

Page 13: ...documentation including Quick Setup System Guide System Board Manual and Late Breaking News if provided Operating system software CD diskettes and documentation Driver software CD System base unit an...

Page 14: ...th the system use shielded cables to prevent excessive electromagnetic interference EMI The cables delivered with the system reduce the amount of EMI produced by the system After placing the system co...

Page 15: ...3 AC Power Receptacle AC Voltage Selection Switch SCSI Port Typical Input Output I O Panel See next page Video Out Typical Blue SCSI Port Location Typical...

Page 16: ...bles from any USB peripheral devices to the USB ports 8 Connect the cable from any external SCSI peripheral devices or a SCSI terminator module to the SCSI port See Connecting External SCSI Devices in...

Page 17: ...Varies by system 4 PCI 64 bit 33 MHz Varies by system 5 PCI 64 bit 66 MHz Varies by system 6 PCI 64 bit 66 MHz Varies by system 7 PCI 64 bit 33 MHz Varies by system 7 Bottom ISA Varies by system CAUTI...

Page 18: ...a integrity and promote optimum performance Use the shortest cables possible to connect SCSI peripheral devices Use high quality SCSI cables to ensure adequate shielding impedance of 110 to 135 ohms T...

Page 19: ...he AC power outlet to which the system s power cord connects is close to the system and is easily accessible When you connect the system s base unit to AC power auxiliary power is applied to the syste...

Page 20: ...or on the front of the base unit and press the Power button What s Next You can do the following to prepare your system for use If you want to get going with the default setup go to Chapter 2 Setting...

Page 21: ...re is installed on the system s primary hard disk drive Installed system software includes Driver software for the SCSI controller graphics controller audio controller and mouse Driver software for pe...

Page 22: ...ation for your system from your network administrator Security role for your server in the domain primary domain controller backup domain controller or stand alone server If your server will be acting...

Page 23: ...e delivery media Going Through Setup CAUTION If you start the system and then turn it off before completing operating system Setup you will have to reinstall the operating system and associated system...

Page 24: ...ng system s Setup files If you delete the I386 directory from the system s hard disk you must have access to an operating system CD to use the operating system s Setup files After you complete Setup a...

Page 25: ...you have to reinstall the operating system or drivers later Because of production timing drivers for your system may have been revised after your system shipped from the factory You should check Inte...

Page 26: ...software for installation instructions What s Next See Chapter 3 Configuring the System to configure the system for use See Chapter 4 Operating the System for information on operating the system See...

Page 27: ...deo display You can also determine which type of graphics controller is installed on your system See the graphics controller documentation delivered with the system and any README files delivered with...

Page 28: ...space bar when prompted to display the Last Known Good menu If using the Last Known Good option fails to correct the video display problems you can obtain a functional video resolution by restarting t...

Page 29: ...a 10 Mbit 100 Mbit Ethernet network controller integrated on the system board The network controller features remote management and Wake On LAN capabilities The required driver software was installed...

Page 30: ...with the operating system Changing Drive Letters If you have more than one hard disk drive or CD ROM drive you may need to reassign system drive letters See the operating system Help for more informat...

Page 31: ...ist 6 Click Close and then click OK 7 When prompted click Yes to restart the system with the new settings or click No to continue with other tasks and use the new settings the next time you restart th...

Page 32: ...asic system operating parameters such as the amount of memory the boot sequence and the type of video display The BIOS is stored in flash programmable memory and reads the system parameters in the sys...

Page 33: ...controls access to the Power button the floppy disk drive the CD ROM drive and other front access peripheral devices To open the door 1 Lift the bottom of the door to swing it up and away from the fac...

Page 34: ...AUTION Shut down the operating system before powering down the system Simply pressing the Power button can cause data corruption or loss Use Automatic Shutdown or the operating system s shutdown optio...

Page 35: ...m than the operating system s shutdown function You can use this utility to shut down the operating system and power down the system in a number of ways To run Automatic Shutdown Double click the Auto...

Page 36: ...spend mode you must then power down the computer before you can restart the system The Automatic System Shutdown dialog also provides these functions Option Description Force All Processes to Terminat...

Page 37: ...ecautions when operating the system When restarting the system use the operating system controls instead of turning the power switch off and on Use the power switch only when instructed or as the last...

Page 38: ...h another key for application specific functions ALT Used with another key for application specific functions DELETE Deletes characters You can use the Windows keys with other keys to perform certain...

Page 39: ...to perform several actions Action Description Point Move the mouse to point to your selection on the screen Click Press and release the left mouse button once Double click Press and release the left...

Page 40: ...n pops out Before removing a diskette ensure the drive LED is not lit To remove a diskette push the eject button and pull the diskette out of the slot To protect the data on a diskette from being over...

Page 41: ...y sensors inside the computer Event information is reported to the Event Log and displayed graphically DMI Console gives easy access to the system s status and configuration information DMI Console wo...

Page 42: ...e guidelines for cleaning system components Item How To Clean Exterior Surfaces Wipe exterior surfaces of the base unit and the monitor screen with a soft cloth lightly moistened with a mild cleaning...

Page 43: ...al devices for troubleshooting help if there are problems these devices The following chapters in this document contain information and instructions that may be helpful when carrying out troubleshooti...

Page 44: ...the DIMM s If error persists replace the DIMM s Timer Not Operational Memory failure in the first 64 KB or Timer 1 on the system board is not functioning Call the Customer Response Center Processor Er...

Page 45: ...anging the boot sequence Power cable is not connected Open the base unit and ensure the power cable is connected Data cable is not connected Open the base unit and ensure the data cable is connected S...

Page 46: ...y the video cable is connected to the monitor and to the system s video out connector Graphics card is not properly seated in its socket Open the base unit and reseat the graphics card Selected resolu...

Page 47: ...the operating system tools and or notify your network administrator Plot node does not recognize your system Notify your network administrator Peripheral Drive Errors CD ROM drive LED does not light...

Page 48: ...ace the lithium battery on the system board DMA bus timeout message displays Reason Solution Failure in DMA bus logic has occurred Call the Customer Response Center Invalid configuration information f...

Page 49: ...hen reinstalling the operating system Exceptions include the network controller driver and the SCSI controller driver which you must install from diskette If updated versions of any drivers have been...

Page 50: ...n of the operating system Install any drivers that were not installed during Setup from the driver CD from diskettes or from other software CDs See the README files delivered with these drivers for in...

Page 51: ...aph Computer Systems online services Updating the Operating System Microsoft Service Packs and Service Releases contain the latest improvements and system fixes for Microsoft operating systems Service...

Page 52: ...40...

Page 53: ...hassis to protect against electrostatic discharge NOTE Right side and left side are as seen from the front of the system Avoiding Electrostatic Discharge Sensitive components inside the base unit can...

Page 54: ...g the left side panel To remove a side panel 1 Slide both lock clips on the side panel away from each other UNLOCK 2 Grasp the handhold on the panel and pull the panel back and away from the chassis T...

Page 55: ...To remove the faceplate 1 Open the door and stow it in the base unit You cannot remove the faceplate if the door is closed See Chapter 4 Operating the System 2 Remove both side panels See Opening and...

Page 56: ...push the faceplate onto the chassis until all tabs engage CAUTION Engage the tabs with care Do not apply more pressure than necessary System Components The following figure shows the system s major c...

Page 57: ...ht side and left side are as seen from the front of the system See Chapter 7 Gaining Access to System Components for details on opening the system and protecting against electrostatic discharge The pr...

Page 58: ...es Since a PnP card is ISA based you install it in an ISA slot NOTE Assign system resources for any non PnP ISA card and any non compliant PCI cards before installation See the Assigning System Resour...

Page 59: ...hapter 9 Servicing System Components for instructions CAUTION Spare blanking plates are included with the system Ensure that you cover an open slot with a blanking plate to ensure proper airflow for c...

Page 60: ...uration you can connect Ultra Ultra2 or Ultra3 SCSI peripheral devices to the SCSI port on the back of the base unit The port connects to Channel A of the SCSI controller See Chapter 1 Setting Up the...

Page 61: ...tle as possible Ensure that cables do not contact sharp metal surfaces or become excessively bent or twisted In particular SCSI cables should not have any creased bends Choosing SCSI IDs To determine...

Page 62: ...he last or only device on the SCSI chain enable SCSI termination Not the last or only device on the SCSI chain disable or remove SCSI termination 8 Ensure that the power switch on each peripheral devi...

Page 63: ...ternal EIDE SCSI device 5 25 in x 1 6 in EIDE Either Bay 4 External Floppy disk drive 3 5 in x 1 0 in N A Bay 5 Internal Disk drive 3 5 in x 1 0 in SCSI Bay 6 Internal Disk drive 3 5 in x 1 0 in SCSI...

Page 64: ...power and data connections to the system board see the System Board Manual Have the vendor s documentation available to follow instructions for setting the SCSI ID enabling or disabling termination i...

Page 65: ...tem memory configurations see the System Board Manual Upgrading Processors You can upgrade a single processor system by installing another processor As higher speed processors become available you can...

Page 66: ...54...

Page 67: ...system s power cord from its AC power outlet WARNING Internal components may be at high temperatures Allow time for them to cool before handling them WARNING Internal components can be damaged by sta...

Page 68: ...r outlet 1 Disconnect the power and data cables from the drive 2 Remove and retain the screws securing the floppy disk drive to its bay left side only 3 Slide the drive out the front of the base unit...

Page 69: ...e system s power cord from its AC power outlet WARNING The CD ROM drive contains a laser and is classified as a Class 1 Laser Product To prevent direct exposure to the laser beam and to avoid hazardou...

Page 70: ...e faceplate Internal Access Peripheral Device WARNING Mishandling a removed disk drive can cause the heads to crash Subsequent failures may not be noticeable for three to six months Handle disk drives...

Page 71: ...rews securing the device to the cage and remove it from the cage 5 Place the new device in the cage and secure it with the screws removed previously 6 Align the tabs on the top of the internal access...

Page 72: ...not bend twist drop or otherwise handle the expansion card carelessly Do not expose the expansion card to moisture or extreme temperatures Do not remove the expansion card from its antistatic package...

Page 73: ...e or extreme temperatures Do not remove the DIMM from its antistatic package until you are ready to install it Release Tab Notch DIMM socket DIMM To replace a DIMM WARNING The system is always on when...

Page 74: ...ensures proper termination for the processor bus without it the system will not function When you add a second processor you must remove this module and replace it with the new processor WARNING The...

Page 75: ...e processor module over the retention clips and the slot The processor module is keyed and fits only one way 3 Press the processor module down until it seats in the slot and the locking tabs on the re...

Page 76: ...cted Cable Connects to P1 and P2 ATX power connectors on the system board P3 through P8 CD ROM drive disk drives and other peripheral devices P9 Floppy disk drive 3 Remove and retain the screws securi...

Page 77: ...Reconnect the power cables to the system board and internal devices 8 Reconnect the AC power cable to the AC power receptacle at the back of the base unit chassis Cooling Fans Two internal fans ensur...

Page 78: ...ts housing and gently push the fan assembly into its housing until the release on top of the fan assembly engages 5 Connect the new fan s power cable to its power supply connector To replace the rear...

Page 79: ...ter 7 Gaining Access to System Components 2 Note where all cables are connected to the system board and then disconnect them from the system board 3 Note where expansion cards are installed and then r...

Page 80: ...n the appropriate expansion card sockets 7 Reconnect the remaining cables to the system board 8 Replace the top cover See Chapter 7 Gaining Access to System Components CMOS Clock Lithium Battery The C...

Page 81: ...onnect the system s power cord from its AC power outlet 1 Disconnect the alarm switch cable from its connector on the system board 2 Remove and retain the screws that secure the switch to the base uni...

Page 82: ...let 1 Remove the faceplate See Chapter 7 Gaining Access to System Components 2 Remove the internal access device cage See Internal Access Peripheral Device in this chapter 3 Disconnect the power switc...

Page 83: ...the keyhole in the chassis and then secure the switch to the chassis with the screw removed previously 4 Connect the power switch system LED cable to its connector on the system board 5 Replace the i...

Page 84: ...72...

Page 85: ...iled information on the system board and its components BIOS memory slots and sockets jumpers and connectors and ports Functional Diagram The following diagram shows the power and data signals of the...

Page 86: ...ces or become excessively bent or twisted In particular SCSI cables should not have any creased bends EIDE Cabling The installed EIDE cable connects the primary EIDE channel to the CD ROM drive and to...

Page 87: ...external SCSI port to SCSI Channel B Connect an external SCSI port only to SCSI Channel A A cable connects Channel B of the on board SCSI controller to up to three SCSI disk drives Cable connects SCS...

Page 88: ...ector Connects To 1 EIDE connector on system board 2 EIDE device 3 EIDE CD ROM drive installed cable or EIDE device optional cable Internal Access Device SCSI Cable 1 3 2 4 Connector Connects To 1 SCS...

Page 89: ...Supply and Cables Different power supplies are used in the different system configurations The power supply in each system is field replaceable See Chapter 9 Servicing System Components for details on...

Page 90: ...cable P9 These cables connect in daisy chains to the power supply and to each other as follows Power supply P3 P4 P5 Power supply P6 P7 P8 P9 P1 Connector Pinout Pin Signal Pin Signal Pin Signal Pin S...

Page 91: ...2 3 4 5 61 Nominal Output Voltages VDC 5 02 3 32 12 0 12 0 5 0 5 0 Maximum Current Rating ADC 40 40 15 0 5 0 5 1 5 1 Standby 5 0 VDC output voltage is always on 2 Maximum 5 0 V and 3 3 V combined powe...

Page 92: ...e bottom front of the base unit chassis The rear fan is mounted to the upper back of the base unit chassis under the system s power supply Both fans bring cool air into the base unit to force out warm...

Page 93: ...n DIMMs 10 ns 3 3V registered buffered 72 bit ECC Memory Type Synchronous Dynamic Random Access Memory SDRAM Memory Bus 133 MHz or 100 MHz 128 bits Memory Size 256 MB minimum 8 GB maximum Memory Expan...

Page 94: ...compatible DB25 Two serial COM 9 pin 16550 compatible DB9 Two Universal Serial Bus USB 12 MB sec One SCSI Ultra3 Video SVGA others vary by controller Audio Microphone line in line out MIDI game Networ...

Page 95: ...ured AC line voltage US 90 132 VAC 47 63 Hz 1 phase 15A 125 V receptacle AC line voltage International 180 264 VAC 47 63 Hz 1 phase 15A 250 V receptacle Power consumption 285 W 3 4 A at 120 VAC maximu...

Page 96: ...84...

Page 97: ...nter From Customer Name Customer Contact Phone Mail Address Reason for Return NOTE All returned equipment MUST be shipped in original Intergraph packaging to obtain warranty service WARNING Back up di...

Page 98: ...stem you will be assigned a RGA log number 3 Complete the RGA Form on the previous page entering the RGA log number obtained from the Customer Response Center Ensure that the address in the From secti...

Page 99: ...oration 9805 Kellner Road Huntsville AL 35894 TO Repair Depot RGA No ________________________ Intergraph Corporation 9805 Kellner Road Huntsville AL 35894 TO Repair Depot RGA No ______________________...

Page 100: ......

Reviews: