background image

25

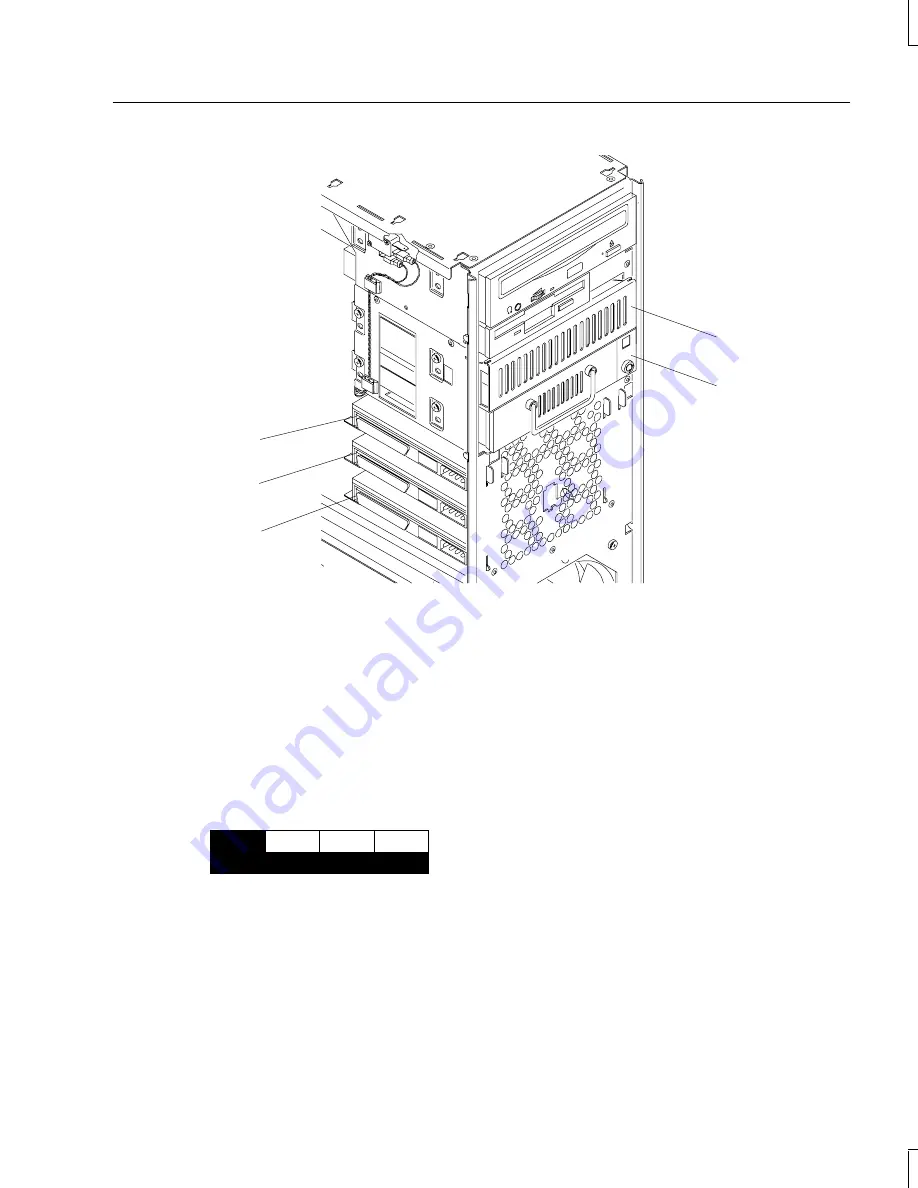
Bay 5

Bay 4

Bay 3

Bay 2

Bay 1

For technical information about the system board, refer to the online  System Reference
delivered with the system.  For technical information on the RAID controller, refer to the
InterRAID documentation.

Standard RAID Disk Drives Configuration

The standard configuration includes three RAID disk drives and one RAID controller.  The
disk drives are installed in bays 1, 2, and 3, and each one has a label to identify the drive,
such as:

ADP

0

4 GB

CH

1

ID

0

The spaces above ADP, CH, and ID are filled in before shipment to identify the drives.

ADP means the RAID controller number connected to the RAID section.  0 is the first, 1
is the second, 2 is the third, and so on.

CH means the RAID SCSI bus channel of the adapter (each adapter has two channels).

ID means the SCSI identification number of the drive.

Summary of Contents for InterServe 80 SL

Page 1: ...InterServe 80 System Setup December 1997 DHA025010 ...

Page 2: ...s documentation and any software and its file formats and audio visual displays described herein all rights reserved may only be used pursuant to the applicable software license agreement contains confidential and proprietary information of Intergraph Computer Systems and or other third parties which is protected by copyright trade secret and trademark law and may not be provided or otherwise made...

Page 3: ... the system that are not approved by the party responsible for compliance could void the user s authority to operate the equipment To reduce the risk of electrical shock do not attempt to open the equipment unless instructed Do not use a tool for purposes other than instructed Excessive continuous use of the Microsoft IntelliMouse can lead to repetitive strain injury if you are unfamiliar with its...

Page 4: ......

Page 5: ...CSI Device 5 SCSI Cable Length Guidelines 5 SCSI Cable Quality Guidelines 6 Device Connection 6 What s Next 7 2 Setting Up the Software 9 Preparing for Setup 10 Pre Installed Software 10 Before You Start Setup 10 Setting Up the Operating System Software 12 Using the Welcome Dialog Box 13 Creating Backup Diskettes 14 Creating an Emergency Repair Disk 15 Reviewing the System Introduction 15 Finding ...

Page 6: ...Updates 32 4 Operating Notes 33 Moving the System 34 Opening and Closing the Door 35 System Power Startup and Shutdown 35 Using the Standby Button 36 System Power States 37 Automatic Shutdown Utility 38 Starting the Automatic Shutdown Utility 38 Configuring the Automatic Shutdown Utility 38 Using the Automatic Shutdown Utility 39 Hardware Security Features 39 Serial and Model Numbers 40 BIOS Param...

Page 7: ...7 Sound 70 Video Display 71 Miscellaneous Hardware 71 Network 72 7 Reinstalling System Software 73 Before You Begin 74 System Software Products 74 Installing Windows NT Server 4 0 76 Configuring the Sound Driver 77 Configuring IDE ATAPI Bus Mastering 78 Getting Operating System Updates 78 8 Using System Resources 79 Option Cards 80 Interrupt Requests 80 BIOS Parameters 81 Get Technical 81 Index 83...

Page 8: ...viii ...

Page 9: ...how to use AMIBIOS Setup to configure the system s basic input output system BIOS u Chapter 6 Troubleshooting describes how to resolve common system problems u Chapter 7 Reinstalling System Software describes how to install the operating system and associated system software if required u Chapter 8 Using System Resources provides information on using system resources to configure the system for us...

Page 10: ...ems Welcome dialog You can also view theSystem Introduction by opening the SYSINTRO HLP file in the C WIN32APP SYSINTRO directory on your system System Introduction is a Windows Help 4 0 document Detailed reference information for your new system is provided in the System Reference which covers subjects such as the following u Opening and closing the unit u Precautions against electrostatic discha...

Page 11: ...m Intergraph s email server at info intergraph com Put help in the body of the message the subject line is ignored to get information on such subjects as Intergraph s online services and where to get World Wide Web browsers u Participate in the Intergraph Customer Forum ICF a bi directional gateway to the USENET newsgroup comp sys intergraph Anything posted to that group or sent to comp sys interg...

Page 12: ...graph s technical and marketing staff and with other Intergraph customers You can use the IBBS to get technical support information documentation and training information programs and software updates and fixes The IBBS is also available for you to give suggestions make inquiries and report problems To connect to the IBBS 1 Set your system s communications protocol for eight 8 data bits no parity ...

Page 13: ...rgraph FAXLink Use the Intergraph FAXLink to get technical support information by fax 24 hours a day 7 days a week From a touch tone phone or fax machine phone u Call 1 800 240 4300 to get new user instructions an index listing of available documents and an overview of the categories of available information u Call 1 205 730 9000 to order the documents up to 5 per call Follow the prompts provided ...

Page 14: ...xiv ...

Page 15: ...chapter to set up the hardware for your InterServe 80 Unpacking the System 2 Placing System Components 2 Setting Up the System 3 Connecting an External SCSI Device 5 SCSI Cable Length Guidelines 5 SCSI Cable Quality Guidelines 6 Device Connection 6 What s Next 7 ...

Page 16: ... cable u Monitor documentation NOTE If any of these items were not delivered call the Customer Response Center immediately at 1 800 633 7248 Save the packaging materials If you need to return equipment for repair it must be in its original packaging for you to obtain warranty service If you have already unpacked and connected the peripherals to the system go to Chapter 2 to begin software setup Pl...

Page 17: ... without first shutting down the system and turning off the power or damage to internal components may result See Chapter 4 for instructions on properly shutting down and powering off the system Setting Up the System Before you connect any cables to the back of the system note the connector locations in the following illustration Ultra SCSI Wide Ultra SCSI Optional Keyboard Mouse Serial COM 1 Para...

Page 18: ...akers or headphones Multimedia keyboard speaker Audio Line Out port External stereo cassette or CD player radio or other device Audio Line In port Multimedia keyboard microphone Microphone port Game joystick or MIDI device MIDI Game port Monitor Video port External SCSI device SCSI port WARNING If you do not use cables supplied by Intergraph Computer Systems you must use shielded cables to prevent...

Page 19: ...ndard external Ultra SCSI port An additional external Wide Ultra SCSI port is optional Ultra SCSI provides a maximum data transfer rate of 20 MB per second and Wide Ultra SCSI provides a maximum data transfer rate of 40 MB per second If you use a non Ultra or non Wide Ultra SCSI device data transfer rates are limited to the speed of that device Before you connect external SCSI devices to your syst...

Page 20: ... each device typically 8 inches 20 cm u SCSI cable between the system and the first device u SCSI cable between each device SCSI Cable Quality Guidelines To ensure data integrity and optimum performance do the following u Use only Intergraph Computer Systems SCSI cables Cables from other vendors may not provide adequate shielding u Use the shortest cables possible to connect SCSI devices to the sy...

Page 21: ...6 Ensure that the power switch on the SCSI device is in the off position and then connect the power cord to the device and then to an AC receptacle 7 Connect the system power cord to the AC receptacle 8 Turn on the power to the SCSI device and any other devices on the SCSI chain 9 Start the system by pressing the Standby power button 10 If necessary install the software drivers and configure the d...

Page 22: ...8 ...

Page 23: ...n as described in this chapter u Reinstall the operating system See Chapter 7 Reinstalling System Software for instructions to install the software completely from CD ROM and diskettes Preparing for Setup 10 Pre Installed Software 10 Before You Start Setup 10 Setting Up the Operating System Software 12 Using the Welcome Dialog Box 13 Creating Backup Diskettes 14 Creating an Emergency Repair Disk 1...

Page 24: ... Driver software for the on board SCSI adapter u Driver software for the on board network adapter u Driver software for the installed video display adapter u Driver software for the on board sound processor u Operating system network software TCP IP and NetBEUI u Quick Fix Engineering QFE update software fixes for operating system problems or limitations if needed u The default NT File System NTFS...

Page 25: ...le for your server before beginning system configuration You cannot change a server to a domain controller without reinstalling Windows NT Server A domain controller maintains security policy and performs user authentication for a domain Servers may be part of a domain although they do not have to participate in a domain See the operating system documentation for a detailed explanation of the diff...

Page 26: ...he monitor by pressing its power switch 2 Press the Standby button power switch on the computer The Standby button is on the front just below the external drive bays The system starts and after some file system conversion from FAT to NTFS the EULA screen displays on the monitor 3 Enter the Product Identification Number found on the Certificate of Authenticity included with your operating system do...

Page 27: ...on Using the Welcome Dialog Box for the next steps in setting up the operating system software Using the Welcome Dialog Box A Welcome icon displays on the desktop after Setup is complete You can use this shortcut to open the Welcome dialog which provides essential system information and utility features To open the Welcome dialog 1 Double click the Welcome icon The Welcome dialog displays 2 Do one...

Page 28: ...led on the system before shipment You may need these backup diskettes later for example if you have to reinstall a device driver or the operating system NOTE You may not have to create backup diskettes for all system software If Version Manager does not list drivers or other system software products then they are available on the operating system software CD or on backup diskettes delivered with e...

Page 29: ... of a damaged Registry that is at the time the operating system was installed along with the standard operating system drivers You should also update your Repair Disk after you finish configuring the system See the operating system documentation and Help for information on creating an Emergency Repair Disk or a Startup disk Reviewing the System Introduction Click the System Introduction tab and th...

Page 30: ...RO directory You may want to link the file to a Shortcut to make it easy to display See Windows NT Help for details on creating a Shortcut Finding Customer Support Information Click the Support tab for information on contacting Customer Support This information is also included in the Preface of this document ...

Page 31: ...perating system and use it to monitor workstations and servers also running Windows NT 4 0 When you add a system to Watchdog s monitored systems list Watchdog checks the system s Windows NT Event Log at regular intervals called polling intervals Watchdog looks for error messages warnings and informational messages from the InterSite and InterSTOR products in the application and system event logs I...

Page 32: ...er Event information is reported to the Windows NT Event Log Hardware Monitor provides a convenient easy to use interface to graphically display the information For example temperatures inside the system chassis display on color coded temperature scales You can tell at a glance if the internal temperatures are outside the optimal operating range and at what rate they are rising or falling InterSit...

Page 33: ...y to poll memory at user specified intervals thus warning of a potential Dual Inline Memory Module DIMM failure Your system hardware can correct single bit errors The ECCMEM driver polls a memory control register once every minute to determine if the hardware corrected a single bit error If the hardware corrected an error the ECCMEM driver reports the location of the DIMM If the driver reports man...

Page 34: ...20 ...

Page 35: ...aRAID Power Console Software 23 Configuring the RAID Disk Array 24 Basic RAID Hardware Information 24 Standard RAID Disk Drives Configuration 25 Additional RAID Disk Drives Configuration 28 Configuring the IntelliMouse 28 Configuring Networking 29 Adjusting Sound Quality 29 Reassigning Hard Disk Drive Letters 29 Changing Virtual Memory Settings 30 Configuring SCSI Peripherals 31 SCSI Configuration...

Page 36: ... the video display driver see the video display adapter documentation and Help delivered with the system and the README TXT files delivered with the video display drivers Correcting Video Display Problems If the system s video display is black not synchronized or distorted after you restart the system you may have a video configuration problem Do not press CTRL ALT DELETE to log on to the Windows ...

Page 37: ... Control Panel to reinstall and configure the display driver as described in the video display adapter documentation delivered with the system Restart the system to use the reconfigured video display driver If problems persist contact the Intergraph Computer Systems Customer Response Center for help Installing MegaRAID Power Console Software NOTE This section only applies to systems with RAID hard...

Page 38: ...nboard RAID This section describes the RAID hardware used in the system explains the standard RAID disk configuration and provides guidelines to configure additional RAID drives The standard RAID hardware is pre configured before shipment The following information is provided to help you understand how RAID is implemented which should be valuable if you need to configure additional RAID hardware B...

Page 39: ...e RAID disk drives and one RAID controller The disk drives are installed in bays 1 2 and 3 and each one has a label to identify the drive such as ADP 0 4 GB CH 1 ID 0 The spaces above ADP CH and ID are filled in before shipment to identify the drives u ADP means the RAID controller number connected to the RAID section 0 is the first 1 is the second 2 is the third and so on u CH means the RAID SCSI...

Page 40: ...0 inch high drives CH 0 ADP 0 CH 1 All the drives in the disk section are packed as one logical drive via MegaRAID Power Console This makes the drives in the system appear as one partition in Windows NT Disk Administrator u 4 GB disk drives result in a 12 GB partition at RAID level 5 u 9 GB disk drives result in a 27 GB partition at RAID level 5 u 18 GB disk drives result in a 54 GB partition at R...

Page 41: ...0 2 The default RAID configuration for the three standard RAID drives is as follows u RAID level 5 u Write through write policy u Cached I O policy u Two disk drives spin up every six seconds u Ultra SCSI enabled If you modify the RAID configuration and want to return to the default settings use the following procedure For details about using MegaRAID BIOS utility refer to the InterRAID documentat...

Page 42: ...Adapter menu select the Configuration submenu then select the Custom Configuration option 4 Select the unformatted RAID drives and configure them 5 When the configuration has been applied the Create Logical Drive dialog displays Set the logical drive options to your desired settings NOTE Before you select Apply note the amount of disk space displayed If this amount changes when you select Apply se...

Page 43: ... network to which the system is connected See the operating system documentation and Help for detailed information on setting up the operating system to use a network Adjusting Sound Quality The system is equipped with an on board sound processor To change sound quality do either of the following u Double click the speaker icon in the taskbar tray to display the audio mixer u Click the SRS icon in...

Page 44: ...before changing page file settings u The size of the page file If your system is equipped with a large amount of RAM Setup might create a page file that is unnecessarily large u Drive letter reassignments If you reassigned your drive letters you may find it necessary to adjust your page file settings To change the size and location of the virtual memory page file 1 From Start click Settings and th...

Page 45: ... so by Intergraph Computer Systems technical support or instructed to do so by the vendor documentation supplied with the SCSI device u If the SCSI device does not negotiate properly with the controller This is common on older drives u If you exceed the total cable length for connecting SCSI devices to the system as specified in the section Connecting an External SCSI Device in Chapter 1 u If you ...

Page 46: ...dapter Then continue with step 6 8 Select Sync Rate Megabytes sec and pressENTER 9 Select the appropriate rate Off 10 20 or 40 and press ENTER select Exit This Menu and then press ENTER 10 From the Device Selections menu select Exit This Menu and press ENTER 11 From the Utilities menu select Exit This Menu and press ENTER The Save Cancel menu displays 12 Select Save Changes and press ENTER 13 Remo...

Page 47: ... functions Moving the System 34 Opening and Closing the Door 35 System Power Startup and Shutdown 35 Using the Standby Button 36 System Power States 37 Automatic Shutdown Utility 38 Starting the Automatic Shutdown Utility 38 Configuring the Automatic Shutdown Utility 38 Using the Automatic Shutdown Utility 39 Hardware Security Features 39 Serial and Model Numbers 40 BIOS Parameters 40 ...

Page 48: ...tem CAUTION Do not use the bottom portion of the face panel or the lip at the top rear of the unit as a hand hold when moving the system Equipment damage and personal injury can result Do not lift here Do not lift here ...

Page 49: ... connect the power cord from the InterServe 80 to an AC power outlet auxiliary power is applied to the system This auxiliary power is available for the system to monitor among other things the Standby button After connecting the system to AC power press the Standby button momentarily to start the system The Standby button on the front of the system is not a traditional on or off power switch Depen...

Page 50: ... set the delay up to 30 seconds You should not set the delay to less than 5 seconds to ensure that you have time to stop system shutdown if needed See the following sections for more detailed information on using the Standby button starting the system and shutting down the system Using the Standby Button The Standby button is on the front left side of the InterServe 80 just below the external driv...

Page 51: ...se features also provide for future functionality such as remote system wake up See the online System Introduction delivered with the system for details One of the power management features is the implementation of power states The upper LED on the front panel indicates the system s current power state as shown in the following table LED Power State Description Explanation Green Working On System ...

Page 52: ... dialog box u Shutdown the Computer Starts the standard Microsoft Windows shutdown This option saves any windows settings that you changed writes information that is currently in memory to the system s hard drive and prepares the system to power down u Power down the Computer Performs an orderly shutdown of the operating system and powers down the computer This option saves any windows settings th...

Page 53: ...on without performing a system shutdown u Close the shutdown dialog without saving changes you made Click Cancel to do this u Stop or start the countdown timer Click the Stop Shutdown Start Shutdown button which toggles between Stop and Start NOTE If you select an option while the countdown timer is running the timer stops automatically Hardware Security Features The InterServe 80 provides you wit...

Page 54: ...of the chassis The model number is on a permanent label affixed on the back panel near the top BIOS Parameters The system uses the AMIBIOS Setup program which lets you customize the Basic Input Output system BIOS to suit your requirements and allocate resources for option cards Refer to Chapter 5 Configuring the BIOS for more information ...

Page 55: ...cements provided by Intergraph Computer Systems Overview 42 Starting AMIBIOS Setup 42 Using AMIBIOS Setup 43 Setup Menu 43 Standard 43 Advanced 45 Chipset 48 PCI PnP 50 Peripheral 52 Utility Menu 54 Language 54 Detect IDE 54 Security Menu 54 Supervisor User 54 Anti Virus 55 Default Menu 55 Original 56 Optimal 56 Fail safe 56 Reprogramming the BIOS 57 Assigning System Resources for Option Cards 59 ...

Page 56: ... Programming Utility FPU or FLASHPROG allows you to update the BIOS The AMIBIOS Setup menus and options discussed in this chapter are for BIOS 841xx ROM where xx is the version The BIOS version number displays as the system starts The message is similar to the following AMIBIOS C 1997 American Megatrends Inc C 1997 Intergraph Corporation 841xx For a summary list of all the parameters and their set...

Page 57: ...sing AMIBIOS Setup The AMIBIOS Setup menu allows you to change most of the BIOS settings The following section describes the parameters grouped in the AMIBIOS Setup menu The available parameters depend on your system configuration and your status as Supervisor or User Setup Menu Standard The Standard Setup menu allows you to set the IDE drive parameters set the system date and time and define flop...

Page 58: ...correct value from the keyboard NOTE The time displays in 24 hour format 3 Press ESC to save the new values and return to Standard Setup Floppy A Floppy B The Floppy A and Floppy B icons allow you to specify the type of floppy disk drive installed in the system The floppy disk drive A parameter is preset to 1 44 MB 3 5 inch Do not change the parameter unless you replace floppy drive A with a diffe...

Page 59: ...oot Device parameters These parameters can be modified only by the Supervisor Try Other Boot Devices This parameter enables the system to boot from the network if attempts to boot from the devices listed in the 1st 4th Boot Device parameters are unsuccessful The default is Yes Above 1 MB Memory Test When enabled this parameter invokes the Power On Self Test POST memory routines on the RAM above 1 ...

Page 60: ...display the Press F1 to RESUME message if an error occurs during boot up diagnostic tests If this setting is Disabled any non fatal errors will not generate the statement but the AMIBIOS will display the appropriate error message Hit DEL Message Display When set to Enable default the system provides a message during boot that the AMIBIOS Setup program can be accessed by pressing the DELETE key Dis...

Page 61: ...isabled System BIOS Cacheable Setting this parameter to Enabled default makes the BIOS code cacheable which improves overall system performance Cx000 16K Shadow When the system boots the BIOS code on ISA adapters is used directly from ROM Disabled or it is copied from the board s ROM to system RAM Overall system performance improves when copied to RAM Enabled When set to Cached default the BIOS is...

Page 62: ... Sound Controller This parameter enables or disables the sound processor circuitry on the system board The default is Enabled USB Function When set to Enabled default this parameter activates the system s two Universal Serial Bus USB ports H W Monitor Primary I O Port This parameter reserves the I O port used by the Hardware Monitor The default is 220 229hh Options are 190 199h 390 399h and Disabl...

Page 63: ...ssor When this parameter is set to Yes the BIOS enables single processor systems to use the multi processor kernel The default is No Memory Data Integrity Mode ECC mode default provides error correction for data stored in memory Parity mode provides error detection for data stored in memory The other setting is None Fixed Memory Hole When set to Enabled this parameter allows the memory in a RAM op...

Page 64: ...o transfer data to a second ISA option card at a faster rate than normal However the ISA option card must support Type F DMA transfers The default is Disabled Second Type F DMA Channel This parameter selects which DMA channel is used for Type F DMA transfers with the second ISA option card Not available grayed by default DMA Channel x Type This parameter specifies the functionality of the selected...

Page 65: ...apability of the PCI IDE controller The default setting is Enabled Use ESCD for PCI IRQ Assignment If this parameter is set to Yes when the system boots it reads ESCD data to determine how to assign IRQs to system devices and option cards You can use PnP operating systems to manipulate this ESCD data to assign specific IRQs to specific system devices and option cards on subsequent system boots Whe...

Page 66: ...cards that require a specific amount of memory and a set memory location The memory addresses available depend on the memory size you select The default is D0000 Peripheral The Peripheral Setup menu has parameters that affect option boards serial ports and parallel port functionality OnBoard FDC When set to Enabled the default this parameter enables the system floppy disk drive I O controller on t...

Page 67: ...f the parallel port by selecting a memory address The values are Disabled 278H 378H 3B8H and Auto The default is Auto The addresses correlate to an LPT port number as defined by the following table Parallel Port Address Interrupt LPT1 378 37A IRQ7 or IRQ5 LPT2 278 27A IRQ7 or IRQ5 LPT3 3BC 3BE IRQ7 or IRQ5 Parallel Port Mode This parameter allows you to change the parallel port mode setting The va...

Page 68: ...tomatically detect and configure any IDE drives you connect to the system For information on setting an IDE device to master or slave see the documentation accompanying the device Language The default for the AMIBIOS Setup program interface is English Detect IDE This parameter searches for IDE devices connected to the IDE controller Any IDE drive found is then made available for you to configure S...

Page 69: ... drives are not checked by the Anti Virus option When Anti Virus is enabled diskettes cannot be formatted unless a quick format is executed which does not write to Track 0 on the diskette A format that writes to Track 0 will not be performed The default is Disabled to allow formatting of diskettes in all circumstances Default Menu The BIOS contains three configurations stored in CMOS RAM Original ...

Page 70: ...e loaded during reboot NOTE When using the Flash Programming Utility to reprogram the flash EPROM with a new BIOS you must select this option after running the Flash Programming Utility and then rebooting to ensure the new BIOS values are used To load the Optimal BIOS values 1 Select the Optimal icon to load the best case BIOS values The following message displays Load Optimal Values 2 Select Yes ...

Page 71: ...ystem Boot Sequence in this chapter When you reprogram the flash EPROM resource assignments for ISA option boards and PC Card devices are lost Your system may have installed ISA option boards or PC Card devices that require specific system resources such as interrupts IRQs or input output I O port addresses If so after reprogramming the BIOS you must run the BIOS Setup again and reallocate the sys...

Page 72: ...ing to run the FLASHPROG product flash exe The following messages display depending on the version of your BIOS Intergraph flash programming utility Reading 841xx ROM Programming flash EPROM Flash EPROM updated Reboot the system by turning the power off Do not use ctrl alt del for rebooting 8 Remove the diskette from the floppy disk drive then power off and restart the system 9 When the following ...

Page 73: ...f memory for ISA option cards that require a fixed amount of memory ISA Reserved Memory Address Change as appropriate to allocate the required memory for ISA option cards that require a set location The available values depend on the amount of memory allocated in the ISA Reserved Memory Size parameter u To assign resources for PC PnP and non compliant PCI option cards change the PCI Slot x IRQ Pri...

Page 74: ...optimize system performance Fail Safe settings are the minimum settings required to boot the system these values do not provide optimal performance If you customize BIOS values you can reset the settings by selecting the Optimal option on the Default menu See page 56 for details N A indicates that a parameter is not available Setup Menu Standard Submenu Parameter Optimal Fail Safe Pri Master CD RO...

Page 75: ...led L1 and L2 Cache Mode WriteBack Disabled L2 Cache ECC Mode Disabled Disabled System BIOS Cacheable Cached Disabled Cx000 16K Shadow Cached Disabled Dx000 16K Shadow Disabled Disabled Setup Menu Chipset Submenu Parameter Optimal Fail Safe Onboard SCSI Controller Enabled Enabled Onboard Network Controller Enabled Enabled Onboard Sound Controller Enabled Disabled USB Function Enabled Disabled H W ...

Page 76: ...m No No PCI 2 1 Latency Compliance Enabled Disabled PCI Latency Timer PCI Clocks 40h 40h PCI VGA Palette Snoop Disabled Disabled Allocate IRQ to PCI VGA Yes Yes PCI IDE Bus Mastering Enabled Disabled Use ESCD for PCI IRQ Assignment No No PCI Slot x IRQ Priority Auto Auto DMA Channel x Usage PnP PnP IRQ x Usage PCI PnP PCI PnP ISA Reserved Memory Size Disabled Disabled ISA Reserved Memory Address D...

Page 77: ... Parallel Port IRQ N A N A Parallel Port DMA Channel N A N A Onboard IDE Primary Disabled Security Menu Parameter Optimal Fail Safe Supervisor N A N A User N A N A Virus Detect N A N A Utility Menu Parameter Optimal Fail Safe Language English Detect IDE Default Menu Parameter Optimal Fail Safe Original N A N A Optimal N A N A Fail safe N A N A ...

Page 78: ...64 ...

Page 79: ...ubleshooting Use this chapter to identify and resolve common system problems of the base unit Checking the System 66 System Power 67 System Boot 67 Sound 70 Video Display 71 Miscellaneous Hardware 71 Network 72 ...

Page 80: ...her attached accessories refer to the accessory documentation for troubleshooting help If these tips do not help resolve your problem refer to the following sections for more detailed troubleshooting If you cannot resolve the problem or if the instructions direct you to call the Intergraph Computer Systems Customer Response Center call 1 800 633 7248 See the Preface of this document for other info...

Page 81: ...wer cables are connected properly Faulty power cord Replace power cord System Boot ERROR Does not boot from expected boot device Reason Solution Boot sequence not correctly set Change the boot sequence See Chapter 5 Operating system not on the system drive Install the operating system as described in Chapter 7 ERROR Series of beeps and error messages display Message Explanation and Solution Refres...

Page 82: ...esponse Center Display Memory Read Write Error The sound controller is faulty Call the Customer Response Center ROM Checksum Error The ROM checksum value does not match the value encoded in the BIOS Call the Customer Response Center CMOS Shutdown Register Read Write Error The shutdown register for CMOS RAM failed Call the Customer Response Center Cache Error External Cache Bad The external cache i...

Page 83: ... installed Disable the SCSI termination See the documentation shipped with the hard disk drive Some viruses cause the system to not recognize hard disk drives Run a virus scan program that checks the Master Boot Record Clear any viruses detected by the program ERROR CD ROM drive is not recognized Reason Solution CD ROM drive power cable not attached Open case and ensure power cable is properly att...

Page 84: ...stalled in ISA slot Remove ISA board then restart the system See the online System Reference Sound ERROR Sound cannot be heard Reason Solution Volume of speakers on multimedia keyboard is low or off Adjust volume up release Mute button or set slider switch to speaker position on multimedia keyboard Speaker cable is not properly connected Verify cable is properly connected Volume is turned off in t...

Page 85: ... resolution is not supported by the monitor Select a supported resolution See the graphics card documentation and README TXT file for resolution details Improper video display driver installed Remove the driver and install a valid driver See Chapter 3 Miscellaneous Hardware ERROR CD ROM drive LED does not light Reason Solution CD ROM drive power cable not attached Open case and ensure power cable ...

Page 86: ...ify your System Administrator Incorrect software configuration Notify your System Administrator ERROR Cannot plot to network plotter on LAN Reason Solution Ethernet cable disconnected Reconnect Ethernet cable ensure proper connection Plotter not added to Print Manager on your system Notify your System Administrator Plot node does not recognize your system Notify your System Administrator ...

Page 87: ...ssociated system software on your InterServe 80 Before you reinstall the software ensure that you read and understand the entire chapter Before You Begin 74 System Software Products 74 Installing Windows NT Server 4 0 76 Configuring the Sound Driver 77 Configuring IDE ATAPI Bus Mastering 78 Getting Operating System Updates 78 ...

Page 88: ...red with expansion boards NOTE You must install certain drivers from backup or other diskettes The correct driver versions may not be on CD ROM If a driver version is delivered on backup diskette or in Version Manager that version should be used instead of what is available on CD ROM Driver software is routinely improved and updated Check the Intergraph Bulletin Board Service IBBS and Intergraph O...

Page 89: ...AID Power Console Driver and Utilities Version Manager and diskette MSMOUSEDRV Microsoft IntelliMouse Driver Version Manager and diskette PCITOKRNG OLICOM Token Ring Driver Vendor diskette QFE_NTS Quick Fix Engineering Update Version Manager and diskette if needed RNSFDDI Rockwell FDDI Driver Vendor diskette SHUTDOWN Automatic Shutdown Utility Version Manager and diskette SMARTDRV InterSite Smart ...

Page 90: ...ess ENTER 3 Press ENTER again to select the system disk driver AMI MegaRAID displays for internal RAID option or Symbios Logic PCI displays for a non RAID system disk Setup returns to the device driver selection screen 4 Press S again to manually install the IDE CD ROM driver 5 Use the arrow keys to highlight the IDE CD ROM ATAPI 1 2 PCI IDE driver and press ENTER 6 Continue Setup as prompted u Al...

Page 91: ...river If you reinstall Windows NT and the associated system software you should configure the sound driver to ensure quality audio capability To configure the sound driver 1 Click Start Programs Accessories Multimedia and then click Volume Control The Master Out window displays 2 From Options click Properties The Properties dialog box displays 3 Click Playback In the Volume Controls list click Mas...

Page 92: ...ATAPI devices 3 Click the Enabled button for each channel with IDE ATAPI devices 4 Click OK 5 Restart the system Getting Operating System Updates Microsoft Service Packs contain the latest improvements and system fixes for Microsoft operating systems Service Packs are created by Microsoft for post release support You can get Service Packs from the Microsoft World Wide Web and FTP sites free of cha...

Page 93: ...s information about option cards interrupt requests IRQs and the basic input output system BIOS This information is useful for installing various types of cards into the system Option Cards 80 Interrupt Requests 80 BIOS Parameters 81 Get Technical 81 ...

Page 94: ...he BIOS so the necessary system resources will be allocated to the card Do this before installing the card u PnP PnP cards are ISA cards that contain configuration registers like PCI cards During startup the system BIOS automatically detects the installed card and assigns the necessary system resources Since a PnP card is ISA based you install it in the ISA slot Interrupt Requests If you install a...

Page 95: ... the AMIBIOS Setup program which lets you customize the basic input output system BIOS to suit your requirements and allocate resources for option cards Refer to Chapter 5 Configuring the BIOS for more information Get Technical See the online System Reference delivered with the system for additional information on system resources such as Direct Memory Addresses DMA PCI and ISA interrupt lines and...

Page 96: ...82 ...

Page 97: ...d reprogramming 57 summary of optimal and fail safe settings 60 BIOS parameter 1st 4th Boot Device 45 Above 1 MB Memory Test 45 AGP Aperature Size 49 Allocate IRQ to PCI VGA 51 Boot to PnP Operating System 50 Build MPS Table for Uniprocessor 49 Cx000 16K Shadow 47 Date Time 44 DMA Channel x Type 50 DMA Channel x Usage 51 Dx000 16K Shadow 47 EPP Version 53 First Type F DMA 50 First Type F DMA Chann...

Page 98: ...nnel 50 Secondary Master 43 Secondary Slave 43 Serial Port 2 Mode 53 Server Monitor DMA Select 49 Server Monitor I O Select 48 BIOS parameter Continued Server Monitor IRQ Select 49 Server Monitor Memory Select 49 System BIOS Cacheable 47 System Boot Up Num Lock 46 System Keyboard 46 Try Other Boot Devices 45 Typematic Rate 46 USB Function 48 Use ESCD for PCI IRQ Assignment 51 VGA Frame Buffer USWC...

Page 99: ...D Default Menu AMIBIOS Setup 55 DMI Console 19 Document about ix conventions ix Document organization ix Domain controller 11 Door opening and closing 35 E ECC Memory Monitoring Utility 19 Emergency Repair Disk Windows NT creating 15 Ergonomics xi Errors miscellaneous hardware 71 network 72 sound 70 system boot 67 system power 67 video display 71 EULA Microsoft End User License Agreement 12 Extern...

Page 100: ...ettings 56 Optimal BIOS settings 56 Original BIOS settings 56 M MegaRAID Power Console software installing 23 Microsoft End User License Agreement EULA 12 Miscellaneous hardware errors 71 Model number location 40 N Network configuring 29 errors 72 information 11 Non compliant PCI cards assigning system resources 59 O Opening system door 35 Operating notes 33 Operating system getting updates 32 inf...

Page 101: ... up hardware 1 operating system 12 system 9 Settings hard disk drive letters 29 virtual memory 30 Setup preparing for 10 Setup files Windows NT 13 Setup Menu AMIBIOS Setup 43 Shutdown Utility 38 Software setting up 9 Sound adjusting quality 29 configuring driver 77 errors 70 Standby button using 36 Startup diskette Windows 95 creating 15 Synchronous data transfer rate changing 32 System asigning r...

Page 102: ...figuring 22 errors 71 last known good 22 problems correcting 22 Virtual memory settings changing 30 W Welcome dialog backup diskettes creating 14 customer support information 16 DMI Console 19 ECC Memory Monitoring Utility 19 Emergency Repair Disk 15 InterSite 17 InterSite Hardware Monitor 18 InterSite Watchdog 17 Startup diskette 15 System Introduction document 15 using 13 Version Manager 14 Wind...

Page 103: ...Customer Response Center From Customer Name Customer Contact Phone Mail Address Reason for Return NOTE All returned equipment MUST be shipped in original Intergraph packaging to obtain warranty service WARNING Back up disk drives before returning equipment Intergraph is not responsible for data lost in shipping or repair process ...

Page 104: ...ystem you will be assigned a RGA log number 3 Complete the RGA Form on the previous page entering the RGA log number obtained from the Customer Response Center Ensure that the address in the From section is the location to which you want the equipment to be returned 4 Place the RGA form in the box containing the equipment This form must accompany returned equipment 5 Secure a Repair Depot address ...

Page 105: ...poration 9805 Kellner Road Huntsville AL 35894 TO Repair Depot RGA No _______________________ Intergraph Corporation 9805 Kellner Road Huntsville AL 35894 TO Repair Depot RGA No _______________________ Intergraph Corporation 9805 Kellner Road Huntsville AL 35894 ...

Page 106: ......

Reviews: