Innovative Neurotronics The WalkAide System Clinical Manual Download Page 19

34

35

5.6  Exercise Mode Settings

WalkAide can be used as a therapeutic modality, as an adjunct to therapy or as a way to 
condition the user’s nerve or muscle.  It is intended to be used only while the user is seated.  

Change the Exercise settings from the Verify WalkAide settings screen of the Standard 
Program (Figure 47) or Exercise Settings tab of the Rapid+ or Adjustment screen (Figure 41).

The Exercise settings ranges are as follows:
 

On Time: 1 - 5 seconds


Off Time: 1 - 10 seconds


Exercise Duration: 1 - 30 minutes

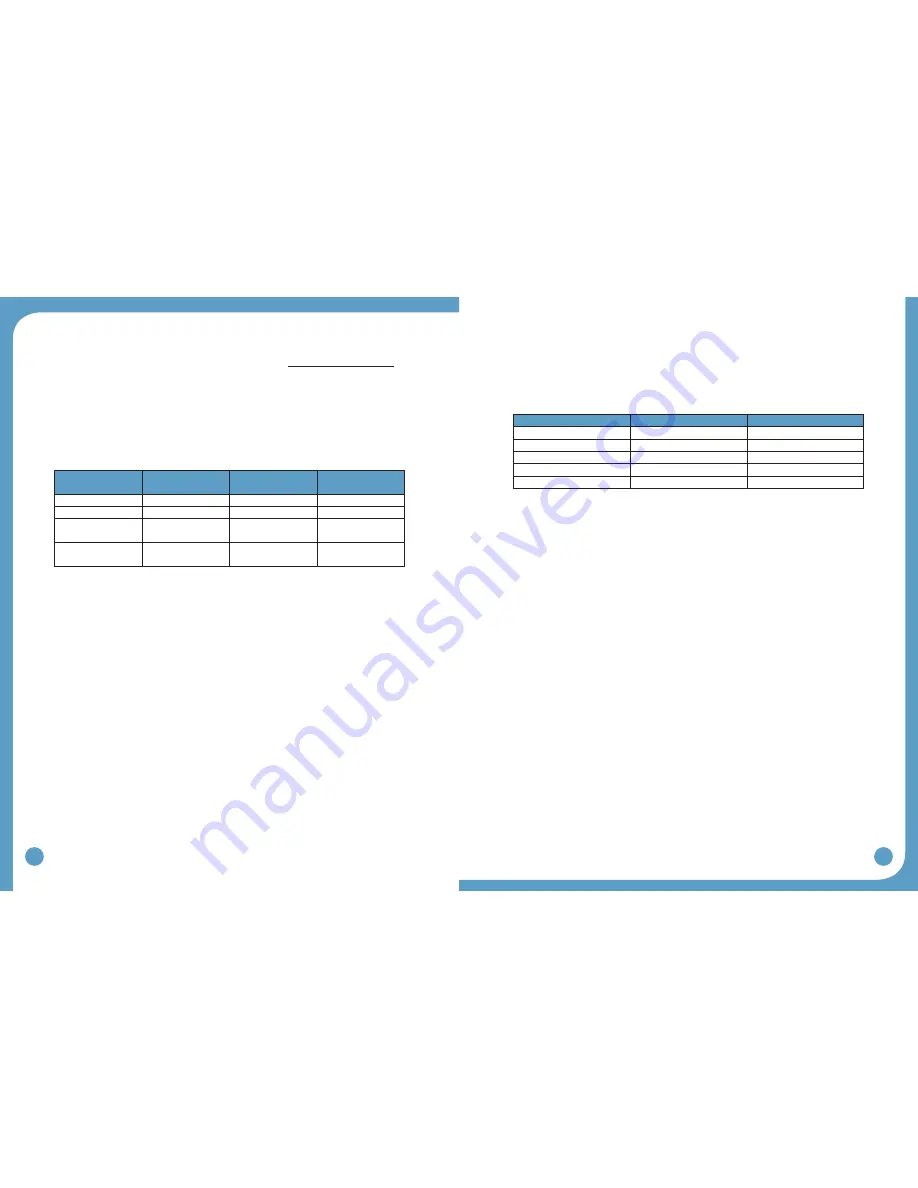
Sample Exercise Settings

User with Severe 

Atrophy (1:5)

User with Moderate 

Atrophy (1:3)

User with Minimal to 

No Atrophy (1:2)

On Time  (Seconds)

1-2

1-3

1-5

Off Time  (Seconds)

5-10

3-10

2-10

Duration  (Minutes)

5-10; 

gradually increase

15;

gradually increase

15-30

Number of sessions 
per day

Start with 1; 

gradually increase

Start with 1; 

gradually increase

1-2

Figure 54: Sample exercise settings

TIPS:

The Exercise Mode may be helpful during fitting to verify correct electrode placement.  


Some users may benefit from using the Exercise Mode to “warm up” the neural pathways 


prior to walking.

 Always have the patient actively engaged in the treatment session.


Activate exercise mode by pressing and holding down the middle button until the WalkAide 
beeps.  Discontinue the Exercise Mode by simply turning the WalkAide unit off, and turning 
the WalkAide unit on again.  The WalkAide control unit returns to Walking mode.  Always turn 
the WalkAide unit off and then on again after any exercise session.

5.7  Wearing Schedule

Gradual introduction into wearing of the WalkAide system is important.  The 

Wearing 

Schedule

 below serves as a general guideline and can be modified by the clinician to meet 

the specific needs of the individual.  Users should proceed through the daily wearing schedule 
and increase wearing time only if no skin irritation and/or muscle soreness is present. (Figure 
55)

ON Time

OFF Time

Days 1-3

15-60 minutes

30 minutes

Days 4-6

1-3 hours

30 minutes

Days 7-9

3-5 hours

30 minutes

Days 10-12

5-6 hours

1 hour

Days 13-14

6-8 hours

1 hour

Figure 55: Wearing schedule

TIPS:

If muscle soreness occurs, reduce the wearing time or discontinue use and contact your 


WalkAide clinician.

 If skin irritation or redness occurs under the electrodes, do not resume WalkAide 


stimulation until the redness disappears.  If the redness has not disappeared by the end 
of the scheduled off period, do not reapply the WalkAide until the redness disappears and 
report this occurrence to your WalkAide clinician.  

 Slowly work in to full-time wearing of the WalkAide System.  How well the user tolerates 


the WalkAide during this break-in period will depend on each individual’s daily regimen and 
overall activity level.

 Remove the cuff at regular intervals throughout the day and inspect the skin under the 


electrodes.  These areas may be pink due to increased blood flow under the electrodes, but 

this redness should disappear quickly.  If the redness persists, discontinue WalkAide wear 
until the redness completely disappears.

 DO NOT use moisturizing soaps, lotions or oils to soften the skin.  Make sure the skin is 


clean and dry prior to applying the cuff.

 Make sure the WalkAide is applied correctly with appropriate electrode position each time 


to maximize function and minimize any potential discomfort. 

 If shaving the leg is desired, this should be done in the evening after the WalkAide has 


been removed for the day to prevent potential irritation during daily wear.

 Wet the electrodes with recommended medium before applying the cuff.  Rewet the 


electrodes occasionally throughout the course of the day to assure good conduction and 
maximize conductivity.

Summary of Contents for The WalkAide System

Page 1: ...physician LM06 R6 2013 Innovative Neurotronics All rights reserved All trademarks and registered trademarks are the property of their respective holders No part of this manual may be reproduced in an...

Page 2: ...9 4 1 Configuring initial set up process Pairing 19 5 0 Fitting Process 20 5 1 Pre screening with the Peripheral Nerve Stimulator 20 5 2 Electrode Placements and System Preparations 22 5 3 Fitting a N...

Page 3: ...ions Do not use on persons with implanted demand type cardiac pacemakers or defibrillators Do not place the electrodes in the carotid sinus region throat Laryngeal or pharyngeal spasms may occur when...

Page 4: ...to operate the equipment 1 5 Precautions Heart Disease Use caution in applying electrical stimulation to persons suspected of having heart disease More clinical data is needed to show that such person...

Page 5: ...Glossary AutosetWalkAide Parameters This calculation process adjusts the threshold settings to more closely match the individual data collected Audible Beep Optional Biofeedback Feature Audible signal...

Page 6: ...d Stims Per Day information since log was last cleared Restore Original Reverses Autoset Optimize functions and manual adjustments returning thresholds and control times to original values Save and An...

Page 7: ...video One free USB port for the Bluetooth Adapter Windows XP with SP2 or Windows 7 A peripheral nerve stimulator can be purchased separately The peripheral nerve stimulator uses a 9 volt battery to op...

Page 8: ...mode A non audible alarm with only a red blinking light indicates hibernation mode Establish a Bluetooth connection with WalkAnalyst to automatically clear hibernation mode If the hibernation mode do...

Page 9: ...Washing Instructions To wash the WalkAide Cuff fabric liner first remove the electrodes and then remove the liner from the cuff Do NOT remove the Black and Red Electrode Locators Make sure to Hand Wa...

Page 10: ...click on Setup exe and choose Run as Administrator Follow the set up instructions that will appear 4 The WalkAnalyst program will be installed in the Program Files Innovative Neurotronics directory un...

Page 11: ...to the WalkLink This is called the pairing process Following the guidelines below to accomplish this process Plug in your USB Bluetooth adapter with the computer powered ON Start the WalkAnalyst appl...

Page 12: ...ot close to a neutral alignment 3 Clean the skin in the area around the head of the fibula with soap and water and wipe dry Failure to adequately prepare the skin may cause improper contact and provid...

Page 13: ...de lead cable Make sure the BLACK lead negative is connected to the BACK electrode and the RED lead positive is connected to the FRONT electrode Figure 26 5 Turn the WalkAide ON by turning the blue In...

Page 14: ...nt Profile Add basic information patient ID location primary diagnosis etc and save the patient file Select Program During the initial fitting you have the following programming options Rapid Program...

Page 15: ...rrow Upon releasing the mouse the WalkAide settings are calculated and an optimization error is displayed An optimization error of less than 20 is recommended Press the Next button to program the Walk...

Page 16: ...e Log to set the internal date time stamp and start a new 69 day tracking sequence For an existing user Select Retrieve Usage Log to download the most recent walking activity data This Usage Log will...

Page 17: ...the Data Data processing involves following the sequence of icons from left to right displayed above the Tilt data graph Zoom Autoset and Optimize are the first three steps involved in processing the...

Page 18: ...cise settings Figure 41 Usage Logs Select Usage Logs tab to view and or clear usage data Figure 42 Preferred Setting You can use the checkbox Set as Preferred Setting to tag a setting as preferred set...

Page 19: ...ual Users should proceed through the daily wearing schedule and increase wearing time only if no skin irritation and or muscle soreness is present Figure 55 ON Time OFF Time Days 1 3 15 60 minutes 30...

Page 20: ...performance improvement and justify medical necessity of WalkAide Evaluation options Collect Walking Data No Device When collecting walking data with no assisted device attach the WalkAide on a cuff...

Page 21: ...de is to be stored for an extended period of time and not used remove the battery from the battery compartment When the alkaline batteries become depleted please dispose of properly in accordance with...

Page 22: ...of the leg The stimulation is optimized if it enters at the motor nerve and exits after traveling in the direction of the muscle Electrode position varies with each patient Conductivity is enhanced b...

Page 23: ...poorly timed on and off cycles that may occur with abnormal tibial motion during swing usually from ataxia Adjustment to the Min Time also addresses periods of faster walking or faster steps when the...

Page 24: ...e testing to prevent possible overstimulation of the user Recommended for pediatric or more sensitive patients a low Pulse Width may provide a less forceful stimulation and allow for a softer contract...

Page 25: ...ur methods to re optimize the user s walking program These are outlined below with clinical descriptors of when each method may be most indicated Option 1 Rapid Adjustment Adjust stimulation parameter...

Page 26: ...trial listed below Save WalkAide Settings and make any clinical comments relevant to this walking program Click on 4 Verify WalkAide Settings and change the Stimulation Mode to Hand Send Parameters to...

Page 27: ...nutes of non use Turn the WalkLink off for a few seconds and then turn it on again Click on the Bluetooth icon in the upper right corner of the screen and Search for Previously Connected WalkLinks Che...

Page 28: ...f another Bluetooth driver software is causing the conflict you may need help from your IT support team Call the Innovative Neurotronics technical support team if you have trouble resolving this probl...

Page 29: ...Reference Part Numbers 20 1000 WalkAide Patient Kit 21 1000 WalkAide Patient Kit Japan 20 1000 WalkAide Patient Kit Reprocessed 20 0100 WalkAide 21 0100 WalkAide Japan 20 0100R WalkAide Reprocessed 2...

Reviews: