


User’s manual
Using the system
35
Following is a list of the sections relating to the elements you can activate by tapping
the ACTIVATE button.
Each section presents its own elements arranged in list form. Each element is
associated with two buttons - ON for activation and OFF for inhibition, and an icon
which changes in accordance with the status:
•
- activated/enabled
•
- deactivated/disabled
Via Web and AlienMobile
First access the “Intrusion” section, then the “Zones” section.
“Zones” section contains a list of the zones available to the user, and each zone
provides the following keys:
• ON - enables the zone and the corresponding icon becomes
• OFF - inhibits the zone and the corresponding icon becomes
5-5
View
This section allows you to view the events log and the current status of some of the
system peripherals and elements.
The “Events log”, “Alarms log”, “Faults log” and “Arm/Disarm op.” allow you to view the
start and end of the corresponding events in chronological order.
The “Nexus status” section shows (on the display) some of the parameters of the Nexus
dialler.
The “System voltage” section allows you to view the respective voltage panel.
The “Zone Status” section shows the status of the zone (Standby, Alarm, Shorted,
Tamper) and its inhibited status (Unbypassed - capable of generating alarms, or
Bypassed - incapable of generating alarms).
The “Faults” section allows you to view current faults only (refer to Appendix C, Fault
signals).
The “Panel version” section allows you to view the firmware version and model of your
SmartLiving control panel.
When viewing the wireless zones, the last line on the display indicates the level of signal
strength on a scale of 0 to 7; the higher the value the better the signal.
If you access the control panel via browser, it will be possible to view the status of:
• Partitions
• zones
• outputs
• timer
• events log
Via Keypad
Method 1
Activate the shortcuts associated with keys
, ...,
(shown on the display) with
or without code entry:
• Shortcut n.28 (
) accesses “View/Events log”
• Shortcut n.29 (
) accesses “View/Alarms log”
• Shortcut n.30 (
) accesses “View/Faults log”
• Shortcut n.31 (
) accesses “View/Arm/Disarm op.”
User access to the information in the “Logs” is filtered. For example, a user can view
only the zone alarms relating to the partitions the code and keypad concerned have
in common.
Use key
or
to scroll the chronological events list.
For some events, key allows you to view the partitions details. For example, the
details of an “Arm” command will show the code and keypad concerned and, if you
press , the list of partitions involved.
Zone n.77
Standby Unbypsed
PanelVersion
6.10 01050
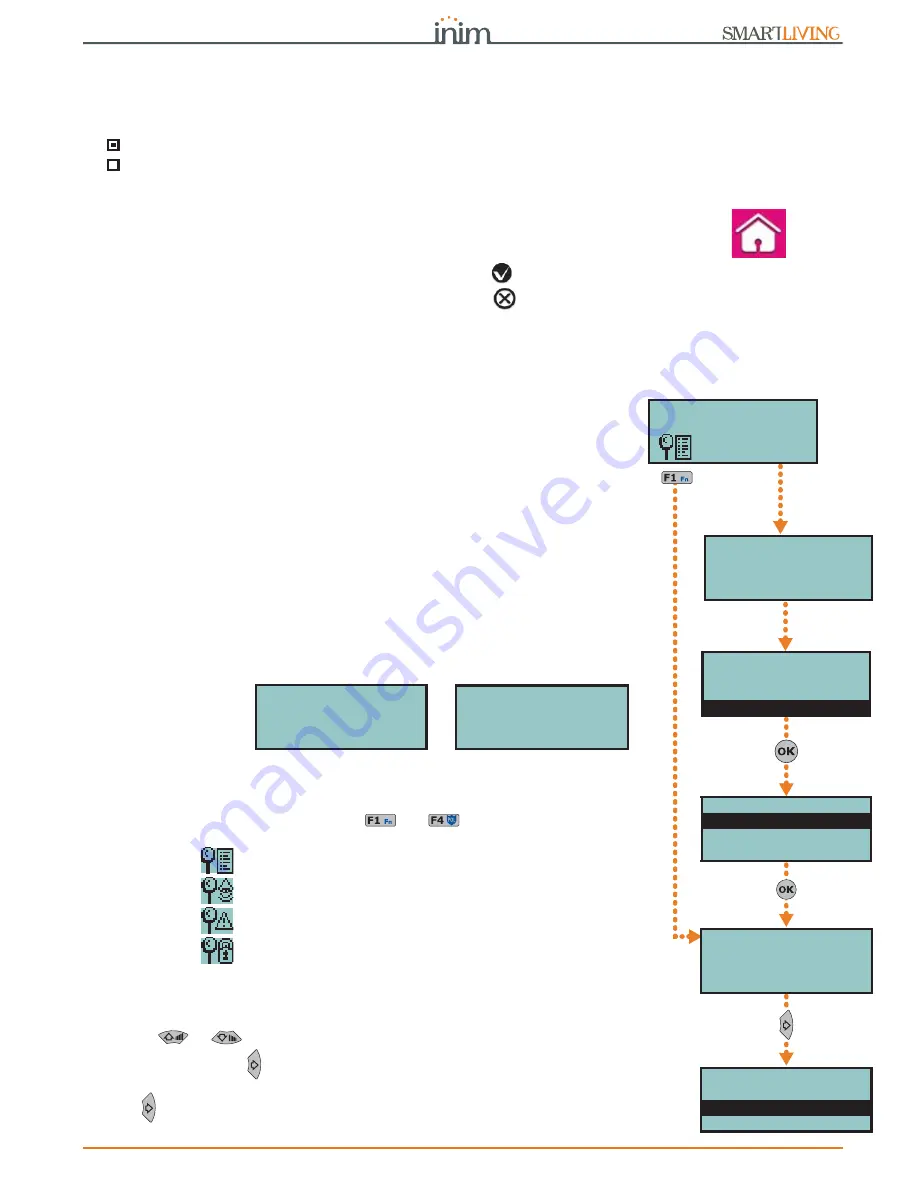
Method 2
Method 1
User Code
Voice functions
Activations
View
Type in code
******
VIEW
Events log
Alarms log
Faults log
Valid Code
18:23 01/02/2016
PARTITION 001
Valid code
18:23 01/02/2016
User Code
KEYP. 001
18:23 01/02/2016
DDDDDDDD--


