background image

32

P

hone

~

~

~

~<MFZ>

ue05_as35_9e.fm
[32/32]

When you cannot answer calls, this function automatically plays a 
message and allows callers to record messages.

A

On the iida Home, 

Settings


[

Call settings


[

Call/Ans Memo


[

Answering memo setting

.

A

On the iida Home, 

Settings


[

Call settings


[

Call/Ans Memo


[

Answering Memo List

.

The answering memo list screen is displayed.

B

Select the message to be played.

The message is played.

When playing the data in Contents Manager or checking the function setting 
by playing the data in manner mode, the data is played on mute. 
Depending on the function, you can adjust the volume by pressing 

u

/

d

 while playing the data.

Turning On the Answering Memo

When you set the same length of answering time for Answering memo and 
Auto Answer, Answering memo takes priority.

The INFOBAR A01 can record a maximum of ten messages of up to 
approximately 60 seconds per message. When ten messages have already 
been recorded, the messages that are already played but not protected are 
deleted from the oldest one. When ten messages are recorded and all of 
them have not been played or are protected, the Answering memo does not 
answer the call.

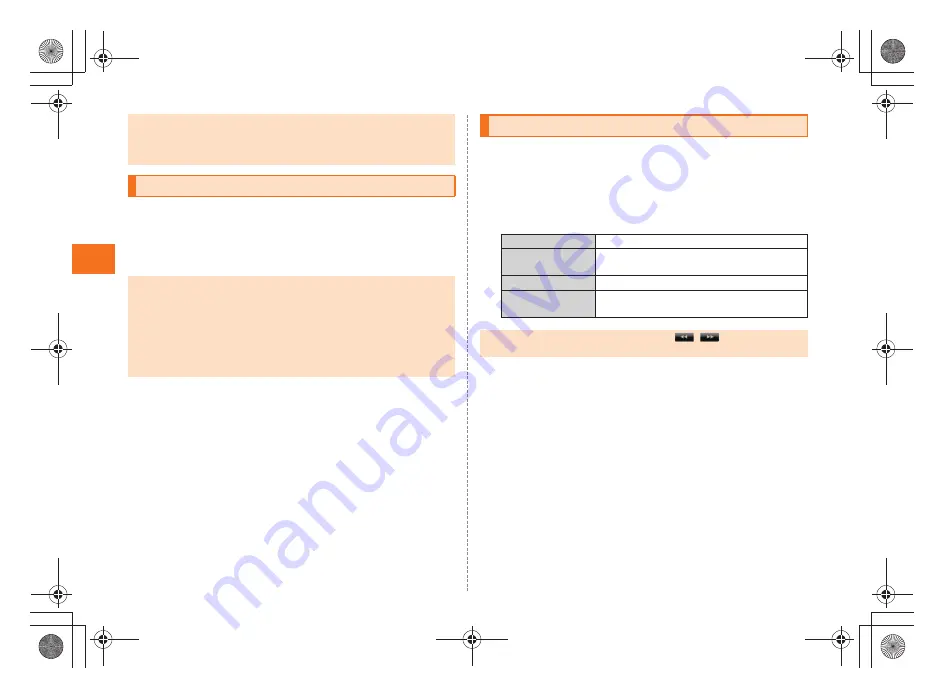
Playing a Message in Answering Memo

Stop

Stop playing the message.

On/Off

Protect/Unprotect the message not to be 
automatically deleted.

Delete

Delete the playing message.

Speaker on/
Speaker off

The message can be heard on the speaker/
earpiece.

When multiple messages are recorded, tap 

/

 while playing a 

message to play the previous/next message.

as35_ue.book  32 ページ  2011年7月20日 水曜日 午後2時26分

Summary of Contents for INFOBAR A01

Page 1: ...June 2011 Edition ...

Page 2: ...tion which is compliant with the Radio Act and may be subject to inspections regulated by the Radio Act When you insert the au IC Card the product number information of your au phone is sent to the au server for the security and operation status notification of the au phone Always be considerate of others around you when using your au phone in public places For a child s use read the Basic Manual ...

Page 3: ... voice Obtain the permission of other people before you take their photos with the cell phone s camera Be considerate of people around you Some people close to you in crowded places such as packed trains may be using a cardiac pacemaker Turn the cell phone off in such places Abide by the rules of hospitals and other medical institutions where it is forbidden to use or carry cell phones Check all t...

Page 4: ...ual Description Explanation On the character entry screen Input mode Tap on the character entry screen Then tap Input mode On the widget Home e Add Press e on the widget Home Then tap Add This manual refers to SHARP microUSB 3 5φ conversion cable 01 as microUSB 3 5φ conversion cable Security Code and PIN Code Security Code and Passwords Usage Example A Using the Answering Service Voice Mail and Ca...

Page 5: ...required when setting Lock UIM card The initial setting of the PIN code is 1234 On the iida Home tap Settings Location security Set up UIM card lock Change UIM PIN to change the PIN code to a four to eight digit number PUK Code Enter the PUK code when the PIN code is locked PUK code is an eight digit number given at the time of purchase and is printed on the back side of the plastic card where you...

Page 6: ... Switching Character Entry Modes 27 Entering Emoji D Emoji Symbol Facemark 27 Switching Input Software 28 Making a Call 29 Making an International Call 001 International Call Service 30 Answering a Call 30 Putting the Call on Hold 30 Answering with the Message of Answering Memo 30 Returning a Call Outgoing History Incoming History 31 Turning On Manner Mode 31 Turning On the Answering Memo 32 Playi...

Page 7: ...ng the Wallpaper 51 Initializing microSD Memory Card 51 Using Global Passport CDMA GSM 52 GLOBAL PASSPORT 52 For overseas use without anxiety 53 Configuring the Overseas Settings 53 Making a Call at Your Travel Destination 54 Receiving a Call at Your Travel Destination 55 Setting Conditions for Activating the Remote Lock 56 Troubleshooting 57 Index 59 TV 1Seg Applications Settings of INFOBAR A01 G...

Page 8: ...6 MFZ ue03_as35_9e fm 6 15 Getting Ready Names and Functions of Parts as35_ue book 6 ページ 2011年7月20日 水曜日 午後2時26分 ...

Page 9: ...the microphone with your fingers etc J Home key Use it to display the iida Home etc K Back key Returns to the previous screen L External connection jack Use it to connect the INFOBAR A01 to the microUSB 3 5φ conversion cable the common AC adapter 03 sold separately the microUSB cable 01 sold separately the 18 pin microUSB conversion adapter 01 sold separately the microUSB stereo earphone conversio...

Page 10: ... 03 sold separately A Open the external connection jack cover of the INFOBAR A01 B Insert the microUSB plug of the common AC adapter 03 sold separately the common DC adapter 03 sold separately to the external connection jack of the INFOBAR A01 Charging the Battery Pack When the battery pack has less than approximately 15 percent of the battery level the message Please connect charger appears on th...

Page 11: ... seconds The phone options screen is displayed If you hold down f on the unlock screen the power is turned off without the phone options screen being displayed B Power off OK Charging is available by connecting the INFOBAR A01 to a PC with the microUSB cable 01 sold separately On the iida Home tap Settings USB connection Mark USB battery charge to enable the setting Common AC adapter 03 sold separ...

Page 12: ...power or inserting another s au IC Card For detailed operations on the initial setup refer to the supplied Setting Guide Japanese A Set Date time Next B Set Location Next C Set Other Set Wi Fi settings au one ID setting Google account Text font or Profile settings D Done E Yes No If you tap No the initial setup screen is not displayed from the next startup Restarting the INFOBAR A01 Sleep Mode In ...

Page 13: ...ery pack by holding the protruding edge and lifting it upward Use the specified battery pack for the INFOBAR A01 and attach it properly A Align the contacts on the battery pack with those of the INFOBAR A01 and then insert the battery pack securely with the protruding edge facing up on the battery pack Removing Attaching the Battery Pack Removing the Battery Pack Concave portion When removing the ...

Page 14: ...umbers Turn off the power and remove the battery pack before removing or inserting the au IC Card A Remove the tray straight out by pulling the tab of it and remove the au IC Card Before attaching the battery pack make sure that the au IC Card is inserted properly Failure to follow the correct procedure when attaching the battery pack may result in damage to the battery pack or the battery pack co...

Page 15: ...bove may damage the ribs for fixing the card Tab Cutout Cutout Using microSD Memory Card Some applications may not be available when a microSD memory card is not inserted The maximum file size available on a microSD memory card is 2 GB per file when saving data to microSD memory card A microSD memory card initialized on other devices may not be used on the INFOBAR A01 properly Initialize it on the...

Page 16: ...eration based on the criteria by au For operation confirmation results of other microSD memory cards contact each microSD memory card manufacturer microSD microSDHC Memory Card Confirmed operation Unconfirmed operation or not for sale As of May 2011 4 GB or more are for microSDHC memory card Operation is confirmed for microSD memory cards that are sold as of May 2011 For the latest information on ...

Page 17: ...roSD memory card Do not remove the microSD memory card forcefully It may result in damage to the microSD memory card or the INFOBAR A01 or data loss Application installed to microSD memory card cannot be used once you removed microSD memory card The microSD memory card may be warm after a long time use It is normal Inserting microSD Memory Card B C D Terminal side Insert a microSD memory card with...

Page 18: ...tly touch a screen and then trace it to the desired direction Main purpose of this operation Scroll screen or switch pages In addition operate gauge and bar when adjusting volume and brightness Flick Touch a screen and then quickly flick your finger up down left or right Main purpose of this operation Switch pages or enter characters by flick input Pinch Touch a screen with two of your fingers and...

Page 19: ... activate the application A Status bar B Application Shortcut panel C Section bar Displays a section title and classifies the section Long touch a section bar to display the section bar list Drag it to any section bar and release your finger to scroll the iida Home to the selected section bar position D Bottom key Operate with the same method as section bar E Opening Closing section key F Panel op...

Page 20: ...uetooth file receiving request USB connecting Card reader mode Fast transfer mode USB connecting in Card reader mode connecting Data upload File sending Uploading data Sending file Finished sending file Failed to send file Finished uploading data Waiting to upload data The Uploading data indicator and Sending file indicator are displayed as animations Downloading Finished downloading Installing da...

Page 21: ...nding Sending and Receiving Data communication off setting In roaming CDMA Signal strength in roaming GSM Level 4 Level 3 Level 2 Level 1 Level 0 Character type Hiragana Kanji Half width alphabet Half width numeric Half width Katakana Full width alphabet Full width numeric Full width Katakana Character code Manner mode status Standard manner mode Drive manner mode Silent manner mode During a call ...

Page 22: ...ch the iida Home to display the iida Home management screen And you can set the sections and panels A Setting key Tap it to display the setting items You can hide panels change the size of the displayed panels etc B Section bar adding key Slide it to the right edge of the screen to add a section bar C Section bar deleting key Slide it to the left edge of the screen to delete a section bar D Add pa...

Page 23: ... Home Moving Deleting the widgets Adding the widgets Widgets cannot be added in such a case as that the displayed widget Home has no available space Application list Icon Application Description BrandGarden Requires download and installation to use Facebook Check Foursquare GREE iida jp LISMO Play music using LISMO Requires download and installation to use LISMO Book Store Requires download and in...

Page 24: ...he destination on Google Maps News Weather Display news and weather Icon Application Description Notepad Create memos One Seg Watch TV 1Seg Osaifu Keitai Use Osaifu Keitai PC mail Use PC mail Pedometer Use pedometer Phone Make a call and use outgoing history incoming history Photo Display images in the microSD card as a list and edit them Picture Sort images and movies by people event and location...

Page 25: ...ending on the function If you have not subscribed to IS NET au NET charges 525 yen for the used month and communication charges apply Icon designs may be changed without prior notice Icon Application Description Switching Orientation Operate the INFOBAR A01 in the upright position The screen display may not be changed if the INFOBAR A01 is laid in parallel to the ground On the iida Home tap Settin...

Page 26: ...n the number of available option menus exceeds the number that can be displayed on the screen as icon More is displayed Option menus that cannot be displayed as icon are collected into More and tap More to display them Even on the same screen the number of items collected into More differs depending on the setting and condition since the number of option menus displayed differs depending on the se...

Page 27: ...ed By flicking the key in the direction of a desired character being displayed the character is entered in the character entry area For example you can enter A by only tapping and you can enter B by flicking left While displaying the TapFlow UI tap All Menu to display all the available menu While displaying the TapFlow UI tap All Menu Reset usage history Yes to reset the TapFlow UI While displayin...

Page 28: ...rmined characters to the undetermined state by tapping the key D Software keyboard You can enter a character assigned to each key E Cursor key Moves the cursor to the left and right Change the range of the characters for character input and conversion F Emoji Symbol and Facemark key Kana Alphanumeric key Displays the list of Emoji D Emoji Symbol Facemark Displays hiragana katakana alphabet number ...

Page 29: ...e shift key you can switch uppercase characters entry and lowercase characters entry The display changes as follows each time you tap it Lowercase character entry Uppercase character entry lock Uppercase character entry You can switch the symbols to enter by tapping the keys in full width numeric or half width numeric entry A On the character entry screen Input mode Alternatively on the character ...

Page 30: ...acter on the left of the cursor When the cursor is at the beginning the character on the right of the cursor is deleted Returns to character entry screen Long touch the facemark Edits the facemark A On the character entry screen Input method Alternatively long touch the character entry area Input method to switch input software B Facemarks in History cannot be edited Switching Input Software Andro...

Page 31: ...ther application during a call execute the following operations Press to return to the iida Home activate Phone and tap Return to call in progress Tap the status bar and tap Current call Dial services available from au phones The following dial services are available Call with fixed line phones all over Japan Call with cell phones PHS and car phones all over Japan 001 001 international call servic...

Page 32: ... Holding while the backlight illuminates except when the unlock screen is displayed The call is put on hold The other party hears voice guidance indicating that the call is put on hold B Slide to the right while the call is on hold The hold state is released and the call is connected You can answer a call with the message of the Answering memo and record the other party s message A e Absence Memo ...

Page 33: ... store up to 100 entries in each of the outgoing and incoming histories If the history exceeds 100 entries it is automatically deleted from the oldest entry The number of the saved entries may be reduced depending on the amount of free space Turning On Manner Mode Volume of call ring tone mail ring tone Vibrator when receiving call mail Volume of operation sound Standard manner mode OFF ON OFF Dri...

Page 34: ...emo When you set the same length of answering time for Answering memo and Auto Answer Answering memo takes priority The INFOBAR A01 can record a maximum of ten messages of up to approximately 60 seconds per message When ten messages have already been recorded the messages that are already played but not protected are deleted from the oldest one When ten messages are recorded and all of them have n...

Page 35: ...e its type Tap the icon displayed on the left of the item and select a type By tapping Custom when you change the type you can save the entered string as a type For the chat address type set the application which is activated when the operation on the address book detail screen tap is executed If you save the name in the following characters it is displayed in order of name and family name on the ...

Page 36: ... mail address on the address book detail screen B Set main phone number Set the phone number for usual use Create shortcut Direct call Create a shortcut to call to the selected phone number or to activate C mail message using the selected phone number as an address Send message directly Using Mail Address Set main mail address Set the mail address for usual use Create shortcut Create a shortcut to...

Page 37: ...harge for sending and receiving e mail varies according to the amount of data sent and received For using overseas high charges can be incurred For details refer to the au comprehensive catalogue or au homepage The function of C mail is to be expanded The contents of the expanded function and time for the function expansion are to be released on the au homepage Charges do not apply when receiving ...

Page 38: ...r a phone number by selecting an entry from the send receive history On the send receive history selecting screen press e Set secrecy not to display Send Receive history when selecting destinations etc Profile Enter a phone number registered in the Profile Secrecy Disable secrecy setting temporarily when it is set on send receive history On the C mail creation screen tap Save After that the mail m...

Page 39: ...ple Settings 1 携帯 PHS PC メールを受信 1 Receive Mail Messages from Cell Phone PHS or PC Reject spoofing or auto forwarded mail messages and receive mail messages from cell phones PHSs or PCs 2 携帯 PHS メールのみを受信 2 Receive only Mail Messages from Cell Phone or PHS Reject mail messages from PCs spoofing mail messages or auto forwarded mail messages and receive mail messages from cell phones or PHSs 詳細設定 Adva...

Page 40: ...ages HTMLメール規制 HTML Mail Restriction Reject e mail messages in HTML format URLリンク規制 URL Link Restriction Reject e mail messages that include a URL 一括指定受信 なりすまし規制 詳細設定 Advanced Settings 拒否通知メール返 信設定 Block Mail Notification Setting Sets whether to send a receiver error address unknown mail message to the sender of the rejected e mail message 設定確認 設定 解除 Check Settings Release Settings Check the setti...

Page 41: ...word Next The mail server is set automatically Block specified numbers Set Specified Numbers Set whether to enable the Block specified numbers If no phone number to be blocked is specified in Specified Number List the specified number screen is displayed Tap Add new and register the phone number Specified Number List Specify the phone number to be blocked Tap Add new to register a phone number to ...

Page 42: ...ocess of composition is discarded A PC mail is received If PC mail is received appears on the status bar and the mail ring tone sounds B Tap the status bar C Select PC mail information The inbox screen is displayed D Select the received PC mail The received PC mail message screen is displayed Gmail is a mail service provided by Google You can send and receive Gmail with the INFOBAR A01 Google acco...

Page 43: ...age E A Gmail is received When Gmail is received appears on the status bar and the mail ring tone sounds B Tap the status bar C Select mail information The inbox screen is displayed D Select the received mail The received mail message screen is displayed A On the received mail message screen Reply Reply all Forward Sending Gmail Receiving Gmail Replying Forwarding Gmail as35_ue book 41 ページ 2011年7月...

Page 44: ...lication may be terminated automatically Filtering function The filtering function blocks inappropriate web pages for young people On the iida Home tap Settings Wireless networks Filtering settings Yes Enter a password OK Enter a password again OK The filtering function is disabled during Wi Fi connection The password used when enabling the filtering function is necessary when disabling the settin...

Page 45: ...reen The shutter sounds and the shot image is automatically saved On the photo monitor screen press e Save settings Auto Save to set to OFF After that the photo preview screen is displayed after shooting You can save the shot data etc Using the Camera Cautions for Using the Camera Taking Photos If you operate nothing in the photo monitor screen for approximately three minutes Camera is terminated ...

Page 46: ...ide the thumbnails C Select an image When you select an image the one image display screen is displayed Operations in the one image display screen Tap the image Displays Hides enlargement reduction icon Paste on Home and Menu Recording Movies You can record movies only in the landscape display If the battery level becomes approximately 10 or lower while recording recording is terminated and saved ...

Page 47: ... played displayed Playing Displaying Data You cannot play data on which is displayed Using Menu in the Contents Screen Delete selected Delete data Select data Enter Yes Tap Check all Uncheck all to select cancel all List Players Display applications related to file format Switch grid list Switch grid display and list display Sort Sort saved data Slideshow Display the taken pictures by slideshow Ta...

Page 48: ...eg connect the microUSB 3 5φ conversion cable for the TV antenna Keep the microUSB 3 5φ conversion cable as straight as possible to use And use INFOBAR A01 in the direction of the good reception on TV 1Seg Also Fully charge the battery pack before you watch record TV 1Seg because the microUSB 3 5φ conversion cable and charging devices cannot be used at the same time A Open the external connection ...

Page 49: ...eo image Switches image sizes Long touch the video image Displays the channel list Tap the program information Displays the program name Operation key Switches channels or searches for a channel by long touch 1Seg Operation Panel Starts Stops recording Displays the channel list Displays the data broadcast operation panel Data Broadcast Operation Panel Moves the cursor Selects an item Returns to th...

Page 50: ...overwrite registration Yes Assigns the broadcast station being watched to the selected remote control number Long touch the broadcast station Delete channel Yes Deletes the broadcast station from the selected remote control number Long touch the unset remote control number Assigns the broadcast station being watched to the selected remote control number as35_ue book 48 ページ 2011年7月20日 水曜日 午後2時26分 ...

Page 51: ... by categories keywords or ranking au one ID is required to use some functions Refer to the supplied Setting Guide Japanese to set au one ID A On the iida Home au one Market The au one Market screen is displayed When you activate au one Market for the first time the terms of service and cautions for using au one Market are displayed so tap Agree OK after confirming the contents Using Android Marke...

Page 52: ... iida Home Settings Applications Manage applications The installed applications list is displayed B Select an application The detailed application information is displayed C Select the operation to perform Follow the on screen instructions to perform it Using GREE Market To use games searched from GREE Market registering as an au one GREE member may be required Managing Applications When you selec...

Page 53: ...OK B Erase microSD C Erase microSD Enter Lock No OK Erase everything Checking Your Profile If au IC Card is not inserted or different au IC Card is inserted auIC Card UIM error appears for checking your profile Tap OK to display the profile screen However information such as Own phone number Own mail address or ICCID is not displayed Also some operations such as attaching the profile to mail may n...

Page 54: ...as When you use global passport GSM global passport CDMA overseas refer to Configuring the Overseas Settings and set each setting Using Global Passport CDMA GSM GLOBAL PASSPORT GSM is an acronym of Global System for Mobile Communications This is one of the wireless communication systems applied to digital cell phones and widely used around the globe such as in Europe America Asia Oceania and Afric...

Page 55: ...ng charges may be incurred from the time that you tap Call To use the INFOBAR A01 overseas you are required to change to the telecommunications carrier s networks that you connect to at your travel destination Obtaining the PRL Roaming Area Information The PRL roaming area information contains information on roaming areas of overseas partner providers who have signed an international roaming contr...

Page 56: ...2 123 XXXX in the USA from South Korea A On the iida Home Phone B Enter an international access code country code area code and the other party s phone number Call 1 Long touch the 0 to enter and the international access code of your travel destination is automatically added when calling 2 If the area code starts with 0 dial it without including the 0 There are some exceptions such as fixed line p...

Page 57: ...call made to your au phone in Japan 090 1234 XXXX from the USA A Enter an international access code Japan country code and phone number of au phone Call If the person you are dialing is using Global Passport enter the country code 81 Japan regardless of his her travel destination Travel destination Number U S Mainland Hawaii Saipan 1 Area code Other party s phone number New Zealand South Korea Chi...

Page 58: ...emote Lock Valid number list Register up to three phone numbers 1 Add new 2 Direct entry Enter a phone number You can select a phone number from Use address book or Use profile Also you can select Payphone Specified period Specify the time limit for receiving the number of calls you have set for Number of calls arrived after the first call is received Number of calls arrived Set the number of call...

Page 59: ...harging incoming indicator illuminates or flashes but ring tone does not sound Is the ring tone volume set to other than minimum Is manner mode disabled P 31 Cannot charge the battery pack Are the charging devices connected properly Is the battery pack attached properly Is USB battery charge enabled If a microSD memory card is not inserted the installation of a USB driver to the PC may be necessar...

Page 60: ...e occurs Does the INFOBAR A01 receive an adequate digital broadcasting signal Is the microUSB 3 5φ conversion cable connected Is the selected area for the area where you use the INFOBAR A01 Cannot operate any key and the screen is frozen Press the reset button with a pointed end of an object for at least two seconds The INFOBAR A01 restarts P 7 Trouble Detail Page Cannot operate the respective add...

Page 61: ...er 8 Charging with the DC adapter 8 Charging Incoming indicator 7 Check Settings Release Settings 38 C mail C mail 35 Cmail 35 Index Compose Gmail 41 PC mail messages 40 Configuring the overseas settings 53 Contents Manager 45 Context menu 24 Create 35 Create mail 33 Create shortcut Mail address 34 Phone number 34 D Data roaming 54 Delete 32 Delete selected 45 Deleting the widgets 21 D Emoji 27 Di...

Page 62: ...16 Operations on the 1Seg screen 47 Option menu 24 Outgoing History 31 P PC mail 39 Phone number 33 Photo 44 PIN code 2 Pinch 16 Playing 45 Playing data 45 Power key 7 PRL settings 53 Profile Cmail 36 Create 35 Profile 51 R Reboot 10 Receiver 7 Receiving a call at your travel destination 55 Receiving calls from countries other than Japan 55 Receiving filter 38 Receiving Gmail 41 Receiving mail 36 ...

Page 63: ...g the power off 9 Turning the power on 9 Turning the power on off 9 U Unmount microSD 51 Using an address book 33 V Valid number list 56 Video Camera 44 Viewing the iida Home 17 Volume up down key 7 W Wallpaper 51 widget Home 17 21 Widgets 21 as35_ue book 61 ページ 2011年7月20日 水曜日 午後2時26分 ...

Page 64: ...June 2011 Edition ...

Reviews: