6
6. GAS SENSOR
There is an Upper and Lower gas sensor. The Lower will pick up lighter
gasses and the lower will pick up heavier gases. They are both designed
to pick up DANGEROUS levels of unburned gas and therefore the Upper
sensor MAY NOT pick up unburned gas before the 5 minute Auto Shut Off
Timer times out. (assuming you had left the kitchen.)
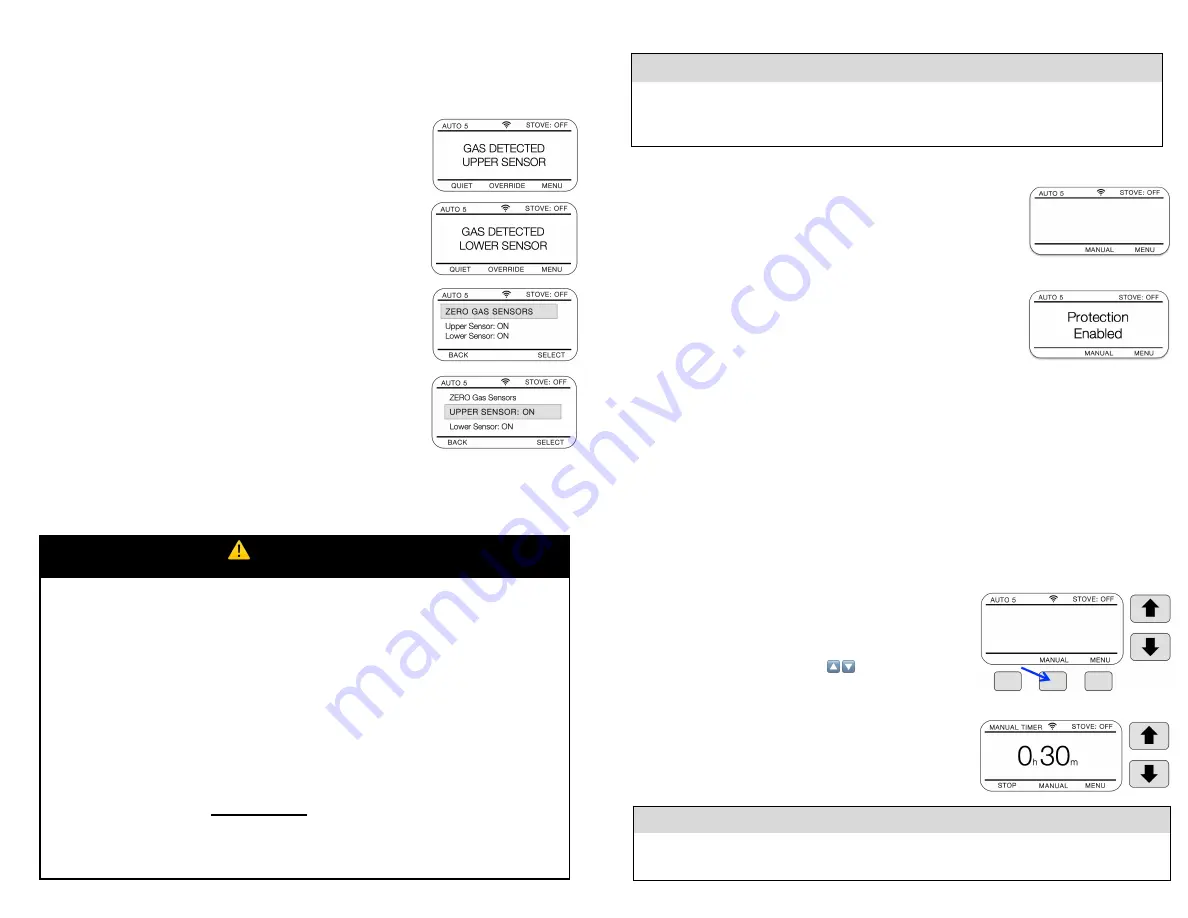
If the Upper Alert triggers and shuts off the gas valve you may Silence it or
if you need to finish cooking you can use the Override to relight the burner.
If it still smells gas after 5 minutes it will repeat the alert. If this continues
shut off the stove and call a repair person to check the stove.
IF you know FOR SURE there is no gas present you can use the Zero
Function which will set the sensors back to normal which should help to
eliminate false alerts.
Every kitchen is different and if you find the sensors do not work for your
kitchen then you can disable either or both.
⚠
Gas Sensors
There are 2 sensors to detect unburned gas. One is in the control panel for lighter natural gasses that
rise and the other is in the gas valve power box below the stove for heavier propane gasses. When a
sensor detects unburned gas, it will shut off the gas flow to the stove. An audible alarm will also beep
twice a second and the screen will display “Gas Alert”.
If you have the device connected to the Internet a Gas Alert text will be sent to the people on the
Contact list for gas alerts. The alarm will beep twice a second until the gas dissipates. You can silence it
by pressing the button labelled “Silence”. After the gas has dissipated the IGuardStove will then beep
once a second and will now display a “Cancel” button allowing you to cancel the Alert.
It is best that you open windows and door to clear the air. If the Alert occurs frequently it is highly
recommended that you call in a professional to determine the cause of the leak. The gas sensors can
take some time ( perhaps days ) to fully stabilize after being powered up for the first time and could
give false reading until they settle. See page 4 for more info.
To ensure maximum benefit we highly recommend that you connect your
i
GuardStove
to the Internet
using your home’s Wi-Fi. This will enable the alert messages to be sent to people on the contact list and
to record the gas alert event into the usage history.
Device Menu Options continued – Gas
The Menu for the gas model includes this setting option #6 instead of the option #6
for the electric model
Operating the iGuardStove Electric Stove Model
1. POWER
When the
i
GuardStove
is installed it is powered all the time. It draws only
5 watts of power while in the standby mode so you will not need to shut it
off. In Standby/Sleep the screen is dark. iGuardStove will wake up and
the screen will come on when it senses you are in the area. If you are
simply coming into the kitchen for other reasons then it will work as a motion controlled night light.
2. START COOKING
Once you turn on the stove knob, the iGuardStove wakes up and switches
from standby into the Automatic Shut Off mode. The screen reads
“Protection Enabled”
. Your iGuardStove is now active and protecting you.
3. AUTOMATIC STOVE SHUT OFF
Your stove operates as it always did. The iGuardStove starts to count down when it doesn’t see you
in the sensor range (approximately 10-12 feet or 3-4m) and will shut off after the 5 minutes times
out.
(Check page 7 to see how to adjust the shut off time)
4. RESUME COOKING
Upon returning to the kitchen, the motion sensor will see the user and automatically turn the stove
back on with no interaction required by the user. 2 sets of 3 quick beeps will act as a reminder to
the user that the device has turned the stove back on. The screen instruction will then read “Turning
Stove Back On”
for 5 seconds and then switch to “Protection Enabled”.
5. STOP COOKING
To stop cooking simply turn the stove knob off as you normally would and that’s it. After 4 minutes
of an inactive stove the iGuardStove will go to sleep to wait until the next time you start to cook.
6. MANUAL TIMER
(
This doesn’t rely on the motion sensor)
This timer allows both the oven and stovetop to be used
uninterrupted for longer cooking times than the Automatic Shut
Off
of 5 minutes.
When in Manual timer mode use the
🔼 🔽
arrows to set the hours
and minutes that you want to have the stove or oven operate.
The manual timer will start to count down without pushing any other buttons. After the Manual timer
times out the screen instruction will display “Timed Out Press
Reset
”. Press “Reset” puts the iGuardStove back to Standby.
If you don’t want someone to have the ability to override the
safety feature by using the Manual Timer then you can simply
disable the Manual Timer and it will disappear from the screen.
BUTTON NAMES
Button names are found above the button on the LCD screen and are called “Situational” meaning
that one time the button may be labelled as a “Back” button and in a different situation it may be
labelled “Reset”. Look above the buttons to see the label description of how that button will react.
Important Note:
Using the Manual Timer basically disables the Auto Shut Off SAFETY feature so be careful with its
use. Its possible that your cooking could start on fire. Try to use it only for the oven.

