background image


PCIE-G41A2 PICMG 1.3 CPU card 

Page 47

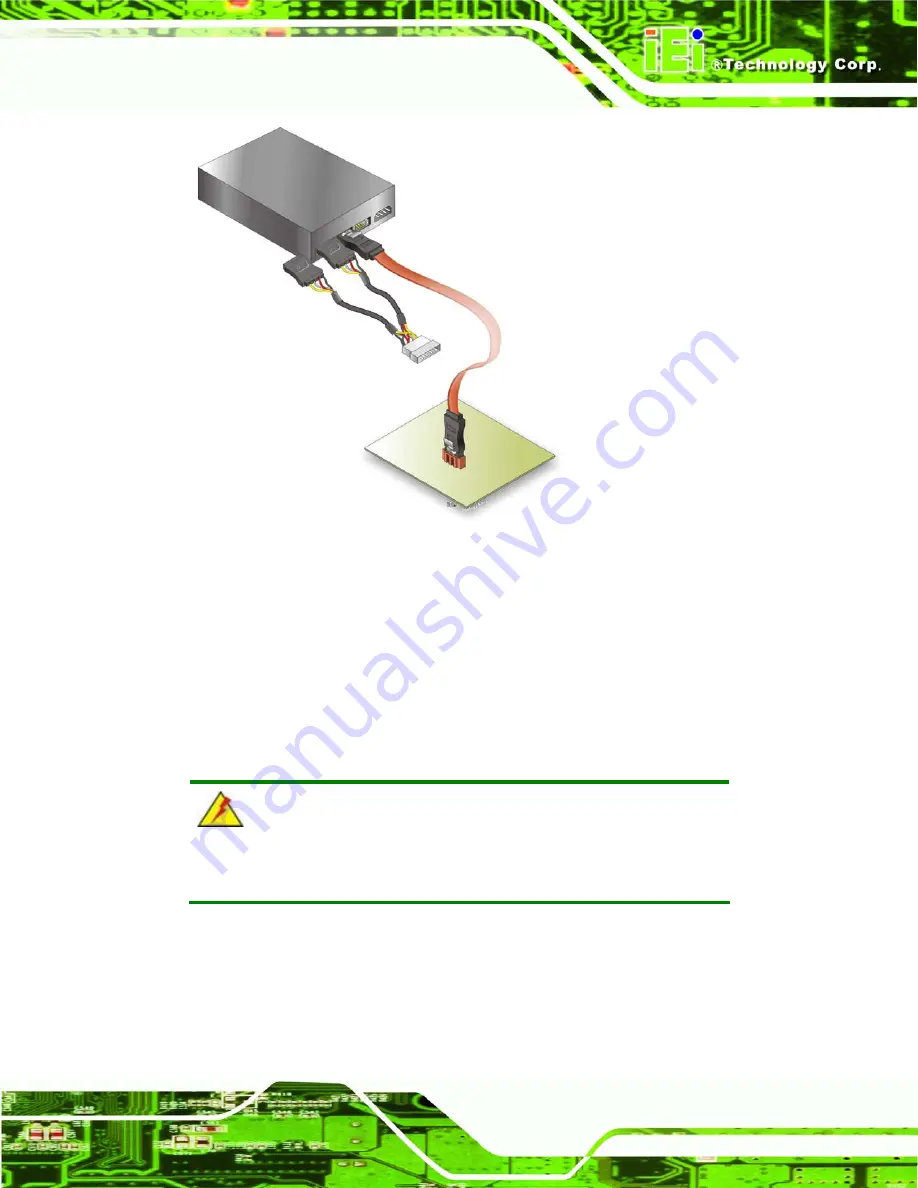
Figure 4-11: SATA Power Drive Connection 

4.4.3 USB Cable (Dual Port) with Slot Bracket 

The PCIE-G41A2 is shipped with a dual port USB 2.0 cable. To connect the USB cable 

connector, please follow the steps below. 

Step 1: 

Locate the connectors

. The locations of the USB connectors are shown in 

Chapter 3

 WARNING: 

If the USB pins are not properly aligned, the USB device can burn out. 

Step 2: 

Align the connectors

. The cable has two connectors. Correctly align pin 1on 

each cable connector with pin 1 on the PCIE-G41A2 USB connector. 

Summary of Contents for PCIE-G41A2

Page 1: ...PU card Page i IEI Technology Corp User Manual MODEL PCIE G41A2 PICMG 1 3 LGA775 Motherboard for Intel Core 2 Duo Quad Extreme CPU 800 1066 1333MHz FSB DDR3 LAN VGA SATA PCI USB HD Audio RoHS Complian...

Page 2: ...PCIE G41A2 PICMG 1 3 CPU card Page ii Revision Date Version Changes 19 May 2010 1 00 Initial release...

Page 3: ...ages arising out of the use or inability to use the product or documentation even if advised of the possibility of such damages This document contains proprietary information protected by copyright Al...

Page 4: ...1 3 CONNECTORS 13 3 1 PERIPHERAL INTERFACE CONNECTORS 14 3 1 1 PCIE G41A2 Layout 14 3 1 2 Peripheral Interface Connectors 14 3 1 3 External Interface Panel Connectors 15 3 2 INTERNAL PERIPHERAL CONNEC...

Page 5: ...ON CONSIDERATIONS 35 4 2 1 Socket LGA775 CPU Installation 37 4 2 2 Socket LGA775 Cooling Kit Installation 40 4 2 3 DIMM Installation 42 4 2 4 Backplane Installation 42 4 2 5 CPU Card Installation 43 4...

Page 6: ...5 3 6 Power Configuration 72 5 3 6 1 ACPI Settings 72 5 3 6 2 APM Configuration 74 5 3 7 Remote Access Configuration 76 5 3 8 USB Configuration 79 5 4 PCI PNP 81 5 5 BOOT 83 5 5 1 Boot Settings Config...

Page 7: ...TOOL FUNCTIONS 119 B 4 1 Factory Restore 121 B 4 2 Backup System 122 B 4 3 Restore Your Last Backup 123 B 4 4 Manual 124 C TERMINOLOGY 125 D DIGITAL I O INTERFACE 129 D 1 INTRODUCTION 130 D 2 DIO CON...

Page 8: ...cation 23 Figure 3 10 Keyboard Mouse Connector Location 24 Figure 3 11 Memory Card Slot Location 25 Figure 3 12 Parallel ATA IDE Connector Location 25 Figure 3 13 Parallel Port Connector Location 27 F...

Page 9: ...ecovery Partition 110 Figure B 6 Press any key to continue 110 Figure B 7 Press F3 to Boot into Recovery Mode 111 Figure B 8 Recovery Tool Menu 111 Figure B 9 About Symantec Ghost Window 112 Figure B...

Page 10: ...igure B 25 Recovery Complete Window 121 Figure B 26 Backup System 122 Figure B 27 System Backup Complete Window 122 Figure B 28 Restore Backup 123 Figure B 29 Restore System Backup Complete Window 123...

Page 11: ...inouts 20 Table 3 8 Floppy Drive Connector Pinouts 21 Table 3 9 Front Panel Connector Pinouts 22 Table 3 10 Infrared Connector Pinouts 23 Table 3 11 Keyboard Mouse Connector Pinouts 24 Table 3 12 Para...

Page 12: ...figuration 72 BIOS Menu 10 ACPI Settings 73 BIOS Menu 11 APM Configuration 74 BIOS Menu 12 Remote Access Configuration 76 BIOS Menu 13 USB Configuration 79 BIOS Menu 14 PCI PnP Configuration 81 BIOS M...

Page 13: ...PCIE G41A2 PICMG 1 3 CPU card Page 1 Chapter 1 1 Introduction...

Page 14: ...include support for four PCI card slots one PCIe x16 slot and one PCIe x4 slot on the backplane High Definition audio via audio kit eight USB 2 0 ports four SATA connectors RAID 0 1 5 FDD IDE paralle...

Page 15: ...d one PCIe x4 slot on the backplane Supports two dual channel DDR3 DIMMs Two Gigabit Ethernet connectors Four SATA connectors High Definition audio with optional audio kit Intel GMA X4500 for DX10 and...

Page 16: ...PCIE G41A2 PICMG 1 3 CPU card Page 4 1 5 Dimensions The main dimensions of the PCIE G41A2 are shown in the diagram below Figure 1 3 PCIE G41A2 Dimensions mm...

Page 17: ...PCIE G41A2 PICMG 1 3 CPU card Page 5 1 6 Data Flow 5Figure 1 4 shows the data flow between the system chipset the CPU and other components installed on the motherboard Figure 1 4 Data Flow Diagram...

Page 18: ...ure UMA Uses up to 352 MB of Dynamic Video Memory Technology DVMT Memory Two dual channel 2 0 GB max 800 MHz or 1066 MHz DDR3 SDRAM DIMMs system max 4 0 GB supported Southbridge Chipset Intel ICH7R BI...

Page 19: ...Floppy Disk Drives One floppy disk drive FDD connector Parallel ATA IDE One Parallel ATA IDE connector Serial ATA Four independent serial ATA SATA channels with 3 0 Gb s data transfer rates Environmen...

Page 20: ...PCIE G41A2 PICMG 1 3 CPU card Page 8 Chapter 2 2 Packing List...

Page 21: ...tic discharge Self grounding Touch a grounded conductor every few minutes to discharge any excess static buildup Use an anti static pad When configuring any circuit board place it on an anti static ma...

Page 22: ...he PCIE G41A2 was purchased from or contact an IEI sales representative directly by sending an email to 32sales iei com tw The PCIE G41A2 is shipped with the following components Quantity Item and Par...

Page 23: ...ble 2 1 Packing List 2 4 Optional Items The following are optional components which may be separately purchased Item and Part Number Image CPU cooler kit P N CF 520 RS R11 CPU cooler kit P N CF 775A R...

Page 24: ...Number Image Audio kit_ 5 1 Channel P N AC KIT08R R10 Audio kit_ 7 1 Channel P N AC KIT 883HD R10 PS2 cable P N 19800 000075 RS 4 port USB cable P N CB USB14 RS SATA power cable P N 32102 000100 100...

Page 25: ...PCIE G41A2 PICMG 1 3 CPU card Page 13 Chapter 3 3 Connectors...

Page 26: ...tors and Jumpers 3 1 2 Peripheral Interface Connectors The table below lists all the connectors on the board Connector Type Label Audio connector 10 pin header J_AUDIO1 Battery 2 pin wafer BAT1 CPU fa...

Page 27: ...SATA 7 pin SATA connector SATA1 SATA 7 pin SATA connector SATA2 SATA 7 pin SATA connector SATA3 SATA 7 pin SATA connector SATA4 SPI Flash ROM 8 pin header JSPI1 SVDO control connector 3 pin header J_S...

Page 28: ...1 Audio Kit Connector CN Label J_AUDIO1 CN Type 9 pin header CN Location See Figure 3 2 CN Pinouts See Table 3 3 This connector connects to an external audio kit Figure 3 2 Audio Kit Connector Locati...

Page 29: ...stem battery The battery provides power to the system clock to retain the time when power is turned off Figure 3 3 Battery Connector Location Pin Description 1 Battery 2 Ground Table 3 4 Battery Conne...

Page 30: ...PIN NO DESCRIPTION 1 GND 2 12 V 3 Rotation Signal 4 Control Table 3 5 CPU Fan Connector Pinouts 3 2 4 CPU Power Input Connector CN Label CPU12V1 CN Type 4 pin connector CN Location See Figure 3 5 CN P...

Page 31: ...3 12 V 4 12 V Table 3 6 CPU Power Input Connector Pinouts 3 2 5 Digital I O Connector CN Label DIO1 CN Type 10 pin header CN Location See Figure 3 6 CN Pinouts See Table 3 7 The digital I O connector...

Page 32: ...1 GND 2 5 V 3 Output 3 4 Output 2 5 Output 1 6 Output 0 7 Input 3 8 Input 2 9 Input 1 10 Input 0 Table 3 7 Digital I O Connector Pinouts 3 2 6 Floppy Disk Connector CN Label FDD1 CN Type 34 pin box he...

Page 33: ...N C 6 N C 7 GND 8 INDEX 9 GND 10 MOTOR ENABLE A 11 GND 12 DRIVE SELECT B 13 GND 14 DRIVE SELECT A 15 GND 16 MOTOR ENABLE B 17 GND 18 DIRECTION 19 GND 20 STEP 21 GND 22 WRITE DATA 23 GND 24 WRITE GATE...

Page 34: ...anel connector connects to the indicator LEDs and buttons on the computer s front panel Figure 3 8 Front Panel Connector Location FUNCTION PIN DESCRIPTION FUNCTION PIN DESCRIPTION Power LED 1 5 V Spea...

Page 35: ...ee Table 3 10 The infrared connector attaches to an infrared receiver for use with remote controls Figure 3 9 Infrared Connector Location Pin Description 1 VCC 2 NC 3 IR RX 4 GND 5 IR TX Table 3 10 In...

Page 36: ...rd and mouse Figure 3 10 Keyboard Mouse Connector Location Pin Description 1 5 V 2 Mouse Data 3 Mouse Clock 4 Keyboard Data 5 Keyboard Clock 6 Ground Table 3 11 Keyboard Mouse Connector Pinouts 3 2 10...

Page 37: ...on 3 2 11 Parallel ATA IDE Connector CN Label IDE1 CN Type 40 pin box header CN Location See Figure 3 12 CN Pinouts See Table 3 12 The Parallel ATA IDE connector can connect to a Parallel ATA IDE hard...

Page 38: ...ND 23 IOW 24 GND 25 IOR 26 GND 27 IDE CHRDY 28 BALE DEFAULT 29 IDE DACK 30 GND 31 INTERRUPT 32 N C 33 SA1 34 PDIAG 35 SA0 36 SA2 37 HDC CS0 38 HDC CS1 39 HDD ACTIVE 40 GND Table 3 12 Parallel ATA IDE...

Page 39: ...6 9 DATA 7 10 ACKNOWLEDGE 11 BUSY 12 PAPER EMPTY 13 PRINTER SELECT 14 AUTO FORM FEED 15 ERROR 16 INITIALIZE 17 PRINTER SELECT LN 18 GROUND 19 GROUND 20 GROUND 21 GROUND 22 GROUND 23 GROUND 24 GROUND...

Page 40: ...N Location See Figure 3 15 CN Pinouts See Table 3 14 This connector provides RS 232 communications Figure 3 15 Serial Port Connector Location PIN NO DESCRIPTION PIN NO DESCRIPTION 1 Data Carrier Direc...

Page 41: ...See Table 3 15 The 8 pin SPI Flash connector is used to flash the BIOS Figure 3 16 SPI Flash Connector PIN DESCRIPTION PIN DESCRIPTION 1 VCC 2 GND 3 CS 4 CLOCK 5 SO 6 SI 7 NC 8 NC Table 3 15 SPI Flash...

Page 42: ...ected to a corresponding SDVO control connector on a compatible IEI backplane Figure 3 17 SDVO Connector Pinout Locations PIN NO DESCRIPTION 1 EXP_EN 2 SDVO_CLOCK 3 SDVO_DATA Table 3 16 SDVO Connector...

Page 43: ...ION 1 VCC 2 GND 3 DATA 4 DATA 5 DATA 6 DATA 7 GND 8 VCC Table 3 17 USB Port Connector Pinouts 3 3 External Peripheral Interface Connector Panel The figure below shows the external peripheral interface...

Page 44: ...a local network PIN DESCRIPTION PIN DESCRIPTION 1 MDIA3 5 MDIA1 2 MDIA3 6 MDIA2 3 MDIA2 7 MDIA0 4 MDIA1 8 MDIA0 Table 3 18 LAN Pinouts 3 3 2 USB Connector CN Label USB_C1 USB_C2 CN Type USB port CN L...

Page 45: ...9 CN Pinouts See Figure 3 20 and Table 3 20 The VGA connector connects to a monitor that accepts a standard VGA input Figure 3 20 VGA Connector PIN DESCRIPTION PIN DESCRIPTION 1 RED 2 GREEN 3 BLUE 4 N...

Page 46: ...PCIE G41A2 PICMG 1 3 CPU card Page 34 Chapter 4 4 Installation...

Page 47: ...stband can help to prevent ESD from damaging the board Self grounding Before handling the board touch any grounded conducting material During the time the board is handled frequently touch any conduct...

Page 48: ...rom the body and helps prevent ESD damage Place the PCIE G41A2 on an antistatic pad o When installing or configuring the motherboard place it on an antistatic pad This helps to prevent potential ESD d...

Page 49: ...ponents When installing the CPU please be careful not to damage it in anyway Make sure the CPU is installed properly and ensure the correct cooling kit is properly installed The LGA775 socket is shown...

Page 50: ...over Step 2 Open the socket Disengage the load lever by pressing the lever down and slightly outward to clear the retention tab Fully open the lever then open the load plate See Figure 4 3 Figure 4 3...

Page 51: ...on the CPU with the socket alignment keys Step 7 Insert the CPU Gently insert the CPU into the socket If the CPU pins are properly aligned the CPU should slide into the CPU socket smoothly See Figure...

Page 52: ...f accidentally or otherwise the pre sprayed layer of thermal paste on the bottom of the heat sink The thermal paste between the CPU and the heat sink is important for optimum heat dissipation To insta...

Page 53: ...the PCB align the support bracket to the screw threads on heat sink that were inserted through the PCB holes See Figure 4 6 Figure 4 6 Securing the Heat sink to the PCIE G41A2 Step 5 Tighten the scre...

Page 54: ...tch on the memory socket See Figure 4 7 Step 3 Insert the DIMM Once aligned press down until the DIMM is properly seated Clip the two handles into place See Figure 4 7 Step 4 Removing a DIMM To remove...

Page 55: ...n the backplane To do this please refer to the reference material that came with the backplane Next secure the CPU card to the chassis To do this please refer to the reference material that came with...

Page 56: ...ault position Setting Description 1 2 Normal Default 2 3 Clear BIOS Table 4 2 Clear BIOS Jumper Settings Figure 4 8 Clear BIOS Jumper Location 4 4 Internal Peripheral Device Connections This section o...

Page 57: ...nnector can only be installed in one direction Figure 4 9 Dual RS 232 Cable Installation Step 3 Secure the bracket The dual RS 232 connector has two D sub 9 male connectors secured on a bracket To sec...

Page 58: ...SATA cable and insert the cable connector into the on board SATA drive connector See Figure 4 10 Figure 4 10 SATA Drive Cable Connection Step 3 Connect the cable to the SATA disk Connect the connecto...

Page 59: ...e To connect the USB cable connector please follow the steps below Step 1 Locate the connectors The locations of the USB connectors are shown in Chapter 3 WARNING If the USB pins are not properly alig...

Page 60: ...ket To secure the bracket to the chassis please refer to the installation instructions that came with the chassis Step 0 4 5 External Peripheral Interface Connection This section describes connecting...

Page 61: ...45 connector Step 0 4 5 2 USB Connection Dual Connector The external USB Series A receptacle connectors provide easier and quicker access to external USB devices Follow the steps below to connect USB...

Page 62: ...lease follow the instructions below Step 1 Locate the female DB 15 connector The location of the female DB 15 connector is shown in Chapter 3 Step 2 Align the VGA connector Align the male DB 15 connec...

Page 63: ...on either side of the connector Step 0 4 6 Software Installation All the drivers for the PCIE G41A2 are on the CD that came with the system To install the drivers please follow the steps below Step 1...

Page 64: ...ge 52 Figure 4 16 Introduction Screen Step 3 Click PCIE G41A2 Step 4 A new screen with a list of available drivers appears Figure 4 17 Figure 4 17 Available Drivers Step 5 Install all of the necessary...

Page 65: ...PCIE G41A2 PICMG 1 3 CPU card Page 53 Chapter 5 5 BIOS...

Page 66: ...ressed restart the computer and try again 5 1 2 Using Setup Use the arrow keys to highlight items press ENTER to select use the PageUp and PageDown keys to change entries press F1 for help and press E...

Page 67: ...ot boot after changes to the system configuration is made CMOS defaults Use the jumper described in Chapter 5 5 1 5 BIOS Menu Bar The menu bar on top of the BIOS screen has the following main items Ma...

Page 68: ...ct Screen Select Item Enter Go to SubScreen F1 General Help F10 Save and Exit ESC Exit v02 61 Copyright 1985 2006 American Megatrends Inc BIOS Menu 1 Main System Overview The System Overview lists a b...

Page 69: ...u BIOS Menu 2 to configure the CPU and peripheral devices through the following sub menus WARNING Setting the wrong values in the sections below may cause the system to malfunction Make sure that the...

Page 70: ...trends Inc BIOS Menu 2 Advanced 5 3 1 CPU Configuration Use the CPU Configuration menu BIOS Menu 3 to view detailed CPU specifications and configure the CPU BIOS SETUP UTILITY Main Advanced PCIPNP Boo...

Page 71: ...gure SATA Channels Before PATA Primary IDE Master Not Detected Primary IDE Slave Not Detected Secondary IDE Master Not Detected Secondary IDE Slave Not Detected Third IDE Master Not Detected Third IDE...

Page 72: ...normal IDE devices IDE DEFAULT Configures SATA devices as normal IDE device RAID Configures SATA devices as normal RAID device AHCI Configures SATA devices as normal AHCI device Configure SATA Channel...

Page 73: ...t Security Chipset Exit Primary IDE Master Device Not Detected Type Auto LBA Large Mode Auto Block Multi Sector Transfer Auto PIO Mode Auto DMA Mode Auto S M A R T Auto 32Bit Data Transfer Enabled Sel...

Page 74: ...her or not the Self Monitoring Analysis and Reporting Technology protocol is supported 32Bit Data Transfer Enables 32 bit data transfer Type Auto Use the Type BIOS option select the type of device the...

Page 75: ...ing Multi Sector Transfer on the specified channel The data to and from the device occurs one sector at a time Auto DEFAULT BIOS auto detects Multi Sector Transfer support on the drive on the specifie...

Page 76: ...ot be determined S M A R T Auto Use the S M A R T option to auto detect disable or enable Self Monitoring Analysis and Reporting Technology SMART on the drive on the specified channel S M A R T predic...

Page 77: ...set Exit Floppy Configuration Floppy A Disabled Select the type of floppy drive connected to the system Select Screen Select Item Enter Go to SubScreen F1 General Help F10 Save and Exit ESC Exit v02 6...

Page 78: ...lect Serial Port Base Addresses Select Screen Select Item Enter Go to SubScreen F1 General Help F10 Save and Exit ESC Exit v02 61 Copyright 1985 2006 American Megatrends Inc BIOS Menu 7 Super IO Confi...

Page 79: ...em and the parallel port device and the transmission rates between the two are much faster than the Normal mode ECP EPP The parallel port is compatible with ECP and EPP devices described above Paralle...

Page 80: ...e the Serial Port2 Address option to select the Serial Port 2 base address Disabled No base address is assigned to Serial Port 2 2F8 IRQ3 DEFAULT Serial Port 2 I O port address is 3F8 and the interrup...

Page 81: ...re 1 264 V 1 125V 1 120 V 3 3V 3 280 V 5V 5 080 V 12V 12 096 V 1 5V 1 520 V 1 8V 1 616 V 5V Dual 5 053 V Select Screen Select Item Enter Go to SubScreen F1 General Help F10 Save and Exit ESC Exit v02...

Page 82: ...G CPU failure can result if this value is set too high When the fan is off it will only start when the temperature exceeds this setting Minimum Value 0 C Maximum Value 127 C Start PWM 070 This is the...

Page 83: ...n PWM Minimum Mode 0 PWM Maximum Mode 127 Hardware Health Monitoring The following system parameters and values are shown The system parameters that are monitored are System Temperatures o CPU Tempera...

Page 84: ...dvanced PCIPNP Boot Security Chipset Exit ACPI Configuration APM Configuration Some SATA CD DVD in AHCI mode need to wait ready longer Select Screen Select Item Enter Go to SubScreen F1 General Help F...

Page 85: ...an Megatrends Inc BIOS Menu 10 ACPI Settings Suspend Mode S1 POS Use the Suspend Mode option to specify the sleep state the system enters when it is not being used S1 POS DEFAULT The system enters S1...

Page 86: ...een F1 General Help F10 Save and Exit ESC Exit v02 61 Copyright 1985 2006 American Megatrends Inc BIOS Menu 11 APM Configuration Restore on AC Power Loss Last State Use the Restore on AC Power Loss BI...

Page 87: ...isabled DEFAULT Wake event not generated by an incoming call Enabled Wake event generated by an incoming call Resume on PCI PME Disabled Use the Resume on PCI PME BIOS option to enable activity on the...

Page 88: ...ate when the alarm goes off 5 3 7 Remote Access Configuration Use the Remote Access Configuration menu BIOS Menu 12 to configure remote access parameters The Remote Access Configuration is an AMIBIOS...

Page 89: ...erial Port Number option to select the serial port used for remote access COM1 DEFAULT System is remotely accessed through COM1 COM2 System is remotely accessed through COM2 NOTE Make sure the selecte...

Page 90: ...pecify when console redirection should occur Disabled The console is not redirected after POST Boot Loader Redirection is active during POST and during Boot Loader Always DEFAULT Redirection is always...

Page 91: ...Enables USB host controllers Select Screen Select Item Enter Go to SubScreen F1 General Help F10 Save and Exit ESC Exit v02 61 Copyright 1985 2006 American Megatrends Inc BIOS Menu 13 USB Configurati...

Page 92: ...come available until a USB compatible operating system is fully booted with all USB drivers loaded When this option is enabled any attached USB mouse or USB keyboard can control the system even when t...

Page 93: ...e IRQ9 Available IRQ10 Available IRQ11 Available IRQ14 Available IRQ15 Available DMA Channel 0 Available DMA Channel 1 Available DMA Channel 3 Available DMA Channel 5 Available DMA Channel 6 Available...

Page 94: ...Q3 IRQ4 IRQ5 IRQ7 IRQ9 IRQ10 IRQ 11 IRQ 14 IRQ 15 DMA Channel Available Use the DMA Channel option to assign a specific DMA channel to a particular PCI PnP device Available DEFAULT The specified DMA i...

Page 95: ...for legacy ISA devices 64K 54 KB reserved for legacy ISA devices 5 5 Boot Use the Boot menu BIOS Menu 15 to configure system boot options BIOS SETUP UTILITY Main Advanced PCIPNP Boot Security Chipset...

Page 96: ...crease the time needed to boot the system Select Screen Select Item Enter Go to SubScreen F1 General Help F10 Save and Exit ESC Exit v02 61 Copyright 1985 2006 American Megatrends Inc BIOS Menu 16 Boo...

Page 97: ...the 10 keys on the keyboard press the Number Lock key located on the upper left hand corner of the 10 key pad The Number Lock LED on the keyboard lights up when the Number Lock is engaged On DEFAULT A...

Page 98: ...device section BIOS SETUP UTILITY Main Advanced PCIPNP Boot Security Chipset Exit Boot Device Priority 1st Boot Device 1st Boot Device 2nd Boot Device 2nd Boot Device 3rd Boot Device 3rd Boot Device S...

Page 99: ...BIOS SETUP UTILITY Main Advanced PCIPNP Boot Security Chipset Exit Hard Disk Drives 1st Drive Hard Drive 1 2nd Drive Hard Drive 2 3rd Drive Hard Drive 3 Specifies the boot sequence from the available...

Page 100: ...reen Select Item Enter Go to SubScreen F1 General Help F10 Save and Exit ESC Exit v02 61 Copyright 1985 2006 American Megatrends Inc BIOS Menu 19 Removable Drives 5 5 5 CD DVD Drives Use the CD DVD Dr...

Page 101: ...boot sequence from the available devices Select Screen Select Item Enter Go to SubScreen F1 General Help F10 Save and Exit ESC Exit v02 61 Copyright 1985 2006 American Megatrends Inc BIOS Menu 20 CD D...

Page 102: ...ervisor Password Change User Password Use the Change User Password to set or change a user password The default for this option is Not Installed If a user password must be installed select this field...

Page 103: ...ends Inc BIOS Menu 22 Chipset 5 7 1 Northbridge Configuration Use the Northbridge Chipset Configuration menu BIOS Menu 23 to configure the Northbridge chipset BIOS SETUP UTILITY Main Advanced PCIPNP B...

Page 104: ...ion that came with the card to see if it is necessary to reserve the space Disabled DEFAULT Memory is not reserved for ISA expansion cards 15 MB 16 MB Between 15 MB and 16 MB of memory is reserved for...

Page 105: ...dge Chipset Configuration Audio Controller Auto Spread Spectrum Mode Disabled Select Screen Select Item Enter Go to SubScreen F1 General Help F10 Save and Exit ESC Exit v02 61 Copyright 1985 2006 Amer...

Page 106: ...Chipset Exit Exit Options Save Changes and Exit Discard Changes and Exit Discard Changes Load Optimal Defaults Load Failsafe Defaults Exit system setup after saving the changes F10 key can be used for...

Page 107: ...m Load Optimal Defaults Use the Load Optimal Defaults option to load the optimal default values for each of the parameters on the Setup menus F9 key can be used for this operation Load Failsafe Defaul...

Page 108: ...PCIE G41A2 PICMG 1 3 CPU card Page 96 Appendix A A BIOS Options...

Page 109: ...nsfer Auto 63 PIO Mode Auto 63 DMA Mode Auto 64 S M A R T Auto 64 32Bit Data Transfer Enabled 64 Floppy A B 65 Parallel Port Address Disabled 66 Parallel Port Mode Normal 66 Parallel Port IRQ IRQ7 67...

Page 110: ...SB 2 0 Controller Enabled 80 Legacy USB Support Enabled 80 USB2 0 Controller Mode HiSpeed 80 IRQ Available 81 DMA Channel Available 82 Reserved Memory Size Disabled 83 Quick Boot Enabled 84 Quiet Boot...

Page 111: ...PCIE G41A2 PICMG 1 3 CPU card Page 99 Load Optimal Defaults 95 Load Failsafe Defaults 95...

Page 112: ...PCIE G41A2 PICMG 1 3 CPU card Page 100...

Page 113: ...PCIE G41A2 PICMG 1 3 CPU card Page 101 Appendix B B One Key Recovery...

Page 114: ...one key recovery software B 1 1 System Requirement The partition created for recovery images must be big enough to contain both the factory default image and the user backup image The size must be ca...

Page 115: ...e o Fedora Core 11 Leonidas o Fedora Core 10 Cambridge o Fedora Core 8 Werewolf o Fedora Core 7 Moonshine o RedHat RHEL 5 4 o RedHat 9 Ghirke o Ubuntu 8 10 Intrepid o Ubuntu 7 10 Gutsy o Ubuntu 6 10 E...

Page 116: ...Setup Procedure for Windows Prior to using the recovery tool to backup or restore system a few setup procedures are required Step 1 Hardware and BIOS setup Step 2 Create partitions Step 3 Install ope...

Page 117: ...rive to the PCIE G41A2 and insert the recovery CD Step 4 Turn on the system Step 5 Press the DELETE key as soon as the system is turned on to enter the BIOS Step 6 Select the connected optical disk dr...

Page 118: ...d to create two partitions One is for the OS installation the other is for saving recovery files and images which will be an invisible partition Press Enter after entering each line below system32 dis...

Page 119: ...PCIE G41A2 PICMG 1 3 CPU card Page 107 system32 format F fs ntfs q v Recovery y system32 exit Figure B 3 Partition Creation Commands...

Page 120: ...partition labeled as Recovery is for use by the system recovery tool and should not be used for installing the operating system or any applications NOTE The operating system installation program may o...

Page 121: ...patient Step 4 When the recovery tool setup menu appears press 2 then Enter Figure B 4 System Configuration for Windows Step 5 The Symantec Ghost window appears and starts configuring the system to b...

Page 122: ...age 110 Figure B 5 Build up Recovery Partition Step 6 After completing the system configuration press any key in the following window to reboot the system Figure B 6 Press any key to continue Step 7 E...

Page 123: ...follow the steps below Step 1 Turn on the system When the following screen displays Figure B 7 press the F3 key to access the recovery tool The message will display for 10 seconds please press F3 befo...

Page 124: ...ard Page 112 Figure B 9 About Symantec Ghost Window Step 4 Use mouse to navigate to the option shown below Figure B 10 Figure B 10 Symantec Ghost Path Step 5 Select the local source drive as shown in...

Page 125: ...in Figure B 12 Then click OK Figure B 12 Select a Source Partition from Basic Drive Step 7 Select 1 2 Recovery NTFS drive and enter a file name called iei Figure B 13 Click Save The factory default im...

Page 126: ...G41A2 PICMG 1 3 CPU card Page 114 Figure B 13 File Name to Copy Image to Step 8 When the Compress Image screen in Figure B 14 prompts click High to make the image file smaller Figure B 14 Compress Im...

Page 127: ...B 15 Image Creation Confirmation Step 10 The Symantec Ghost starts to create the factory default image Figure B 16 Figure B 16 Image Creation Complete Step 11 When the image creation completes a scree...

Page 128: ...ows Please follow the steps below to setup recovery tool for Linux OS Step 1 Hardware and BIOS setup Refer to Section B 2 1 Step 2 Install Linux operating system Make sure to install GRUB v0 97 or ear...

Page 129: ...to create a partition for recovery images system32 diskpart DISKPART list vol DISKPART sel disk 0 DISKPART create part pri size ___ DISKPART assign letter N DISKPART exit system32 format N fs ntfs q v...

Page 130: ...re B 20 System Configuration for Linux Step 5 Access the recovery tool main menu by modifying the menu lst To first access the recovery tool main menu the menu lst must be modified In Linux system ent...

Page 131: ...factory default image Follow Step 2 Step 12 described in Section B 2 5 to create a factory default image S t e p 0 B 4 Recovery Tool Functions After completing the initial setup procedures as describe...

Page 132: ...saved in the hidden partition 3 Restore your last backup Restore the last system backup image 4 Manual Enter the Symantec Ghost window to configure manually 5 Quit Exit the recovery tool and restart...

Page 133: ...n the main menu Step 2 The Symantec Ghost window appears and starts to restore the factory default A factory default image called iei GHO is created in the hidden Recovery partition Figure B 24 Restor...

Page 134: ...in menu Step 2 The Symantec Ghost window appears and starts to backup the system A backup image called iei_user GHO is created in the hidden Recovery partition Figure B 26 Backup System Step 3 The scr...

Page 135: ...Type 3 and press Enter in the main menu Step 2 The Symantec Ghost window appears and starts to restore the last backup image iei_user GHO Figure B 28 Restore Backup Step 3 The screen is shown as in F...

Page 136: ...llow the steps below Step 1 Type 4 and press Enter in the main menu Step 2 The Symantec Ghost window appears Use the Ghost program to backup or recover the system manually Figure B 30 Symantec Ghost W...

Page 137: ...PCIE G41A2 PICMG 1 3 CPU card Page 125 Appendix C C Terminology...

Page 138: ...low amplitude signal represents a binary 0 while a high amplitude signal represents a binary 1 BIOS The Basic Input Output System BIOS is firmware that is first run when the computer is turned on and...

Page 139: ...o and the processor core voltage FSB The Front Side Bus FSB is the bi directional communication channel between the processor and the Northbridge chipset GbE Gigabit Ethernet GbE is an Ethernet versio...

Page 140: ...and Reporting Technology S M A R T refers to automatic status checking technology implemented on hard disk drives UART Universal Asynchronous Receiver transmitter UART is responsible for asynchronous...

Page 141: ...PCIE G41A2 PICMG 1 3 CPU card Page 129 Appendix D D Digital I O Interface...

Page 142: ...t7 as Input value mov dx 0A21h GPIO output I O base address in al dx Get output status jmp 2 Wait jmp 2 Wait and al 0Fh mov bl al Move al to bl temporarily inc dx sets dx to 0A22h in al dx Get input s...

Page 143: ...PCIE G41A2 PICMG 1 3 CPU card Page 131 Appendix E E Watchdog Timer...

Page 144: ...INT 15H is used to control the Watchdog Timer INT 15H AH 6FH Sub function AL 2 Sets the Watchdog Timer s period BL Time out value Its unit second is dependent on the item Watchdog Timer unit select i...

Page 145: ...the system resets EXAMPLE PROGRAM INITIAL TIMER PERIOD COUNTER W_LOOP MOV AX 6F02H setting the time out value MOV BL 30 time out value is 48 seconds INT 15H ADD THE APPLICATION PROGRAM HERE CMP EXIT_A...

Page 146: ...PCIE G41A2 PICMG 1 3 CPU card Page 134 Appendix F F Compatibility...

Page 147: ...run on the PCIE G41A2 Microsoft Windows 7 Microsoft Windows Vista Microsoft Windows XP SP2 32 bit Fedora 8 Ubuntu 9 10 F 2 Compatible Processors The following Intel Socket LGA775 processors have been...

Page 148: ...PCIE G41A2 PICMG 1 3 CPU card Page 136 Appendix G G Hazardous Materials Disclosure...

Page 149: ...the presences of small quantities of certain materials in the product and is applicable to China RoHS only A label will be placed on each product to indicate the estimated Environmentally Friendly Use...

Page 150: ...rcuit Board X O O O O X Metal Fasteners X O O O O O Cable Assembly X O O O O X Fan Assembly X O O O O X Power Supply Assemblies X O O O O X Battery O O O O O O O This toxic or hazardous substance is c...

Page 151: ...CIE G41A2 PICMG 1 3 CPU card Page 139 RoHS RoHS Pb Hg Cd CR VI PBB PBDE X O O O O X X O O O O X X O O O O X X O O O O O X O O O O X X O O O O X X O O O O X O O O O O O O SJ T11363 2006 X SJ T11363 200...

Reviews: