PCIE-G41A2 PICMG 1.3 CPU card
Page 41
Step 3:
Mount the cooling kit
. Gently place the cooling kit on top of the CPU. Make
sure the four threaded screws on the corners of the cooling kit properly pass
through the predrilled holes on the bottom of the PCB.
Step 4:
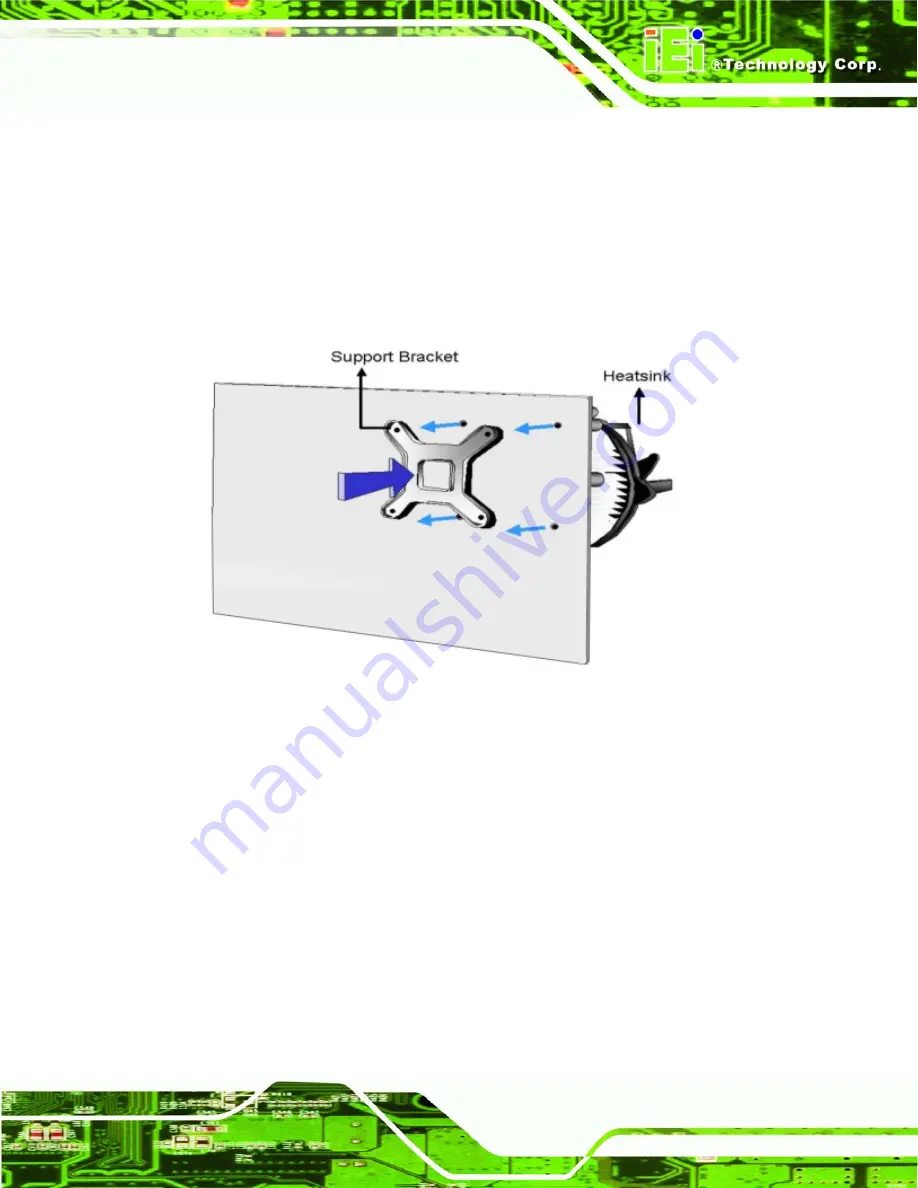
Secure the cooling kit
. From the solder side of the PCB, align the support
bracket to the screw threads on heat sink that were inserted through the PCB
holes. (See
Figure 4-6
)
Figure 4-6: Securing the Heat sink to the PCIE-G41A2
Step 5:
Tighten the screws
. Use a screwdriver to tighten the four screws. Tighten each
nut a few turns at a time and do not over-tighten the screws.
Step 6:
Connect the fan cable
. Connect the cooling kit fan cable to the fan connector
on the PCIE-G41A2. Carefully route the cable and avoid heat generating chips
and fan blades.
Step 0:
Summary of Contents for PCIE-G41A2
Page 13: ...PCIE G41A2 PICMG 1 3 CPU card Page 1 Chapter 1 1 Introduction...
Page 20: ...PCIE G41A2 PICMG 1 3 CPU card Page 8 Chapter 2 2 Packing List...
Page 25: ...PCIE G41A2 PICMG 1 3 CPU card Page 13 Chapter 3 3 Connectors...
Page 46: ...PCIE G41A2 PICMG 1 3 CPU card Page 34 Chapter 4 4 Installation...
Page 65: ...PCIE G41A2 PICMG 1 3 CPU card Page 53 Chapter 5 5 BIOS...
Page 108: ...PCIE G41A2 PICMG 1 3 CPU card Page 96 Appendix A A BIOS Options...
Page 111: ...PCIE G41A2 PICMG 1 3 CPU card Page 99 Load Optimal Defaults 95 Load Failsafe Defaults 95...
Page 112: ...PCIE G41A2 PICMG 1 3 CPU card Page 100...
Page 113: ...PCIE G41A2 PICMG 1 3 CPU card Page 101 Appendix B B One Key Recovery...
Page 137: ...PCIE G41A2 PICMG 1 3 CPU card Page 125 Appendix C C Terminology...
Page 141: ...PCIE G41A2 PICMG 1 3 CPU card Page 129 Appendix D D Digital I O Interface...
Page 143: ...PCIE G41A2 PICMG 1 3 CPU card Page 131 Appendix E E Watchdog Timer...
Page 146: ...PCIE G41A2 PICMG 1 3 CPU card Page 134 Appendix F F Compatibility...
Page 148: ...PCIE G41A2 PICMG 1 3 CPU card Page 136 Appendix G G Hazardous Materials Disclosure...


