background image

tSH-700 Series Firmware Update via Ethernet (Ver. 1.2/Jun. 2017)


  Page: 7


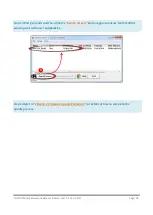
Step 16: Log in to the web configuration pages for the tSH-700 

(use the default password 

“admin”)

Step 17: Verify that the version and date details for the firmware are correct. 


17 

16 

17 

Summary of Contents for tSH-700 Series

Page 1: ...reliable However no responsibility is assumed by ICP DAS for its use nor for any infringements of patents or other rights of third parties resulting from its use COPYRIGHT Copyright 2017 by ICP DAS Al...

Page 2: ...to update the firmware If the module name shows RevB please download tSH700_RevBxxx_xxxxxx zip firmware file to update on the contrary the module name is not RevB please download tSH700fw_vxxx_xxxxxx...

Page 3: ...directly to the Internet as this may cause the update process to fail Refer to Chapter 3 Connecting the Power and Host PC in the tSH 700 Quick Start Guide for more detailed information Download the Q...

Page 4: ...pdate Refer to Section 2 1 Local Firmware Update for more details The Remote Firmware Update method allows the user to initialize the module via a web interface without needing to adjust the hardware...

Page 5: ...ile Supports tSH 700 module tSH700 dat tSH 700 Series tSH700_RevB dat tSH 700RevB Series Step 5 Assign a valid IP Address can be different with the current IP and the factory default MAC Address for t...

Page 6: ...nit Mode to initiate the update Step 10 Confirm that the two MAC addresses factory default listed in the Command Prompt window Waiting request from MAC x x x x and BOOTPREQ from MAC x x x x are the sa...

Page 7: ...erate the module in Run Mode Step 13 In the eSearch Utility search for the tSH 700 module again to verify that it is functioning correctly Note that the network settings for the module may need to be...

Page 8: ...Update via Ethernet Ver 1 2 Jun 2017 Page 7 Step 16 Log in to the web configuration pages for the tSH 700 use the default password admin Step 17 Verify that the version and date details for the firmwa...

Page 9: ...ollow the procedure described below to update firmware of the tSH 700 on the remote PC Step 1 In the eSearch Utility click the Search Servers button to search for any tSH 700 modules connected to the...

Page 10: ...orts tSH 700 module tSH700 dat tSH 700 Series tSH700_RevB dat tSH 700RevB Series Step 5 Assign a valid IP Address can be different with the current IP and the factory default MAC Address for the tSH 7...

Page 11: ...ndow will be displayed to indicate the progress of the update Step 8 Open a web browser such as Internet Explorer or Firefox and enter the URL for the tSH 700 in the address bar of the browser and log...

Page 12: ...m MAC x x x x and BOOTPREQ from MAC x x x x are the same as indicated in the image below If these addresses do not match the update cannot proceed Refer to note4 Page 19 below for more details Step 12...

Page 13: ...need to be reconfigured after updating the firmware Refer to Step 3 in Chapter 1 above for more details Step 14 Click the name of the tSH 700 module to highlight it Step 15 Click the Web button and t...

Page 14: ...ate the firmware for the module using the following procedure Step 1 In the eSearch Utility select the BOOTP item from the Server menu A check mark should be displayed next to the item after it has be...

Page 15: ...menu Step 5 Refer to Steps 4 to 17 in Chapter 2 Firmware Update Procedure for details of how to complete the update process Note the module will response with no IP address in the BOOTP mode User has...

Page 16: ...t PC IP address is 10 0 8 31 refer to the following two methods to update firmware Method 1 Using Dynamic Host Configuration Protocol DHCP to automatically assigns an IP address to tSH 700 module Foll...

Page 17: ...Jun 2017 Page 16 Step 4 Wait 2 seconds and then click the Search Servers button again to ensure the tSH 700 is working well with new configuration Step 5 Refer to Chapter 2 Firmware Update Procedure...

Page 18: ...the eSearch Utility to search for any tSH 700 modules to the network Step 2 Double click the name of tSH 700 to open the Configure Server UDP dialog box Step 3 Select the 0 OFF option from the DHCP dr...

Page 19: ...Jun 2017 Page 18 Step 5 Wait 2 seconds and then click the Search Servers button again to ensure the tSH 700 is working well with new configuration Step 6 Refer to Chapter 2 Firmware Update Procedure...

Page 20: ...re that prevents any modifications from being made to the firmware stored in the flash memory so before attempting to update the firmware the Init Switch should be set to the Init position and then th...

Page 21: ...not begin if a user defined MAC address is assigned in the firmware update window since the addresses do not match If this situation occurs repeat the update procedure and manually enter the factory d...

Reviews: