


Before
you
can
enable
the
memory
sparing
feature,
you
must
install
one
additional
pair
of
DIMMs.
The
memory
sparing
DIMM
pair
must
be
the
same
speed,
type,
and
the
same
size
as
or
larger
than
the
active
DIMM
pair.
To
enable
memory
mirroring
or
sparing
through
the
Configuration/Setup
Utility
program,
select
Advanced
Setup
from
the
main
menu,
and
select
Memory
Configuration
.
For
more
information
about
using
the
Configuration/Setup
Utility
program,
see
the
Users
Guide
.
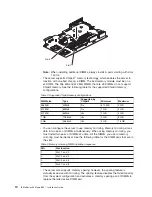
See
the
following
table
for
memory-sparing
DIMM
connector
assignments.
Table
4.
Memory-sparing
DIMM
connector
assignments
Active
DIMM
connectors
Memory
sparing
DIMM
connectors
Slot
1
and
2
Slot
3
and
4
Slot
1
and
2
Slot
3
and
4
Slot
5
and
6
Slot
1
and
2
Slot
3
and
4
Slot
5
and
6
Slot
7
and
8
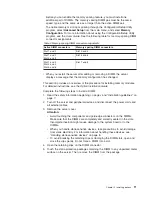
v
When
you
restart
the
server
after
adding
or
removing
a
DIMM,
the
server
displays
a
message
that
the
memory
configuration
has
changed.
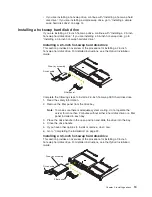
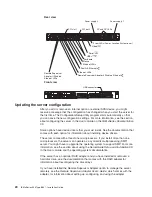
This
section
provides
an
overview
of
the
procedure
for
installing
memory
modules.
For
detailed
instructions,
see
the
Option
Installation
Guide
.
Complete
the
following
steps
to
install
a
DIMM:
1.
Read
the
safety
information
beginning
on
page
v
and
“Installation
guidelines”
on
page
7.
2.
Turn
off
the
server
and
peripheral
devices,
and
disconnect
the
power
cords
and
all
external
cables.
3.
Remove
the
server
cover.
Attention:
v
Avoid
touching
the
components
and
gold-edge
connectors
on
the
DIMMs.
Make
sure
that
the
DIMMs
are
completely
and
correctly
seated
in
the
slots.
Incomplete
insertion
might
cause
damage
to
the
system
board
or
to
the
DIMMs.
v
When
you
handle
static-sensitive
devices,
take
precautions
to
avoid
damage
from
static
electricity.
For
information
about
handling
these
devices,
see
“Handling
static-sensitive
devices”
on
page
8.
v
To
avoid
breaking
the
retaining
clips
or
damaging
the
DIMM
slots,
open
and
close
the
clips
gently.
Do
not
force
a
DIMM
into
a
slot.
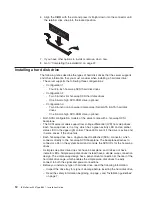
4.
Open
the
retaining
clips
on
the
DIMM
connector.
5.
Touch
the
static-protective
package
containing
the
DIMM
to
any
unpainted
metal
surface
on
the
server.
Then,
remove
the
DIMM
from
the
package.
Chapter
2.
Installing
options
11
Summary of Contents for 883725U
Page 3: ...IBM xSeries 336 Type 8837 Installation Guide ERserver...
Page 18: ...6 IBM xSeries 336 Type 8837 Installation Guide...
Page 38: ...26 IBM xSeries 336 Type 8837 Installation Guide...
Page 46: ...34 IBM xSeries 336 Type 8837 Installation Guide...
Page 64: ...52 IBM xSeries 336 Type 8837 Installation Guide...
Page 66: ...54 IBM xSeries 336 Type 8837 Installation Guide...
Page 112: ...100 IBM xSeries 336 Type 8837 Installation Guide...
Page 113: ......
Page 114: ...Part Number 25R4613 Printed in USA 1P P N 25R4613...


