background image

ix

Säkerhetsföreskrifter

FARA

Koppla los nätkabeln innan du rengör skrivaren.

VARNING

Innan du kopplar på strömmen till skrivaren ska du
kontrollera att den är ansluten till rätt   
strömförsörjning.

I avsnittet Val av uppställningsplats (Select a Site) i
kapitel 2 av Installationsanvisningar (Setup Guide)   
finns information om rätt strömförsörjning.

Sikkerhetsinformasjon

ADVARSEL

Trekk ut strømledningens støpsel fra stikkontakten før
skriveren rengjøres.

OBS!

Kontroller at skriveren er tilknyttet riktig strømkilde før
du slår den på.

Du finner nærmere opplysninger om egnede   
strømkilder under avsnittet Valg av egnet sted for
skriveren (Select a Site) i kapittel 2 i
Installasjonshåndboken (Setup Guide).

Summary of Contents for 6400 Series

Page 1: ...S246 0149 03 6400 Line Matrix Printer Coax Twinax Multi Platform Interface Feature Operation Guide...

Page 2: ...lowing revisions Reader comments may be sent by fax to 1 800 524 1519 or by e mail to print_pubs vnet ibm com or by regular mail to Department H7FE Building 003G The IBM Printing Systems Company Infor...

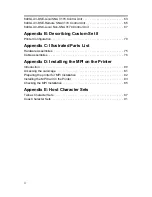
Page 3: ...er 19 Coax Code Maps 22 Using Twinax with the MPI Twinax Connection 29 Twinax Code Maps 34 Code Dump Mode 37 Twinax Command Interpreter 40 Using PC Parallel with MPI Introduction 44 Connection 45 Sett...

Page 4: ...Configuration 70 Appendix C Illustrated Parts List Hardware Assemblies 75 Cable Assemblies 76 Appendix D Installing the MPI on the Printer Introduction 80 Accessing the card cage 81 Preparing the pri...

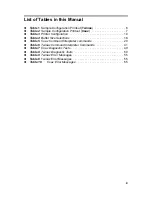
Page 5: ...Table 3 Printer Configuration 10 Table 4 Buffer Size Selections 16 Table 5 Coax Command Interpreter commands 20 Table 6 Twinax Command Interpreter Commands 41 Table 7 Coax Diagnostic Tests 49 Table 8...

Page 6: ...e NY 10577 U S A Electronics Emission Notices Federal Communications Commission FCC Statement Note This equipment has been tested and found to comply with the limits for a Class A digital device pursu...

Page 7: ...ception requiring the owner or operator to take whatever steps are necessary to correct the interference Avis de confomit aux normes du minist re des Communications du Canada Cet quipment ne d passe p...

Page 8: ...n this publication are trademarks of the IBM Corporation in the United State or other countries or both IBM AS 400 SCS The following terms denoted by a double asterisk in this publication are trademar...

Page 9: ...Site section in Chapter 2 of the Setup Guide for information on proper power sources Sikkerhedsinstrukioner FARE Tag stikket ud af kontakten inden De g r printeren ren FORSIGTIG Forvis Dem om at prin...

Page 10: ...kohdassa Asennuspaikan valinta Select Site on tietoja virtal hteen valinnasta Normas de Seguran a PERIGO Desligue o fio de corrente alternada antes de limpar a impressora ATEN O Antes de ligar a impre...

Page 11: ...i kapitel 2 av Installationsanvisningar Setup Guide finns information om r tt str mf rs rjning Sikkerhetsinformasjon ADVARSEL Trekk ut str mledningens st psel fra stikkontakten f r skriveren rengj res...

Page 12: ...x...

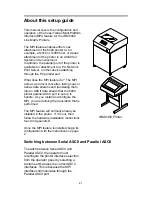
Page 13: ...coax or twinax data streams and translating them into an ASCII data stream that the 6400 printer parallel ASCII port is set up to handle As you install and configure the MPI you are defining the tran...

Page 14: ...rix Printer Setup Guide S246 0116 6400 Line Matrix Printer Operators Guide S246 0115 6400 IGP User s Guide S246 0151 6400 Code V User s Guide S246 0150 Related Publications Related Publications The fo...

Page 15: ...Multi Platform Interface Feature Operation Guide 1 CONFIGURATION Preparing for Configuration 2 Configuring the Printer 9 Configuring for port switching 12...

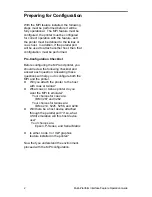
Page 16: ...uring the MPI and printer you should review the following checklist and answer each question Answering these questions will help you to configure both the MPI and the printer Will you attach the print...

Page 17: ...onfigure the MPI and the printer Set the MPI dip switches Page 5 Set the printer configuration Page 9 If configuring for coax set the coax buffer size using the rotary switch see Using Coax with the M...

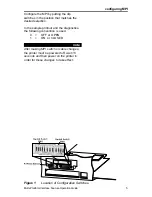
Page 18: ...auto termination cable part number 14H5335 is attached to the MPI twinax is the default Therefore if you want to configure the MPI for coax the coax BNC adapter cable must be attached to the MPI The...

Page 19: ...the dip switches in the position that matches the desired selection In the sample printout and the diagnostics the following convention is used 0 OFF or OPEN 1 ON or CLOSED note After making MPI swit...

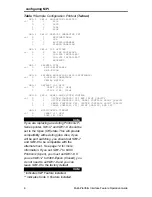
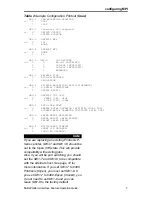
Page 20: ...SYSTEM CONTROLS CPI PANEL CONTROLS PRINT QUALITY 1 0 PANEL CONTROLS CPI SYSTEM CONTROLS PRINT QUALITY 1 1 PANEL CONTROLS CPI PRINT QUALITY AND LPI SW2 4 MULTIPLEXER TIMEOUT 0 SHORT 15 SEC 1 LONG 45 S...

Page 21: ...TER OPERATOR INITIATED LOCAL COPY 1 DISABLE AFTER OPERATOR INITIATED LOCAL COPY SW2 3 PAPER ERROR REPORTING 0 NEVER REPORT PAPER ERRORS 1 REPORT PAPER ERRORS SW2 4 MULTIPLEXER TIMEOUT 0 SHORT 15 SECON...

Page 22: ...figuring MPI 8 Multi Platform Interface Feature Operation Guide note indicates IGP Feature installed indicates Code V Feature installed note MPP means Maximum Print Position MPL means Maximum Page Len...

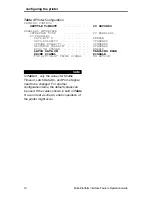
Page 23: ...guration is not set to Custom Set 8 do so now Table 3 shows the most important values shuttle time out latch data on and prime signal If these printer configuration values are set incorrectly it may c...

Page 24: ...RD RESPONSE POLARITY STANDARD BUSY ON STROBE ENABLE LATCH DATA ON TRAILING EDGE PRIME SIGNAL DISABLE TOF ACTION AT PRIME SIGNAL NO ACTION Table 3 Printer Configuration note In Table 3 only the values...

Page 25: ...he feature installed and the printer properly configured Check the sample printouts of Table 2 and Table 1 to see how to configure the MPI when these two features are being used Further changes to Cus...

Page 26: ...emulation used by the PC application to match the emulation you have set in the printer For example when you have set the printer emulation to 6400 Epson your host ASCII application should use a stand...

Page 27: ...Multi Platform Interface Feature Operation Guide 13 Using Coax with the MPI Coax Connection 14 Coax Buffer Size 16 Coax Code Dump Mode 17 Coax Command Interpreter 19 Coax Code Maps 22...

Page 28: ...or additional information on defining the printer in the S 370 and S 390 environments refer to Appendix A of this manual Power on the printer At this point the SYNC LED indicating line activity will b...

Page 29: ...rm Interface I O has two LEDs labeled SYNC and SYS see page 75 These can be used to determine line connection status and host acknowledgment When the coax cable is first attached to the BNC Adapter th...

Page 30: ...ump mode 8 1920 Screen 4K Buffer 9 1920 Screen 4K Buffer Table 4 Buffer Size Selections Coax Buffer Size While connected to the coax line the IBM 6400 Multi Platform Interface Feature has a built in b...

Page 31: ...xadecimal format This can be useful when debugging your Entering Code Dump mode To enter the Code Dump mode Power off the printer 2 3 Power on the printer and place it on Once the Configuration Printo...

Page 32: ...Interface Feature Operation Guide Exiting Code Dump Mode To exit Code Dump mode 1 Power off the printer 2 Reset the buffer size by setting the ADDRESS switch to the desired address 0 6 or 8 9 3 Power...

Page 33: ...an pass the hexadecimal codes to the printer that access the ASCII features of the printer These codes allow you to transparently pass any character or sequence of characters to the printer These code...

Page 34: ...value of the three digit number immediately following the command Top of form will be set to the current physical line The value must be in the range 000 127 There may NOT be any other characters emb...

Page 35: ...eature Operation Guide 21 ONN turns on command interpreter ONN HEX 0C 0C 0C send three ONN HEX 41 42 43 send ABC in ASCII to printer OFF HEX 0C 0C 0C ONN HEX 0C 0C 0C OFF printer then feed three sheet...

Page 36: ...the ASCII character These maps illustrate the translation from host code page United States to ASCII code page PC850 Translation maps for other code pages such as United Kingdom are not shown See App...

Page 37: ...nc nc nc 4 2F 34 3A 5 CR nc nc nc nc 5 5C 35 2B 6 nc LN nc nc nc nc 6 7C 36 7 nc nc nc nc nc nc 7 7C 37 8 8 3E 3F 38 nc nc nc nc nc 9 9 3C 21 39 nc nc nc nc nc A 5B 24 5E nc nc nc nc nc B 5D 7E nc nc...

Page 38: ...TT ATT ATT ATT 5 f v F V 66 76 46 56 ATT ATT ATT ATT 6 g w G W 67 77 47 57 ATT ATT ATT ATT 7 h x H X 68 78 48 58 ATT ATT ATT ATT 8 i y I Y 69 79 49 59 ATT ATT ATT ATT 9 j z J Z 6A 7A 4A 5A ATT ATT ATT...

Page 39: ...c nc 6 nf BS nf nf nc nc nc nc 7 nf nf nf nf nc nc nc nc 8 GE nf SA nf nc nc nc nc 9 nf nf nf nf nc nc nc 60 A nf nf nf nf nc 21 7C 3A B VT nf FMT nf 2E 24 2C 23 C FF nf nf nf 3C 2e 25 40 D CR nf nf n...

Page 40: ...77 46 4a 57 36 7 g p x nc G P X 7 67 70 78 47 50 58 37 8 h q y nc H Q Y 8 68 71 79 48 51 59 38 9 i r z nc I R Z 9 69 72 7A 49 52 5A 39 A nc nc nc nc nc nc nc nc B nc nc nc nc nc nc nc nc C nc nc nc nc...

Page 41: ...ration Guide 27 The following Format FMT control codes are supported in LU1 SCS SHF 2BC1 SET HORIZONTAL FORMAT any MPP valid SVF 2BC2 SET VERTICAL FORMAT any Line Density valid SLD 2BC6 SET LINE DENSI...

Page 42: ...28 Multi Platform Interface Feature Operation Guide Using Twinax with the MPI Twinax Connection 29 Twinax Code Maps 34 Code Dump Mode 37 Twinax Command Interpreter 40...

Page 43: ...ny active devices on the twinax line that the printer is going to be on 1 Terminate the device immediately up cable of the printer on the twinax line 2 Place on Hold any devices down cable of the prin...

Page 44: ...WER switch should be in the OFF position Smart T attachment Connect the supplied Smart T twinax auto termination cable part number 14H5335 to the 15 pin connector on the printer s MPI interface See Fi...

Page 45: ...line the twinax cable attaches to either side of the Smart T connected to the printer 3 If there is a down cable device connect the other twinax cable to either side of the Smart T Address switch Bef...

Page 46: ...rface I O has two LEDs labeled SYNC and SYS see page 75 These can be used to determine line connection status and host acknowledgment When the twinax cable is first attached to the Smart T the SYNC LE...

Page 47: ...r verification test 2 Select this printer s ID number to run the test on this printer 3 Select the number of times that you wish to print the WORK STATION VERIFICATION TEST Possible selections are a P...

Page 48: ...host character sets Translating Host Code Page to ASCII Code Pages Set the active printer ASCII printer emulation as follows to correctly map host code pages to ASCII code pages Epson Emulation Chara...

Page 49: ...f nf nf nf 83 88 B6 D2 3 ATR nf nf nf N 84 89 8E D3 4 nf nf nf PP A0 8A B7 D4 5 nf NL LF ETR N 85 A1 B5 D6 6 nf BS nf nf C6 8C C7 D7 7 nf nf nf nf 86 8B 8F D8 8 nf nf nf nf 87 8D 80 DE 9 nf nf nf nf A...

Page 50: ...6 66 6F 77 F4 46 4F 57 36 7 g p x G P X 7 67 70 78 AC 47 50 58 37 8 h q y H Q Y 8 68 71 79 AB 48 51 59 38 9 i r z I R Z 9 69 72 7A F3 49 52 5A 39 A AE A6 AD 5E F0 FB FD FC B AF A7 A8 B3 93 96 E2 EA C...

Page 51: ...ormat Entering Code Dump mode To access the Code Dump mode provided by the controller 1 Power off the printer 2 Set the ADDRESS switch to address 7 3 Power on the printer After the MPI configuration h...

Page 52: ...Interface Feature Operation Guide Exiting Code Dump Mode To exit Code Dump mode 1 Power off the printer 2 Set the ADDRESS switch on the MPI to the device s current address 0 6 on the host system 3 Po...

Page 53: ...mp header is identical to the Diagnostic self test header except for the test identification in the first line Following the header the received data is printed in a structured field dump format See F...

Page 54: ...ol codes you can pass the ASCII hexadecimal codes to the printer that access the features of the printer These codes allow you to transparently pass any character or sequence of characters to the prin...

Page 55: ...Pack valid Hexadecimal characters two to a byte and send to the printer Invalid Hexadecimal characters will be skipped all SNA commands will be passed out Terminate Hex mode by sending an at sign Tabl...

Page 56: ...e To send a carriage return line feed ABC followed by a form feed you would send the following ONN HEX 0D 0A 41 42 43 0C or ONN HEX 0D 0A ABC HEX 0C In either case once the Command Interpreter is enab...

Page 57: ...Multi Platform Interface Feature Operation Guide 43 Using PC Parallel with MPI Introduction 44 Connection 45 Setting time outs on the Parallel Host 46...

Page 58: ...support devices attached via a parallel port When connected to two host systems the interface will switch to the other port once the port currently printing is idle for a preset period of time When th...

Page 59: ...l connector on the printer Select a time out configuration either short or long to match your system s needs note 1 The printer will feed a blank page when data host inputs are switched 2 When switchi...

Page 60: ...prompt or in a batch file will set the parallel port timeout to infinite retry DOS will continue to try to print a file until it is completed or removed from the print queue with a PRINT T command OS...

Page 61: ...Multi Platform Interface Feature Operation Guide 47 TROUBLESHOOTING Diagnostics 48 Troubleshooting your Host Printer Operation 52 Compatibility Issues 54...

Page 62: ...nd the MPI are operating properly Diagnostic Header Each diagnostic test prints a header that displays the firmware part number revision level and the controller board option switch settings For examp...

Page 63: ...de All other address settings for the coax diagnostic mode are invalid Table 7 Coax Diagnostic Tests Coax Operation Dialing the diagnostic test number into the ADDRESS Address 7 switch selects the dia...

Page 64: ...ests Twinax Operation Dialing the diagnostic test number into the ADDRESS switch selects the diagnostic routines Powering up the printer executes them See NOTE You may change the ADDRESS switch while...

Page 65: ...8 twinax on page 50 1 Run each diagnostic and save the diagnostic printout 2 Check all of the installation connections 3 Verify that the printer s configuration is set according to Table 3 on page 10...

Page 66: ...is set using the interface configuration switches SW1 1 and SW1 2 Your emulation options for twinax mode are 4214 4234 5225 or 5256 In the coax operating mode 3287 or 3262 are available 4 Verify that...

Page 67: ...rint the job in hexadecimal format Use this printout to verify data from the host 11 With the MPI not in code dump mode set the printer configuration to Hex Print Mode and print the job Use the printo...

Page 68: ...when implementing the printer in the host environment Cancel Key When the user presses the printer s CANCEL key nothing is reported to the host application The MPI does not send a message to the host...

Page 69: ...id Control Code Invalid SCS Parameter Invalid Parameter Graphic Check Unprintable character detected after receipt of a set graphic exception action Table 9 Twinax Error Messages Error Reported Cause...

Page 70: ...II and Parallel ASCII To switch between Serial ASCII and Parallel ASCII the operator must reconfigure the printer interface selection from the operator panel by selecting a custom set that used the co...

Page 71: ...Printer in S 370 S 390 Environments Overview 58 6400 LU1 SCS Local SNA 3174 Control Unit 59 6400 LU1 SCS Remote SNA 3174 Control Unit 61 6400 LU3 DSE Local SNA 3174 Control Unit 63 6400 LU3 DSE Remote...

Page 72: ...y to define a printer in the S 370 S 390 environment to VTAM JES2 POWER PSF VPS JES328X Print Facility NCP VM VSE MVS and or other software depending upon your operating environment and printing requi...

Page 73: ...or another Application Program such as VPS or JES328X products 4 Select the options on the printer that are appropriate for the environment Step 1 VTAM Definition The following should be added to the...

Page 74: ...NAME LOC64XX DEST R1 Step 3 Define to CICS or another application program An application program must provide the SCS commands to control the printer CICS VPS and other applications support SCS as wel...

Page 75: ...be required if VPS See details below 4 Define to JES328X Print Facility VPS or equivalent product 5 Select the options on the printer that are appropriate for the environment Step 1 NCP Definition XYZ...

Page 76: ...OFCBLOD WS W R Q PMD LIM F T C P CKPTPAGE 30 DESTID NAME P64XX DEST R1 Step 4 Define to CICS or another application program An application program must provide the SCS commands to control the printer...

Page 77: ...Not required but recommended See details below 3 Define to CICS or another Application Program such as VPS or JES328X products 4 Select the options on the printer that are appropriate for the environ...

Page 78: ...plication program Refer to the vendor documentation for defining a DSE printer to the program for its use Host system commands to change printer setting are not supported in DSE mode Step 4 Printer Se...

Page 79: ...e to JES328X Print Facility VPS or equivalent product 5 Select the options on the printer that are appropriate for the environment Step 1 NCP Definition XYZ GROUP TYPE NCP LINK ADDRESS 032 PU ADDR C1...

Page 80: ...KPTPAGE 30 DESTID NAME P64XX DEST R1 Step 4 Define to CICS or another application program Refer to the vendor documentation for defining a DSE printer to the program for its use Host system commands t...

Page 81: ...NOT required but recommended See details below 3 Define to CICS or another Application Program such as VPS or JES328X products 4 Select the options on the printer that are appropriate for the environ...

Page 82: ...plication program Host commands for changing printer settings are not supported in this mode Refer to the vendor documentation for defining an DSC printer to the program for its use Step 4 Printer Set...

Page 83: ...Multi Platform Interface Feature Operation Guide 69 Appendix B Describing Custom Set 8 Printer Configuration 70...

Page 84: ...g is a listing of the values stored in Custom Set 8 If you are experiencing problems printing jobs you may need to change values contained in Custom Set 8 Detailed descriptions of the values contained...

Page 85: ...CUSTOM SET VALUES CUSTOM PRELOADED SET 8 PARALLEL INTERFACE INTERFACE TYPE PC PARALLEL PC PARALLEL DATABIT 8 ENABLE DATA POLARITY STANDARD STROBE POLARITY STANDARD RESPONSE POLARITY STANDARD BUSY ON S...

Page 86: ...MULTINATIONAL ASCII USA ECMA LATIN 1 SELECT SUBSET PRIMARY ASCII USA SELECT SUBSET EXTENDED MULTINATIONAL DEC MULTINATIONAL ASCII USA CONTROL CODE 06 8 0 LPI CONTROL CODE 08 ELONGATED DEFINE CR CODE C...

Page 87: ...R INCH 6 0 LINES PER INCH FORMS WIDTH FORMS WIDTH IN INCHES 13 2 INCHES FORMS WIDTH IN MM 335 3 MM FORMS WIDTH IN CHARACTERS 132 CHARACTERS FORMS LENGTH FORMS LENGTH IN INCHES 11 0 INCHES FORMS LENGTH...

Page 88: ...74 Multi Platform Interface Feature Operation Guide Appendix C Illustrated Parts List Hardware Assemblies 75 Cable Assemblies 76...

Page 89: ...hardware assemblies Multi Platform Interface Feature Operation Guide 75 Hardware Assemblies...

Page 90: ...cable assemblies 76 Multi Platform Interface Feature Operation Guide Cable Assemblies...

Page 91: ...cable assemblies Multi Platform Interface Feature Operation Guide 77...

Page 92: ...Cable Assembly Twinax Auto termination Length 39 Part No Description 14H5335 cable assemblies 78 Multi Platform Interface Feature Operation Guide...

Page 93: ...uide 79 Appendix D Installing the MPI on the Printer Introduction 80 Accessing the card cage 81 Preparing the printer for MPI Installation 82 Installing the MPI Card in the Printer 83 Attaching the MP...

Page 94: ...owing instructions are for trained service personnel only Before installing the card print the 6400 configuration and graphics option configuration Retain these for possible reference To complete this...

Page 95: ...m any and all power before proceeding with any installation To access the Card Cage 1 Open the Printer Cover Unload any paper 2 Loosen the hold down screws 3 Lift slightly the right end and slide the...

Page 96: ...tor that is currently installed in the printer and open the interface expansion slot To remove the interface 1 With the printer s rear cabinet door open remove the interface expansion slot cover panel...

Page 97: ...th any installation 1 Install supplied standoff into the mounting hole next to connector J111 on the printer s Controller Board 2 Connect MPI data cable connector P112 to J112 on the printer s Control...

Page 98: ...ulti Platform PCBA to the standoff installed earlier located on the printer s mother board next to connector J111 See Figure 8 5 Connect the printer s Centronics data cable to the connector P3 on the...

Page 99: ...cking the MPI Installation Once you have verified that the connectors and boards are securely connected re install the Paper Guide Assembly to the card cage Reconnect the AC power cord and run the bui...

Page 100: ...86 Multi Platform Interface Feature Operation Guide Appendix E Host Character Sets Twinax Character Sets 87 Coax Character Sets 91...

Page 101: ...tion Guide 87 Twinax Character Sets Multinational EBCDIC Character Set 0 1 2 3 4 5 6 7 8 9 A B C D E F 0 0 1 a j A J 1 2 b k s B K S 2 3 c l t C L T 3 4 d m u D M U 4 5 e n v E N V 5 6 f o w F O W 6 7...

Page 102: ...rface Feature Operation Guide USA EBCDIC Character Set 0 1 2 3 4 5 6 7 8 9 A B C D E F 0 0 1 a j A J 1 2 b k s B K S 2 3 c l t C L T 3 4 d m u D M U 4 5 e n v E N V 5 6 f o w F O W 6 7 g p x G P X 7 8...

Page 103: ...ture Operation Guide 89 Austria Germany EBCDIC Character Set 0 1 2 3 4 5 6 7 8 9 A B C D E F 0 0 1 a j A J 1 2 b k s B K S 2 3 c l t C L T 3 4 d m u D M U 4 5 e n v E N V 5 6 f o w F O W 6 7 g p x G P...

Page 104: ...Feature Operation Guide French Canadian EBCDIC Character Set 0 1 2 3 4 5 6 7 8 9 A B C D E F 0 0 1 a j A J 1 2 b k s B K S 2 3 c l t C L T 3 4 d m u D M U 4 5 e n v E N V 5 6 f o w F O W 6 7 g p x G P...

Page 105: ...de 91 Coax Character Sets USA Internal 3270 Character Set 0 1 2 3 4 5 6 7 8 9 A B C D E F 0 0 a q A Q 1 1 b r B R 2 2 c s C S 3 3 d t D T 4 4 e u E U 5 5 f v F V 6 6 g w G W 7 7 Y h x H X 8 8 A i y I...

Page 106: ...face Feature Operation Guide USA EBCDIC Character Set 0 1 2 3 4 5 6 7 8 9 A B C D E F 0 0 1 a j A J 1 2 b k s B K S 2 3 c l t C L T 3 4 d m u D M U 4 5 e n v E N V 5 6 f o w F O W 6 7 g p x G P X 7 8...

Page 107: ...eration Guide 93 UK Internal 3270 Character Set 0 1 2 3 4 5 6 7 8 9 A B C D E F 0 0 a q A Q 1 1 b r B R 2 2 c s C S 3 3 d t D T 4 4 e u E U 5 5 f v F V 6 6 g w G W 7 7 Y h x H X 8 8 A i y I Y 9 9 E j...

Page 108: ...face Feature Operation Guide UK EBCDIC Character Set 0 1 2 3 4 5 6 7 8 9 A B C D E F 0 0 1 a j A J 1 2 b k s B K S 2 3 c l t C L T 3 4 d m u D M U 4 5 e n v E N V 5 6 f o w F O W 6 7 g p x G P X 7 8 h...

Page 109: ...coax character sets Multi Platform Interface Feature Operation Guide 95...

Page 110: ...coax character sets 96 Multi Platform Interface Feature Operation Guide...

Reviews: