16
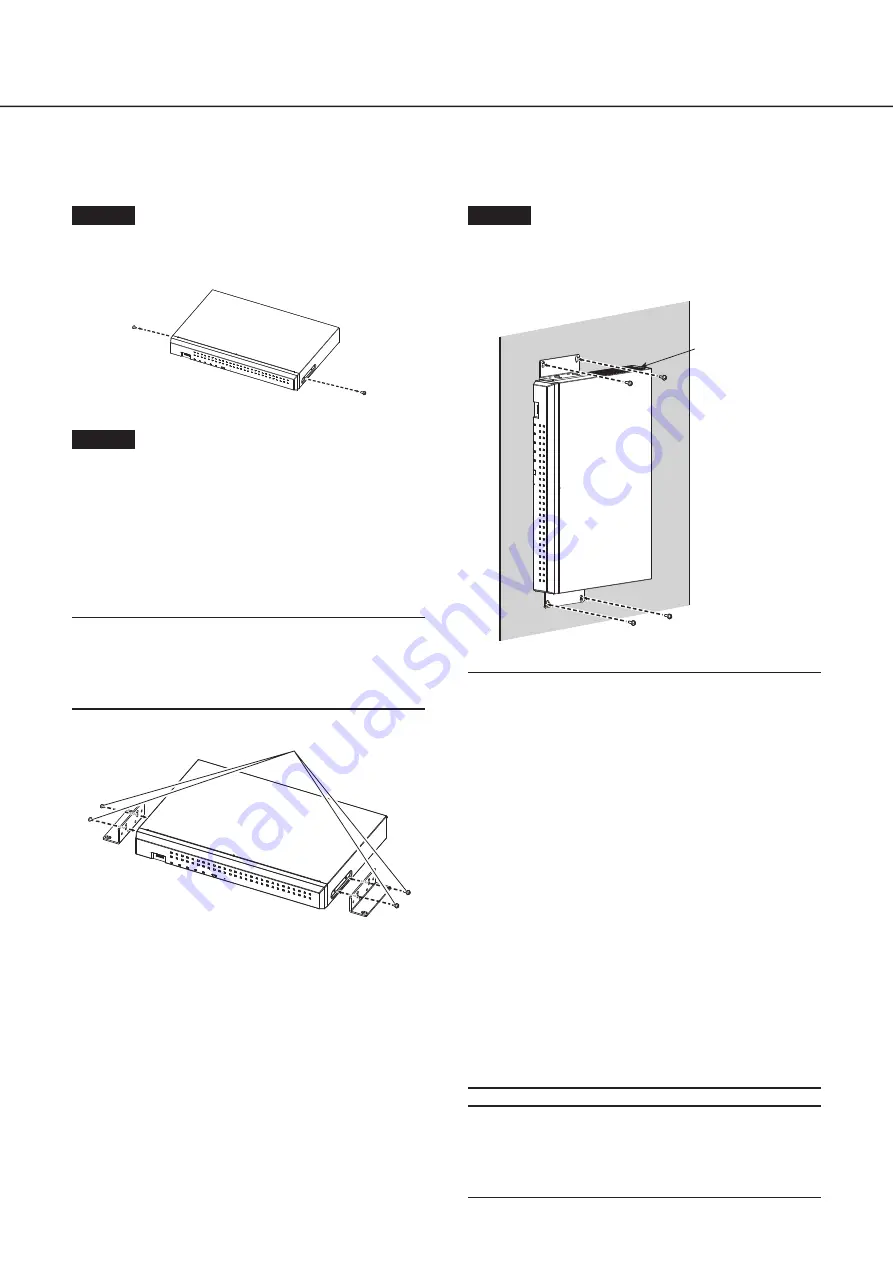
Wall Mounting
Rack mount bracket WV-QRM201 (set of 2, option) is required for wall mounting this product.
Step 1
Remove the screws (2 pcs.) at the front of both sides
of the product.
Keep the removed screws (M3 × 6 mm) securely.
Step 2
Attach the rack mount brackets (WV-QRM201: option)
to both sides of the product.
Secure with four rack mount bracket fixing screws (included
with WV-QRM201).
• Screw tightening torque:
0.59 N·m to 0.78 N·m (6.0 k
g
f·cm to 8.0 k
g
f·cm)
{0.43 lbf·ft - 0.58 lbf·ft}
Note:
• Use the following standard accessories included with the
WV-QRM201 rack mount bracket.
Rack mount brackets × 2
Rack mount bracket fixing screws (M3 × 10 mm) × 4
Rack mount bracket fixing screws
(M3 × 10 mm: included with WV-QRM201) × 4
Step 3
Mount the product vertically on the wall.
Securely fix the product to the wall with mounting screws
(4 pcs.) (M5, 10 mm or longer, locally procured).
Cooling fan outlet
Important:
• When installing the recorder on a wall, the height should
be no more than 2 m {6.6 ft}.
• Make sure to mount on the wall so that the cooling fan
outlets are always on the top or to the left and right. Do
not face the cooling fan outlets downwards.
• Make sure that the minimum pullout strength of the
mounting screws is 196 N (20 kgf) {44 lbf} per screw.
• Select the type of screws according to the material of
the wall. Do not use wood screws or nails.
• Adequately reinforce the wall when mounting on a wall
that is not strong enough, like a wall made of gypsum
boards.
• The operating temperature of the recorder ranges from
+0 °C to +45 °C {32 °F - 113 °F}.
* When the temperature of HDD rises, the features may
deteriorate and the service life may be affected. It is
recommended to use the recorder (including the AC
power adapter) at approx. +25 °C {77 °F}.
• Route the cables (including the DC cable of the AC
power adapter) properly so that they will not be pulled or
bent and the AC power adapter will not be hung in the
air.
Note:
• If you install the recorder on a wall in the direction as
shown in the above-mentioned STEP 3, the cooling fan
outlet will be located at the top, and the cooling effect
will be higher.
2
Installation
(continued)


