background image

13

(When replacing the hard disk drives)

When replacing a hard disk drive with another one, it is necessary to perform the removal process. In this case, do the 
following.

Step 1

Perform the removal process of the hard disk drive.  
(

 Operating Instructions (PDF))

Step 2

Turn off the power of the recorder. (

 Page 24)

Step 3

Remove the existing HDD and install a new HDD by 
refering to the above procedures. 

Step 4

Turn on the power of the recorder. (

 Page 20)


New hard disk drive will be formatted automatically.


When the formatting is completed, the hard disk 
drive will become operable.


When the hard disk drive is formerly used for record-
ing, perform the link process (

 Operating 

Instructions (PDF)) on the "HDD management" page.


The status of hard disk drive can be checked on the 
setup menu - the "Maintenance" page - the "HDD 
information" tab. (

 Operating Instructions (PDF))

1

 Installation of the hard disk drive

 (continued)

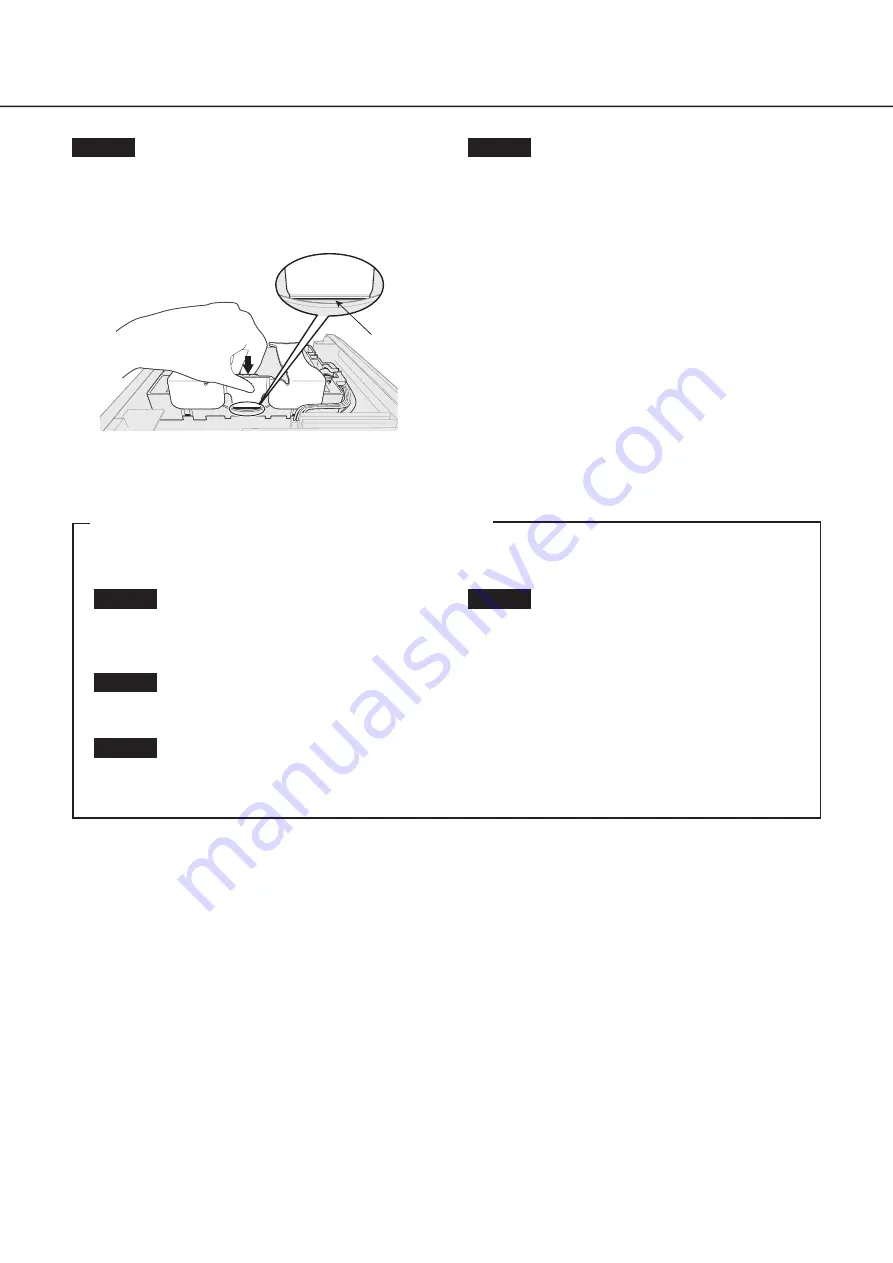
Step 7

Pass the hook of the HDD HOLDER TOP through the inside 
of the HDD HOLDER BASE. Push in the arrow on the HDD 
HOLDER TOP, close the HDD HOLDER TOP, and then fix 
HDD.

Hook

Step 8

Install the top cover as before, and tighten the two screws 
on the left and right sides of the main unit, and the three 
screws on the back to secure it.

Summary of Contents for WJ-NU101K Series

Page 1: ...Recorder Model No WJ NU101K Series WJ NU201K Series WJ NU300K Series The Operating Instructions and Important Information PDF is on our support website https i pro com global en surveillance document...

Page 2: ...s 12 When replacing the hard disk drives 13 2 Installation 14 Rack mounting 14 Install vertically 15 Wall Mounting 16 3 Connections 17 Connection of cameras a mouse and a PC 17 Connection of monitors...

Page 3: ...ents REC event Advanced setup Configure the settings relating to monitors Monitor Configure the settings relating to network Network Configure the settings relating to the user management User managem...

Page 4: ...criptions of the screens are based on the WJ NU300 For the latest information on the part numbers versions and network cameras that can be connected hereinafter referred to as cameras and information...

Page 5: ...y cause deformation discoloration and malfunction Keep this product away from water and moisture i PRO Co Ltd assumes no responsibility for injuries or property damage resulting from failures arising...

Page 6: ...rives by drawing in air from the front Avoid placing this product near noise sources If the cables are placed near noise sources such as fluorescent lamps noises may be produced In this case rewire av...

Page 7: ...ue can be changed using the mouse wheel When no operation is made for 10 seconds or more the mouse cursor will be hidden The mouse cursor will be dis played again when the mouse is moved This section...

Page 8: ...ield A a button This button changes the characters to be entered between capital letters and small letters Next button Changes the keys to be displayed for character entry The displayed keys are chang...

Page 9: ...etup pages Easy Start button It is possible to configure the minimum settings required to operate the recorder such as date time and cam era registration Basic setup Setup page buttons Each Basic setu...

Page 10: ...ings The settings can be done through a web browser on the PC Refer to the Operating Instructions PDF The PC is required for reading the Important Information the Operating Instructions PDF and camera...

Page 11: ...Example of an operational screen 11 Operations flow continued...

Page 12: ...k drives are locally procured Contact your dealer for purchasing installing and replacing the hard disk drives Install the hard disk drive 1 Installation of the hard disk drive Step 1 Unplug the DC pl...

Page 13: ...ting is completed the hard disk drive will become operable When the hard disk drive is formerly used for record ing perform the link process Operating Instructions PDF on the HDD management page The s...

Page 14: ...Rack mount bracket fixing screw M3 10 mm included with WV QRM101 2 Rack mount bracket large Note For positioning of the forward screw holes tighten from the screws marked with Mounting bracket large a...

Page 15: ...ch the rubber foot that is included with the WV QRM001 to the position as shown in the illustration Note Use the following standard accessories included with the WV QRM001 rack mount bracket Rack moun...

Page 16: ...no more than 2 m 6 6 ft Make sure to mount on the wall so that the cooling fan outlets are always on the top or to the left and right Do not face the cooling fan outlets downwards Make sure that the m...

Page 17: ...bnet mask 255 255 255 0 Default gateway 192 168 0 1 Recorder WJ NU101 Mouse included Camera 4 max IP address example 192 168 0 101 192 168 0 104 Subnet mask 255 255 255 0 PoE Switching hub locally pro...

Page 18: ...terminal using an HDMI cable locally procured Sub monitor HDMI Main monitor HDMI HDMI cable locally procured HDMI cable locally procured Recorder WJ NU101 Note Use a High Speed HDMI Cable Also when t...

Page 19: ...supplied at an event occurrence Open collector output 24 V DC max 200 mA max 8 Camera error output Signal output upon detection of a camera error 9 HDD error output Recording error output Signal outpu...

Page 20: ...r output Recording error output Signal ground 6 9 Alarm connection example When a signal output from the other device is supplied to the Alarm input 1 terminal pin No 1 or Alarm input 2 terminal pin N...

Page 21: ...amera reset L active Alarm output The set time on the setup menu L active General purpose input output when set to input 100 ms or more For N O L active For N C H active General purpose input output w...

Page 22: ...ug DC cable AC power adapter included Power cord included Power plug How to prevent DC plug disconnection Fix a 10 cm 15 cm 4 inches 6 inches space of the DC cable from the DC plug with the included c...

Page 23: ...5 cm to 20 cm 5 7 8 to 7 7 8 inches from the plug with the included cable clamp for DC cable to prevent the cable from unplugging Step 2 The administration registration window is displayed on the main...

Page 24: ...to Off to stop all recordings Operating Instructions PDF Step 2 Unplug the power plug from the power outlet after confirming that the REC indicator is off OPERATE indicator on the front of the recorde...

Page 25: ...es are connected correctly and firmly Confirm the cables are firmly connected 16 17 Is the connection distance to the camera too long Check that the Ethernet cable is 100 m or shorter Depending on the...

Page 26: ...the recorder may keep bad time The clock function of the recorder is accurate within 30 seconds per month To keep the correct recording set the time periodically or configure the system using the NTP...

Page 27: ...correctly you will help to save valuable resources and prevent any potential negative effects on human health and the environment For more information about collection and recycling please contact yo...

Page 28: ...ted in China i PRO Co Ltd Tokyo Japan https www i pro com Authorised Representative in EU i PRO EMEA B V Laarderhoogtweg 25 1101 EB Amsterdam Netherlands i PRO EMEA B V UK Branch 1010 Cambourne Busine...

Reviews: