


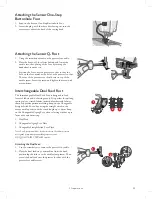


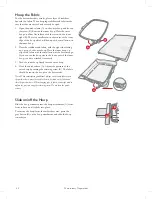


Bobbin Winding while Embroidering or
Sewing
1. Raise the auxiliary spool pin. Place the large spool cap,
felt pad and thread spool on the spool pin.
2. Bring the bobbin thread around the thread tension disc
(A) and through the thread guide (B) as illustrated.
3. Guide the thread through the hole in the bobbin from
the inside to the outside.
4. Push the bobbin winder lever towards the bobbin to
wind. A pop-up message appears on screen. To adjust
winding speed drag the slider with your stylus. Stop and
start the bobbin winding with the on-screen buttons.
Hold the end of the thread firmly when starting to wind.
When the bobbin is full, the bobbin winder lever will
move back and the winding will stop automatically. The
pop-up message closes. Remove the bobbin and cut the
thread using the bobbin winding thread cutter.
Note: Make sure that the thread does not touch the cap of the
horizontal spool pin when winding the bobbin. If it does, place the cap
and spool higher on the vertical spool pin.
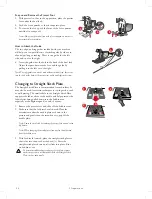
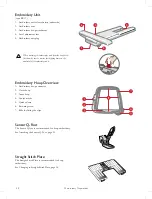
Inserting the Bobbin
Use only the bobbins designed for your DESIGNER
SAPPHIRE™ 85 machine.
1. Remove the bobbin cover by sliding it towards you.
2. Place the bobbin in the bobbin case. It drops in only one
way with the logo facing up. The thread unreels from the
left of the bobbin. The bobbin will then rotate counter-
clockwise when you pull the thread.
3. Place your finger on the bobbin to keep it from turning
as you pull the thread firmly to the right and then to the
left into the tension spring (A) until it “clicks” into place.
Continue threading around (B) and to the right of the
thread cutter (C).
4. Slide on the bobbin cover (D). Pull the thread to the left
to cut (E).
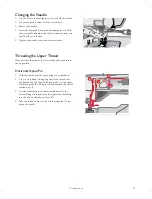
Changing the Presser Foot
1. Make sure that the needle is in the highest position. Pull
the presser foot down and towards you.
2. Line up the cross pin on the foot with the gap in the
presser foot ankle. Push the foot into the gap until the
foot snaps into place.
A
B
1
2
3
4
C
B
E
D
34
Summary of Contents for Viking Designer Sapphire 85
Page 1: ...User s Guide KEEPING THE WORLD SEWING ...
Page 7: ...1 1 Introduction ...
Page 21: ...2 2 Preparations ...
Page 37: ...3 3 Embroidery Preparations ...
Page 41: ...4 4 Maintenance ...
Page 48: ......
Page 50: ...4710713 26C 2020 KSIN Luxembourg II S a r l All rights reserved www husqvarnaviking com ...


