


Thread Sensor
• If the needle thread breaks or bobbin thread is running
low, the machine stops and a pop-up appears on the
screen. If needle thread breaks: Remove the thread
completely, re-thread the machine and touch OK in the
pop-up.
• If bobbin thread is running low: You can continue sewing
without closing the pop-up before the bobbin thread runs
out completely. This gives you an opportunity to plan
where to stop and change the bobbin. When the bobbin is
replaced with a full one, touch OK in the pop-up.
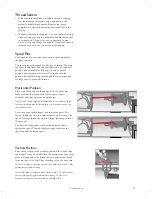
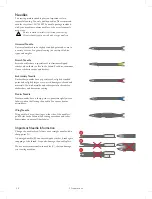
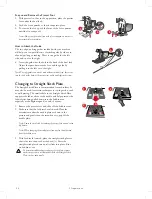
Spool Pins
Your machine has two spool pins; a main spool pin and an
auxiliary spool pin.
The spool pins are designed for all types of thread. The main
spool pin is adjustable and can be used both in a horizontal
position (the thread reels off the spool) and a vertical
position (the thread spool rotates). Use the horizontal
position for regular sewing threads and the vertical position
for large spools or specialty threads.
Horizontal Position
Place a spool cap and the thread spool on the spool pin.
Make sure that the thread reels off the spool counter
clockwise and slide on a second spool cap.
Note: Not all thread spools are manufactured in the same way. If you
experience problems with the thread, turn it in the opposite way or use
the vertical position.
Use a spool cap slightly larger than the thread spool. For
narrow thread spools, use a smaller spool cap in front of the
spool. For large thread spools, use a larger spool cap in front
of the spool.
The flat side of the spool cap should be pressed firmly
against the spool. There should be no space between the
spool cap and the thread spool.
Vertical Position
Raise the spool pin to the vertical position. Slide on the large
spool cap. For spools smaller than the medium size spool cap,
place a felt pad under the thread spool to prevent the thread
from reeling off too fast. Place thread spool on the spool pin.
Note: Do not place a spool cap on top of the vertical spool pin as it may
prevent the spool from rotating.
Note: Push down the spool pin until it locks in place. This will prevent
the spool pin from being folded down while sewing. To place it in
horizontal position, pull the spool pin up and then fold it.
25
Summary of Contents for Viking Designer Sapphire 85
Page 1: ...User s Guide KEEPING THE WORLD SEWING ...
Page 7: ...1 1 Introduction ...
Page 21: ...2 2 Preparations ...
Page 37: ...3 3 Embroidery Preparations ...
Page 41: ...4 4 Maintenance ...
Page 48: ......
Page 50: ...4710713 26C 2020 KSIN Luxembourg II S a r l All rights reserved www husqvarnaviking com ...


