INSTALLATION
32
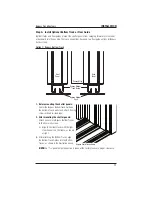
Step D. Rack and Secure the Left Corner Panel(s)
1.
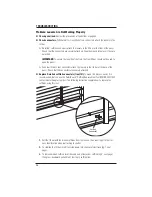
After mounting the panel(s), close the panel(s) and check for proper alignment.
➤
If misaligned, grasp the left side of the
left frame at the top and bottom and
move the frame up and down until proper
alignment is achieved.
➤
Mark the position of the frame on the wall
and open the panel.
2.
Attach the bottom of the frame through the
pre-drilled holes. Be sure the frame lines up
with your mark.
3.
Close the panel(s) and check alignment.
4.
Secure the balance of the frame. There should be one screw within 3" of each corner and no
more than 30" between fasteners.
IMPORTANT:
With each fastener that is placed, close the panels and check the alignment. If the
alignment is lost, go back to the fastener, remove, re-align, and re-install.
Step E. Mount the Right Corner Panel(s)
■
Repeat Step C for the right panel(s).
Step F. Rack and Secure the Right Corner Panel(s)
■
Repeat Step D for the right panel(s).
Step G. Complete the Installation
1.
To release all Duracatch
™
panel lock assemblies, insert a #2 Robertson bit into the square
hole, then push in and rotate the plunger assembly 180° counterclockwise.
2.
Close the panels and, if needed, adjust the Duracatch locks with a Robertson screwdriver as
described on page 9 so that all doors close easily yet stay firmly shut.
3.
If necessary, install magnets and strike plates (see page 41).
4.
Perform any other necessary finish work to complete the installation (see page 42).
Corner Windows
Mark
Position

