


42/56
V 03/2018
Original
Operati ng Instructi on Manual
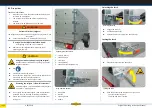
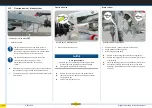
11 Repair / maintenance
11.1 Duty to repair
•
Regular visual check / inspecti on of trailer and
components for damage, dirt, wear.
•
Functi onal inspecti on of trailer and the individual
components.
•
Regular lubricati on on wear parts and repair of individual
components.
•
Readjusti ng / ti ghtening loose screw connecti ons.
•
Repair of worn, faulty, safety-relevant components by
qualifi ed specialists in a specialist workshop.
►
Before presenti ng the trailer for a technical inspecti on
such as TÜV, have it inspected, maintained and repaired,
if necessary, at a specialist workshop.
Intended use of the trailer includes:
•
Complying with the maintenance and repair work as
specifi ed by the manufacturer.
•
Regular care / cleaning of the trailer to remove dirt /
foreign bodies.
•
Regularly presenti ng the trailer for technical
examinati on / inspecti on.
Not complying with the maintenance instructi ons could
invalidate or reduce the product liability or warranty
from the manufacturer!
►
Comply with all necessary maintenance and repair in
structi ons defi ned as part of the intended use.
►
All completed inspecti ons should be documented and
verifi ed with a stamp (secti on: Proof of inspecti on).
•
Trailers that are regularly maintained have a higher resale
value if the maintenance is documented.
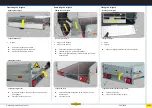
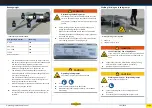
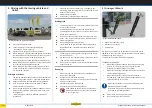
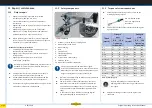
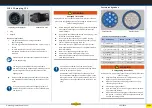
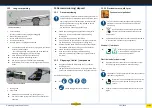
11.2 Safety components
2
1
2
3
4
5
6
8
7
9
10
Safety components
1.
Drawbar / overrun device / coupling head
2.
Brake system / hand brake
3.
Wheel bearing
4.
Axle
5. Tyres/wheels
6. Electrical equipment
7. Jockey wheel
8.
Arrester cable / safety cable
9.
Tie-down points
10.
Wheel shock absorbers (opti onal)
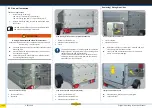
Safety components must be inspected at regular
intervals by qualifi ed personnel in a specialist workshop.
Maintenance of the safety components depends on the
degree of wear (intensity of use) on the trailer.
►
We recommend performing an inspecti on every 6 months
(but at least once a year).
►
See list for details of safety components on the trailer.
►
Maintenance work on safety components must always
be performed by qualifi ed personnel - see table: Mainte-
nance acti viti es for qualifi ed personnel (specialist work
shop).
►
In the event of a repair, always use approved original
spare parts supplied by the manufacturer.
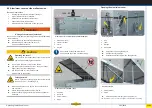
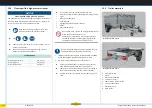
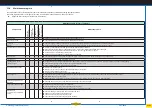
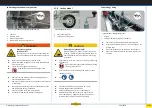
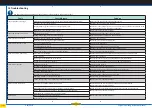
11.3 Torques of screw connecti ons
►
Check / ti ghten the fastening screws / nuts with the
following ti ghtening torques.
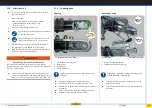
►
Use a calibrated torque
wrench to ti ghten screw
connecti ons.
►
Set the torque wrench to the relevant maximum ti ghten-
ing torque value.
Thread
(metric)
Strength
class
Thread
(metric)
Strength
class
8.8
10.9
8.8
10.9
Tightening
torque (Nm)
Tightening
torque (Nm)
M 5
5.5
8.1
M 20
425
610
M 6
9.6
14
M 20x 1.5
475
980
M 8
23
34
M 22
580
820
M 8x1
25
37
M 22x1.5
630
900
M 10
46
67
M 24
730
1050
M 10x1.25
49
71
M 24x2
800
1150
M 12
79
115
M 27
1100
1550
M 12x1.5
83
120
M 27x2
1150
1650
M 14
125
185
M 30
1400
2000
M 14x1.5
135
200
M 30x2
1500
2150
M 16
195
290
M 36
2450
3500
M 16x1.5
210
310
M 36x2
2650
3780
M 18
300
430
M 42
3930
5600
Table: Tightening torques
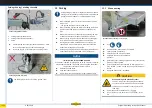
Only use self-locking nuts once because the
clamping eff ect of the plasti c ring is reduced if you
use it again.
►
Replace self-locking nuts aft er unscrewing the screw
connecti on.